For 1990-2009 cars only
Tools Required
| • | J 36796 Clip Zip Tool |
| • | J 38778 Door Trim Pad and Garnish Clip Remover |
Removal Procedure
- Remove the door trim panel. Refer to Front Side Door Trim Panel Replacement .
- Remove the door module. Refer to Door Control Module Replacement .
- Remove the water deflector. Refer to Front Side Door Water Deflector Replacement .
- Remove the inside door handle. Refer to Front Side Door Inside Handle Replacement .
- Remove the window inner belt seal strip. Refer to Front Side Door Window Belt Inner Sealing Strip Replacement .
- Remove the outside rear view mirror. Refer to Power Mirror Replacement .
- Remove the window outer belt seal strip. Refer to Front Side Door Window Belt Outer Sealing Strip Replacement .
- Remove the window. Refer to Front Side Door Window Replacement .
- Remove the window weatherstrip. Refer to Front Side Door Window Weatherstrip Replacement .
- Remove the door frame applique. Refer to Front Door Frame Applique Replacement .
- Remove the window regulator. Refer to Front Side Door Window Regulator Replacement .
- Remove the rear window channel. Refer to Front Side Door Window Rear Channel Replacement .
- Remove the outside door handle. Refer to Front Side Door Outside Handle Replacement .
- Remove the door latch. Refer to Front Side Door Latch Replacement .
- Remove the upper auxiliary weatherstrip. Refer to Front Side Door Upper Auxiliary Weatherstrip Replacement .
- Remove the door bottom auxiliary weatherstrip. Refer to Front Side Door Bottom Auxiliary Sealing Strip Replacement .
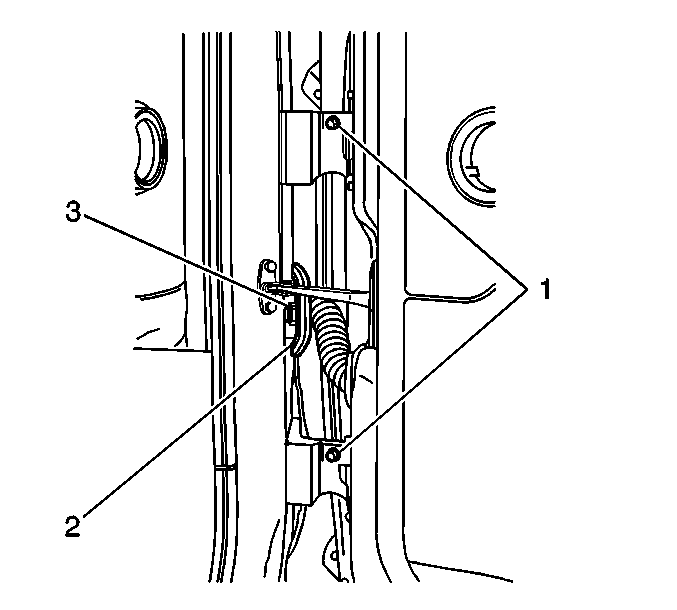
- Insert a small flat bladed tool between the door wire harness conduit (2) and the hinge pillar in order to depress and release the tab (3) on the door wiring harness connector.
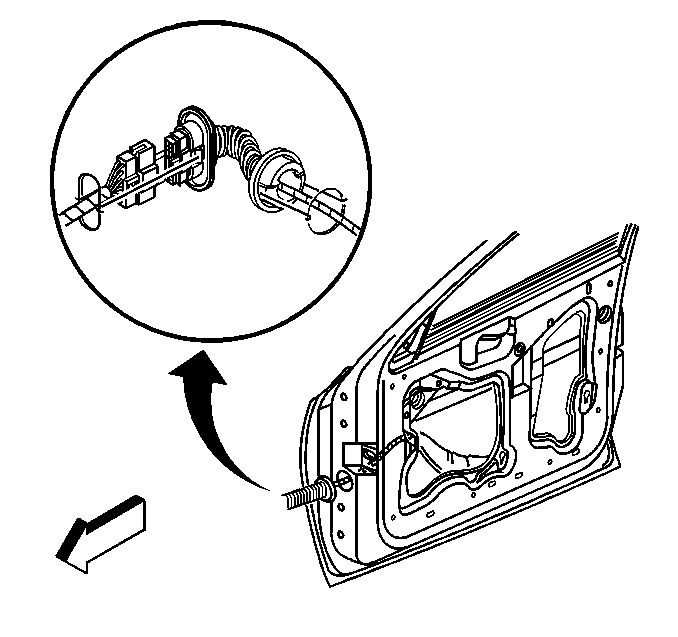
- Disconnect the door wiring harness from the body wiring harness.
- Remove the door wire harness from the hinge pillar.
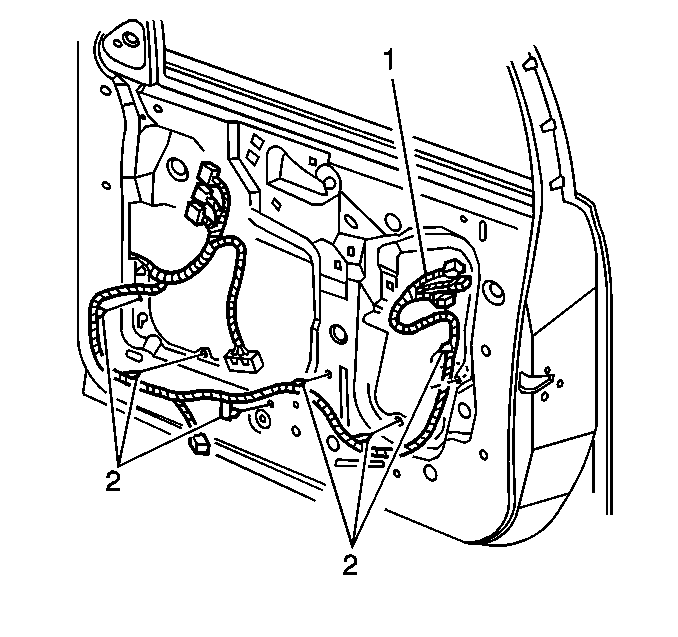
- Remove the wiring harness clips (2) from the inner door panel.
- Remove the rubber conduit and the wiring harness from the door.
- Remove all the plastic nuts and retainers from the door shell.
- Remove the door check link. Refer to Door Check Link Replacement .
- Remove the intermediate hinge fasteners (1) from both hinges.
- Lift the door to remove.
- Remove the door hinges. Refer to Front Side Door Hinge Replacement .


Installation Procedure
- Install the door hinges to the door. Refer to Front Side Door Hinge Replacement .
- Align the door hinge halves.
- Lower the door so the hinge halves mate together.
- Apply Loctite® Blue, GM P/N 12345382, or Canadian P/N 10953489, or equivalent to the intermediate door hinge bolts.
- Install the intermediate door hinge bolts to the hinge.
- Install the door check link. Refer to Door Check Link Replacement .
- Touch up any paint damage to the hinge and the check link fasteners with body color paint.
- Install all the retainers into the door shell that were removed during disassembly.
- Route the wiring harness and the conduit into the door.
- Install the door wiring harness clips (2) to the inner door panel.
- Connect the door wire harness to the body wire harness.
- Snap the wire harness connectors into the hinge pillar.
- Install the door bottom auxiliary weatherstrip. Refer to Front Side Door Bottom Auxiliary Sealing Strip Replacement .
- Install the upper auxiliary weatherstrip. Refer to Front Side Door Upper Auxiliary Weatherstrip Replacement .
- Install the door latch. Refer to Front Side Door Latch Replacement .
- Install the outside door handle. Refer to Front Side Door Outside Handle Replacement .
- Install the rear window channel. Refer to Front Side Door Window Rear Channel Replacement .
- Install the window regulator. Refer to Front Side Door Window Regulator Replacement .
- Install the door frame applique. Refer to Front Door Frame Applique Replacement .
- Install the window weatherstrip. Refer to Front Side Door Window Weatherstrip Replacement .
- Install the window. Refer to Front Side Door Window Replacement .
- Install the window outer belt seal strip. Refer to Front Side Door Window Belt Outer Sealing Strip Replacement .
- Install the outside rearview mirror. Refer to Power Mirror Replacement .
- Install the window inner belt seal strip. Refer to Front Side Door Window Belt Inner Sealing Strip Replacement .
- Install the inside door handle. Refer to Front Side Door Inside Handle Replacement .
- Adjust the door if needed. Refer to Door Adjustment .
- Install the water deflector. Refer to Front Side Door Water Deflector Replacement .
- Install the door module. Refer to Door Control Module Replacement .
- Install the door trim panel. Refer to Front Side Door Trim Panel Replacement .

Notice: Use the correct fastener in the correct location. Replacement fasteners must be the correct part number for that application. Fasteners requiring replacement or fasteners requiring the use of thread locking compound or sealant are identified in the service procedure. Do not use paints, lubricants, or corrosion inhibitors on fasteners or fastener joint surfaces unless specified. These coatings affect fastener torque and joint clamping force and may damage the fastener. Use the correct tightening sequence and specifications when installing fasteners in order to avoid damage to parts and systems.
Tighten
Tighten the intermediate front door hinge bolts (1) to 24 N·m
(18 lb ft).


