Removal Procedure
Caution: Gasoline or gasoline vapors are highly flammable. A fire could occur if an ignition source is present. Never drain or store gasoline or diesel fuel in an open container, due to the possibility of fire or explosion. Have a dry chemical (Class B) fire extinguisher nearby.
- Drain the fuel tank. Refer to Fuel Tank Draining .
- Raise and suitably support the vehicle. Refer to Lifting and Jacking the Vehicle .
- Remove the right hand rear fascia bolts.
- Remove the rear frame support.
- Disconnect the fuel supply line at the fuel filter and the return line near the fuel filter. Refer to Servicing Quick Connect Fittings .
- Remove the clamps from the fuel tank breather hose and evaporative emission (EVAP) hoses at the fuel tank near the fuel filter, discard the clamps.
- Disconnect the fuel tank breather hose and the EVAP hoses.
- Disconnect the fuel sender electrical connector.
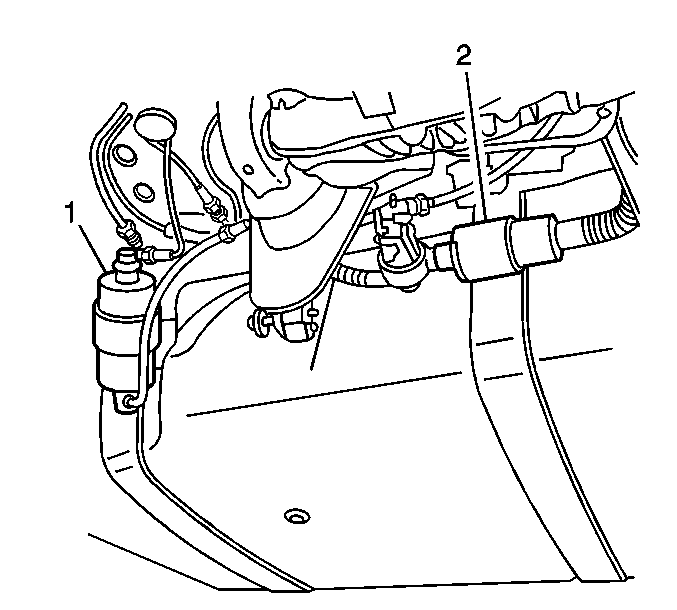
- Remove the fuel filter (1) retaining bolt from the bracket.
- Remove the EVAP vent valve (2) retaining bolt from the bracket.
- With the aid of an assistant, support the fuel tank and remove the following components:
- Lower the tank.
- Place the fuel tank in a suitable work area.
- Wipe off the male line ends with a clean shop towel.
- Inspect all of the connectors for dirt and damage. Clean or replace components and assemblies as required.
Notice: Do not attempt to straighten any kinked nylon fuel lines. Replace any kinked nylon fuel feed or return pipes in order to prevent damage to the vehicle.


Notice: Do not bend the fuel tank straps as this may damage the straps.
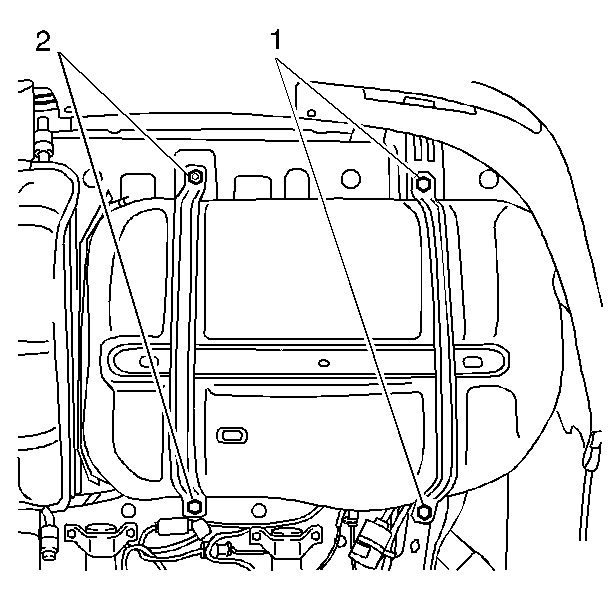
| • | The left fuel tank retaining strap attaching bolts (2) |
| • | The right fuel tank strap attaching bolts (1) |
| • | Both fuel tank retaining straps |
Installation Procedure
- If you are replacing the fuel tank, remove the following components and reinstall these components on the new tank:
- With the aid of an assistant, raise the fuel tank.
- Install the fuel tank retaining straps (2), the left attaching bolts (2) and the right attaching bolts (1).
- Connect the fuel sender electrical connector.
- Connect the fuel tank breather hose and the EVAP hoses to the fuel tank using new clamps.
- Install the fuel supply and the return line quick-connect fittings. Refer to Servicing Quick Connect Fittings .
- Install the in-line fuel filter attaching bolt and fuel tank ground strap to the retaining bracket.
- Install the EVAP vent valve (2) to the retaining bracket.
- Install the rear frame rail support and the rear frame rail support bolts.
- Install the right hand rear fascia bolts.
- Lower the vehicle.
- Connect the negative battery terminal.
- Add the fuel and install the fuel filler cap.
- Crank the engine for a few seconds, turn OFF the engine if the engine starts.
- Check for any fuel leaks.
Important: Before installing the fuel tank, refer to Fuel Tank Leak Test .
| • | The fuel sender assembly--Refer to Fuel Sender Assembly Replacement . |
| • | The fuel pressure sensor--Refer to Fuel Tank Pressure Sensor Replacement . |
| • | The exhaust heat shield nuts and heat shield |
Notice: Use the correct fastener in the correct location. Replacement fasteners must be the correct part number for that application. Fasteners requiring replacement or fasteners requiring the use of thread locking compound or sealant are identified in the service procedure. Do not use paints, lubricants, or corrosion inhibitors on fasteners or fastener joint surfaces unless specified. These coatings affect fastener torque and joint clamping force and may damage the fastener. Use the correct tightening sequence and specifications when installing fasteners in order to avoid damage to parts and systems.
| • | Install the exhaust heat shield and the exhaust heat shield nuts. |
Tighten
Tighten the nuts to 4 N·m (35 lb in).

Tighten
Tighten the fuel tank retaining strap bolts to 30 N·m (22 lb ft).

Tighten
Tighten the bolt to 18 N·m (13 lb ft).
Tighten
Tighten to 22 N·m (16 lb ft).
Tighten
Tighten the bolts to 8 N·m (71 lb in).
