While in the Navigation map screen, press the TUNE/SEL knob and the Navigation Menu will appear. From this menu you will be able to choose from an itemized list of options or use the multi-function buttons to make adjustments to the system and plan routes.
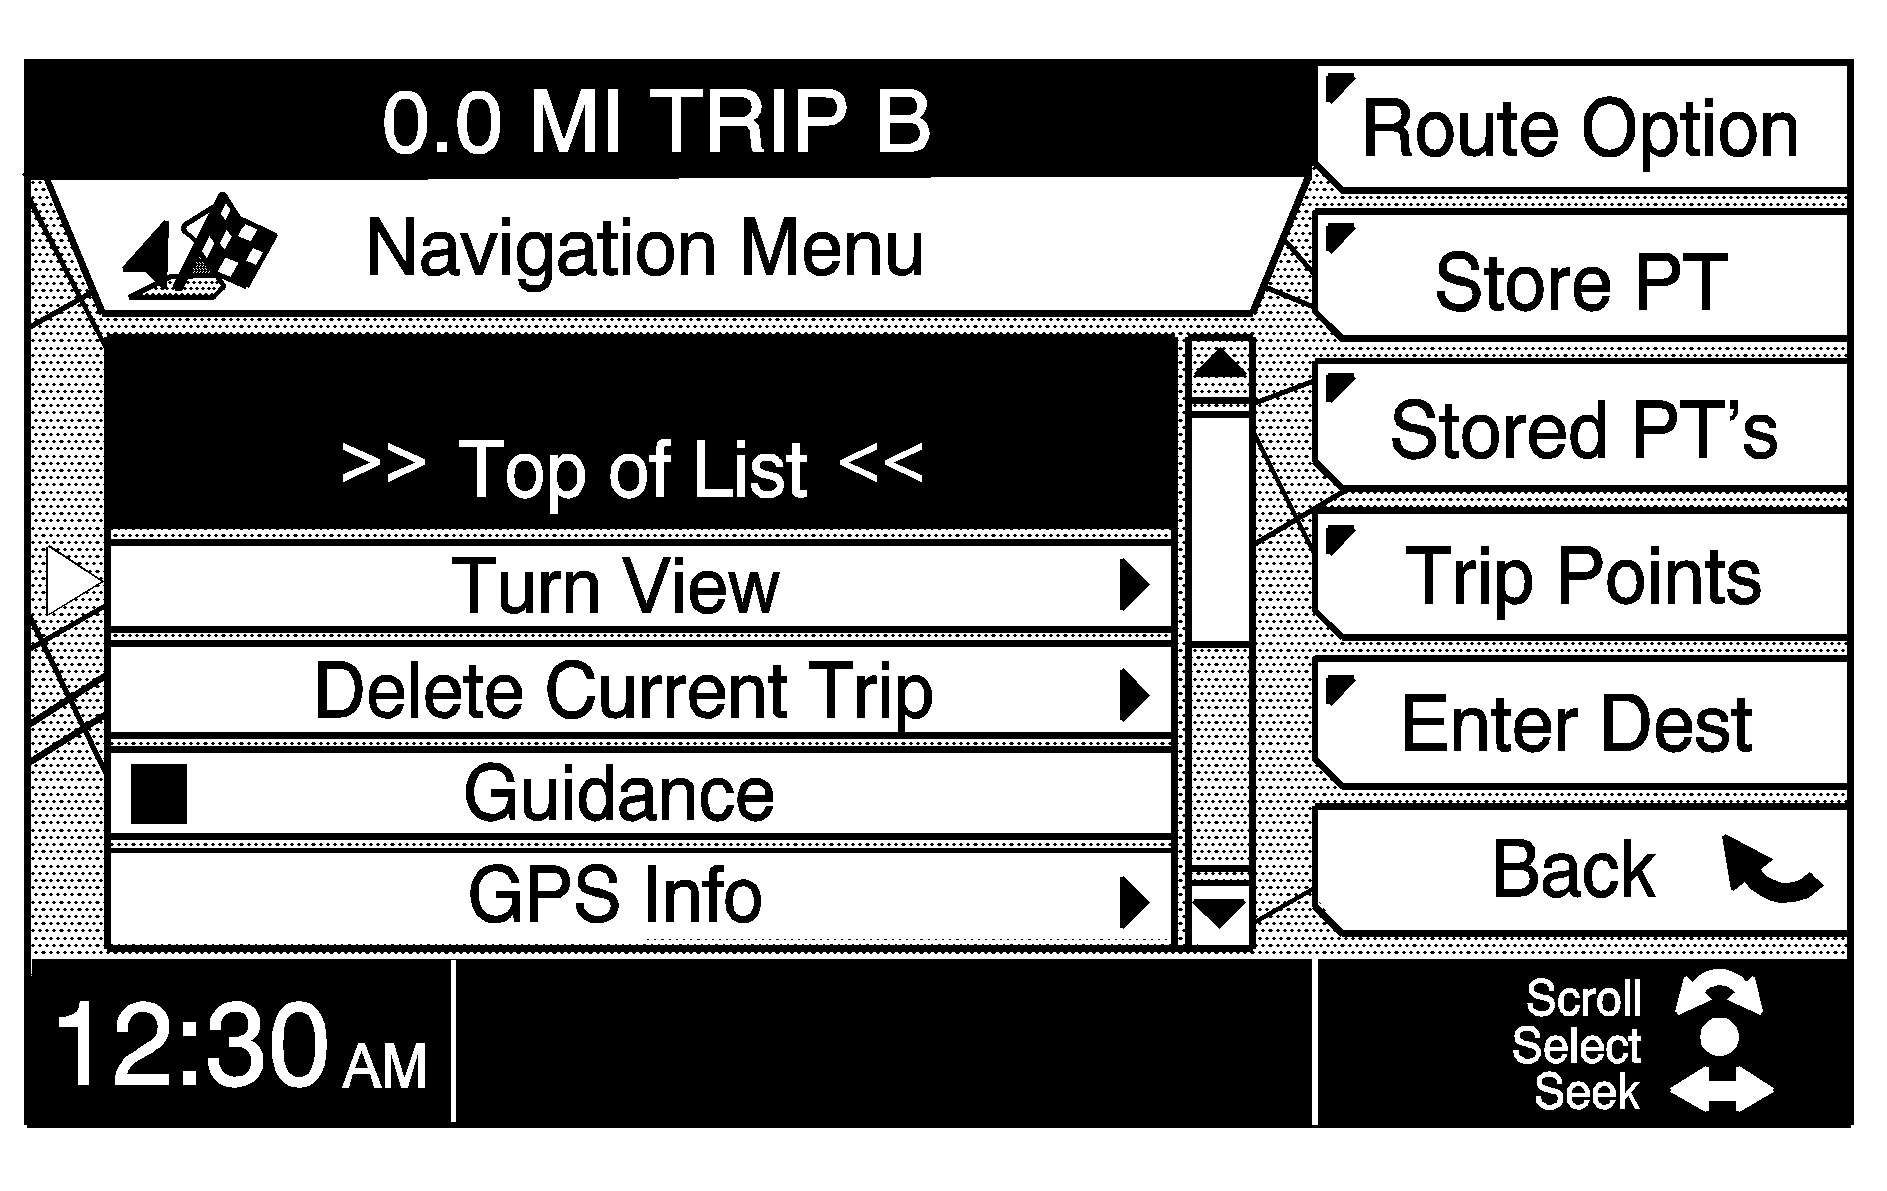
You will be able to choose from the following menu items:
| • | Turn View |
| • | Delete Current Trip |
| • | Guidance |
| • | GPS Info |
| • | Voice Volume |
| • | Map Scroll |
| • | Map Icons |
| • | Tracking |
These multi-function buttons are also available:
| • | Route Option |
| • | Store PT |
| • | Stored PTs |
| • | Trip Points |
| • | Enter Dest |
| • | Back |
Any menu items and multi-function buttons shown here or under the Enter Dest (Destination) Menu listed later in this section may be "mixed and matched" to help you personalize your system. See "Navigation Multi-Function Buttons" for more information.
To change a menu item to a multi-function button do the following:
- Scroll to the menu item using the TUNE/SEL knob to highlight it.
- Press and hold the multi-function button you wish it to replace for two seconds.
The menu item will now be a multi-function button and will remain that way unless you choose to change it again. The item that was originally that multi-function button will now be a menu item.
Back is the only multi-function button that cannot be changed or moved.
Turn View
Select this option to decide which view of the map you will see as your trip progresses. The following multi- function buttons will become available when you choose Turn View from the list:
Map
Press this button to display the street map with the route of travel highlighted. You will see the vehicle on the map as a pointed arrow. See Symbols for more information. You will also see the progress of route travel on the map as you follow the highlighted route. The map will display street names to show that the system knows where your vehicle is.
Popup
Press this button to see the regular view of the map and to have the next turn, represented by an arrow pointing in the direction of the turn, pop up as you approach it.
Always
Always Split
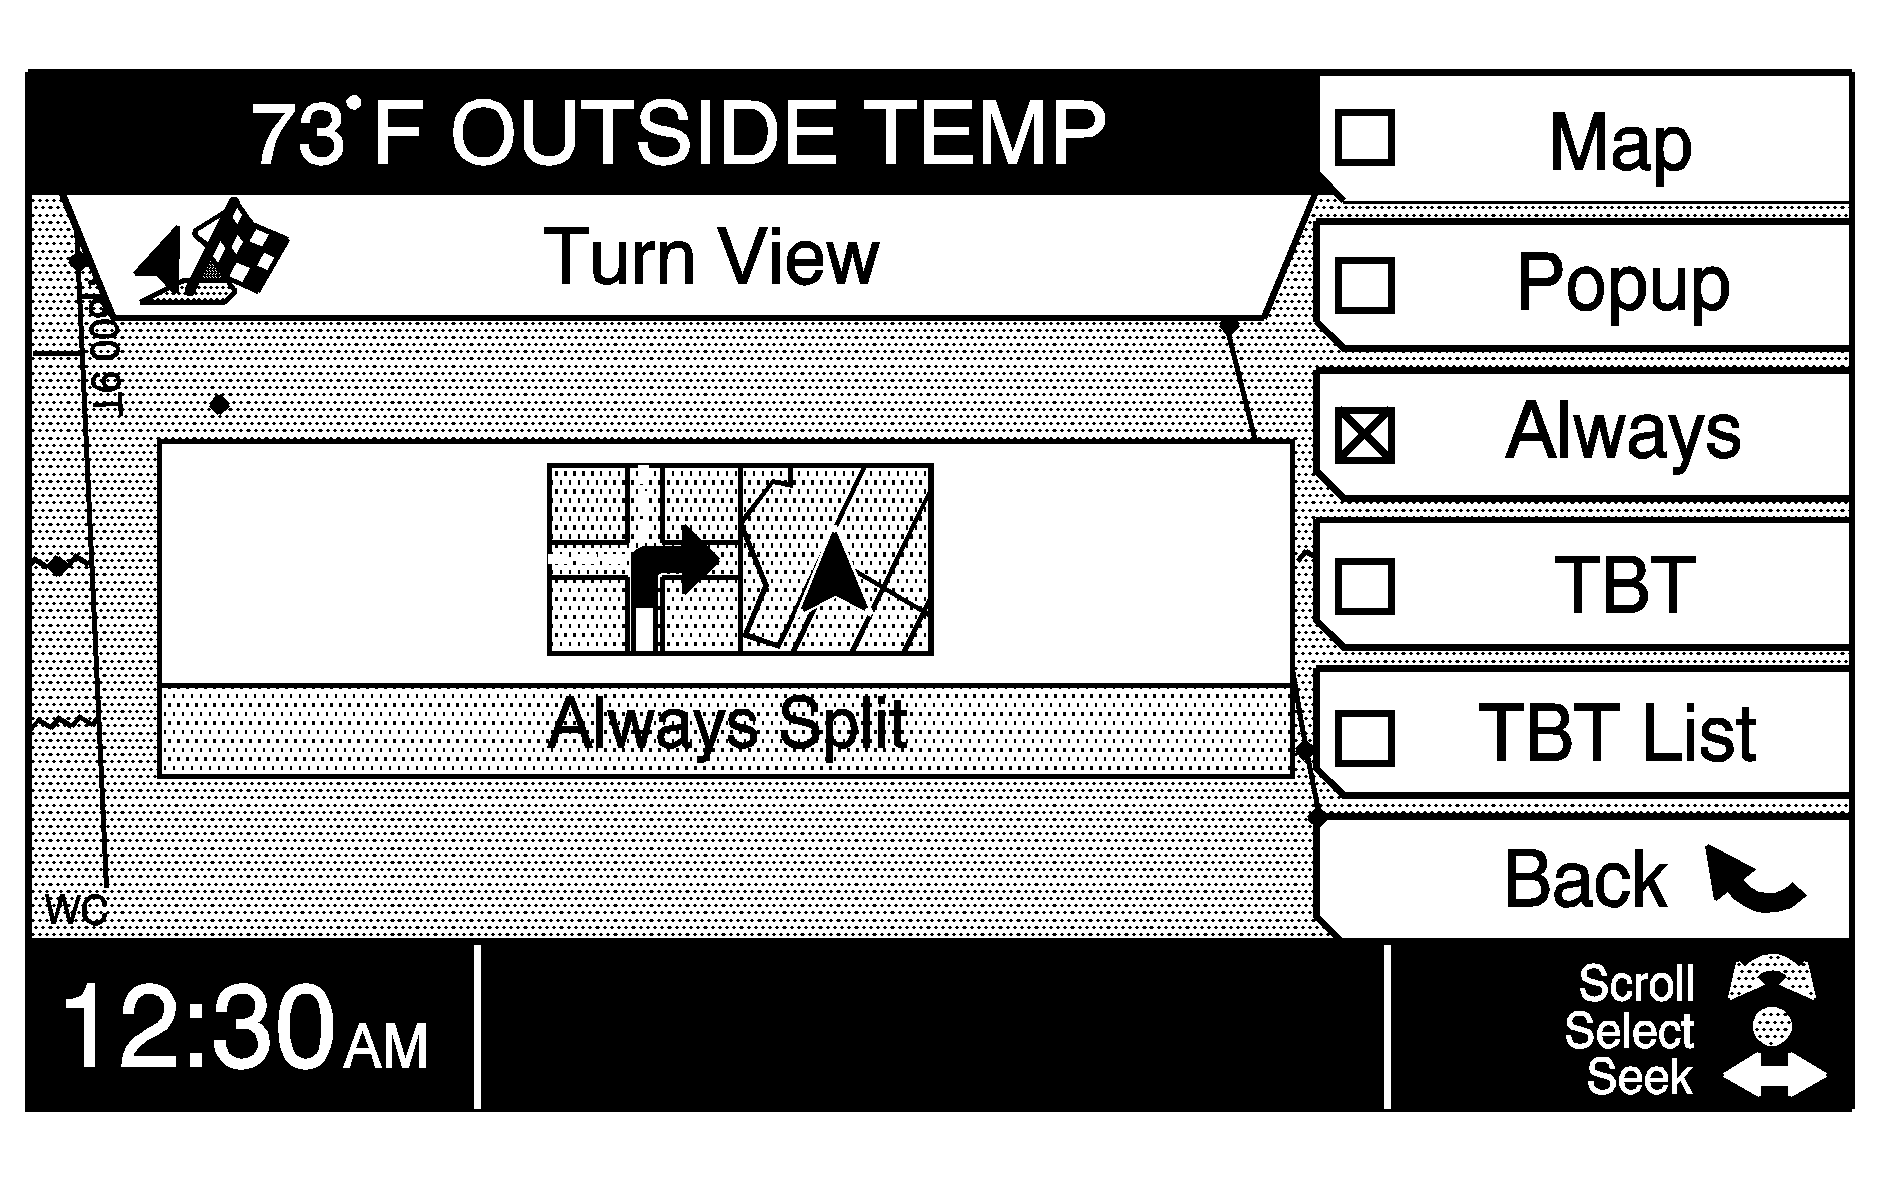
Press this button to see the regular view of the map and the popup view on the screen together at all times.
TBT (Turn by Turn)
Press this button to see the route as a series of turns. No map view will be offered with this option. Instead, the entire intersection will be displayed, along with the next maneuver that you will be required to perform.
The system will also supply street names when available. The display will change once the next maneuver is within a short distance.
TBT (Turn by Turn) List
Turn-By-Turn (TBT) List
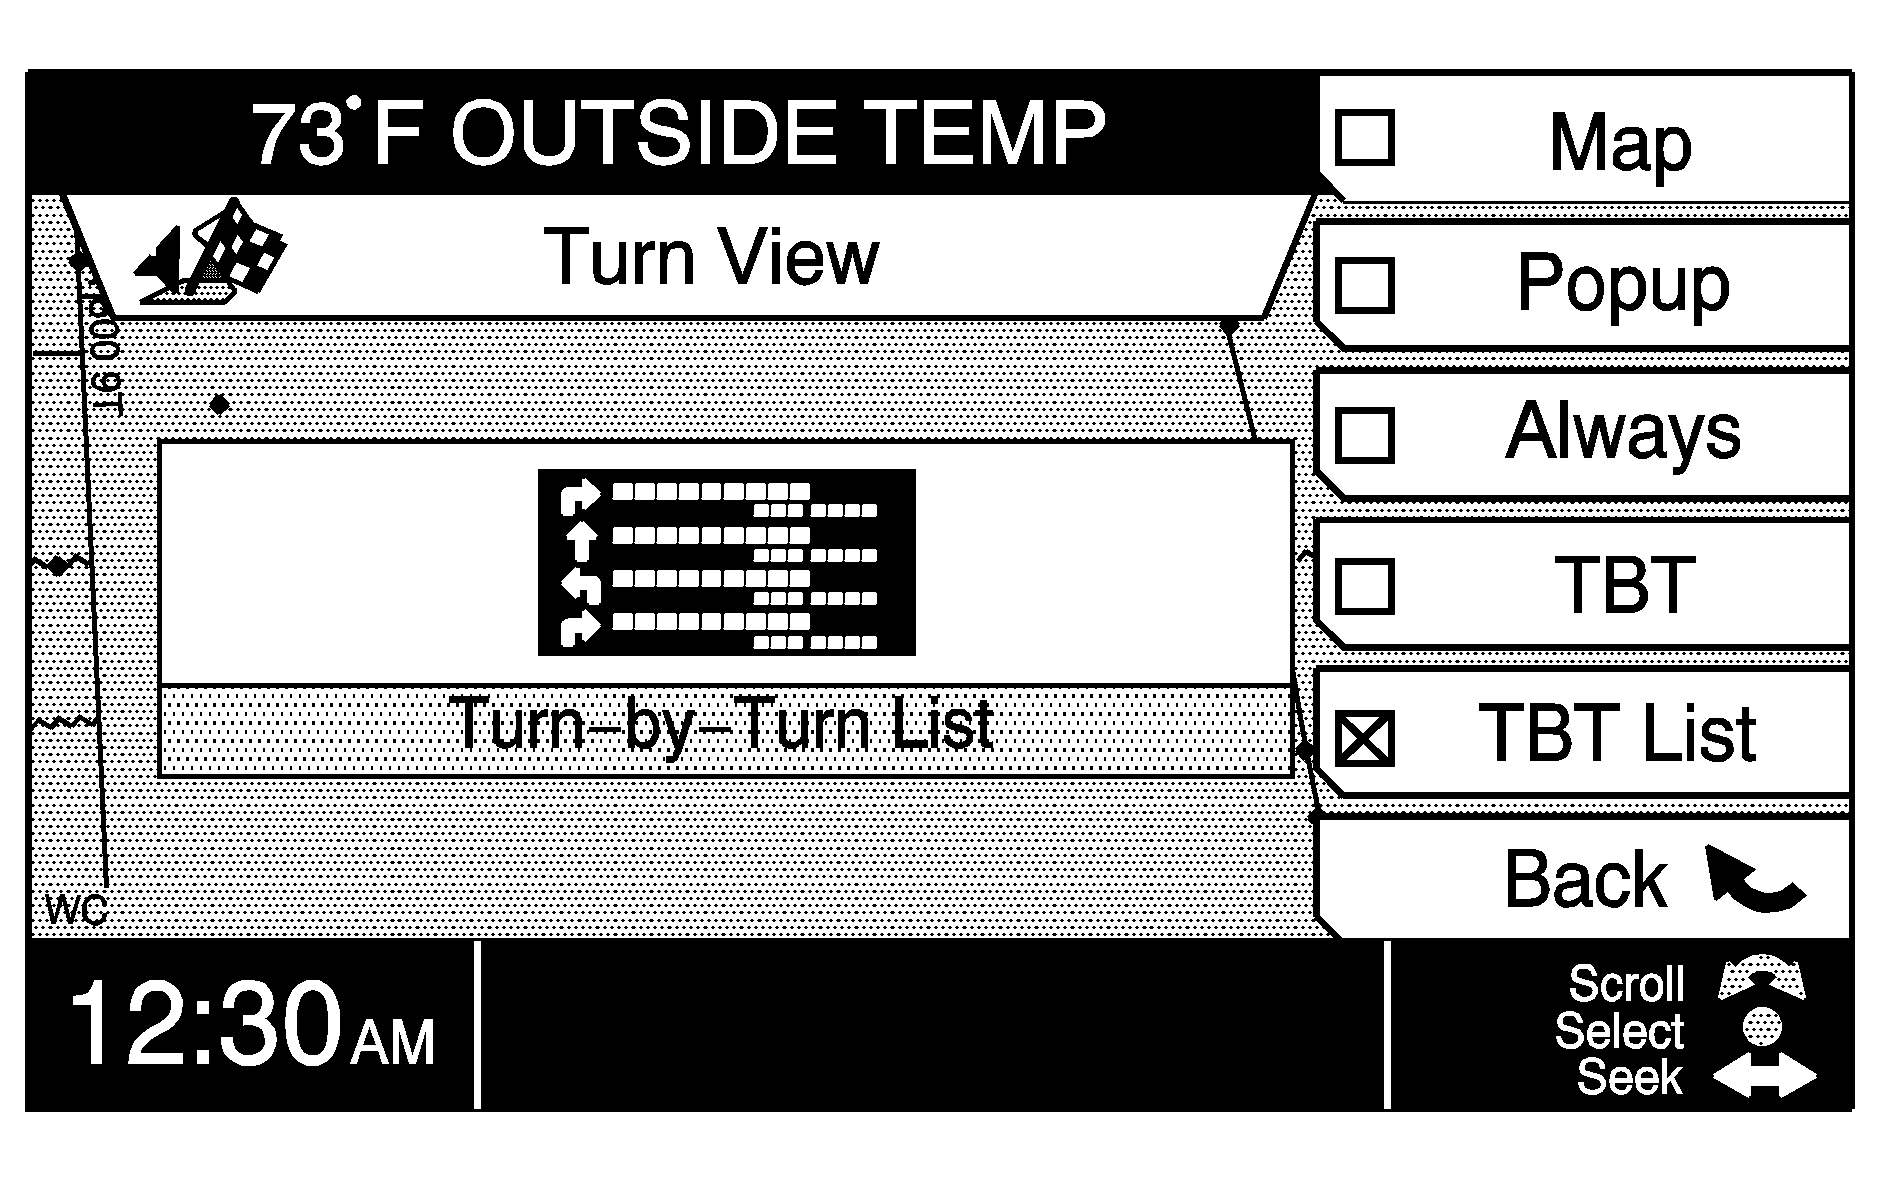
Press this button to see all the turns in the next 50 miles (80 km) of the planned route listed in order on the screen. The turn list will update to include new maneuvers as you move closer to your destination. There will be an arrow to the left of each turn indicating the direction of the turn.
Delete Current Trip
Select this option to delete the current trip. The system will ask you to confirm your choice by selecting Yes or No. Press the Yes multi-function button to delete the current trip or press the No multi-function button to continue with the planned route.
Guidance
Use this option to turn guidance on and off. If the guidance is off, the NAV (navigation) Repeat button can also be used turn the guidance on.
GPS Info (Information)
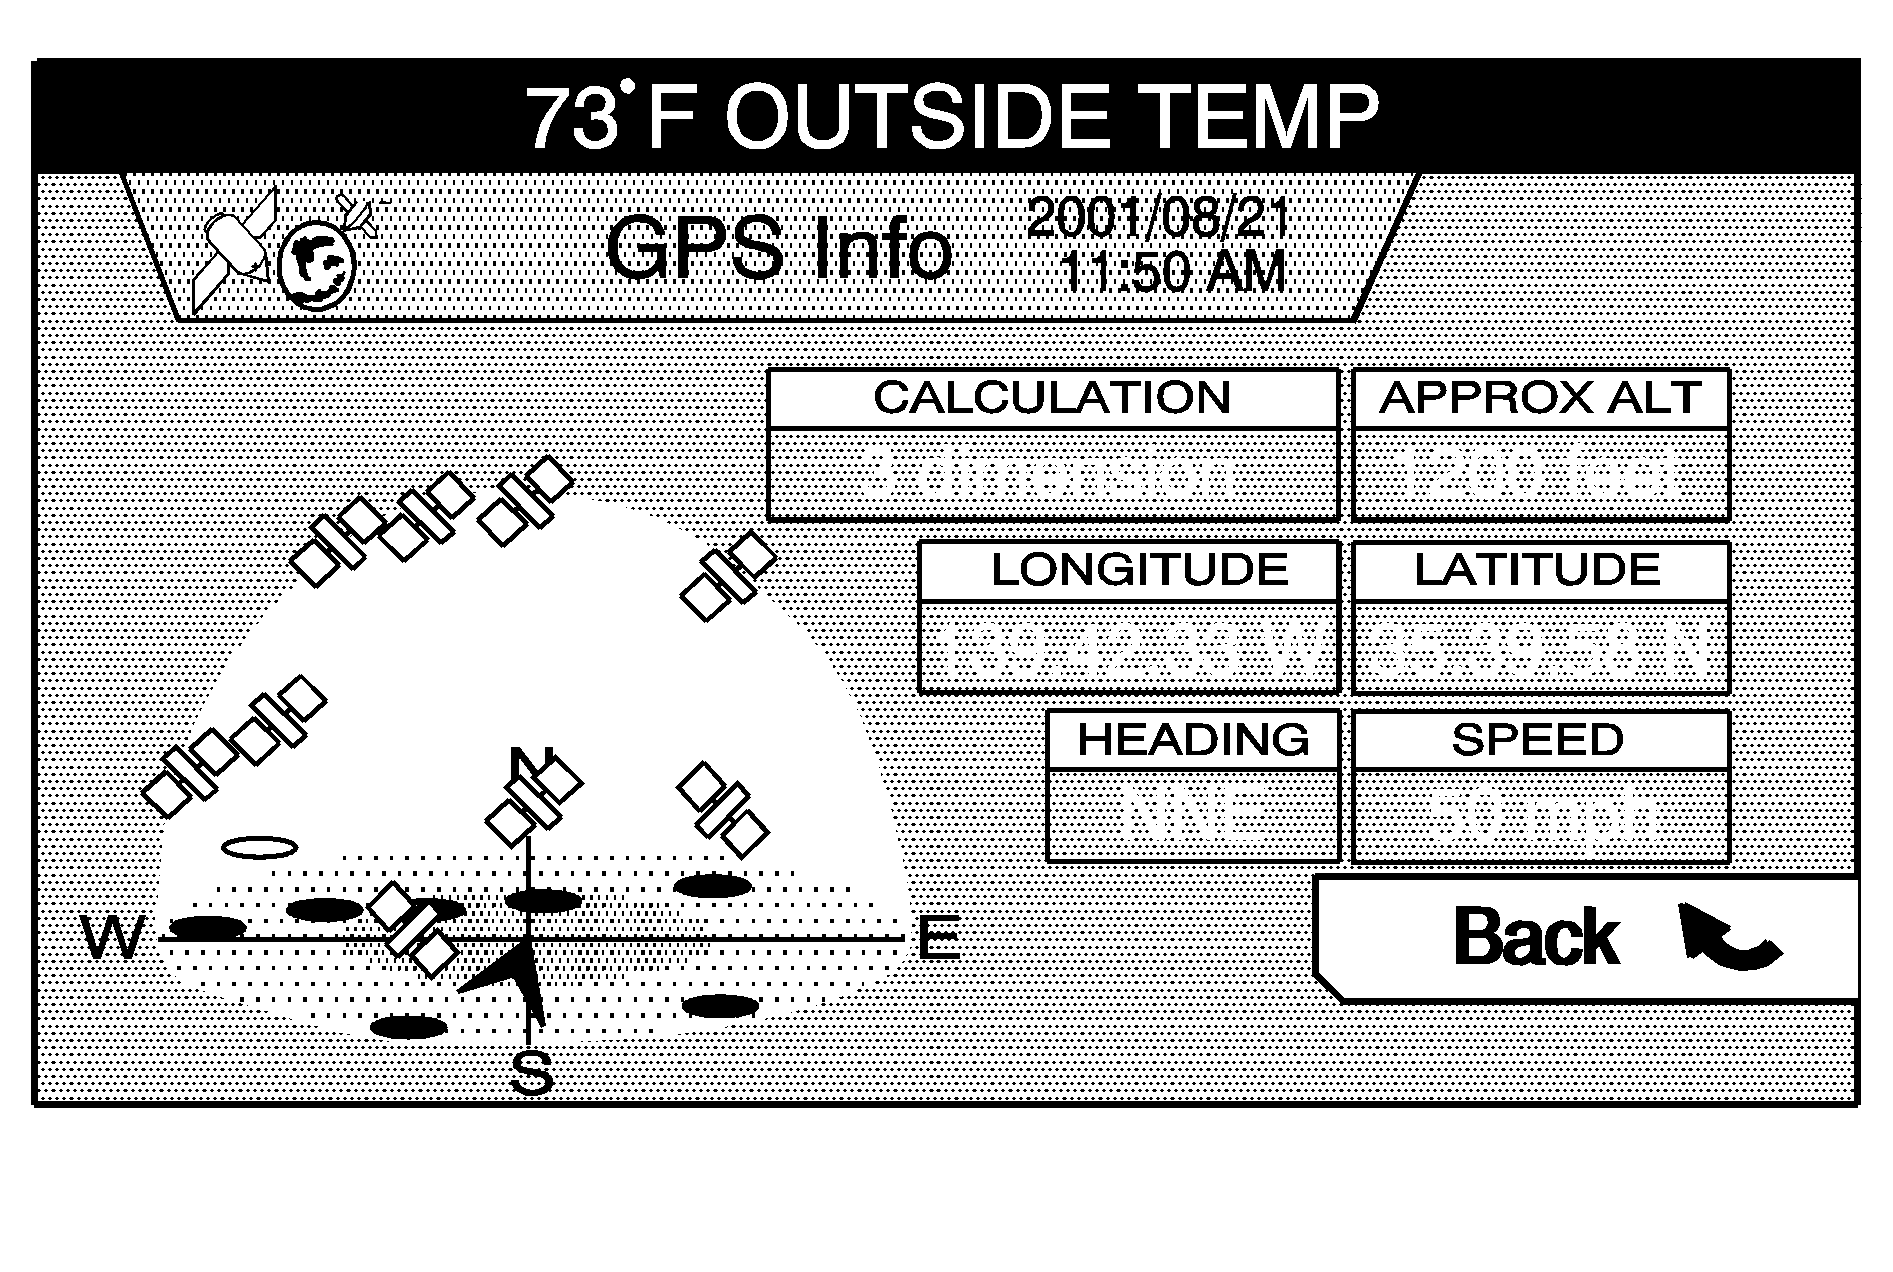
Select GPS Info to see the latest GPS information available for your vehicle. This can include latitude, longitude, heading, etc. The last direction the vehicle was heading in while in motion will be displayed.
Voice Volume
Select Voice Volume to adjust the navigation and voice recognition prompt volume level for the system. Turn the TUNE/SEL knob to make the volume louder or softer. Each time you stop turning the knob, the system will respond with either "Louder" or "Softer" to provide you with an example of the new volume level. You can also turn the navigation prompts on and off using the NAV button. The NAV button will turn the navigation voice prompts on or off, but it will not affect the voice recognition prompts.
Map Scroll
Select Map Scroll to move and adjust the map view. This view can also be used to enter destinations, waypoints and stored points.
While in Map Scroll, turn the TUNE/SEL knob to select the direction to move the map. Then, press the TUNE/SEL knob to move the map in that direction. The map will continue to move as long as the TUNE/SEL knob is pressed. See "Map Entry" under "Enter Dest (Destination)" later in this section for more information.
Map Icons
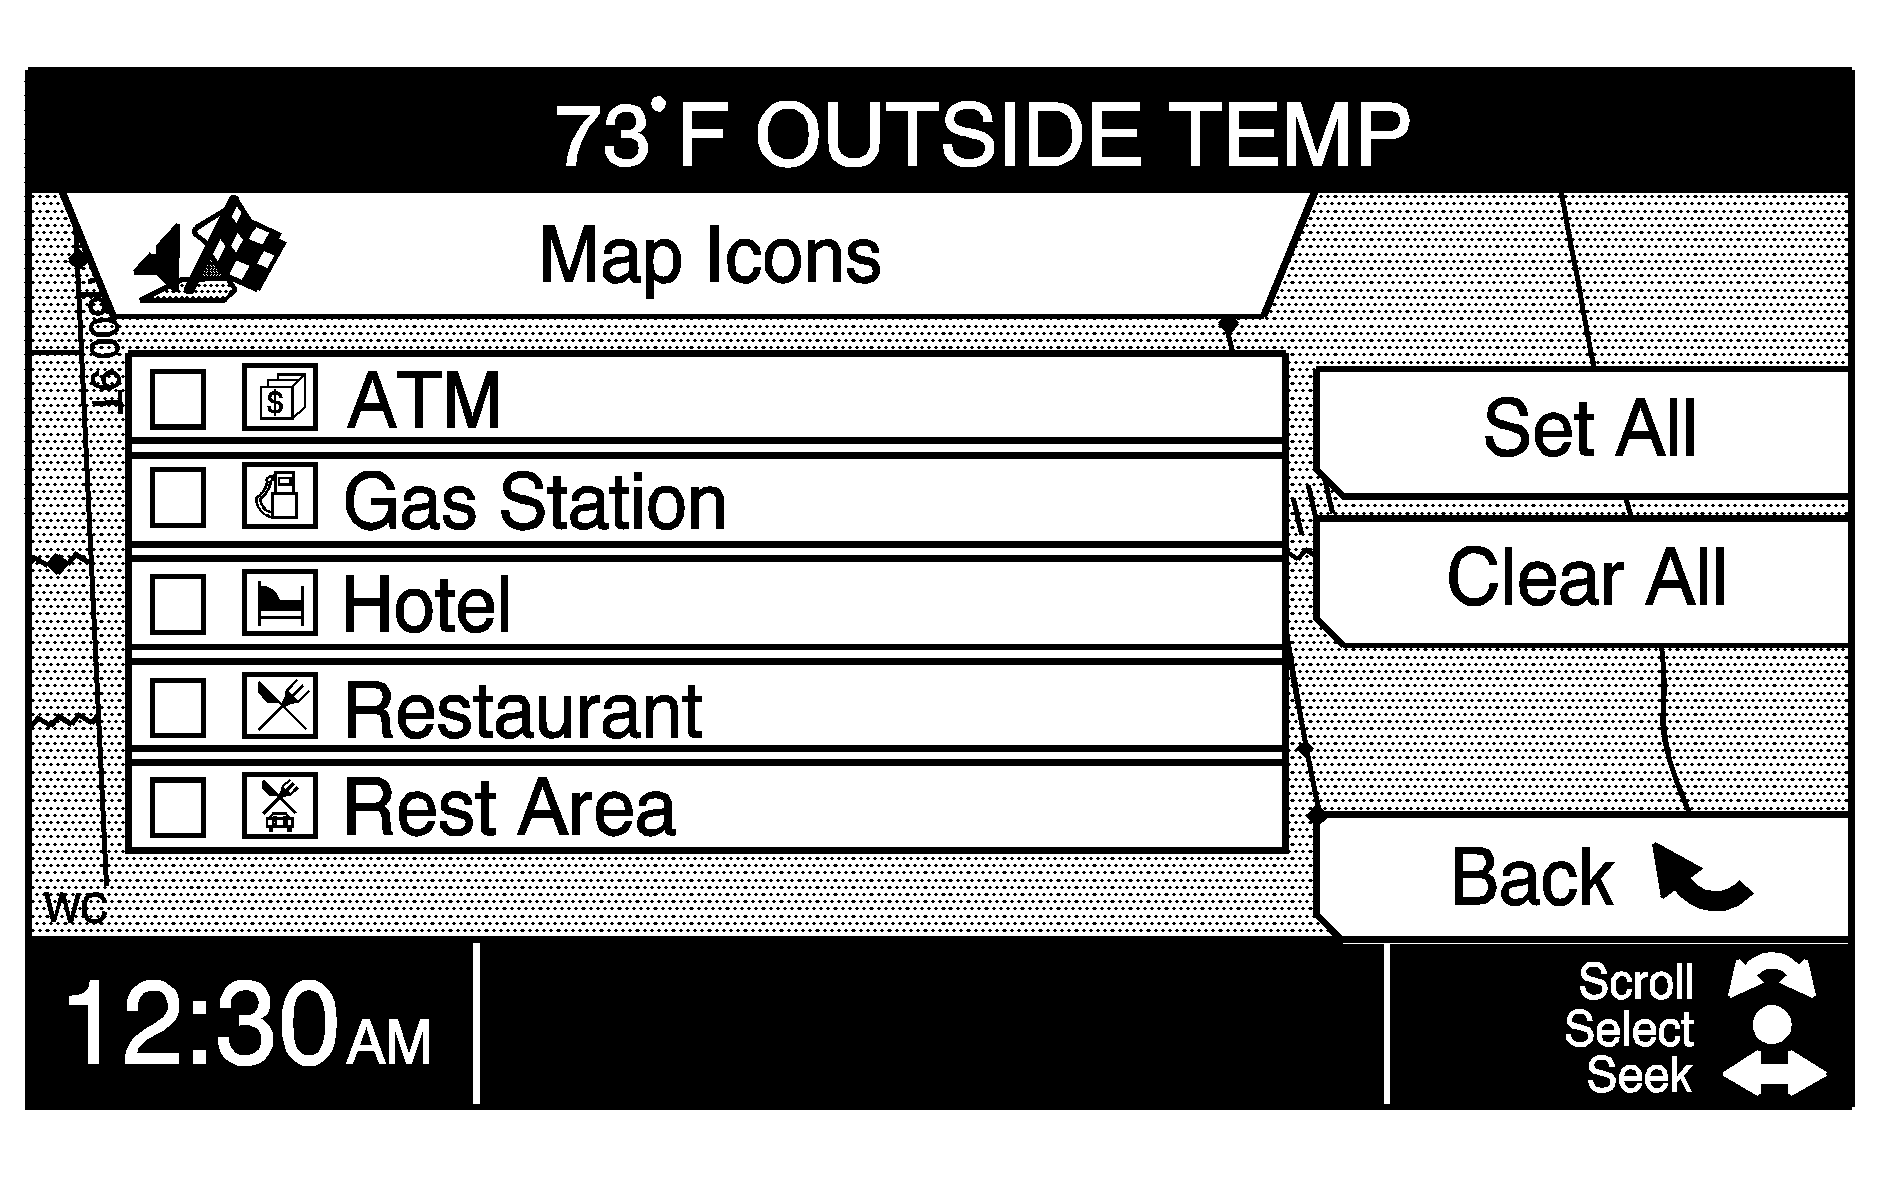
You can choose which icons you want to appear on the map. These icons appear on the map at the location of the POI (point of interest). To set the icons, do the following:
- Turn the TUNE/SEL knob until the icon is highlighted.
- Press the TUNE/SEL knob to select the icon. When the icon is selected, an X will appear in the box next to the icon.
If you prefer to see all the icons, press the Set All multi-function button. This will select all five icons. You can de-select all previously chosen icons by pressing the Clear All multi-function button. De-selecting all the icons means that these five icons will not appear on the screen while you are traveling on a planned route.
Interstate America®: This feature allows the system to inform you of the services available at each exit on a major highway (i.e. restaurants, gas stations, lodging, etc.).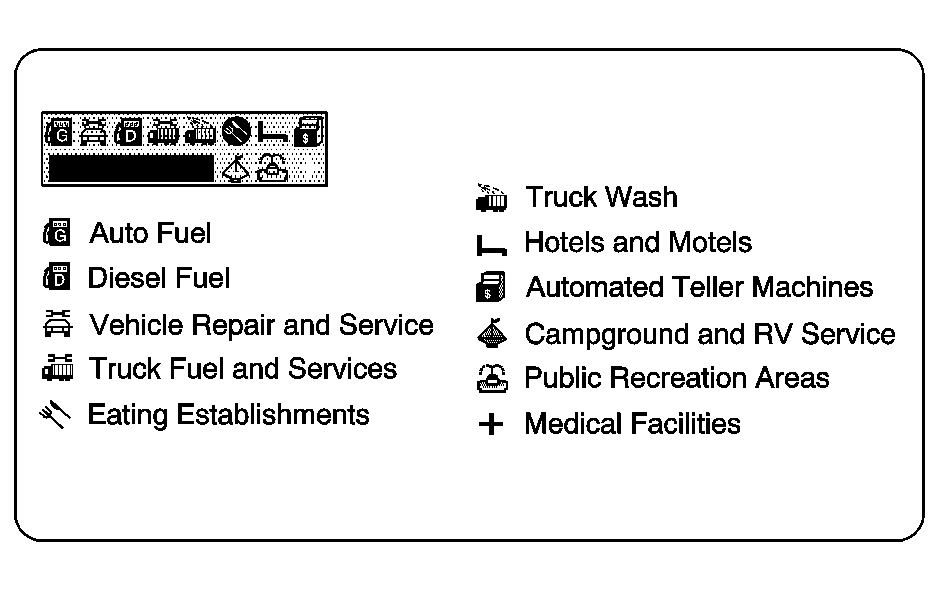
Once you have a route planned and begin to travel on an interstate, a box with a series of icons will appear in the upper left corner of the screen. These icons indicate what services are available at the next exit. A smaller Interstate America icon will appear on the map next to the referenced exit.
Tracking
Select Tracking to leave a "trail" to show where you have been on the map. Your path will be represented by bubbles that appear three-dimensional on the screen.
Tracking can be useful for the following reasons:
| • | When tracking is activated, you can see where you have already traveled. |
| • | When you wish to return to your point of origin without planning another route, you can follow the tracking bubbles back to where you started. |
| • | When you drive into an area with few digitized roads listed in the DVD database, you can follow the tracking bubbles back to a digitized area. |
To clear the trail left by tracking, turn off Tracking by pressing the TUNE/SEL knob. This will erase the bubbles. You may then choose to turn Tracking back on again, in which case your trail will begin from your current location.
The maximum length of a tracking trail is 50 miles (80 km). Once you exceed this number, the bubbles marking the beginning of your route begin to disappear as new ones are created at the end of your trail.
Route Option
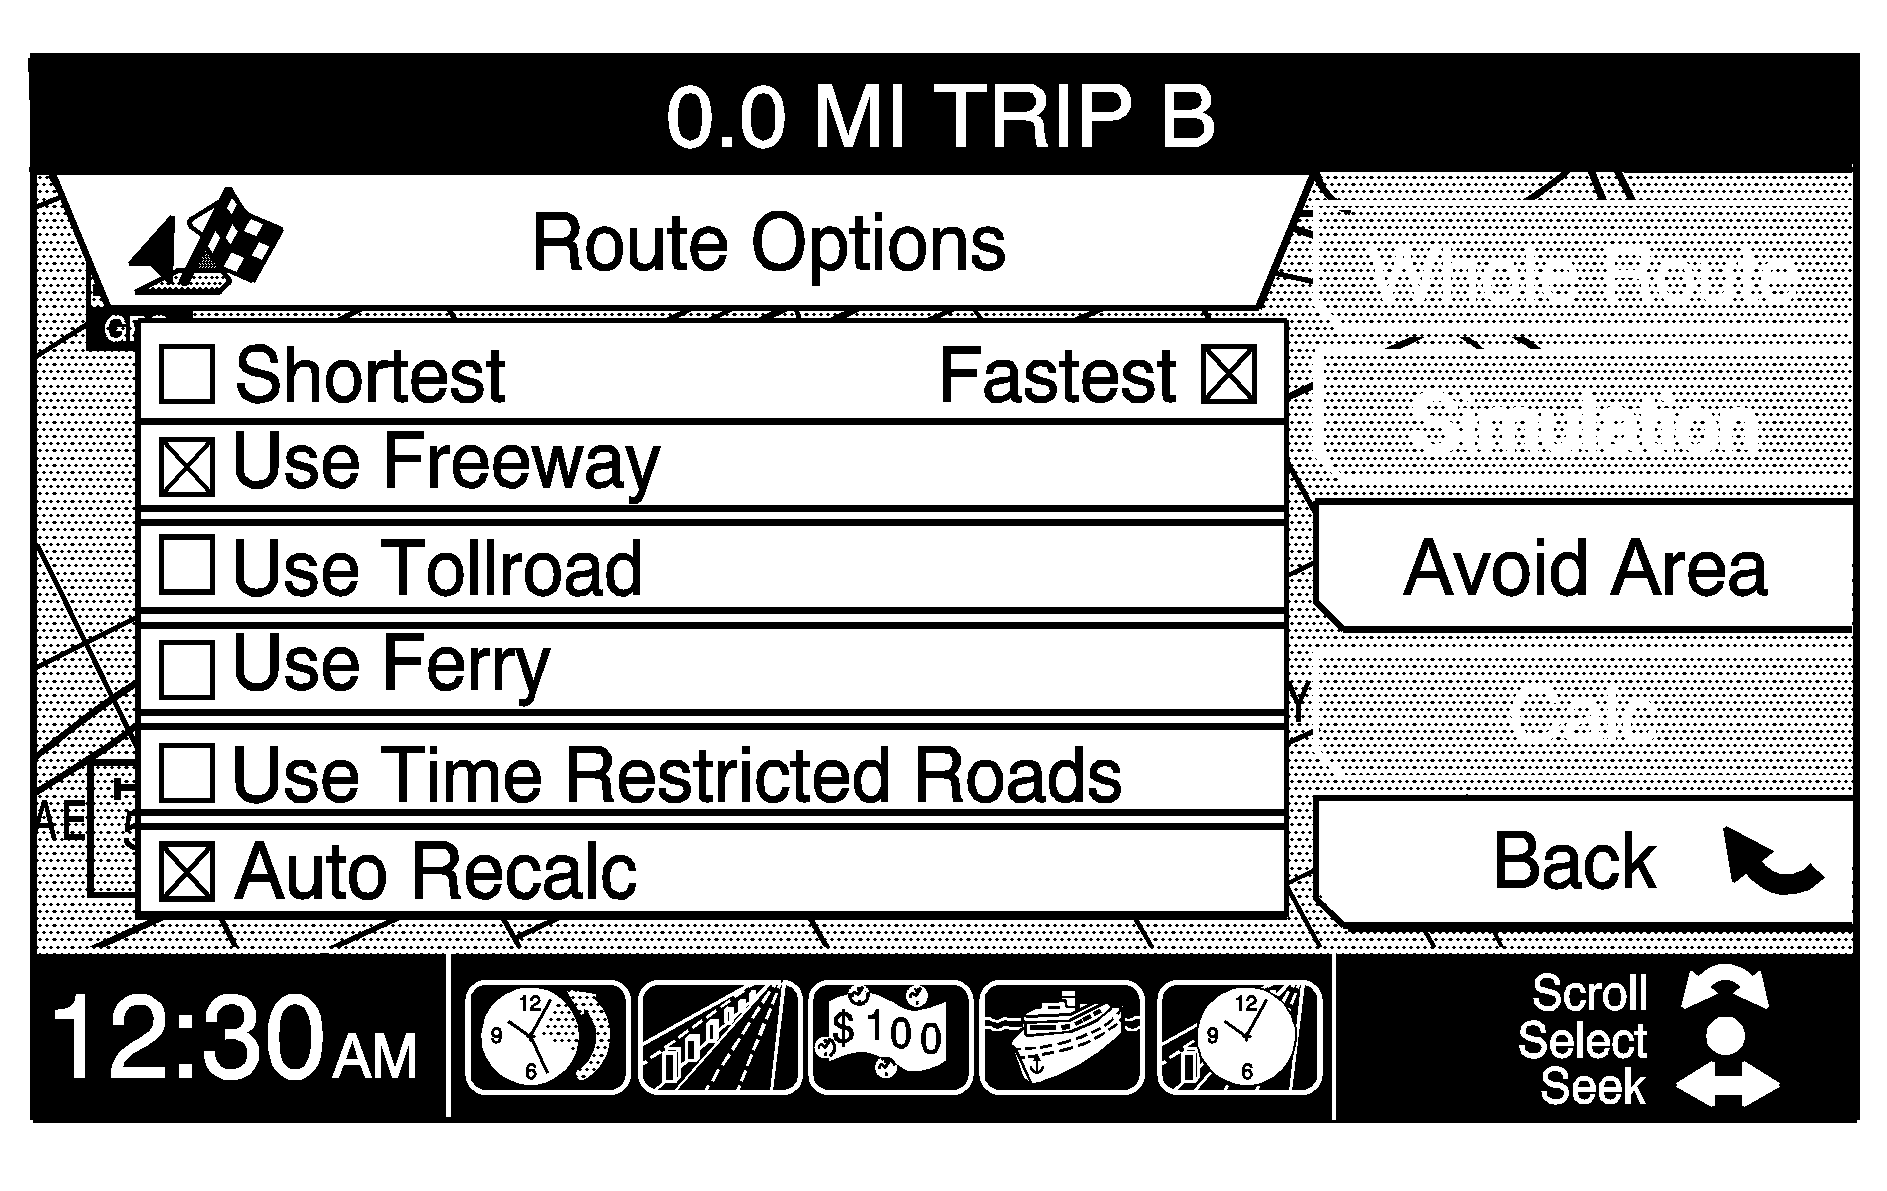
The five icons that appear at the bottom of the screen indicate which route options have been selected. These same icons appear on the navigation screen when a calculation is in process.
When you press the Route Option multi-function button, you are able to select from the following options on the route calculation methods list:
Shortest/Fastest Route
The system will calculate the shortest route or fastest route possible. The system determines the shortest route based on the shortest distance. The fastest route is the route with the lowest estimated travel time.
Use Freeway
The system will calculate the best route using the freeways wherever possible. This selection will not always offer the shortest distance or time to your destination.
Use Tollroad
The system will calculate the best route using tollroads wherever possible.
Use Ferry
The system will calculate the best route possible using ferries wherever possible.
Use Time Restricted Roads
The system will calculate the best route possible using roads that are time restricted. These include any roads where use is prohibited by the time of day you are traveling (i.e. no left turns before 3:00 p.m., etc.).
Auto Recalc (Automatic Recalculation)
If you have selected this option and leave the original calculated route, the system will automatically calculate a new route without any further input from the driver.
To choose from the list of options, use the TUNE/SEL knob. You may select all or none of the options listed as route calculation options.
Under Route Option Menu you will also be able to use the following multi-function buttons:
Whole Route
The system will go to the main navigation map and zoom out so that the entire route will be displayed.
Simulation
The system will simulate traveling along the route.
Avoid Area
The system will allow you to choose an area you want to avoid traveling through. When you press this button, a map showing the travel area will be displayed, along with arrows that will allow you to scroll on the map to the area you want to avoid. See "Map Scroll" listed previously in this section for more information.
Before you set the area to avoid, you may want to select the FWY (Freeway) multi-function button so the system will allow you to take the freeway through the avoidance area. If you don't select it first, the system will avoid the chosen area entirely.
When you near the area you want to avoid, the voice prompt will come on with this message, "You are approaching your avoidance area." This allows you to decide if you still want to avoid the area or cancel the command.
You can enter up to 10 avoidance areas.
Calc (Calculate)
The system will begin calculating the chosen route using the route options you have selected.
Back
This button returns you to the previous screen.
Store PT (Point)
Press the Store PT button to save the current location to a stored point in the system memory.
A total of 60 points can be stored. The first stored point is reserved for your home location. If all 60 points are entered, the system will notify you that there is no available storage space left in memory. A stored point must then be removed before another can be stored.
Stored PTs (Points)
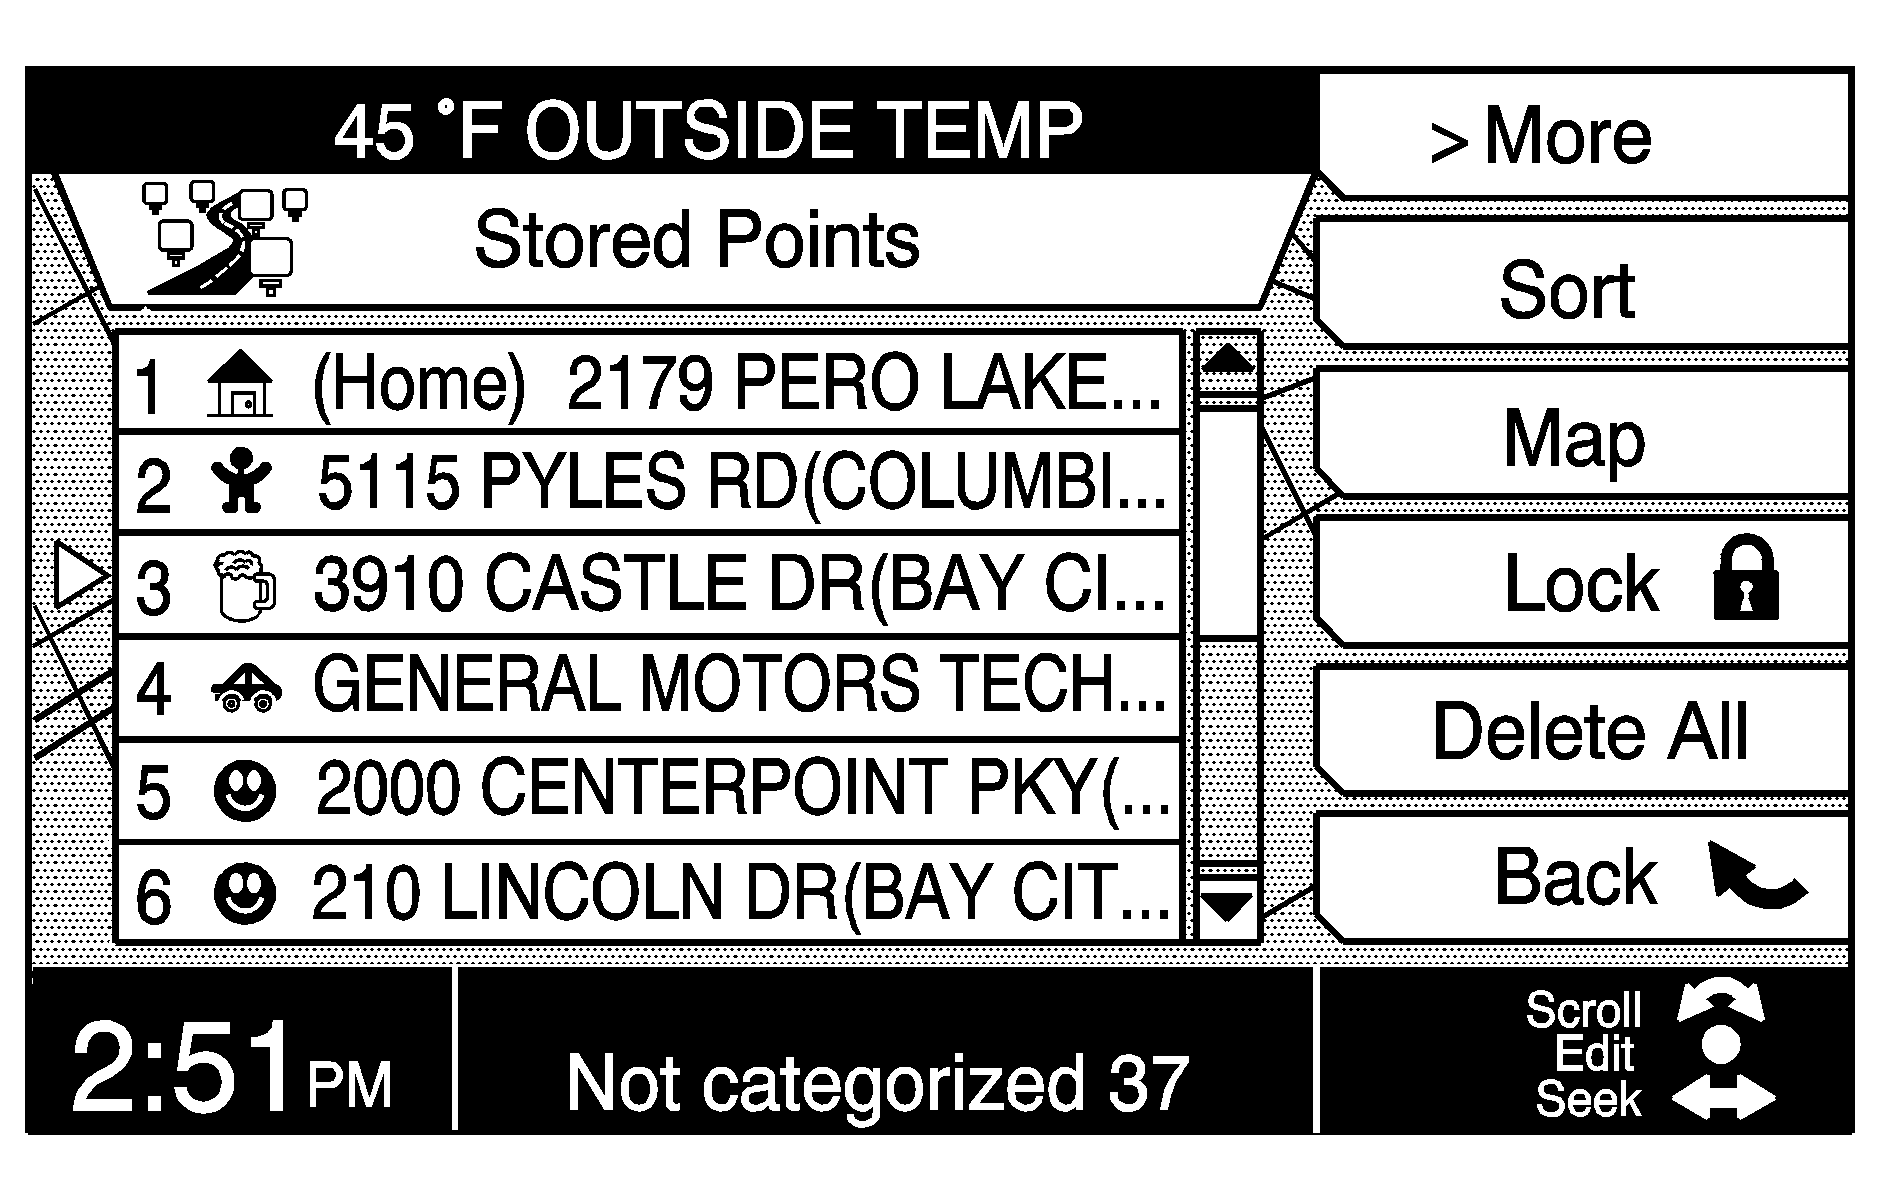
Press the Stored PTs button to view the list of all points. The list will show points stored, reserved and empty points. The first stored point will be considered Home. You must store the location you would like to be Home.
The list will also display the following multi-function button options:
>More
Use this button to scroll the complete name of a stored point.
Sort
This button allows you to sort your stored points into categories. The following are the five available categories:
| • | Personal |
| • | Business |
| • | Leisure |
| • | Special |
| • | Uncategorized Point |
Once you have categorized the store point, press the Back button to return to the previous menu. Each categorized stored point will have an icon in front of it and will be highlighted a different color than other marked points on the list. You may then press one of the multi-function buttons to sort your stored points by that category.
Map
This button takes you to the map showing the location of the selected stored point.
Lock
This button allows you to lock the selected stored point so it cannot be accidentally deleted.
Delete All
This button deletes all stored points which haven't been locked in.
Back
This button always returns you to the previous screen.
Use the TUNE/SEL knob to move to the stored point you want to edit. Once you make your selection, by pressing the TUNE/SEL knob, you will be able to do the following:
Edit Name: Select this option to edit the name of a stored point. The alpha-numeric bar will appear at the bottom of the screen to allow you to input the new name or address. See "Alpha-numeric Bar" under Navigation System Overview for more information.Categorized (Landmark): Use this selection to categorize and attach a landmark icon to your stored point. Select the category with the multi-function button, then use the TUNE/SEL knob to scroll and select the desired landmark icon.
Delete: Select this option to delete the stored points from the list. If you select this option, the system will ask you if you are sure you want to delete the stored point. You may then press Yes or No and return to the previous screen.
Change: Use this selection to change a currently stored point.
Trip Points
Trips can be as simple as one destination or in addition to the destination can have up to 10 waypoints. Press this button to list, edit and save the waypoints and destination entered for your current trip. Once you have entered all the points for the trip, press the Store multi-function button to save the trip to memory. The system will allow you to save up to 10 trips. The following choices are available in the Trip Points menu:
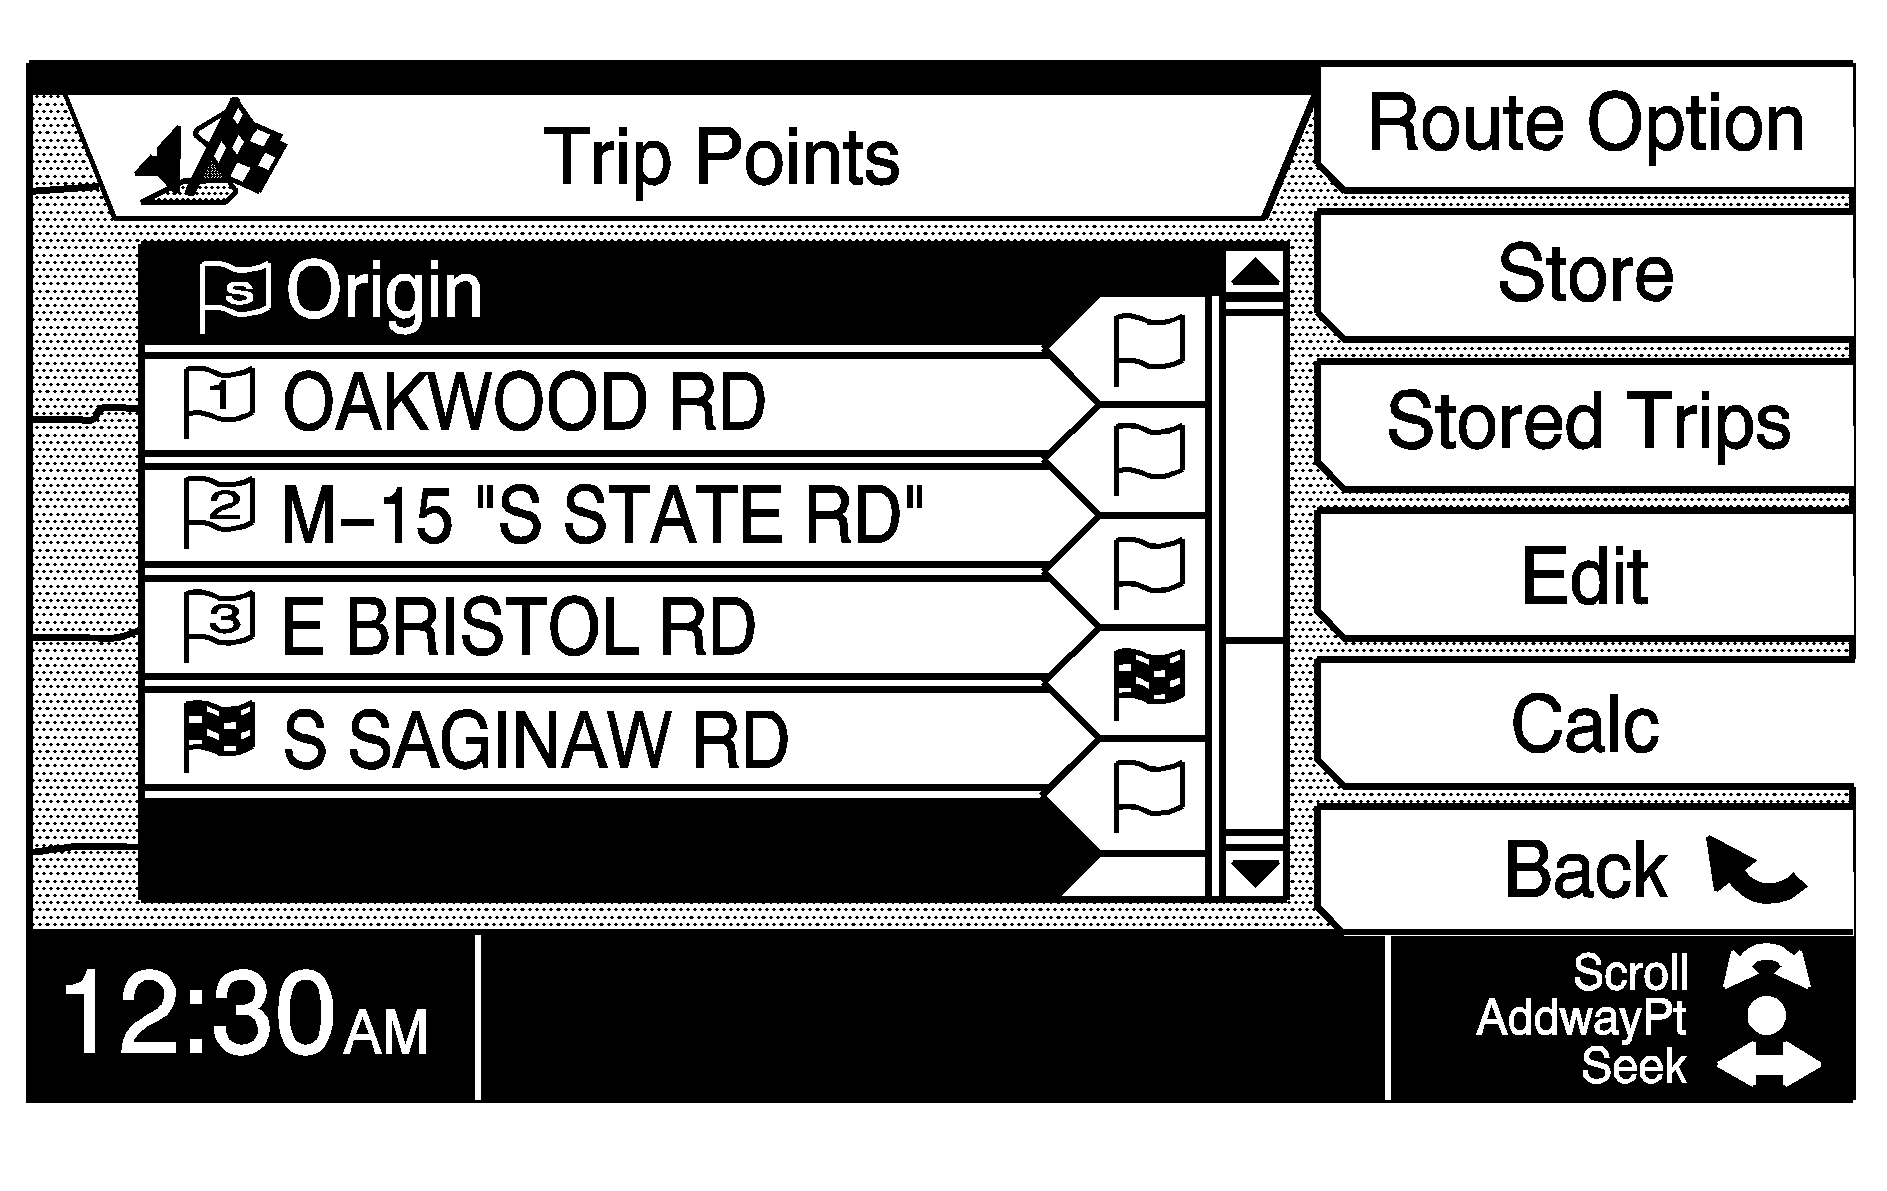
Route Option
This multi-function button is the same as Route Option from the main Navigation Menu. See Navigation Menu for more information.
Store
Press the multi-function button to save a trip to memory.
Stored Trips
Press the multi-function button to retrieve a list of all stored trips.
The following prompts are available to you while in the Stored Trips menu:
| • | >More |
| • | Info |
| • | Map |
| • | Edit Name |
| • | Delete |
| • | Back |
Info (Information): Press this multi-function button to list the destination and any waypoint(s) for a stored trip.
Map: Press this multi-function button to view the map associated with the stored trip.
Edit Name: Press this multi-function button to change some or all of the information of the saved trip name.
Delete: Press this multi-function button to delete a stored trip.
Back: Press the multi-function button next to this prompt to return to the Trip Points menu.
Edit
Press the multi-function button next to this prompt to change your stored trips. Use this function to change the order or delete any or all waypoints or the destination within a trip.
To change the order of a stored trip, do the following:
- Scroll to the waypoint or destination you want to move using the TUNE/SEL knob.
- Press the multi-function button next to the Move prompt.
- Turn the TUNE/SEL knob to move the point to the desired location.
- Press the multi-function button next to the OK prompt to confirm the change.
Calc (Calculation)
Press the multi-function button next to this prompt to start route calculation by the system.
Back (Trip Points Menu)
Press the multi-function button next to this prompt to return to the main Navigation Menu.
Enter Dest (Destination)
Press this button to display the Enter Destination menu. This menu will give you more ways to plan a trip.
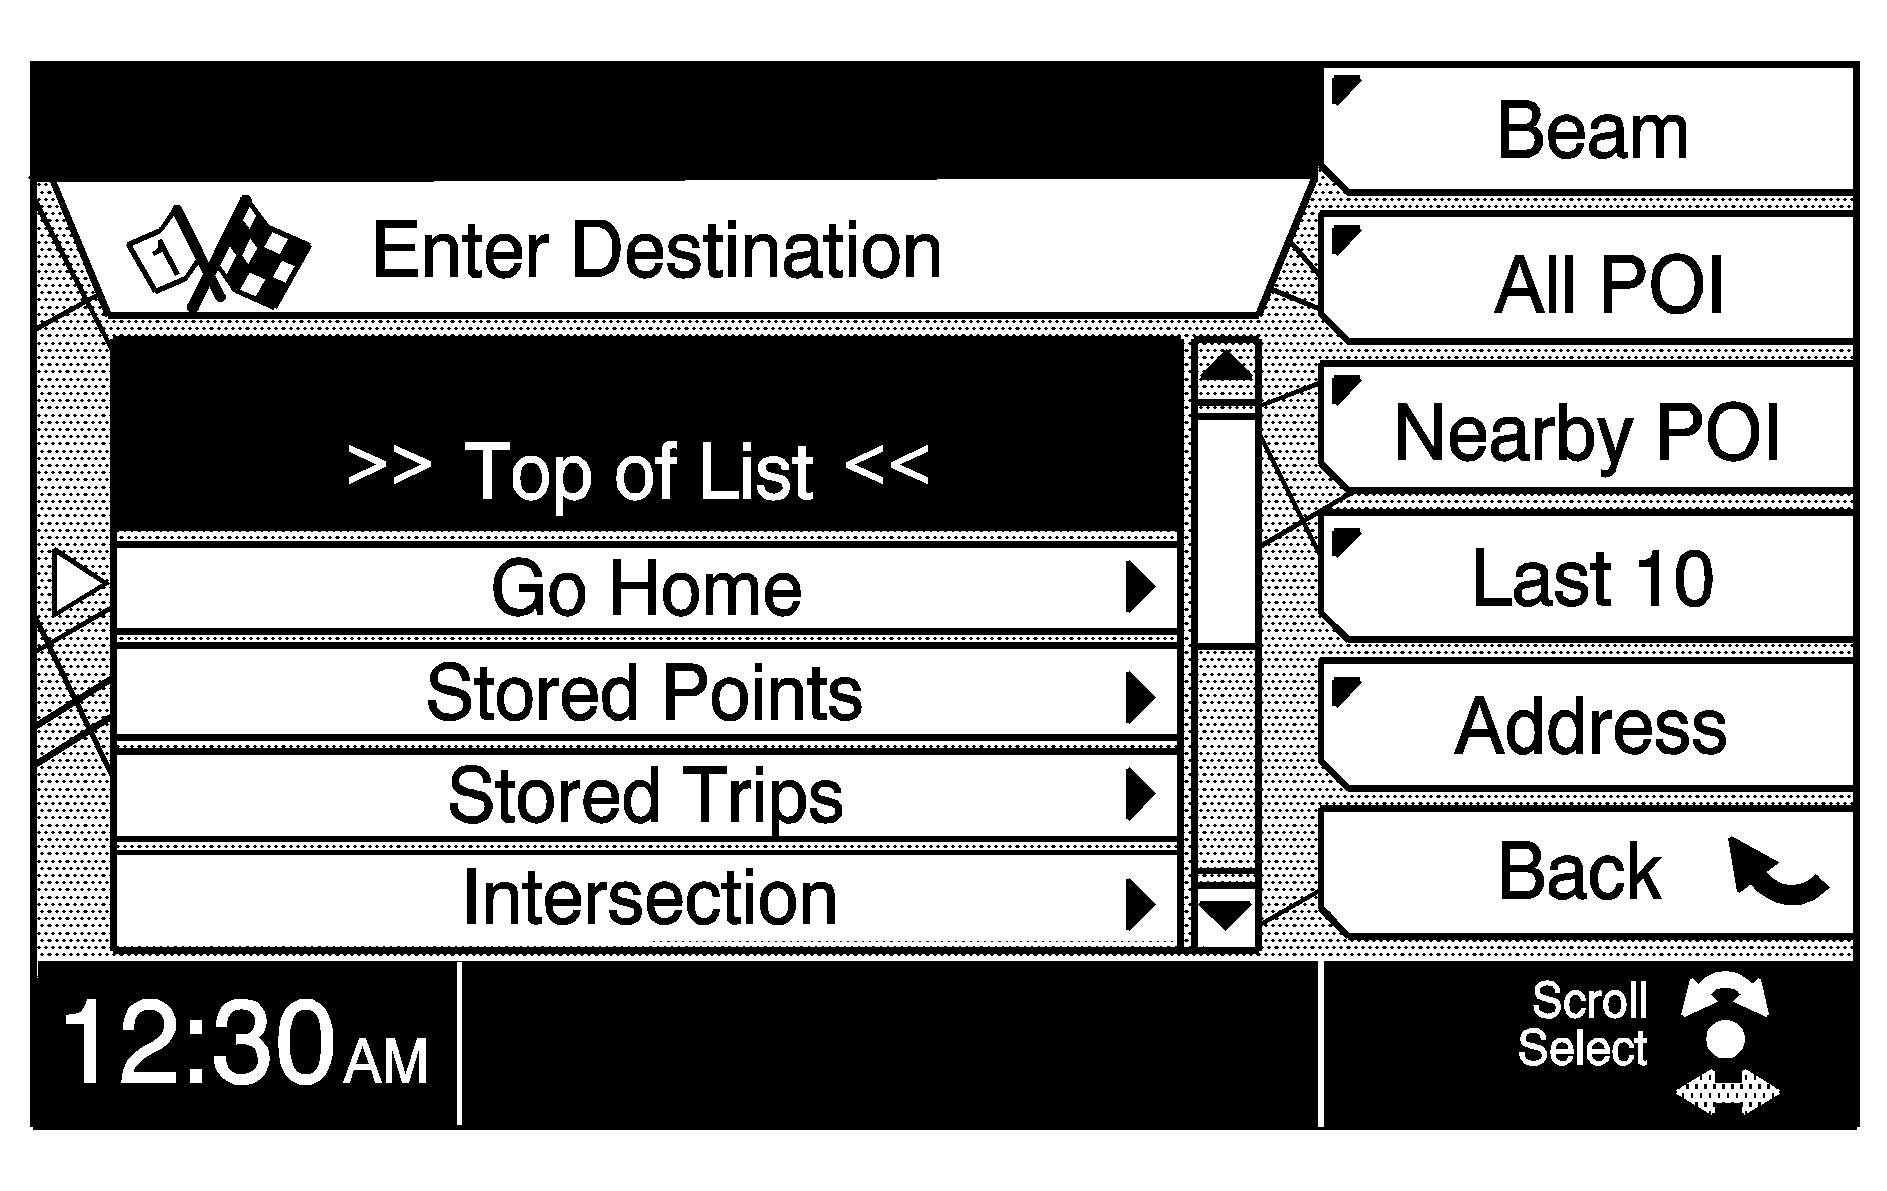
You may choose to enter a destination using one of the items from the list on the screen. Use the TUNE/SEL knob to choose from the following destination planning options:
Go Home
This option will take you to the destination you stored as Home (first stored point). See "Stored PTs" earlier in this section for more information.
Stored Points
This option allows you to select a destination from your stored points list.
Stored Trips
This option allows you to select a destination from your stored trips list.
Intersection
This option allows you to select a destination by inputting the intersecting roads. When you select Intersection, the alpha-numeric bar will appear to allow you to input the name of the first street. This should bring up a list of cities that have a street with that name. Select the correct city and then the system will allow you to enter the second street. You will only be able to input streets that intersect with the first. After you have entered the second street, the route will be calculated and a voice prompt will come on to direct you to "Proceed to the highlighted route."
Some cities have multiple listings for a particular street. If you do not see the second street, press the back multi-function button and select another entry for the first street.
Phone
This option allows you to select a destination by inputting the phone number.
When you select Phone, the alpha-numeric bar will appear to allow you to enter the phone number of your destination. Once the phone number has been entered, the multi-function button can be used to map, set the destination or calculate the route to this destination.
If the phone number cannot be found, an error message "no phone number is available" will be displayed.
Previous Origin
This option allows you to return to the place where you started your last planned route. Only one previous origin can be stored at a time by the system. Once you enter a new route, the previous origin will be changed.
Map Entry
Use this selection to enter a destination by using the map. Turn the TUNE/SEL knob to select a direction to scroll. Press the TUNE/SEL knob to move the map in the direction selected. Use the Set Dest multi-function button to insert this location as your new destination and take you to the Trip Points menu.
Once you have reached the desired destination, press the Calculate button and a trip will be planned with that as the only point in the trip. You will also hear a voice prompt directing you to "Proceed to the highlighted route."
Use the Zoom In and Zoom Out buttons to view the map as desired.
While in the Enter Dest menu, you may also plan a route using the following multi-function buttons:
Beam
This button allows you to input addresses or telephone numbers you may have stored in your Palm™ hand-held computing device directly into the Navigation System.
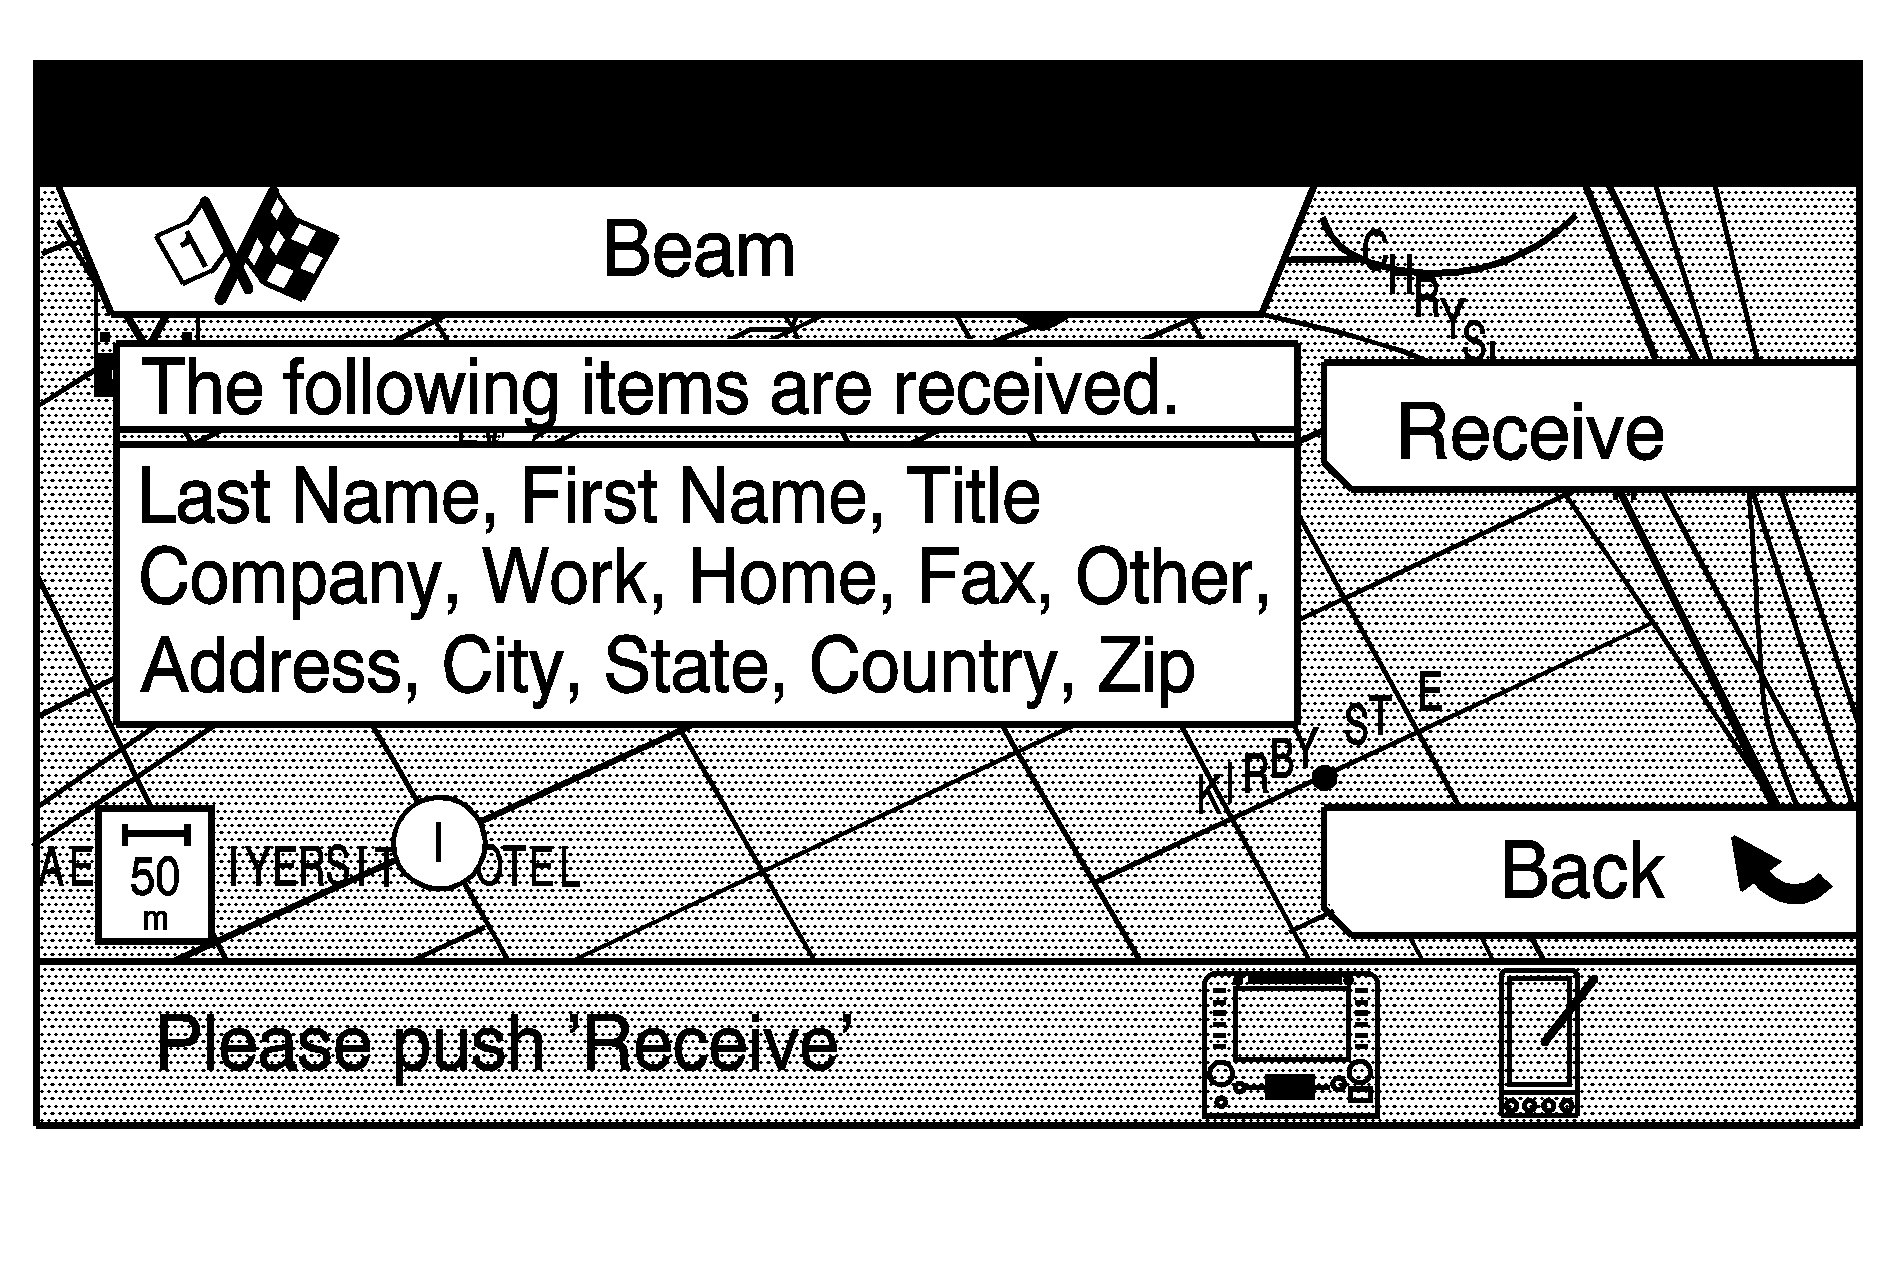
When transmitting data to the unit, ensure the format is the same as that on the screen. For the system to be able to properly search for an address, standard street and directional abbreviations should be used. Instead of "West Hall Road" use "W Hall Rd".
When you press the Receive multi-function button, the system will ask you to send the data. Hold the Palm near the infrared receiver located in the upper right corner of the screen and transmit. When the information has been successfully received, you will be able to use it to help plan your route.
After receiving the beamed data, the screen will display this data. A search must be performed to find the matching data in the navigation database. Turn the TUNE/SEL knob to select a field to search, then press the Search multi-function button. Search will be highlighted if the field is searchable.
You may be requested to select a city or street to narrow the search. After successfully finding the match in the navigation database, you can use the multi-function buttons to map, set the destination or calculate the route.
If the data cannot be found in the navigation database, a message "no data found" will be displayed. If this occurs, select another field to search. Repeat this process until all search fields have been checked or a match is found.
You may also select information from the All POI (Points of Interest) or Nearby POI menus to send to your Palm using the INFO button.
A second way to access the Beam screen is through the Address Book screen. See "Address Book" under Main Menu for more information.
All POI (Points of Interest)
This option allows you to choose a destination from the all points of interest list. See "Points of Interest Categories" later in this section for the complete list.
There are four ways to limit a search for a point of interest from this screen:
| • | Choose a city, village, township or county. |
| • | Choose a state. |
| • | Choose a category. |
| • | Enter the name of the POI. |
To enter the city of a POI, the state of a POI or a POI category, use the following steps:
- Press either the City, State or Category multi-function button.
- Enter the name of the city, state or POI category using the alpha-numeric bar. To limit the search of a point of interest, the city or category must be entered first.
As you enter the item, the system will search for a match. Select the correct point of interest from the list.
To search for a POI by name, enter the name of the POI in the POI Name screen.
The POI Name screen allows you to do the following functions with the multi-function buttons on the currently selected POI:
| • | More: Press this button to view the entire POI name. |
| • | Info (Information): Press this button to display all known information. |
| • | Map: Press this button to view the location of the vehicle on the map. |
| • | Set Dest (Destination): Press this button to make the POI the destination for the current trip. |
| • | Sort: Press this button to sort the POI list by distance from the current location. |
| The TUNE/SEL knob can be used to scroll through the list and if pressed, will calculate the route to the selected POI. |
| • | Airport |
| • | Amusement Park |
| • | ATM |
| • | Auto Dealerships |
| • | Auto Service & Maintenance |
| • | Automobile Club |
| • | Bank |
| • | Border Crossing |
| • | Bowling Center |
| • | Bus Station |
| • | Business Facility |
| • | Casino |
| • | City Center |
| • | City Hall |
| • | College and University |
| • | Community Center |
| • | Commuter Rail Station |
| • | Convention/Exhibition Center |
| • | Court House |
| • | Ferry Terminal |
| • | Gas Station |
| • | Golf Course |
| • | Grocery Store |
| • | Historical Monument |
| • | Hospital |
| • | Hotel |
| • | Ice Skating Rink |
| • | Library |
| • | Marina |
| • | Movie Theater |
| • | Museum |
| • | Nightlife |
| • | Park & Ride |
| • | Park/Recreation Area |
| • | Parking Garage |
| • | Parking Lot |
| • | Performing Arts |
| • | Police Station |
| • | Rental Car Agency |
| • | Rest Area |
| • | Restaurant |
| • | School |
| • | Shopping |
| • | Ski Resort |
| • | Sports Center |
| • | Sports Complex |
| • | Tourist Attraction |
| • | Tourist Information |
| • | Train Station |
| • | Winery |
The full names of some POI on the list cannot be displayed due to their length. These names will be followed by three dots (...). If you wish to see the full name of the POI, press the More button and the system will scroll to the end of the name.
The POI for Restaurant is broken down into fifty-one distinct categories. Select Restaurant from the POI choices and press the List button. Cuisine Type will then appear as an option. Press the List button again to view the restaurant categories and select one to use as your POI.
Nearby POI (Points of Interest)
This feature allows you to limit your choices of a Nearby POI to within a 30 mile (48 km) radius of one of three locations: current location, waypoint location or destination location.
After entering the Nearby POI screen, use the location multi-function button to select which one of the three locations you want to search for Nearby POIs. The location screen shows a list of all points along your trip. Use the TUNE/SEL knob to select the desired location. Press the Back multi-function button to return to the Nearby POI screen.
The selected location will be shown at the bottom of the screen.
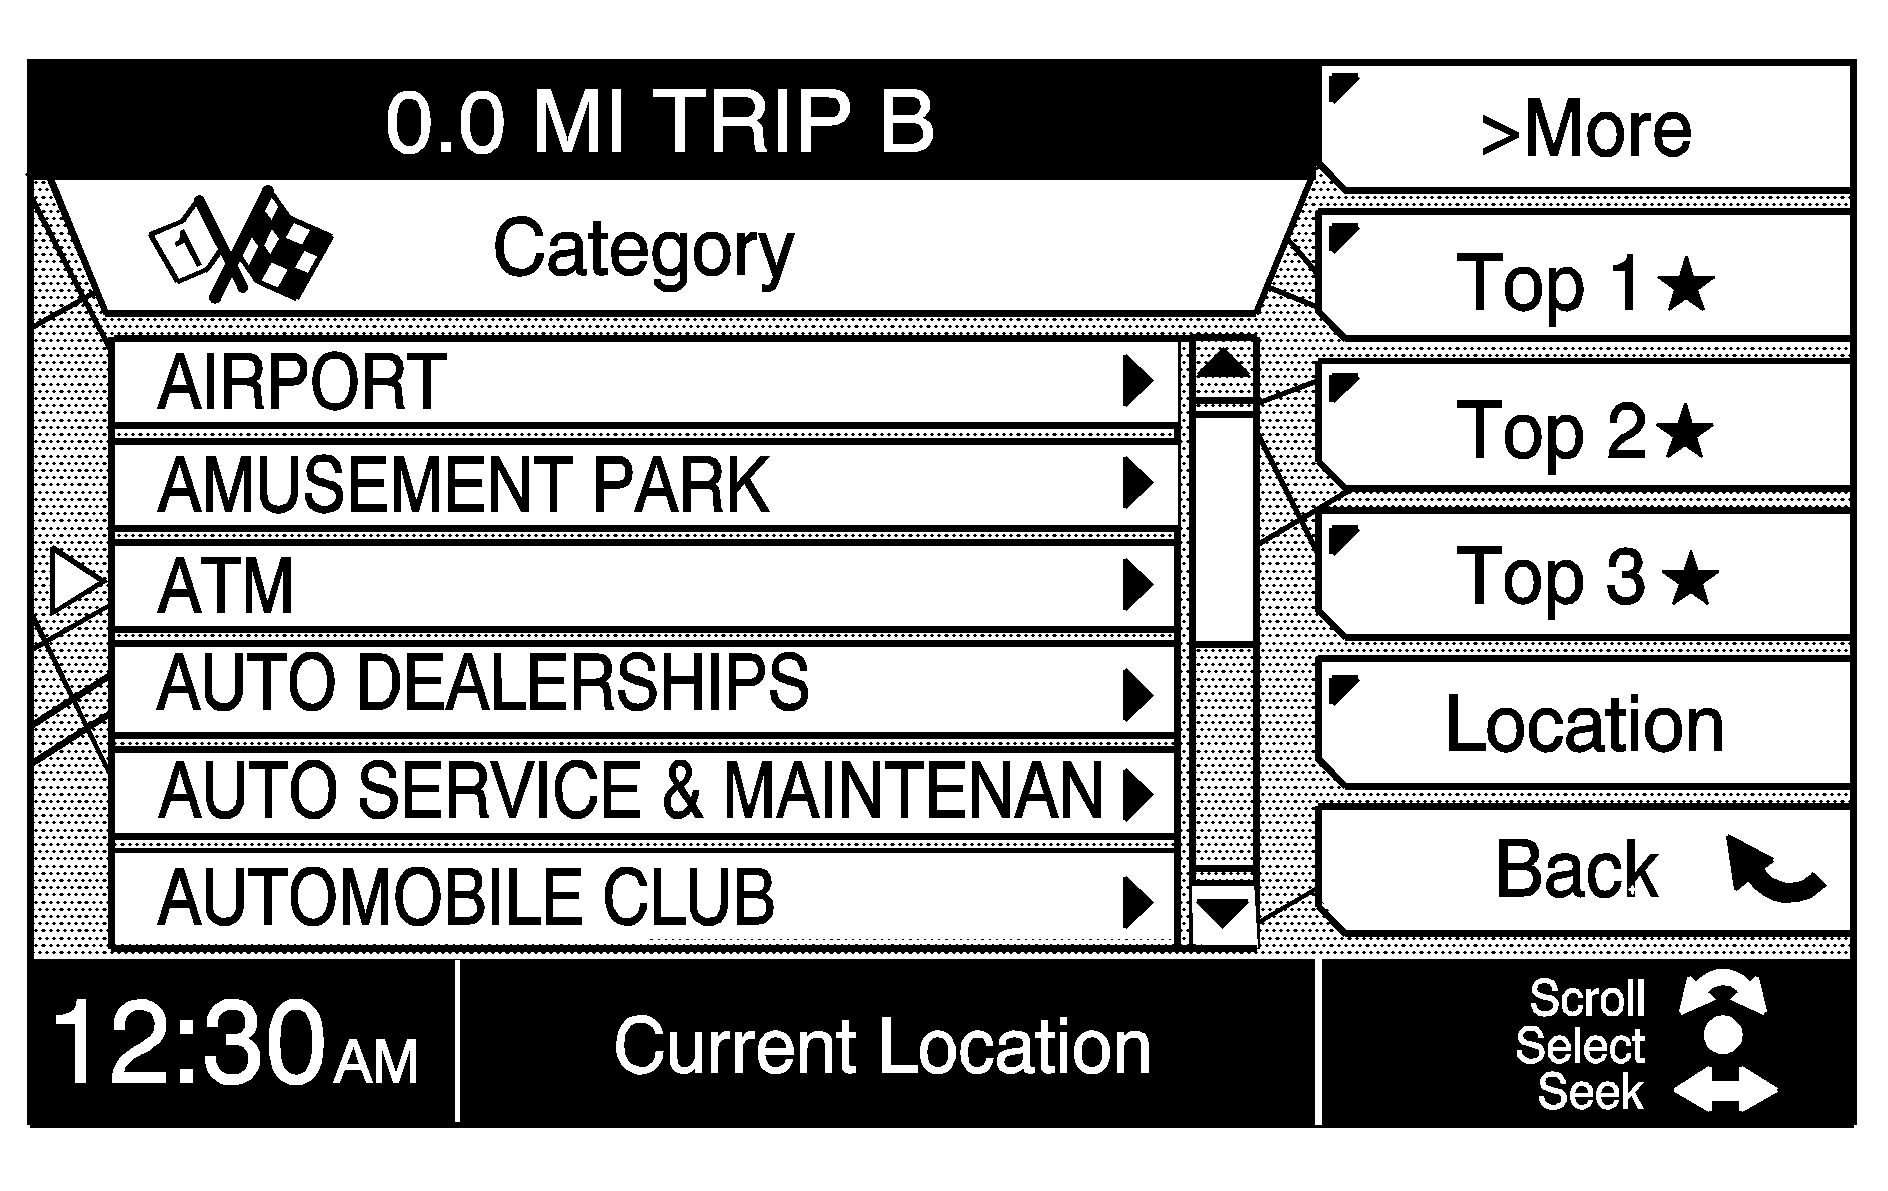
Choose a category from the Nearby POI list using the TUNE/SEL knob. Once a category is selected a list of available POI will be displayed. The points are listed in order of straight-line distance from the selected location. If the selected location is the current location, an arrow will show the direction of the Nearby POI.
Turn the TUNE/SEL knob to select the desired POI. This point can be added to your trip or replace the current trip. Pressing the TUNE/SEL knob will calculate a route to the POI. This also deletes any trip that may have been active.
Use the Set Dest multi-function button to add this POI to your current trip (as your destination) without deleting your current trip. This will take you to the Trip Points screen where this POI can be moved to any location in your trip point list.
Top 1, 2, 3: The most commonly used categories can be put at the top of the list for easy access. These categories are the only available categories when the vehicle is in motion. To move a category to one of the Top 3 spots, turn the TUNE/SEL knob to the desired category. Then, press the Top 1, Top 2 or Top 3 multi-function button to move that category to that location.Info (Information): Press this button to receive further information about the chosen POI, such as the address and phone number. From this screen you may also transfer information to your Palm hand-held computing device. See Address Book in Main Menu for more information. For example, if you select a restaurant as your POI and press the Info button, the name, address and phone number for that restaurant will appear. When a Nearby POI is not available within the search area, the system will display "No Facility Found in This Area."
Last 10
This feature allows you to select a destination from the last 10 destinations. Press the Last 10 button to bring up the list. Choose your destination from this list turning the TUNE/SEL knob.
While using the Last 10 feature, press the Store PT button to add a location from the Last 10 list to the stored points list. Press the Map button while using the Last 10 feature, and the system will take you to the map screen and show you the location of the point you have chosen.
You can use the Set Dest, Delete or Calculate multi-function buttons as described earlier for any other destination. See "Enter Destination" listed previously in this section for more information.
Address
This method allows you to enter a destination using an address (without a zip code). You need to provide the system with a street number, street name and a city.
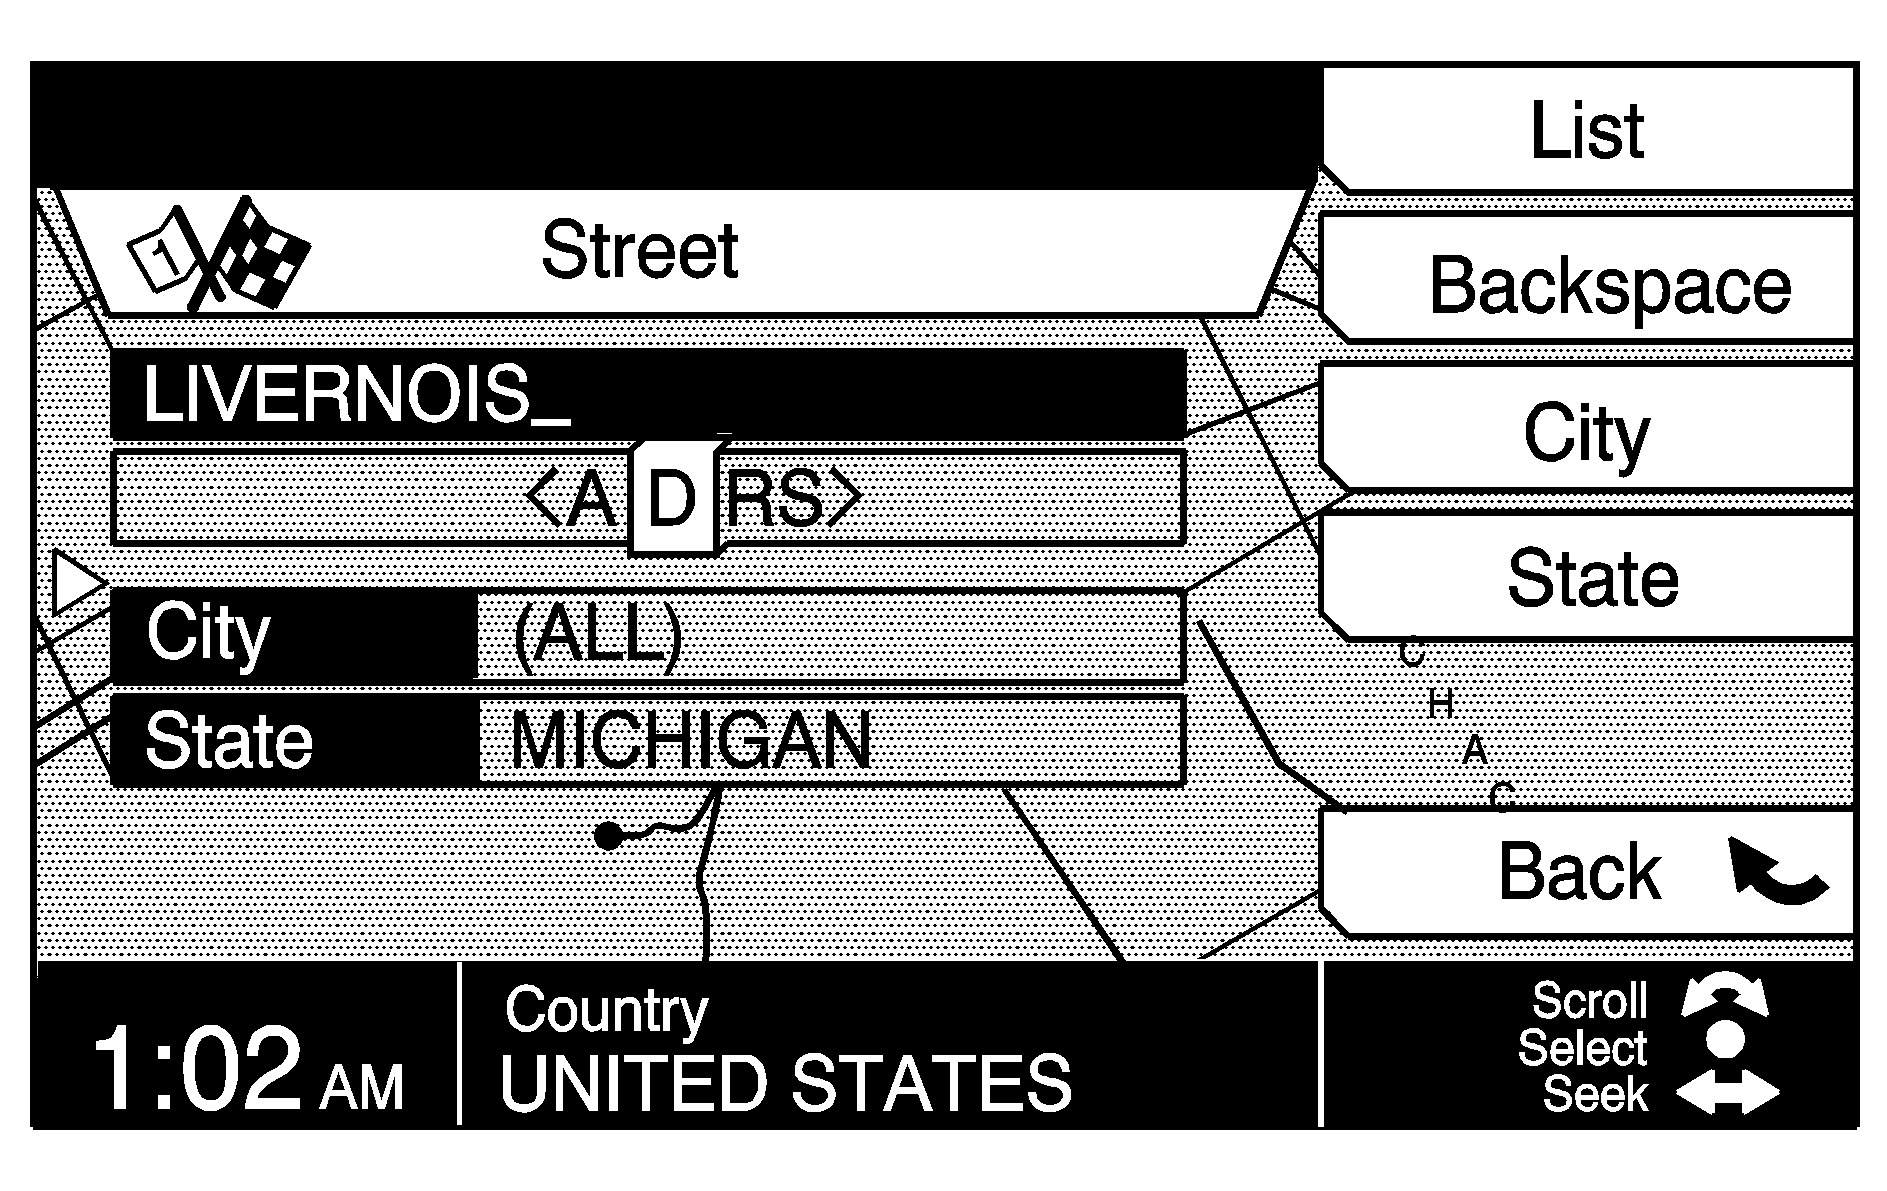
Enter the name of a street using the alpha-numeric bar. Since there may be many streets within the map database with the same name, you may have difficulty selecting the correct one. If this occurs we recommend entering the city, village, township or county name first.
To enter the city name, select City on the Address screen. Enter the name of the city using the alpha-numeric bar. Select the desired city name from the list the system provides. After you have entered the city name, the system will prompt you to enter the name of the street or will give you a list of street names to choose from. Enter or select the desired street name.
As information is entered, the system will automatically search for available names. While inputting a name, the List button will become available once there are names to choose from. Press the List button to view the available name choices or continue to spell the name to further limit the number of available items. If you are unsuccessful when inputting a name, the name may need to be input differently or the map DVD may not contain this information. See Database Coverage Explanations .
Enter the address number using the alpha-numeric bar.
The system will list the address number range that is available for the street. Some cities may have multiple entries for a street. If the address number does not fall in the address number range displayed on the screen, press Back and select another street name. If the address number still does not appear, it is possible that the map DVD does not contain this information. See Database Coverage Explanations .
If you did not select the city name previously, the system may prompt you to do so using the alpha-numeric bar or from a list of names which the system provides. Select the desired city name.
Press the Calculate multi-function button to delete any current trip and set this as your destination. The system will return to the Enter Destination screen. Use the Set Dest function as previously described to add this point to your current trip.
Creating a Trip with Waypoints
Once a destination has been entered, you can also add waypoints. Trip waypoints are destinations you want to arrive at before reaching your final destination. The system will automatically guide you to each waypoint, then on to your final destination. Up to 10 waypoints can be entered for any trip.
To enter a waypoint, press the Trip Points multi-function button on the navigation menu screen. Then, turn the TUNE/SEL knob to scroll the trip points list. A waypoint can be added at any location designated by a blank flag. Press the TUNE/SEL knob to select the location. The system will then allow you to enter a waypoint using the same method as Enter Destination. See "Enter Destination" listed previously in this section for more information.
Once you have entered all desired waypoints for your trip, press the Calculate multi-function button. The system will return you to the map and will plan the route to your waypoints and destination.
After the first waypoint, the color of the highlighted route will change. See Colors on the Screen later in this section for more information.
Editing a Trip
While at the Trip Point screen, press the Edit multi-function button. This screen allows you to delete or move points in a trip. If you wish to delete a waypoint, scroll to that waypoint and press Delete. You may also change the order of the waypoints by scrolling to a waypoint and pressing Move. Then, turning the TUNE/SEL knob move it to the desired location within the list. Once the waypoint is at the desired location, press the TUNE/SEL knob or the Ok multi-function button.
Plan a Route
After a destination has been entered, you must press the Calculate multi-function button. The system will return you to the map and will plan the route to your selected destination. While the system is planning the route, the Route Option and Cancel multi-function buttons will be available. Also the Add Way Pt multi-function button will appear if there are less than 10 waypoints in the current trip.
When your route guidance has been planned, it will be highlighted and a checkered flag will appear on the map to show your destination. Symbols will also appear for any waypoints that have been set. The system will display "Route Calculation Completed" at the bottom of the screen.
Traveling on a Planned Route
After a route has been calculated and the route highlighted, you may hear an audio prompt to proceed to the highlighted route. When you are ready, drive the vehicle to the highlighted route. Once you begin driving on the route, the system will give additional audio and visual prompts, as you approach your next maneuver. Each maneuver is indicated on the map with a red maneuver pin.
Maneuver Pins
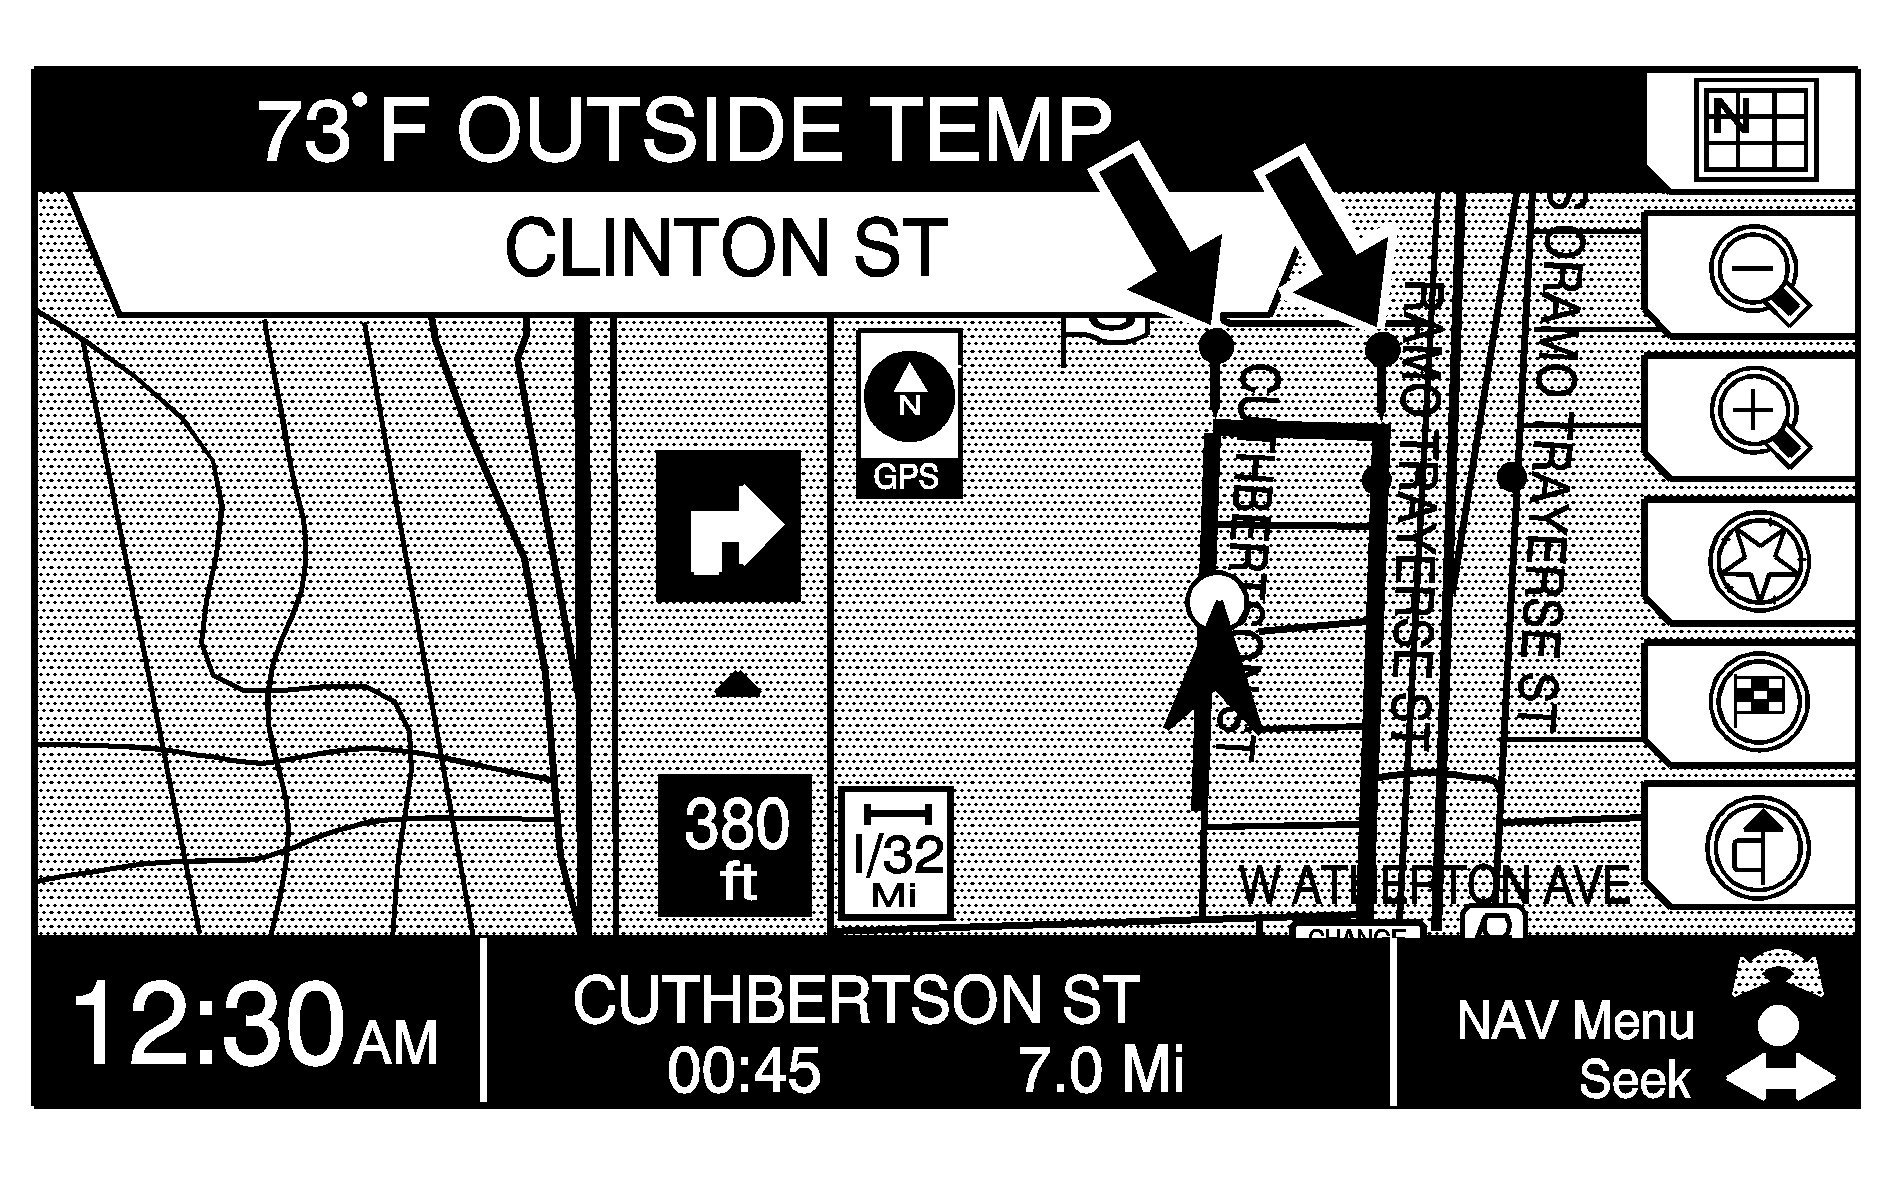
Maneuver pins are red "stick pin" icons on the map that indicate changes in the road or special action that must be taken by the driver to remain on the currently traveled road. For example, the road may have a sharp curve in it. The curve would not qualify as an official turn on the planned route. However, the driver must be aware of the curve so that he or she can stay on the planned route. Maneuver pins are always displayed along a planned route, but voice prompts and screen popups will only be given if these features are turned on.
As you are traveling, the current road is shown at the bottom center of the map screen. In addition in the upper center of the map screen will be the next maneuver. Anytime while on the route, you can press the NAV (navigation) Repeat button to get an audio prompt of your next maneuver.
There are two different types of roads in the map database. Fully attributed roads allow for a destination to be set and turn-by-turn guidance to be provided to the exact location of the address. In Process Data (IPD) roads contain only street name and address information. Other information such as turn restrictions and direction of travel is not included for these IPD roads. Therefore, turn by turn guidance cannot be provided to the exact address. When trips are planned that include an IPD destination, turn-by-turn guidance will be provided on the fully attributed roads closest to the destination. When nearing the end of the highlighted route the system will state, "Enroute to your destination, some roads contain incomplete data. Turn guidance will not be provided in this area." As you reach the end of the highlighted route the system will state, "Turn guidance will not be provided in this area. Please use the direction arrow and distance indicator to proceed to your destination." You should refer to the direction and distance information in the lower center area of the screen to navigate to the destination, or refer to the information in the waypoint box for a waypoint.
Once your vehicle is near your destination, the system will say "You've arrived at your destination, ending route guidance."
Back: This button always returns you to the previous screen.