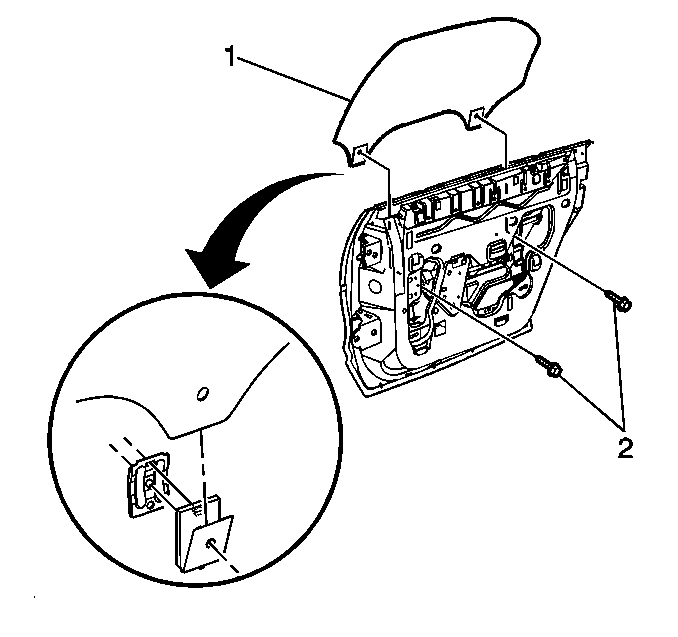
Removal Procedure
- Remove the trim panel. Refer to one of the following procedures:
- Remove the water deflector. Refer to Door Water Deflector Replacement .
- Remove the inner belt strip.
- Raise or lower the window in order to access the 2 retaining bolts (2).
- Remove the window glass (1).

Installation Procedure
- Clean the insulators.
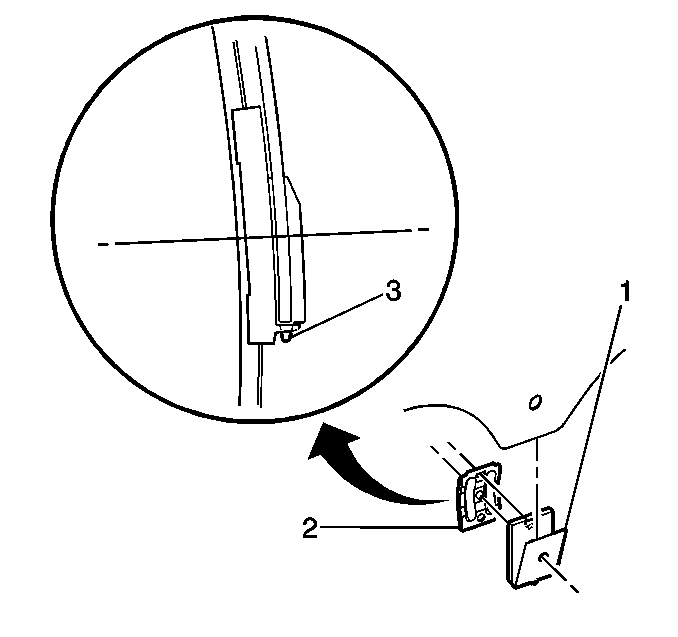
- Complete the following steps in order to install the retainer and the insulators to the glass:
- Complete the following steps in order to install the glass in the glass guidance module:
- Loosely install the rear glass attaching bolt (2).
- Loosely install the front glass attaching bolt (2).
- Tighten the rear attaching bolt.
- Tighten the front attaching bolt.
- Install the water deflector. Refer to Door Water Deflector Replacement
- Install the trim panel. Refer to one of the following procedures:

Important: Replace the retainers.
| 2.1. | Install the inboard face of the insulator (1) through the hole in the glass. |
| 2.2. | Folding the outboard side of the insulator around the bottom of the glass, snap the faces together in the glass pane hole. |
| 2.3. | Install the bottom of the retainer plate (2) into the bottom insulator retaining tabs. |
Rotate the top of the retainer toward the glass until the insulator snap tab (3) engages.
| 3.1. | Provide power to the window motor and move the guideblocks to approximately 12.5 cm (5 in) from the full up (closed) position. |
| 3.2. | Install the window assembly through the opening in the door beltline. |
Align the lower tabs of the glass insulators to the rectangular holes of the guideblock lower shelf.
| 3.3. | Apply slight pressure on the glass in order to ensure that the insulators remain engaged to the glass system guideblocks. |
| 3.4. | Move the guideblocks down to the glass bolt install position. |

Important:
• Replace the bolts. • Inspect the torque of the glass attachment screws within
1 minute
after installation. The adhesive in the retainer threaded hole cures. If
a torque inspection indicates that the torque is below specifications,
replace the screw in order to ensure proper clamp load. Do NOT attempt
to correct the torque by retightening the existing screw in the existing
retainer.
Notice: Use the correct fastener in the correct location. Replacement fasteners must be the correct part number for that application. Fasteners requiring replacement or fasteners requiring the use of thread locking compound or sealant are identified in the service procedure. Do not use paints, lubricants, or corrosion inhibitors on fasteners or fastener joint surfaces unless specified. These coatings affect fastener torque and joint clamping force and may damage the fastener. Use the correct tightening sequence and specifications when installing fasteners in order to avoid damage to parts and systems.
Tighten
Tighten the bolt to 9 N·m (80 lb in).
Tighten
Tighten the bolt to 9 N·m (80 lb in).
