Removal Procedure
Tools Required
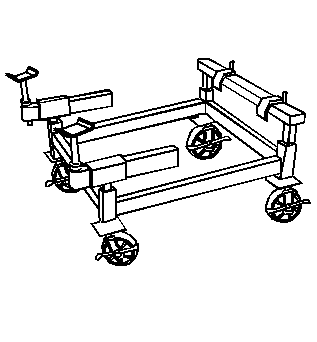
J 39580 Universal Engine Support Table
- Install the engine support fixture. Refer to Engine Support Fixture in Engine Mechanical.
- Raise and suitably support the vehicle. Refer to Lifting and Jacking the Vehicle in General Information.
- Remove the front tires and wheels. Refer to Wheel Removal in Tires and Wheels.
- Remove the outer tie rod ends from the steering knuckles. Refer to Rack and Pinion Outer Tie Rod End Replacement in Power Steering.
- Remove the stabilizer shaft from the vehicle. Refer to Stabilizer Shaft Replacement in Front Suspension.
- Remove the power steering gear heat shield. Refer to Steering Gear Heat Shield Replacement in Power Steering.
- Remove the power steering gear from the frame. Refer to Steering Gear Replacement in Power Steering.
- Use a strap in order to secure the power steering gear to the exhaust pipe.
- Remove the power steering cooler pipe from the frame. Refer to Power Steering Cooler Pipe/Hose Replacement in Power Steering.
- Use strap in order to secure the power steering cooler line to the battery cables.
- Remove the front wheel speed sensor connectors from the wheel speed sensors.
- Remove the front wheel speed sensor wiring harnesses from the lower control arms.
- Remove the lower ball joints from the steering knuckles. Refer to Lower Control Arm Ball Joint Replacement in Front Suspension.
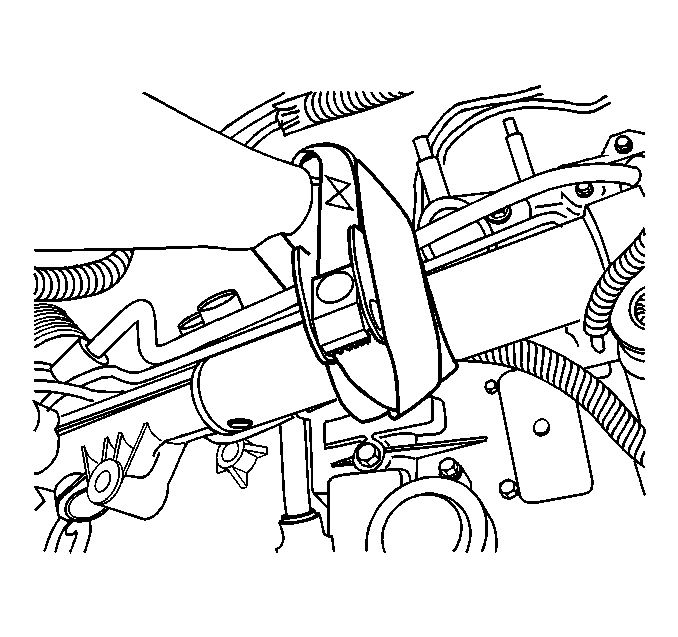
- Remove the engine mount nuts. Refer to Engine Mount Replacement in Engine Mechanical.
- Remove the transaxle mount nuts. Refer to Transmission Mount Replacement in Automatic Transaxle.
- Position J 39580 underneath the frame.
- Lower the vehicle until the frame contacts the J 39580 .
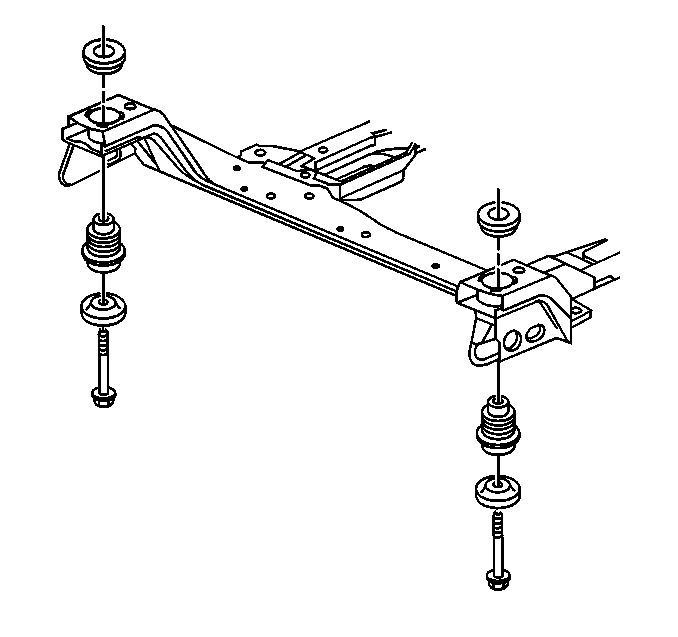
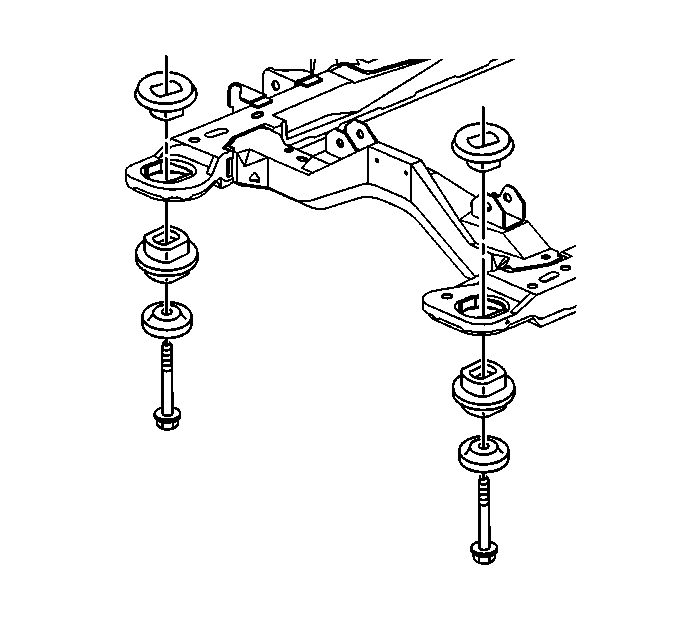
- Remove and DISCARD the frame front bolts.
- Remove and DISCARD the frame rear bolts.
- Raise the vehicle in order to separate the frame from the vehicle.
- Remove the frame insulators from the frame. Refer to Front Frame Cushion or Insulator Replacement and to Rear Frame Cushion or Insulator Replacement .
- Remove the lower control arms from the frame. Refer to Lower Control Arm Replacement in Front Suspension.

Installation Procedure
- Install the lower control arms to the frame. Refer to Lower Control Arm Replacement in Front Suspension.
- Apply a thin layer of GM P/N 12345884 (or equivalent) to the frame insulators.
- Install the frame insulators to the frame. Refer to Front Frame Cushion or Insulator Replacement and to Rear Frame Cushion or Insulator Replacement .
- Position J 39580 and frame under the vehicle.
- Lower the vehicle and align the guide pins to the body.
- Insert two 19 X 203 mm (0.75 X 8.0 in) guide pins or drill bits into the frame right side alignment holes in order to align the frame.
- Install the NEW frame front bolts.
- Install the NEW frame rear bolts.
- Remove the alignment pins from the frame.
- Install the transaxle mount nuts. Refer to Transmission Mount Replacement in Automatic Transaxle.
- Install the engine mount nuts. Refer to Engine Mount Replacement in Engine Mechanical.
- Install the wheel speed sensor wiring harnesses to the lower control arms.
- Install the wheel speed sensor electrical connectors.
- Install the lower ball joints to the steering knuckles. Refer to Lower Control Arm Ball Joint Replacement in Front Suspension.
- Install the power steering cooler pipe to the frame. Refer to Power Steering Cooler Pipe/Hose Replacement in Power Steering.
- Install the power steering gear to the frame. Refer to Steering Gear Replacement in Power Steering.
- Install the power steering gear heat shield. Refer to Steering Gear Heat Shield Replacement in Power Steering.
- Install the stabilizer shaft. Refer to Stabilizer Shaft Replacement in Front Suspension.
- Install both tie rod ends to the steering knuckles. Refer to Rack and Pinion Outer Tie Rod End Replacement in Power Steering.
- Install the front tires and wheels. Refer to Wheel Removal in Tires and Wheels.
- Lower the vehicle.
- Remove the engine support fixture. Refer to Engine Support Fixture in Engine Mechanical.
- Inspect the front wheel alignment and adjust the toe angle if necessary. Refer to Wheel Alignment Measurement in Wheel Alignment.
Important: Ensure that the power steering cooler line does not become trapped by the engine mount during this step.
Important: Ensure that the alignment pins remain installed during the frame installation.
Caution: These fasteners MUST be replaced with new fasteners anytime they become loose or are removed. Failure to replace these fasteners after they become loose or are removed may cause loss of vehicle control and personal injury.
Notice: Use the correct fastener in the correct location. Replacement fasteners must be the correct part number for that application. Fasteners requiring replacement or fasteners requiring the use of thread locking compound or sealant are identified in the service procedure. Do not use paints, lubricants, or corrosion inhibitors on fasteners or fastener joint surfaces unless specified. These coatings affect fastener torque and joint clamping force and may damage the fastener. Use the correct tightening sequence and specifications when installing fasteners in order to avoid damage to parts and systems.
Tighten
Tighten the bolts to 135 N·m (100 lb ft).
Caution: These fasteners MUST be replaced with new fasteners anytime they become loose or are removed. Failure to replace these fasteners after they become loose or are removed may cause loss of vehicle control and personal injury.
Tighten
Tighten the bolts to 180 N·m (133 lb ft).
