For 1990-2009 cars only
Instrument Panel Trim Pad Replacement Chevrolet
Removal Procedure
- Disable the SIR system. Refer to Disabling the SIR System in SIR.
- Remove the defroster grille. Refer to Instrument Panel Compartment Replacement .
- Remove the end caps. Refer to Instrument Panel Outer Trim Cover Replacement .
- Remove the screws from under the end caps.
- Open the instrument panel compartment.
- Remove the screws for the glove box trim plate and accessory trim plate.
- Remove the screws from the bracket in the upper left corner of the glove box.
- Remove the accessory trim plate. Refer to Instrument Panel Accessory Trim Plate Replacement .
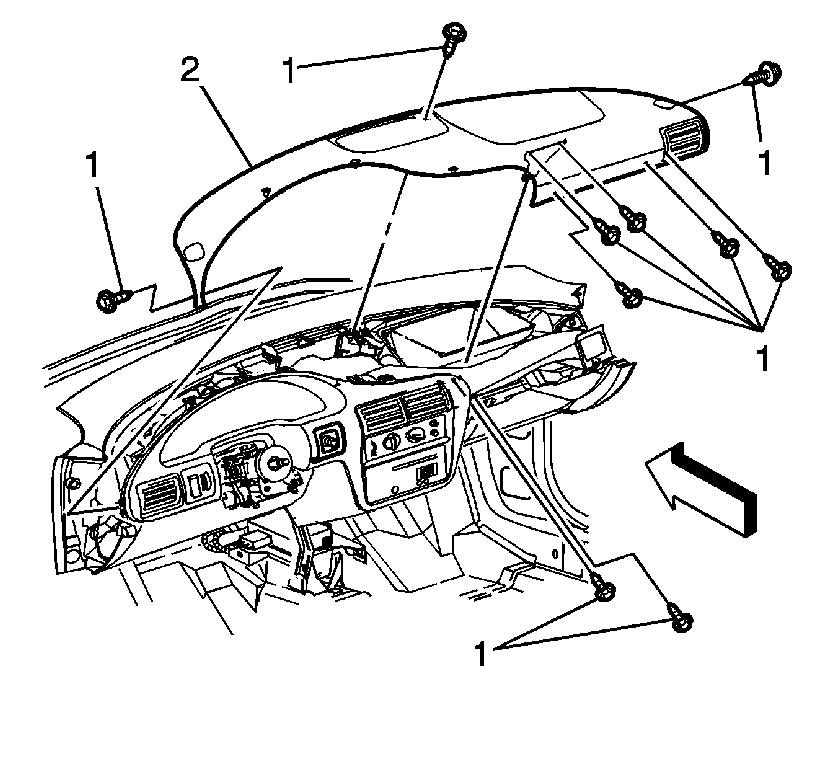
- Remove all of the hex head screws (1) attaching the instrument panel trim pad (2).
- Remove the instrument panel trim pad (2) from the instrument panel.
Notice: Always ensure that you install the screws for the glove box bracket using the proper torque in order to avoid a rattle condition.

Installation Procedure
- Install the pad (2) to the instrument panel.
- Install the hex head screws (1) attaching the trim pad (2) to the instrument panel.
- Install the accessory trim plate. Refer to Instrument Panel Accessory Trim Plate Replacement .
- Install the screws to the accessory trim plate and glove box trim plate.
- Install the screws through the upper left corner of the glove box.
- Install the screws under the end caps.
- Install the end caps. Refer to Instrument Panel Outer Trim Cover Replacement .
- Install the defroster grille. Refer to Instrument Panel Compartment Replacement .
- Enable the SIR system. Refer to Enabling the SIR System in SIR.

Notice: Always ensure that you install the screws for the glove box bracket using the proper torque in order to avoid a rattle condition.
Instrument Panel Trim Pad Replacement Pontiac
Removal Procedure
- Disable the SIR system. Refer to Disabling the SIR System in SIR.
- Remove the defroster grille. Refer to Instrument Panel Compartment Replacement .
- Remove the instrument panel valance.
- Remove the end caps. Refer to Instrument Panel Outer Trim Cover Replacement .
- Remove the screws from under the end caps.
- Open the instrument panel compartment.
- Remove the retaining screws for the glove box trim plate and the accessory trim plate.
- Remove the screws from the bracket in the upper left corner of the glove box.
- Remove the accessory trim plate.
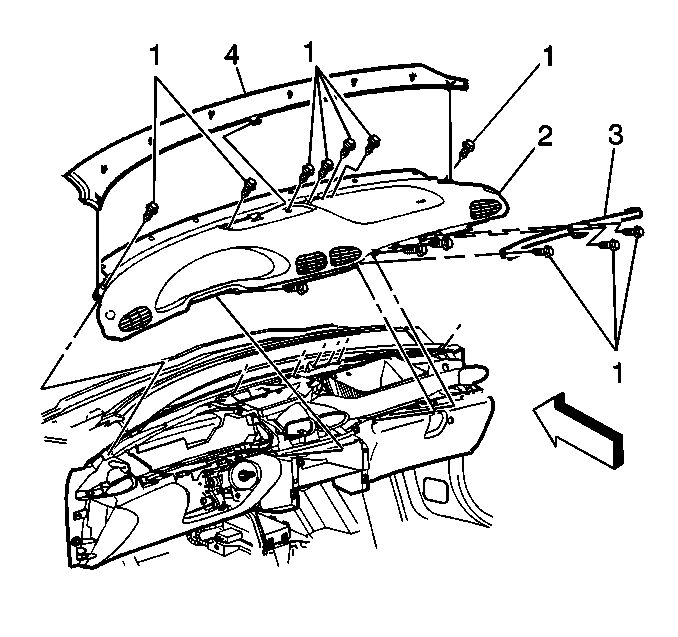
- Remove all of the screws (1) attaching the instrument panel trim pad (2).
- Remove the instrument panel trim pad (2) from the instrument panel.
Notice: Always ensure that you install the screws for the glove box bracket using the proper torque in order to avoid a rattle condition.

Installation Procedure
- Install the pad (2) to the instrument panel.
- Install the screws (1) attaching the trim pad (2) to the instrument panel.
- Install the accessory trim plate.
- Install the screws to the accessory trim plate and the glove box trim plate.
- Install the screws through the upper left corner of the glove box.
- Install the screws under the end caps.
- Install the end caps. Refer to Instrument Panel Outer Trim Cover Replacement .
- Install the instrument panel valance.
- Install the defroster grille. Refer to Instrument Panel Compartment Replacement .
- Enable the SIR system. Refer to Enabling the SIR System in SIR.

Tighten
Tighten the screws to 2 N·m (18 lob in).
Notice: Always ensure that you install the screws for the glove box bracket using the proper torque in order to avoid a rattle condition.
