Power Antenna Assembly Replacement Eldorado
Removal Procedure
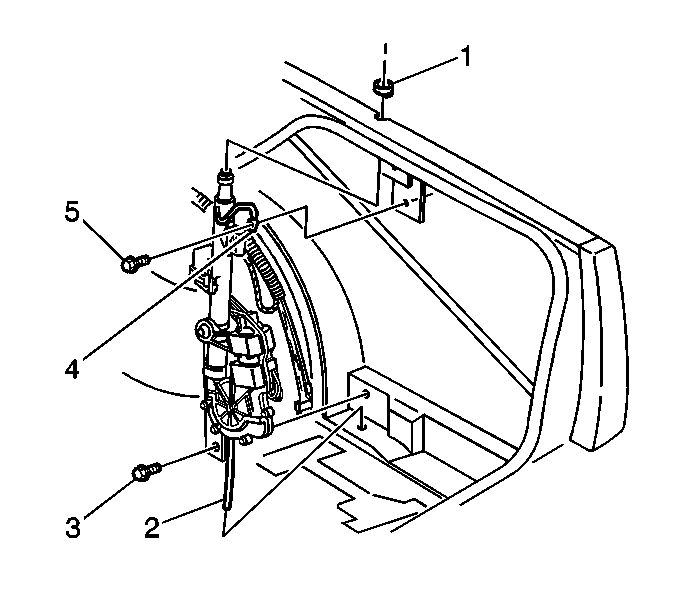
- Remove the rear compartment trim. Refer to Rear Compartment Trim Panel Replacement in Body Rear End.
- Disconnect the electrical connectors.
- Disconnect the antenna coax lead-in.
- Remove the antenna drain hose (2) from the hole in the floor pan.
- Remove the ground strap fastener (5).
- Remove the lower fastener (3).
- Pull the antenna assembly downward in order to remove from the spacer (1).
- Remove the antenna assembly.

Installation Procedure
- Apply a soap and water solution to the inside of the spacer (1).
- Insert the top of the antenna up through the spacer.
- Align the lower leg of the antenna bracket to the hole in the inner quarter.
- Install the antenna lower fastener (3).
- Align the ground strap (4) to the upper bracket.
- Install the antenna drain hose (2) to the hole in the floor pan.
- Connect the antenna coax lead-in.
- Connect the electrical connectors.
- Install the rear compartment trim. Refer to Rear Compartment Trim Panel Replacement in Body Rear End.

Push to secure.
Notice: Use the correct fastener in the correct location. Replacement fasteners must be the correct part number for that application. Fasteners requiring replacement or fasteners requiring the use of thread locking compound or sealant are identified in the service procedure. Do not use paints, lubricants, or corrosion inhibitors on fasteners or fastener joint surfaces unless specified. These coatings affect fastener torque and joint clamping force and may damage the fastener. Use the correct tightening sequence and specifications when installing fasteners in order to avoid damage to parts and systems.
Tighten
Tighten the fastener to 9 N·m (80 lb in).
Install the ground strap fastener (5).
Tighten
Tighten the fastener to 6 N·m (53 lb in).
Power Antenna Assembly Replacement Deville
Removal Procedure
- Remove the rear compartment trim. Refer to one of the following procedures Rear Compartment Trim Panel Replacement in Body Rear End.
- Disconnect the electrical connectors.
- Disconnect the antenna coax lead-in.
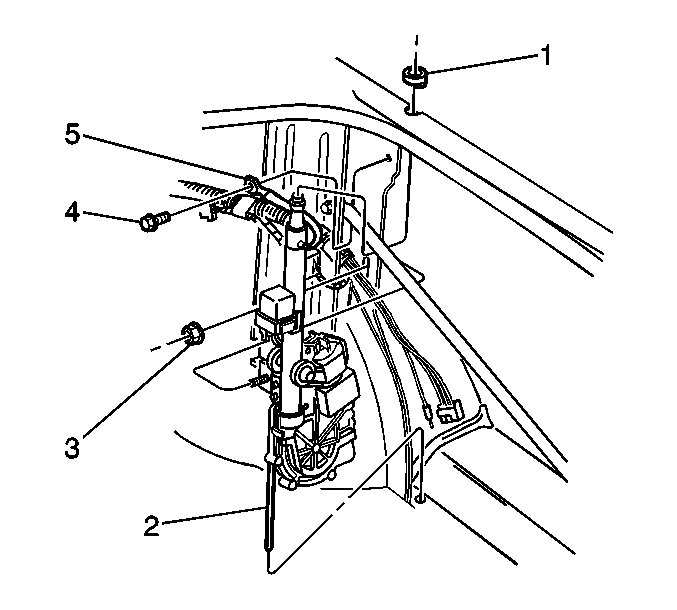
- Remove the antenna drain hose (2) from the hole in the floor pan.
- Remove the ground strap fastener (4).
- Remove the antenna fastener (3).
- Pull the antenna assembly downward in order to remove from the spacer (1).
- Remove the antenna assembly.

Installation Procedure
- Apply a soap and water solution to the inside of the spacer (1).
- Insert the top of the antenna up through the spacer.
- Align the stud on the antenna bracket to the slot in the brace.
- Install the antenna bracket fastener (3).
- Align the ground strap (5) to the brace.
- Install the antenna drain hose (2) to the hole in the floor pan.
- Connect the antenna coax lead-in.
- Connect the electrical connectors.
- Install the rear compartment trim. Refer to one of the following procedures Rear Compartment Trim Panel Replacement in Body Rear End.

Push to secure.
Notice: Use the correct fastener in the correct location. Replacement fasteners must be the correct part number for that application. Fasteners requiring replacement or fasteners requiring the use of thread locking compound or sealant are identified in the service procedure. Do not use paints, lubricants, or corrosion inhibitors on fasteners or fastener joint surfaces unless specified. These coatings affect fastener torque and joint clamping force and may damage the fastener. Use the correct tightening sequence and specifications when installing fasteners in order to avoid damage to parts and systems.
Tighten
Tighten the fastener to 6 N·m (53 lb in).
Install the ground strap fastener (4).
Tighten
Tighten the fastener to 6 N·m (53 lb in).
