Rear Bumper Replacement DeVille
Removal Procedure
- Remove the taillamp assemblies. Refer to Tail Lamp Replacement in Lighting Systems.
- Remove the rear compartment rear trim panel. Refer to Rear Compartment Trim Panel Replacement in Body Rear End.
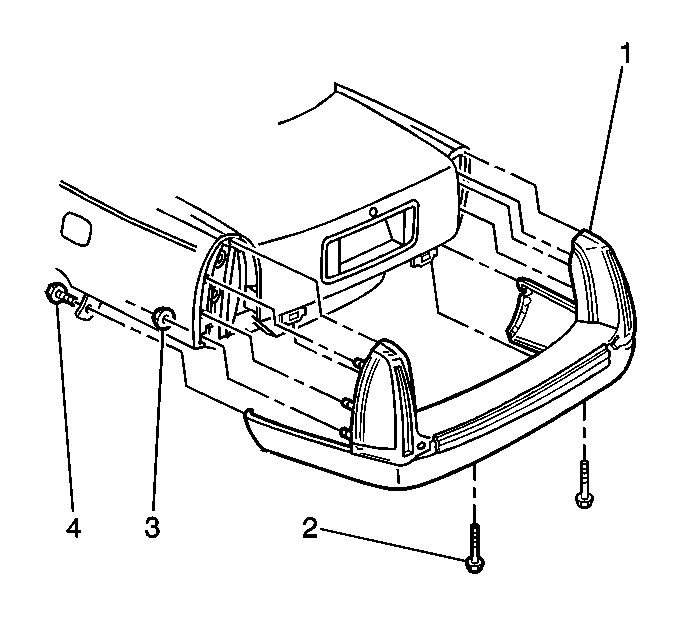
- Remove the nuts that retain the upper fascia (1) to the upper quarter panels.
- Remove the rear wheelhouse extensions. Refer to Wheelhouse Extension Replacement - Rear in Exterior Trim.
- Remove the bolts that retain the lower fascia (2) to the wheelhouse area.
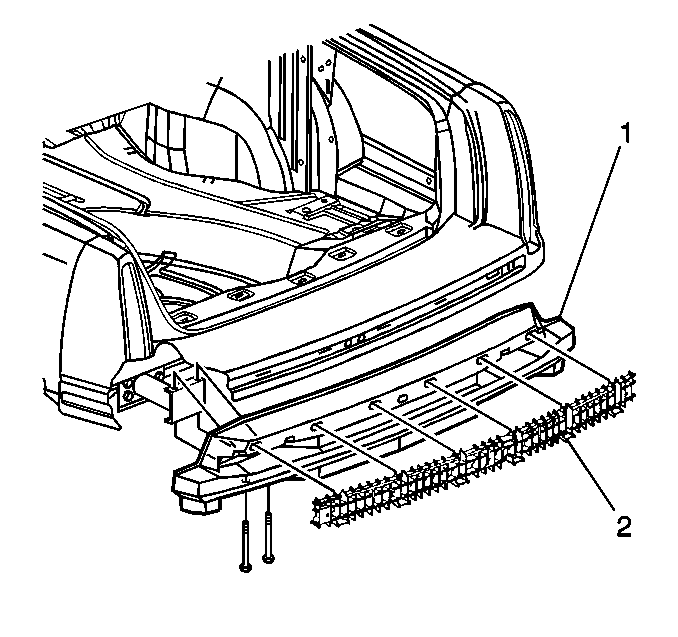
- Remove the bolts that retain the impact bar (1) to the energy absorbers.
- With the aid of a helper, remove the rear bumper assembly (1).
- Remove the push-in retainers (3) that retain the upper and the lower fascias to the impact bar (7).
- Gently pry the impact bar (7) from the upper fascia (1).
- Remove the impact bar (7) from the fascia.
- Remove the 3 push-in retainers (6) that retain the lower fascia (2) to the upper fascia (1).
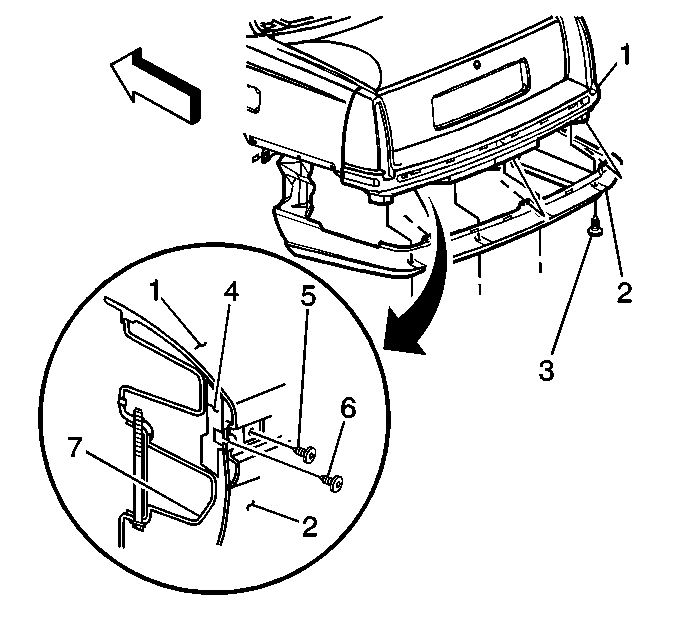

Release the tabs that retain the impact bar (7) to the top edge of the lower fascia (2).
Installation Procedure
- Align the upper fascia to the rear quarters.
- Install the impact bar (1) to the energy absorbers.
- Install the lower fascia (2) to the impact bar (7).
- Align the lower fascia (2) with the upper fascia (1) by installing the center push-in retainer (6).
- Install the retainers to the bottom of the lower fascia.
- Install the bolts in order to retain the lower fascia (2) to the wheelhouse area.
- Align the bumper as needed. Refer to Rear Bumper Adjustment .
- Install the rear compartment rear trim panel. Refer to Rear Compartment Trim Panel Replacement in Body Rear End.
- Install the wheelhouse extensions. Refer to Wheelhouse Extension Replacement - Rear in Exterior Trim.
- Install the taillamps. Refer to Tail Lamp Replacement in Lighting Systems.
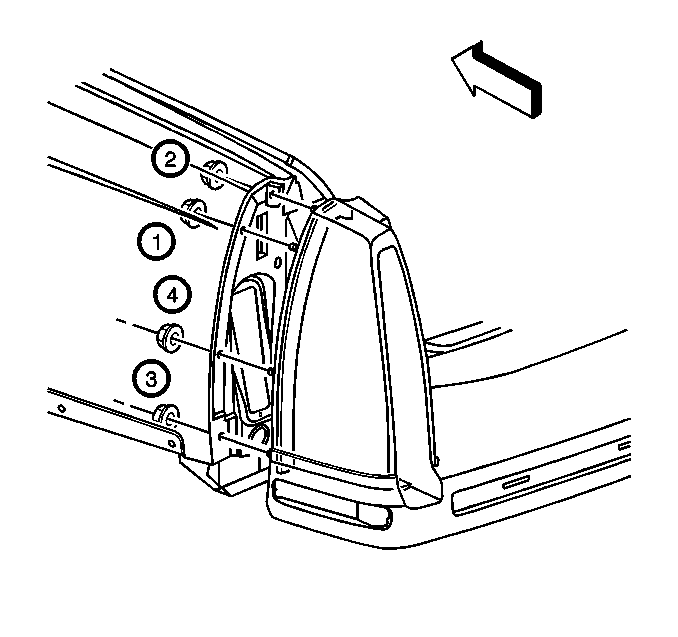
Notice: Use the correct fastener in the correct location. Replacement fasteners must be the correct part number for that application. Fasteners requiring replacement or fasteners requiring the use of thread locking compound or sealant are identified in the service procedure. Do not use paints, lubricants, or corrosion inhibitors on fasteners or fastener joint surfaces unless specified. These coatings affect fastener torque and joint clamping force and may damage the fastener. Use the correct tightening sequence and specifications when installing fasteners in order to avoid damage to parts and systems.
Tighten
Tighten the nuts in sequence to 6 N·m (53 lb in).

Tighten
Tighten the bolts to 24 N·m (18 lb ft).

Install the 2 remaining retainers (6) in order to retain the lower fascia (2).
Important: Before you install the lower fascia to the wheelhouse area bolts, ensure that the lower fascia is tucked between the body side molding and the rear side marker lamp.
Tighten
Tighten the bolts to 11 N·m (97 lb in).
Rear Bumper Replacement Eldorado
Removal Procedure
- Raise the vehicle on a hoist. Refer to Lifting and Jacking the Vehicle in General Information.
- Remove the side marker lamp sockets.
- Remove the 3 screws at the wheel opening that retain the fascia extension to the fascia.
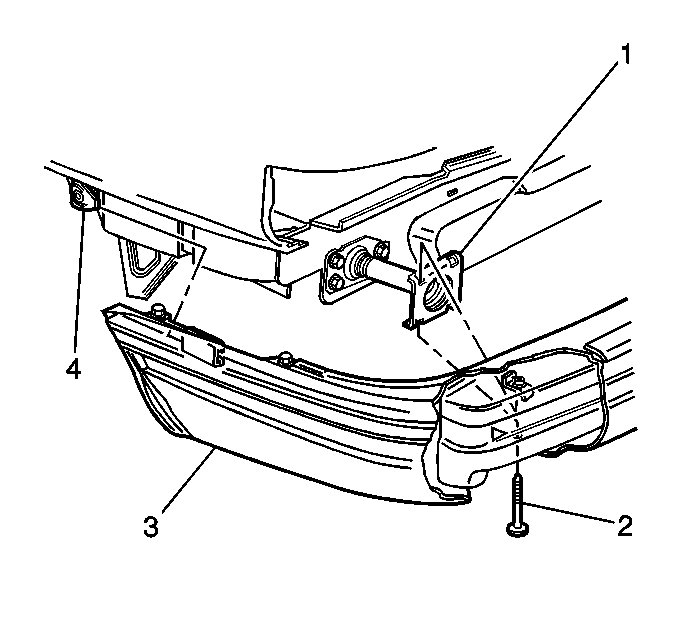
- Remove the 2 bolts (2) that retain the energy absorber (1) to the impact bar.
- Remove the plastic fasteners that retain the fascia (3) to the impact bar (1).
- Remove the impact bar (1) from the fascia (3).
- Remove the 3 plastic rivets on each side that retain the fascia side moldings.
- Remove the 2 plastic rivets that retain the center molding.
- Release the plastic snap tabs from the inside of the fascia in order to remove the fascia center molding.
- Remove the side marker lamp and the rear reflector.
- Remove the molding insert, if needed.
- Remove the heat shield (3).
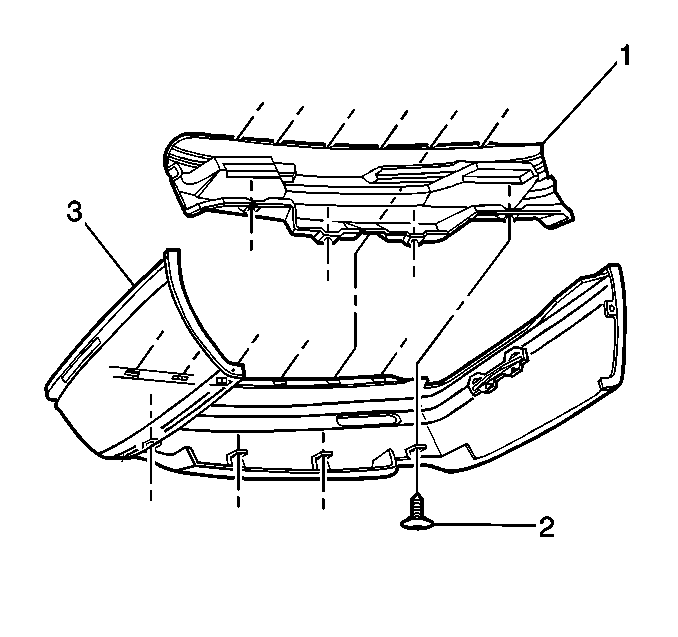
Release the snap tabs and remove the moldings.
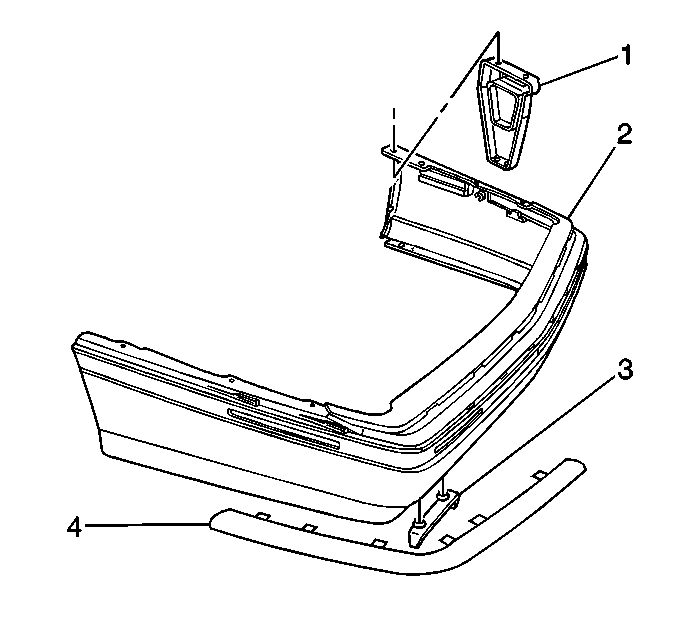
Installation Procedure
- Install the heat shield (3).
- Install the side marker lamps and the rear reflectors.
- Install the snap tabs in order to retain the fascia center molding.
- Install the 2 plastic rivets in order to retain the center molding.
- Install the snap tabs in order to retain the side moldings to the fascia.
- Install the 3 plastic rivets on each side in order to retain the fascia side moldings.
- Install the impact bar (1) to the fascia (3).
- Install the plastic fasteners in order to retain the fascia (3) to the impact bar (1).
- Install the bumper (3) to the vehicle.
- Engage the fascia side retainers to the guide (4) on the fender.
- Install the 2 energy absorber bolts (2).
- Install the screws at the wheel opening in order to retain the fascia extension to the fascia.
- Install the side marker lamp sockets.
- Lower the vehicle.


Notice: Use the correct fastener in the correct location. Replacement fasteners must be the correct part number for that application. Fasteners requiring replacement or fasteners requiring the use of thread locking compound or sealant are identified in the service procedure. Do not use paints, lubricants, or corrosion inhibitors on fasteners or fastener joint surfaces unless specified. These coatings affect fastener torque and joint clamping force and may damage the fastener. Use the correct tightening sequence and specifications when installing fasteners in order to avoid damage to parts and systems.
Tighten
Tighten the bolts to 24 N·m (18 lb ft).
