Tools Required
J 42219-B Fuel Tank Sender Wrench
Removal Procedure
- Remove the fuel tank. Refer to Fuel Tank and Evaporation Emission Canister Replacement .
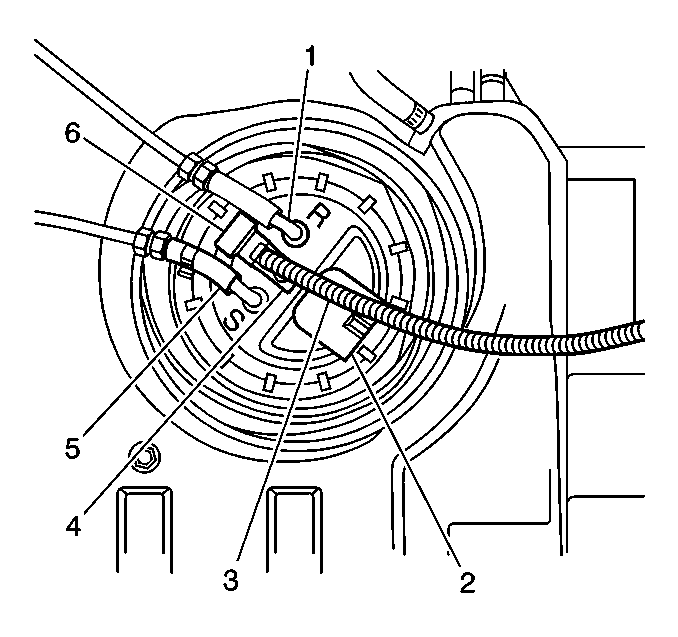
- Disconnect the electrical connectors from the fuel tank pressure sensor (6) and the fuel tank connection cover (2).
- Remove the fuel pressure (5) and return lines (1) from the tank connection cover and discard the clamps.
- Remove the air reference hose (3) from the fuel tank pressure sensor.
- Remove the fastener (4) securing the fuel tank pressure (FTP) sensor to the fuel tank connection cover and remove the fuel tank pressure sensor.
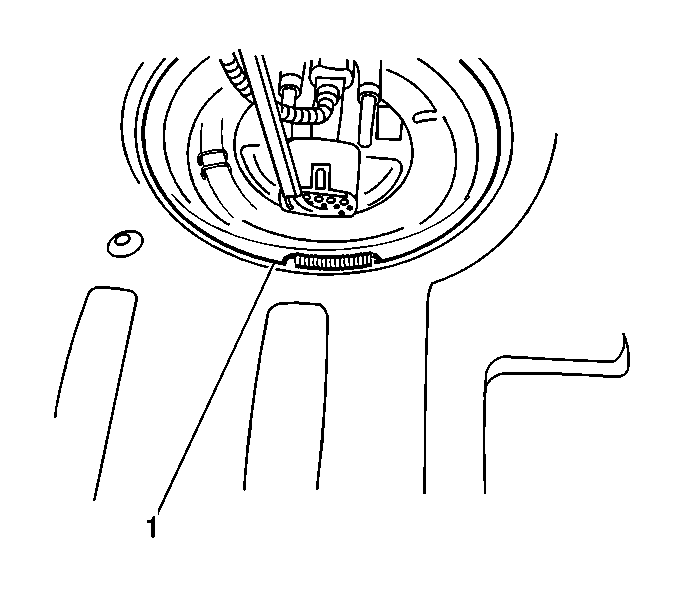
- Remove the spring loaded clamp (1) around the fuel tank boot. Note the position of the clamp. The clamp must be reinstalled in the same position.
- Carefully pull the boot from the outer fuel tank housing.
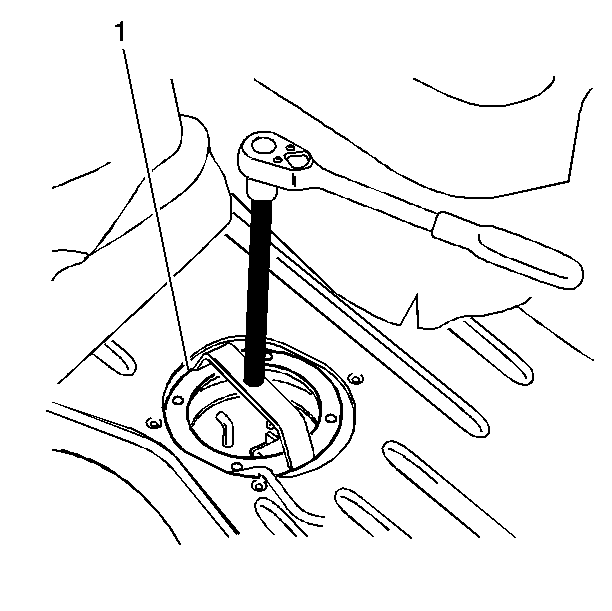
- Remove the fuel sender locking nut (1) from the fuel tank by using the J 42219-B .
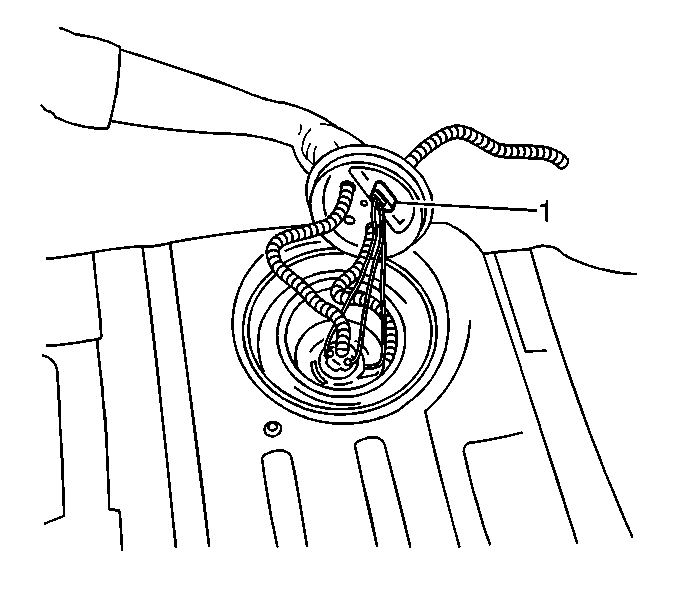
- Lift the fuel tank connection cover from the tank and position aside.
- Remove the fuel level sensor electrical connector (1) from the fuel tank connection cover.
- Unlock the fuel sensor by pressing the hook outward.
- Remove the fuel sensor by pulling upward on the hook to slide the unit from the fuel pump housing.
- Remove the fuel sender seal (lip) from the fuel tank opening. Carefully slide the seal over the wiring and hoses, then pull the seal over the fuel tank connection cover.
- Discard the seal.
Caution: Gasoline or gasoline vapors are highly flammable. A fire could occur if an ignition source is present. Never drain or store gasoline or diesel fuel in an open container, due to the possibility of fire or explosion. Have a dry chemical (Class B) fire extinguisher nearby.

Important: DO NOT remove the steel band around fuel sender lock nut. This steel band does not require removal in order the loosen the fuel sender lock nut.


Important: Note the position of the fuel sender seal prior to removal. An incorrectly installed seal can cause fuel leaks or EVAP DTCs to set.
Installation Procedure
- Install the fuel level sender in the tank by positioning the float in first and sliding the unit into the slots in the side of the fuel reservoir.
- Push the unit down in the slot until the tab on the hook engages in the reservoir.
- Connect the fuel level sender electrical connector (1) to the fuel tank connection cover.
- Install a new lip seal on the tank as follows:
- Install the fuel tank connection cover on the fuel tank opening.
- Use the J 42219-B in order to install the fuel sender locking nut (1).
- Attach the fuel tank boot to the outer fuel tank housing.
- Install the spring-loaded clamp around the boot, in the same position that the clamp was prior to removal.
- Install the fuel tank pressure sensor and tighten the fastener to 2 N·m (18 lb in).
- Connect the air reference hose (3) to the fuel tank pressure sensor.
- Connect the fuel pressure (5) and return lines (1) to the fuel tank connection cover using new clamps.
- Connect the fuel tank pressure sensor (6) and fuel tank connection cover (2) electrical connectors.
- Install the fuel tank. Refer to Fuel Tank and Evaporation Emission Canister Replacement .

Important: Always replace the fuel sender assembly lip seal when servicing the fuel sender assembly.
| 4.1. | Carefully pull the seal over the fuel tank connection cover. |
| 4.2. | Slide the seal over the wires and hoses to the fuel tank opening. |
| 4.3. | Fit the groove in the side of the seal into the lip in the fuel tank opening. |

Notice: Use the correct fastener in the correct location. Replacement fasteners must be the correct part number for that application. Fasteners requiring replacement or fasteners requiring the use of thread locking compound or sealant are identified in the service procedure. Do not use paints, lubricants, or corrosion inhibitors on fasteners or fastener joint surfaces unless specified. These coatings affect fastener torque and joint clamping force and may damage the fastener. Use the correct tightening sequence and specifications when installing fasteners in order to avoid damage to parts and systems.
Tighten
Tighten the locking nut to 50 N·m (37 lb ft).
Be sure that the lip seal provides a snug seal between the fuel sending unit and the fuel tank.


