Oil Pump Replacement First Design
Removal Procedure
Special Tools
| • | J 35268-A Camshaft/Front Main Seal Installer |
| • | J 36660-A Torque/Angle Meter |
| • | J 42098 Crank Hub Torx Socket |
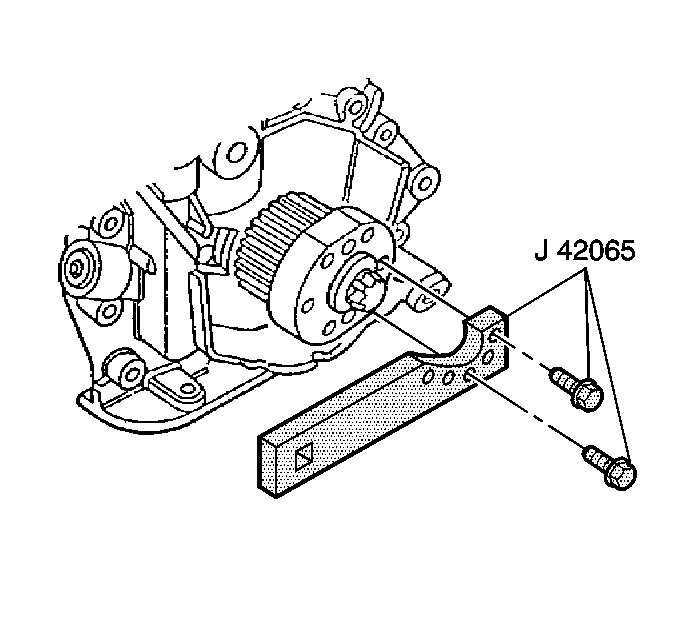
| • | J 42065 Crank Hub Holding Tool |
- Disconnect the negative battery cable.
- Recover the A/C system. Refer to Refrigerant Recovery and Recharging.
- Drain the coolant. Refer to Cooling System Draining and Filling.
- Remove the intake air resonator. Refer to Intake Air Resonator Replacement.
- Remove the front timing belt cover. Refer to Timing Belt Cover Replacement.
- Remove the timing belt. Refer to Timing Belt Replacement.
- Remove the rear timing belt cover. Refer to Timing Belt Rear Cover Replacement.
- Remove the A/C compressor. Refer to Air Conditioning Compressor Replacement.
- Remove the A/C compressor and power steering pump bracket bolts.
- Position the A/C compressor and power steering pump bracket out of the way of the oil pump housing and secure.
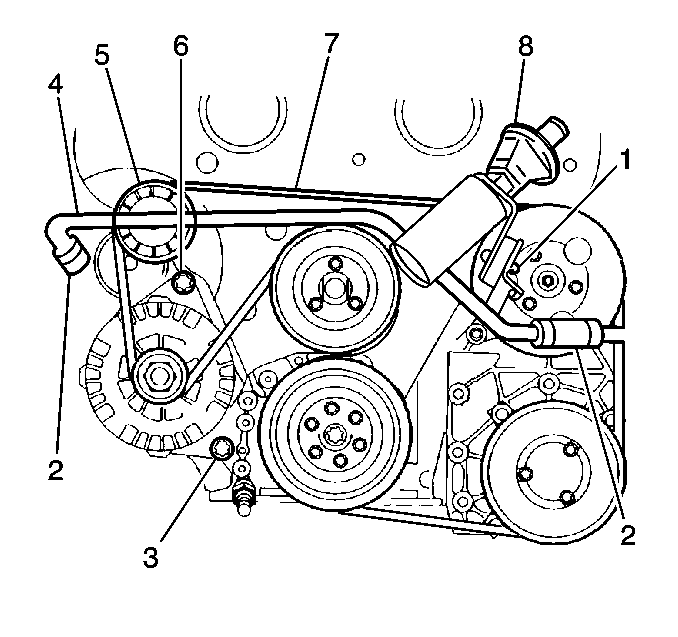
- Remove the generator lower mounting bolt (3).
- Loosen the upper generator mounting bolt (6).
- Pivot the generator out of the way and secure.
- Remove the oil pan. Refer to Oil Pan Replacement.
- Remove the upper oil pan housing. Refer to Oil Pan Replacement.
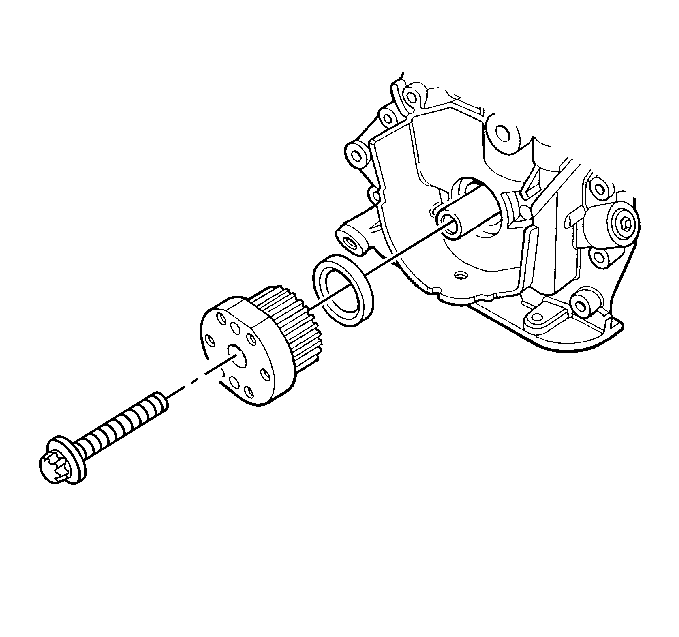
- Mount the J 42065 to the crankshaft drive gear.
- Use the J 42098 to remove the crankshaft drive gear bolt.
- Remove the crankshaft drive gear.
- Remove the six oil pump bolts.
- Remove the oil pump.
- Remove the front main oil seal and collar from the oil pump.
- Clean the oil pump sealing surfaces if the pump is to be reinstalled.
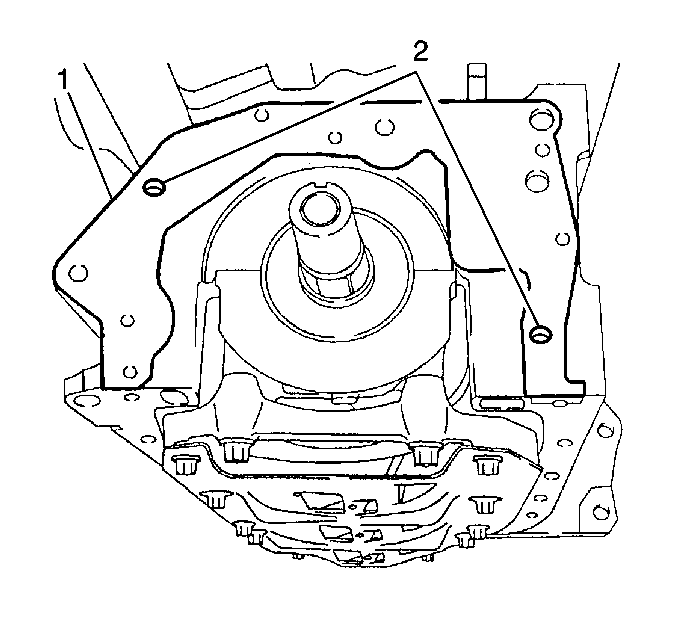
- Clean the engine block (1) and the upper oil pan housing sealing surfaces.
- Ensure all of the old sealant, gasket material, residual oil is removed and the guide pins (2) are in place.
Caution: Refer to Battery Disconnect Caution in the Preface section.
Installation Procedure
- Coat the pump side of the new oil pump gasket in the crosshatched areas shown in the illustration with a thin, even coating of anaerobic sealant GM P/N 1052942 or equivalent. (Note the tightening sequence for the bolts).
- Install the oil pump gasket.
- Install the oil pump and align with the guide pins (2).
- Apply thread sealant GM P/N 12346004, or equivalent, to the six oil pump bolts and install the bolts.
- Install the timing belt idler pulley and washer for camshafts 3 and 4.
- Release and pivot the generator into place and install the generator lower mounting bolt (3).
- Remove the timing belt idler pulley and washer for camshafts 3 and 4.
- Install the oil pump collar.
- Install the front main oil seal. Coat the lip of the front main oil seal with a small amount of GM P/N 1052497 chassis grease or equivalent to aid in installation.
- Use the J 35268-A to install the front main oil seal.
- Ensure the front main oil seal if fully and evenly seated.
- Install the crankshaft drive gear.
- Install a new crankshaft drive gear bolt.
- Install the upper oil pan housing. Refer to Oil Pan Replacement.
- Install the oil pan. Refer to Oil Pan Replacement.
- Position the A/C compressor and power steering pump bracket.
- Install the A/C compressor and power steering pump bracket bolts.
- Install the A/C compressor. Refer to Air Conditioning Compressor Replacement.
- Install the rear timing belt cover. Refer to Timing Belt Rear Cover Replacement.
- Install the timing belt. Refer to Timing Belt Replacement.
- Install the front timing belt cover. Refer to Timing Belt Cover Replacement.
- Install the intake air resonator. Refer to Intake Air Resonator Replacement.
- Charge the A/C system. Refer to Refrigerant Recovery and Recharging.
- Reconnect the negative battery cable and reprogram the applicable accessories.
- Fill the cooling system. Refer to Cooling System Draining and Filling.
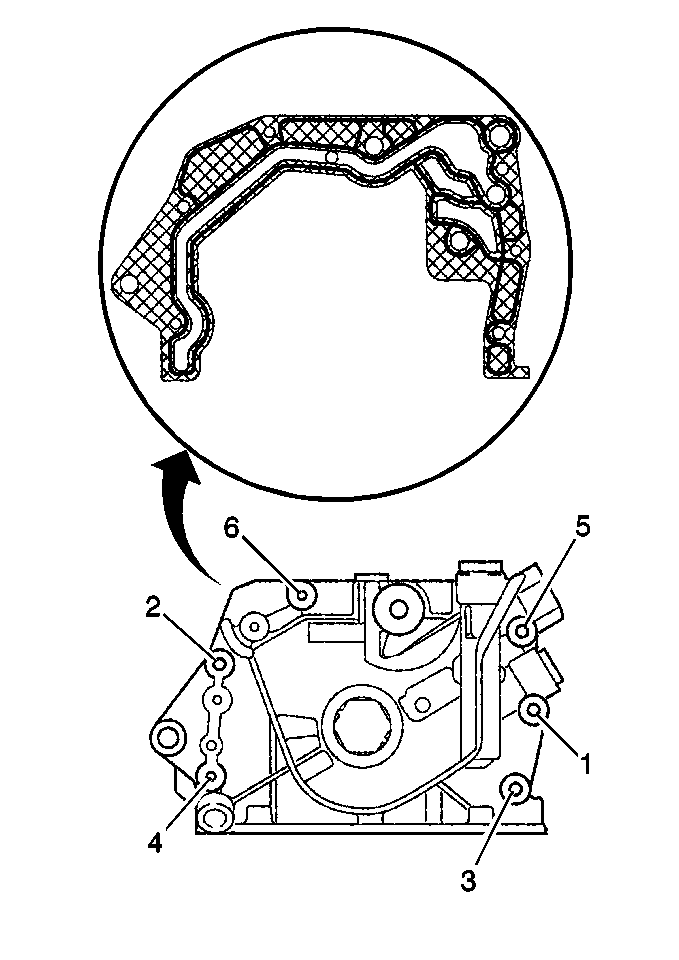
Important: Do not cover and/or restrict the gasket openings with excess sealant.
Notice: Refer to Fastener Notice in the Preface section.
Tighten
Tighten the oil pump bolts, using the sequence shown, to 8 N·m (71 lb in).
Important: The timing belt is NOT installed at this point, the camshaft 3 and 4 idler pulley bolt is torqued to specification to allow for proper compression of the oil pump gasket.
Tighten
Tighten the timing belt idler pulley locking nut to 40 N·m (30 lb ft).
Tighten
| • | Tighten the generator lower and upper bolts to 40 N·m (30 lb ft). |
| • | Re-tighten the six oil pump bolts, using the sequence shown, to 9 N·m (80 lb in). |
Tighten
Tighten the crankshaft drive gear bolt, while counterholding with
J 42065
, to 250 N·m (184 lb ft) plus 45 degrees, plus 15 degrees.
Tighten
Tighten the A/C compressor and power steering pump bracket bolts to 40 N·m (30 lb ft).
Oil Pump Replacement Second Design
Removal Procedure
Second Design Oil Pump and Rear Timing Belt Cover Information
Starting with engine unit number 08191279, a second design oil pump housing and rear timing belt cover were introduced into MY97 Catera production. The second design rear timing belt cover features an additional hole that allows access to one of the oil pump bolts located behind the cover. Since it is necessary to re-torque all of the oil pump bolts after the timing belt idler pulley installation, the access hole was added to the cover to make the re-torque procedure easier. The second design oil pump has an extended boss to shield the access hole in the rear timing belt cover from road and other debris. Both first and second design pumps use the same gaskets. Second design pumps can be installed on first design engines, however, it requires the use of the second design rear timing belt cover and a longer (M6 x 25 mm) oil pump bolt in the number six position.
Special Tools
| • | J 35268-A Camshaft/Front Main Seal Installer |
| • | J 36660-A Torque/Angle Meter |
| • | J 42098 Crank Hub Torx Socket |
| • | J 42065 Crank Hub Holding Tool |
- Disconnect the negative battery cable.
- Recover the A/C system. Refer to Refrigerant Recovery and Recharging.
- Drain the coolant. Refer to Cooling System Draining and Filling.
- Remove the intake air resonator. Refer to Intake Air Resonator Replacement.
- Remove the front timing belt cover. Refer to Timing Belt Cover Replacement.
- Remove the timing belt. Refer to Timing Belt Replacement.
- Remove the rear timing belt cover. Refer to Timing Belt Rear Cover Replacement.
- Remove the A/C compressor. Refer to Air Conditioning Compressor Replacement.
- Remove the A/C compressor and power steering pump bracket bolts.
- Position the A/C compressor and power steering pump bracket out of the way of the oil pump housing and secure.
- Remove the generator lower mounting bolt (3).
- Loosen the upper generator mounting bolt (6).
- Pivot the generator out of the way and secure.
- Remove the oil pan. Refer to Oil Pan Replacement.
- Remove the upper oil pan housing. Refer to Oil Pan Replacement.
- Mount the J 42065 to the crankshaft drive gear.
- Use the J 42098 to remove the crankshaft drive gear bolt.
- Remove the crankshaft drive gear.
- Remove the six oil pump bolts.
- Remove the three upper oil pan housing bolts that thread into the oil pump.
- Remove the oil pump.
- Remove the front main oil seal and collar from the oil pump.
- Clean the oil pump sealing surfaces if the pump is to be reinstalled.
- Clean the engine block (1) and the upper oil pan housing sealing surfaces.
- Ensure all of the old sealant, gasket material and residual oil is removed.
- Ensure the guide pins (2) are in place.
Caution: Refer to Battery Disconnect Caution in the Preface section.
Installation Procedure
- Coat the pump side of the new oil pump gasket in the crosshatched areas shown in the illustration with a thin, even coating of anaerobic sealant GM P/N 1052942 or equivalent. (Note the tightening sequence).
- Install the oil pump gasket.
- Install the oil pump and align with the guide pins (2).
- Apply thread sealant GM P/N 12346004, or equivalent, to the six oil pump bolts and install the bolts.
- Install the oil pump collar.
- Install the front main oil seal. Coat the lip of the front main oil seal with a small amount of GM P/N 1052497 chassis grease or equivalent to aid in installation.
- Use the J 35268-A to install the front main oil seal.
- Ensure the front main oil seal if fully and evenly seated.
- Install the crankshaft drive gear.
- Install a new crankshaft drive gear bolt.
- Install the upper oil pan housing. Refer to Oil Pan Replacement.
- Install the oil pan. Refer to Oil Pan Replacement.
- Release and pivot the generator into place and install the generator lower mounting bolt (3).
- Position the A/C compressor and power steering pump bracket.
- Install the A/C compressor and power steering pump bracket bolts.
- Install the A/C compressor. Refer to Air Conditioning Compressor Replacement.
- Install the rear timing belt cover. Refer to Timing Belt Rear Cover Replacement.
- After installing and tightening to specifications the timing belt idler pulley for camshafts 3 and 4 in the previous procedure, re-tighten the six oil pump bolts.
- Install the timing belt. Refer to Timing Belt Replacement.
- Install the front timing belt cover. Refer to Timing Belt Cover Replacement.
- Install the intake air resonator. Refer to Intake Air Resonator Replacement.
- Charge the A/C system. Refer to Refrigerant Recovery and Recharging.
- Reconnect the negative battery cable and reprogram the applicable accessories.
- Fill the cooling system. Refer to Cooling System Draining and Filling.
Important: Do not cover and/or restrict the gasket openings with excess sealant.
Notice: Refer to Fastener Notice in the Preface section.
Tighten
Tighten the oil pump bolts, using the sequence shown, to 8 N·m (71 lb in).
Tighten
Tighten the crankshaft drive gear bolt, while counterholding with
J 42065
, to 250 N·m (184 lb ft) plus 45 degrees, plus 15 degrees.
Tighten
Tighten the generator lower (3) and upper bolts (6) to 40 N·m (30 lb ft).
Tighten
Tighten the A/C compressor and power steering pump bracket bolts to 40 N·m (30 lb ft).
Important: The oil pump bolts must be re-tightened to the appropriate specifications AFTER the generator mounting bolts and the timing belt idler pulley for camshafts 3 and 4 have been tightened to specifications to allow for proper compression of the oil pump gasket.
The second design of the rear timing belt cover has a hole in it to access the oil pump bolt behind the cover.Tighten
Tighten the six oil pump bolts to 9 N·m (80 lb in).
