Engine Replacement HP5
Special Tools
J 39580 Engine Support Table
Removal Procedure
Danger: Always perform the High Voltage Disabling procedure prior to servicing any High
Voltage component or connection. Personal Protection Equipment (PPE) and proper procedures must be followed.
The High Voltage Disabling procedure will perform the following tasks:
| • | Identify how to disable high voltage. |
| • | Identify how to test for the presence of high voltage. |
| • | Identify condition under which high voltage is always present and personal protection equipment (PPE) and proper procedures must be followed. |
- Disable the hybrid high voltage system. Refer to
High Voltage Disabling
- Disconnect the 12 volt battery negative cable. Refer to
Battery Negative Cable Disconnection and Connection
- Remove the front compartment sight shield. Refer to
Front Compartment Sight Shields Replacement.
- Remove the fuel injector sight shield. Refer to
Fuel Injector Sight Shield Replacement
- Drain the coolant from the generator control module. Refer
Generator Control Module Cooling System Draining and Filling
- Remove the power inverter module. Refer to
Drive Motor Generator Power Inverter Module Removal and Installation
- Remove the engine control module. Refer to
Engine Control Module Replacement
- Disconnect the air conditioning evaporator outlet hose. Refer to
Evaporator Outlet Hose Replacement
- Disconnect the air conditioning discharge hose from the condenser. Refer to
Discharge Hose Replacement
- Disconnect the air conditioning suction hose. Refer to
Suction Hose Replacement
- Disconnect the air conditioning liquid line from the condenser. Refer to
Liquid Line Replacement
- Disconnect the fuel lines from the engine. Refer to
Fuel Hose/Pipes Replacement - Chassis
- Disconnect the heater hoses from the engine. Refer to
Heater Inlet Hose Replacement and
Heater Outlet Hose Replacement
- Disconnect all necessary engine electrical connectors. Refer to
Harness Routing Views
- Remove the left and right powertrain mount bolts.
- Raise and support the vehicle. Refer to
Lifting and Jacking the Vehicle.
- Drain the engine oil.
- Remove the front tire and wheel assemblies. Refer to
Tire and Wheel Removal and Installation.
- Remove the front brake disc calipers from the caliper mounting bracket, then suspend the calipers with mechanics wire or equivalent. DO Not disconnect the brake hoses.
- Remove the engine splash shields. Refer to
Engine Splash Shield Replacement.
- Remove the air deflector from the frame. Refer to
Front Bumper Fascia Air Deflector Replacement.
- Remove the front catalytic converters. Refer to
Catalytic Converter Replacement - Left Side.
- Remove the strut to steering knuckle retaining bolts.
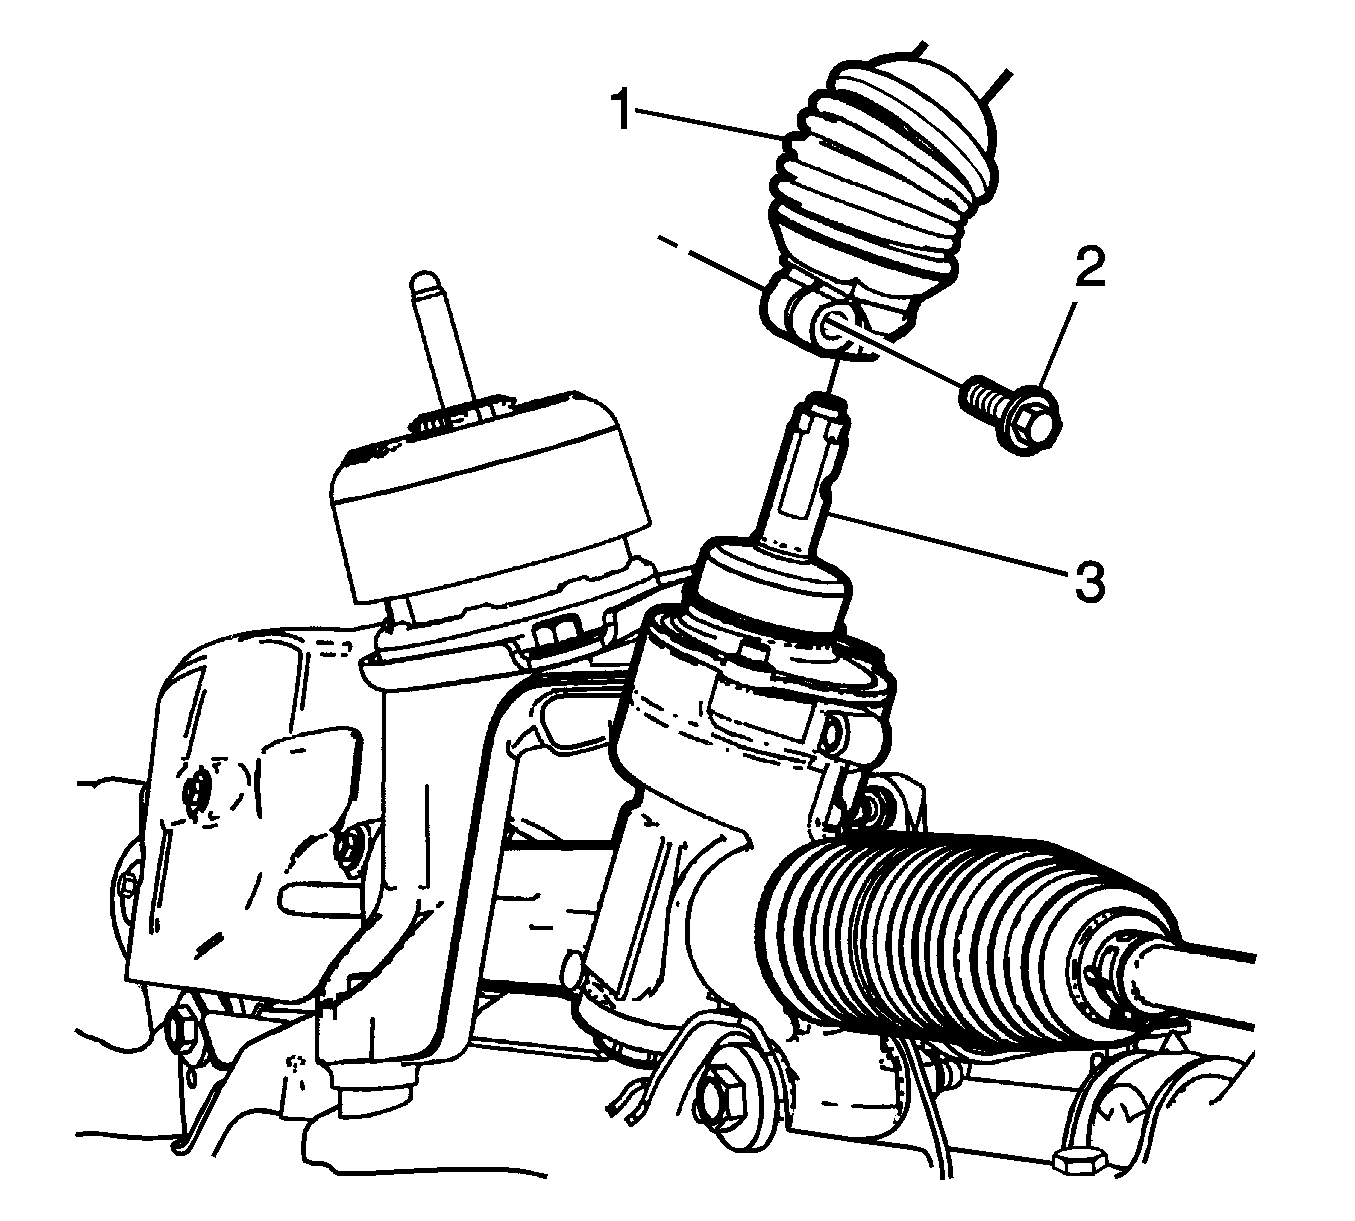
- Disconnect the steering shaft coupling (1) from the steering gear. Refer to
Steering Shaft Coupling Replacement.
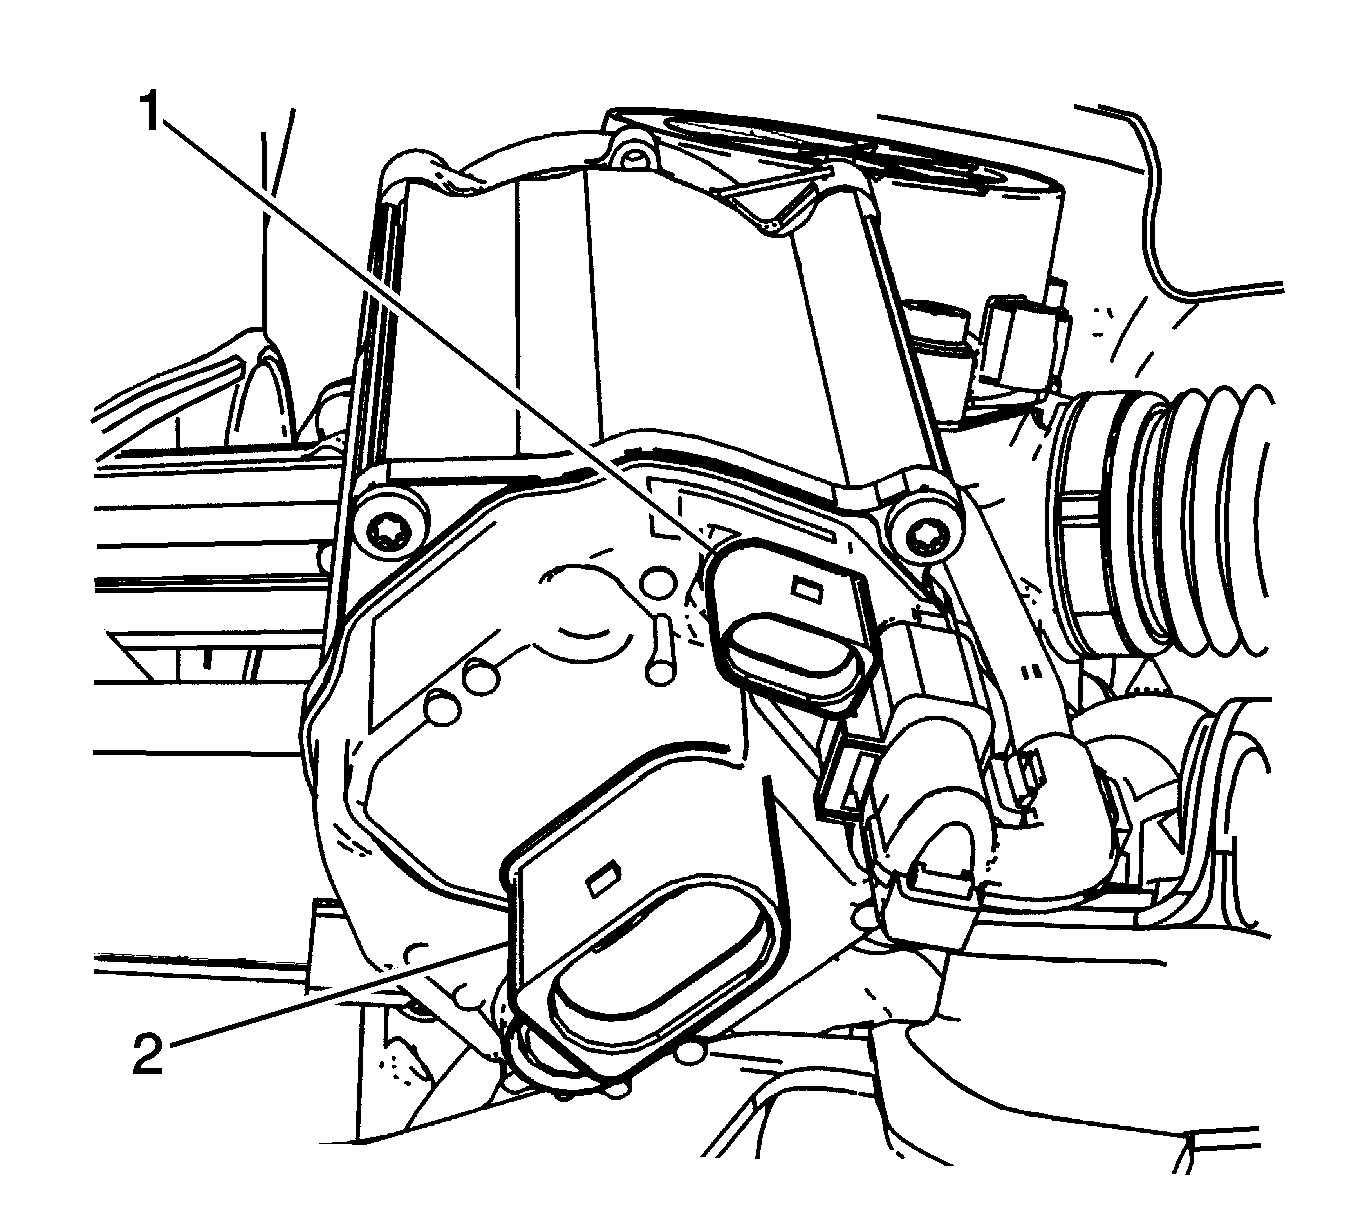
- Disconnect the electrical connectors (1, 2) from the Electronic Power Steering rack motor.
- Disconnect the out tie rod ends from the steering knuckle. Refer to
Steering Linkage Outer Tie Rod Replacement
- Disconnect the stabilizer links from the stabilizer bar. Refer to
Stabilizer Shaft Link Replacement
- Remove the steering gear electric motor ground strap from the underbody.
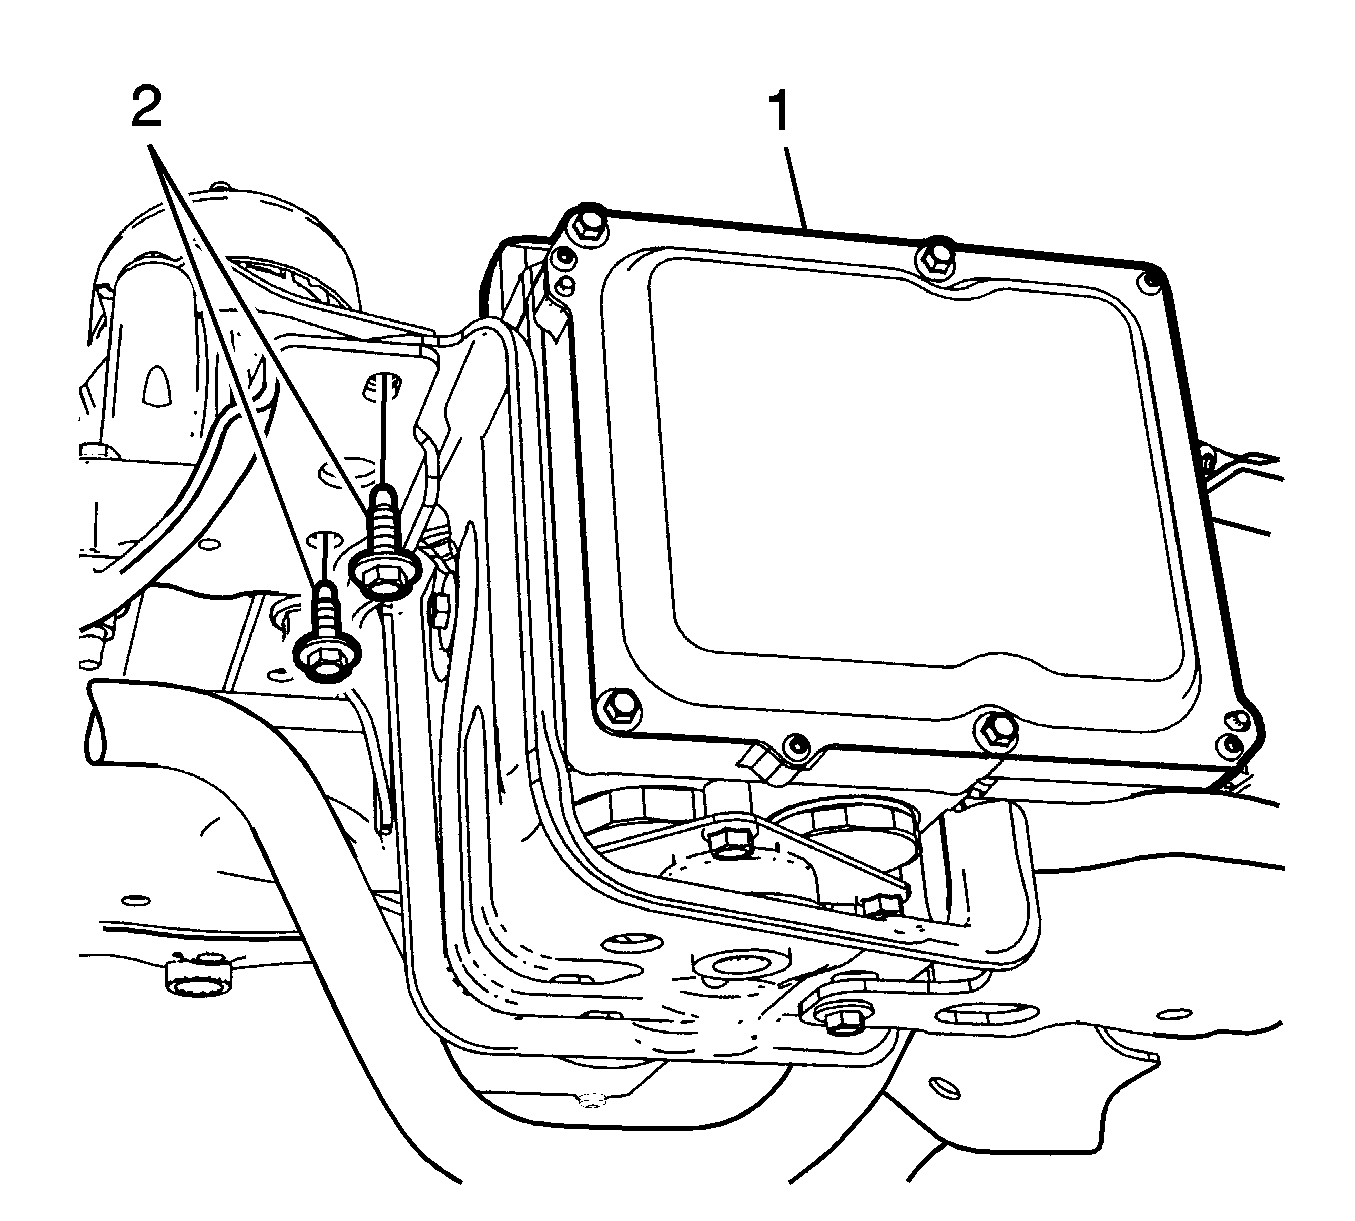
- Remove the four bolts that attach the electric brake control module (EBCM) (1) to the frame.
Note: Support the EBCM with mechanics wire to the vehicle underbody.
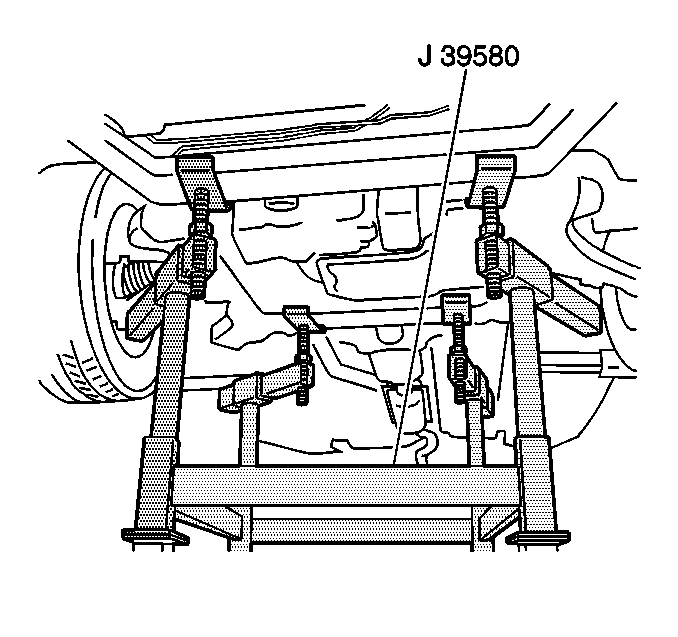
- Lower the vehicle until the frame contacts the
J 39580 .
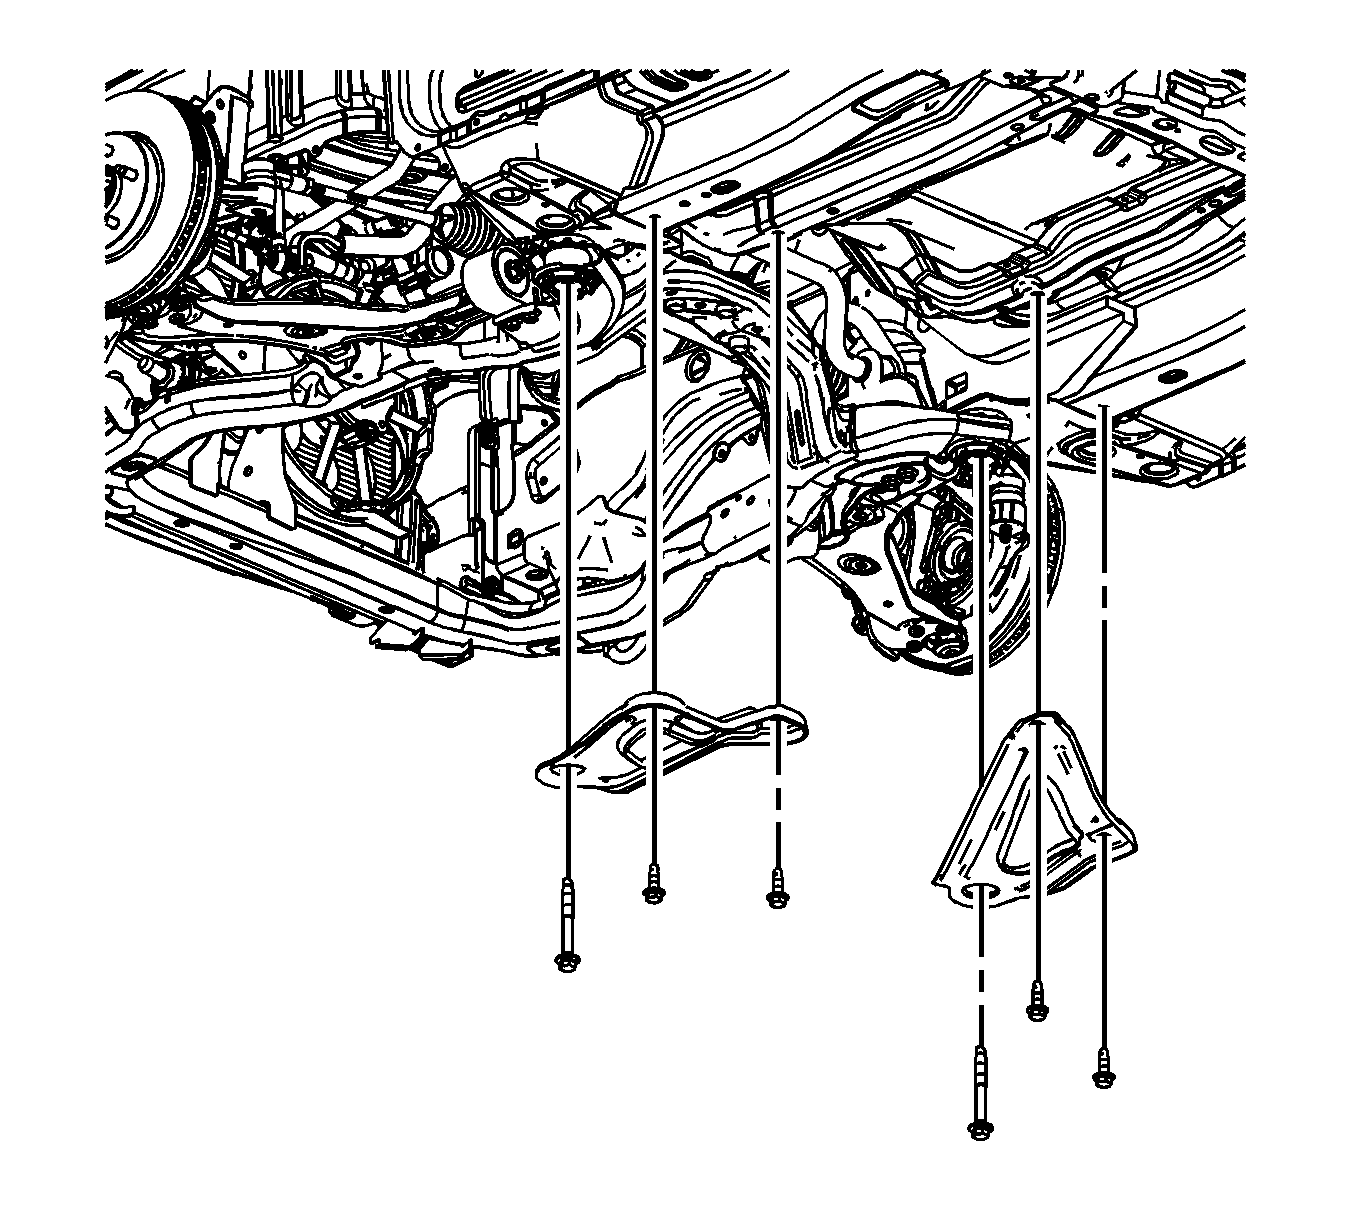
- Remove the frame reinforcements. Refer to
Drivetrain and Front Suspension Frame Reinforcement Replacement.
- Remove the front frame retaining bolts.
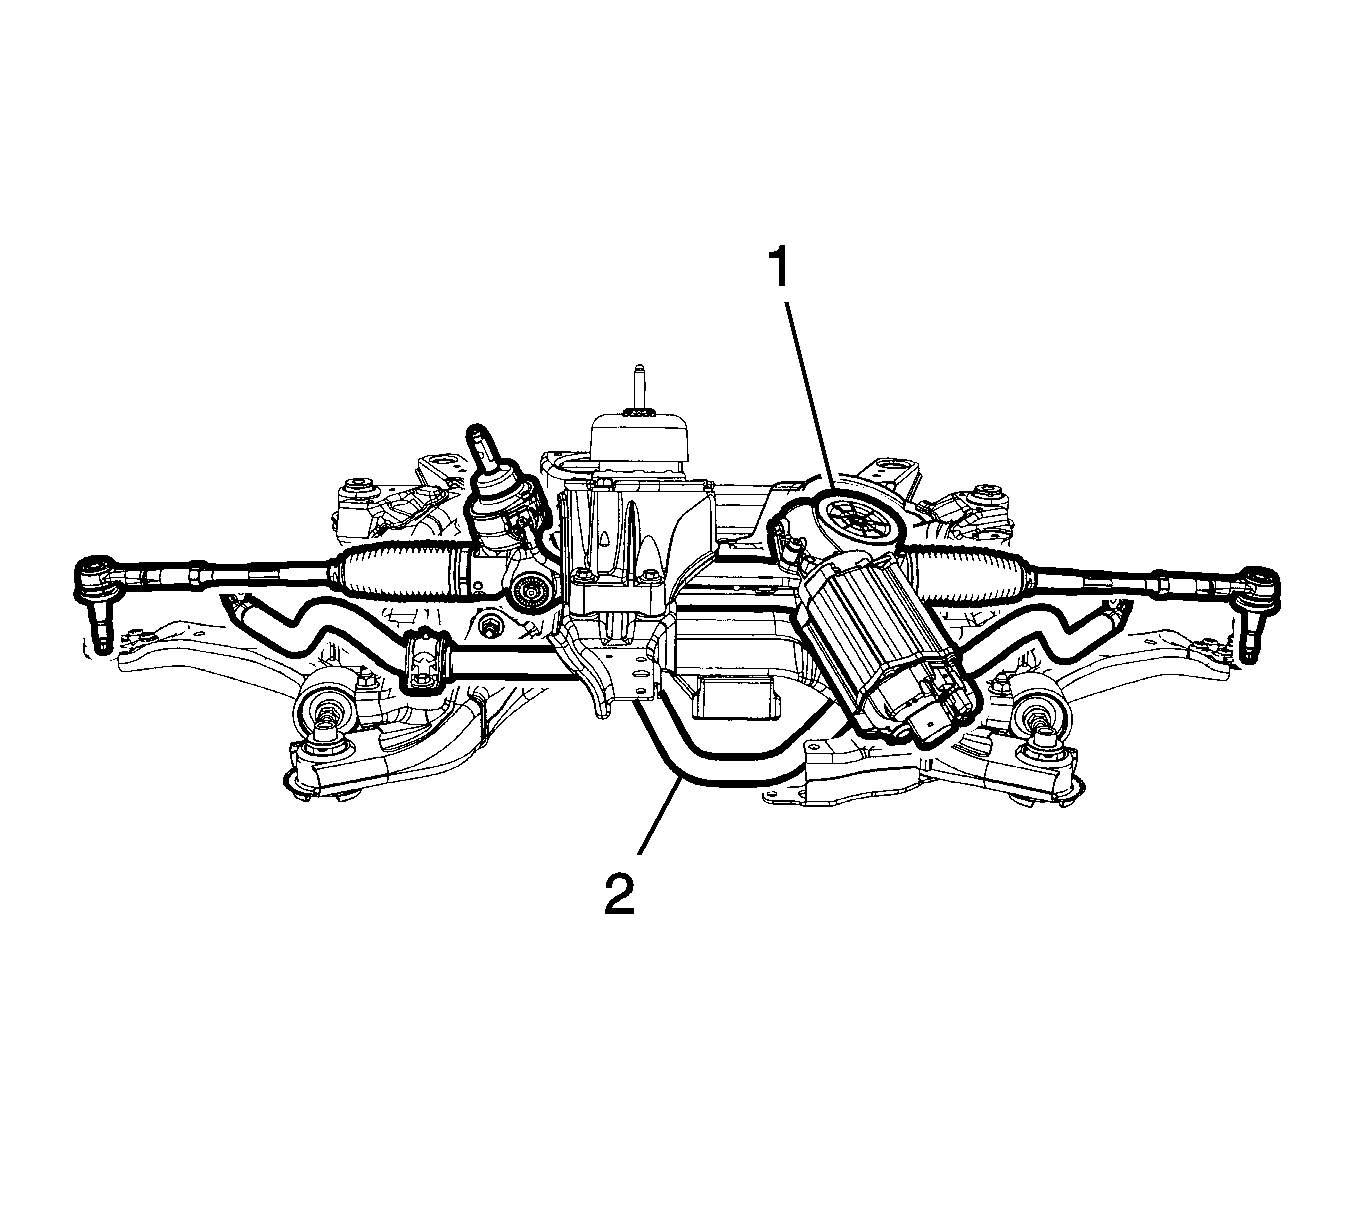
- Raise the vehicle off of the frame with the radiator, condenser, engine, transaxle, power steering rack (1) and stabilizer bar still attached the frame.
Installation Procedure

- Lower the vehicle on to the frame.
Caution: Refer to Fastener Caution in the Preface section.
- Install the front frame bolts, then tighten the bolts to
155 N·m (114 lb ft).

- Install the frame reinforcements. Refer to
Drivetrain and Front Suspension Frame Reinforcement Replacement.
- Raise the vehicle off of the
J 39580 .
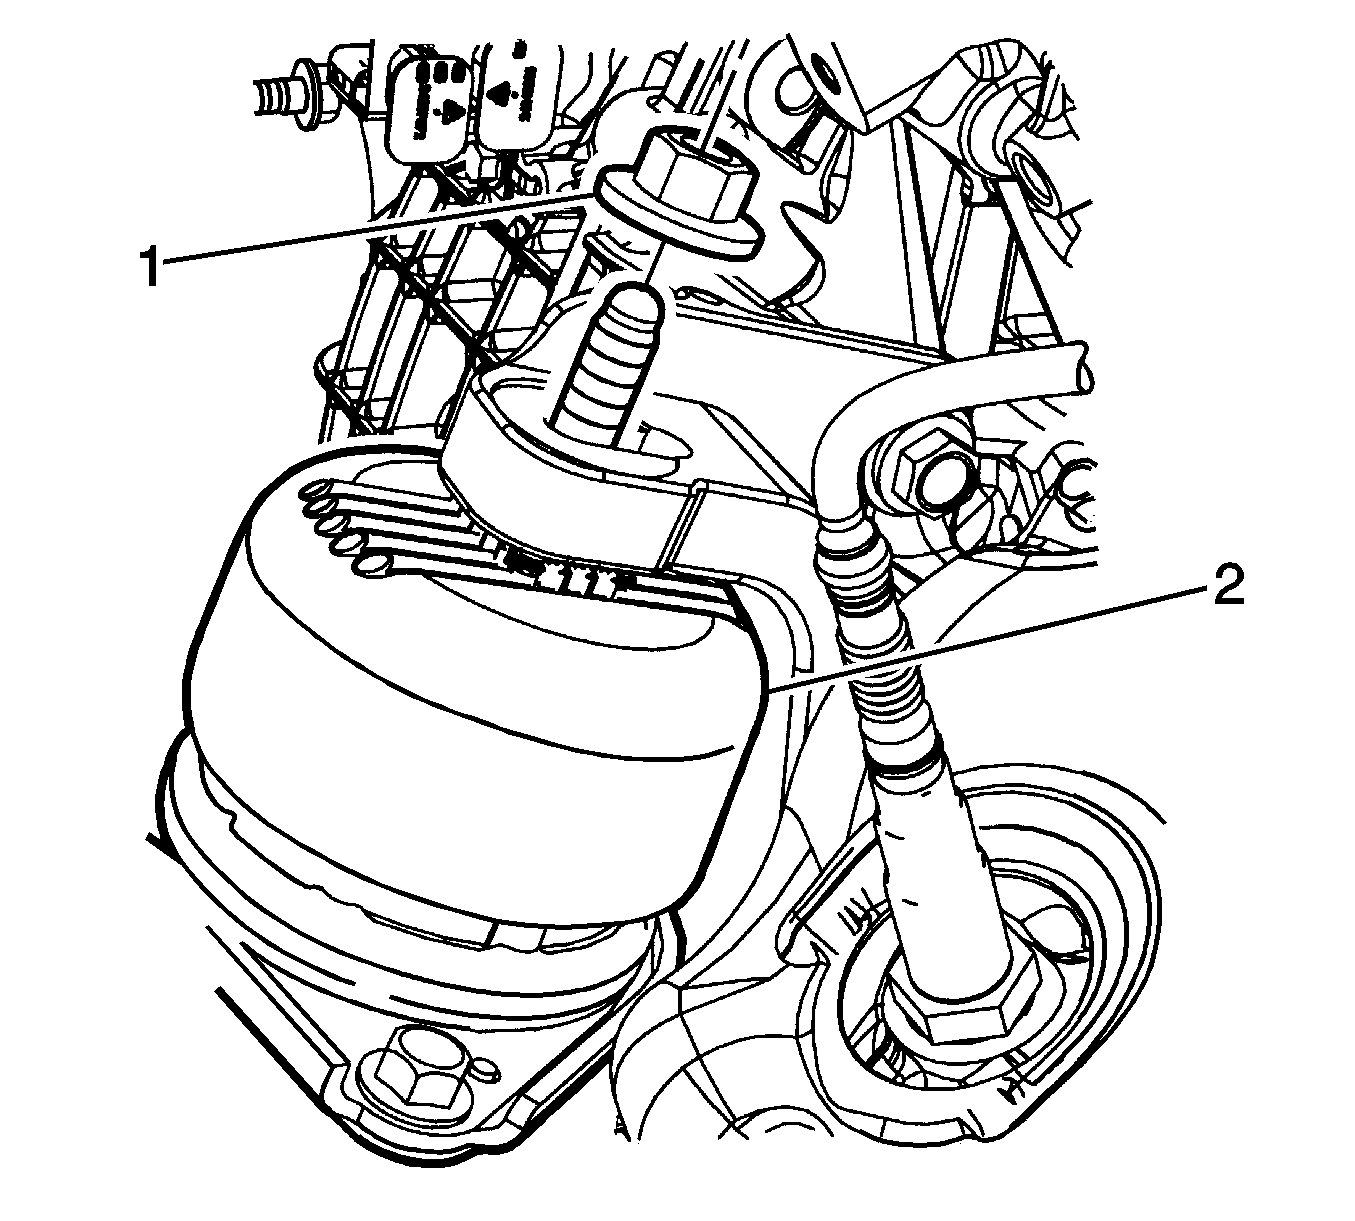
- Install the rear transmission mount to bracket retaining nut, then tighten the nut to
100 N·m (74 lb ft).
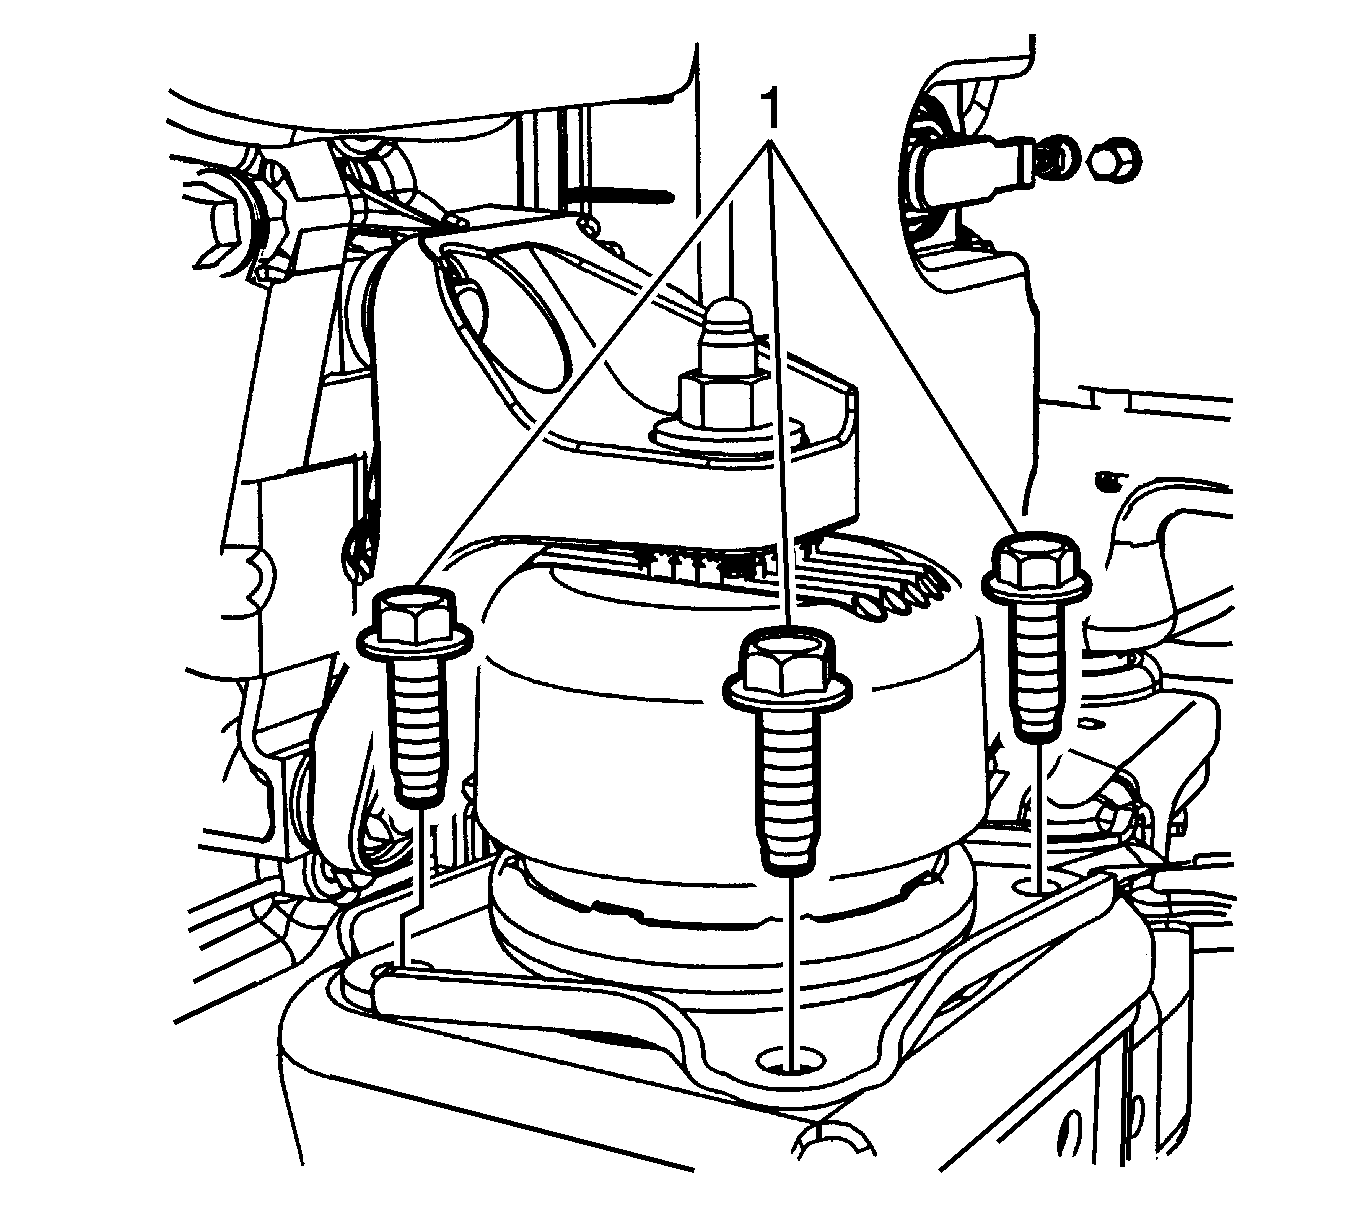
- Install the front transmission mount to frame retaining bolts (1), then tighten the bolts to
76 N·m (56 lb ft).

- Install the steering shaft coupling (1) to the steering gear. Refer to
Steering Shaft Coupling Replacement.
- Install the four EBCM bolts, then tighten the bolts to
40 N·m (30 lb ft)

- Connect the two electric power steering rack electrical connectors (1,2).
- Install the steering gear electric motor ground strap to the underbody.
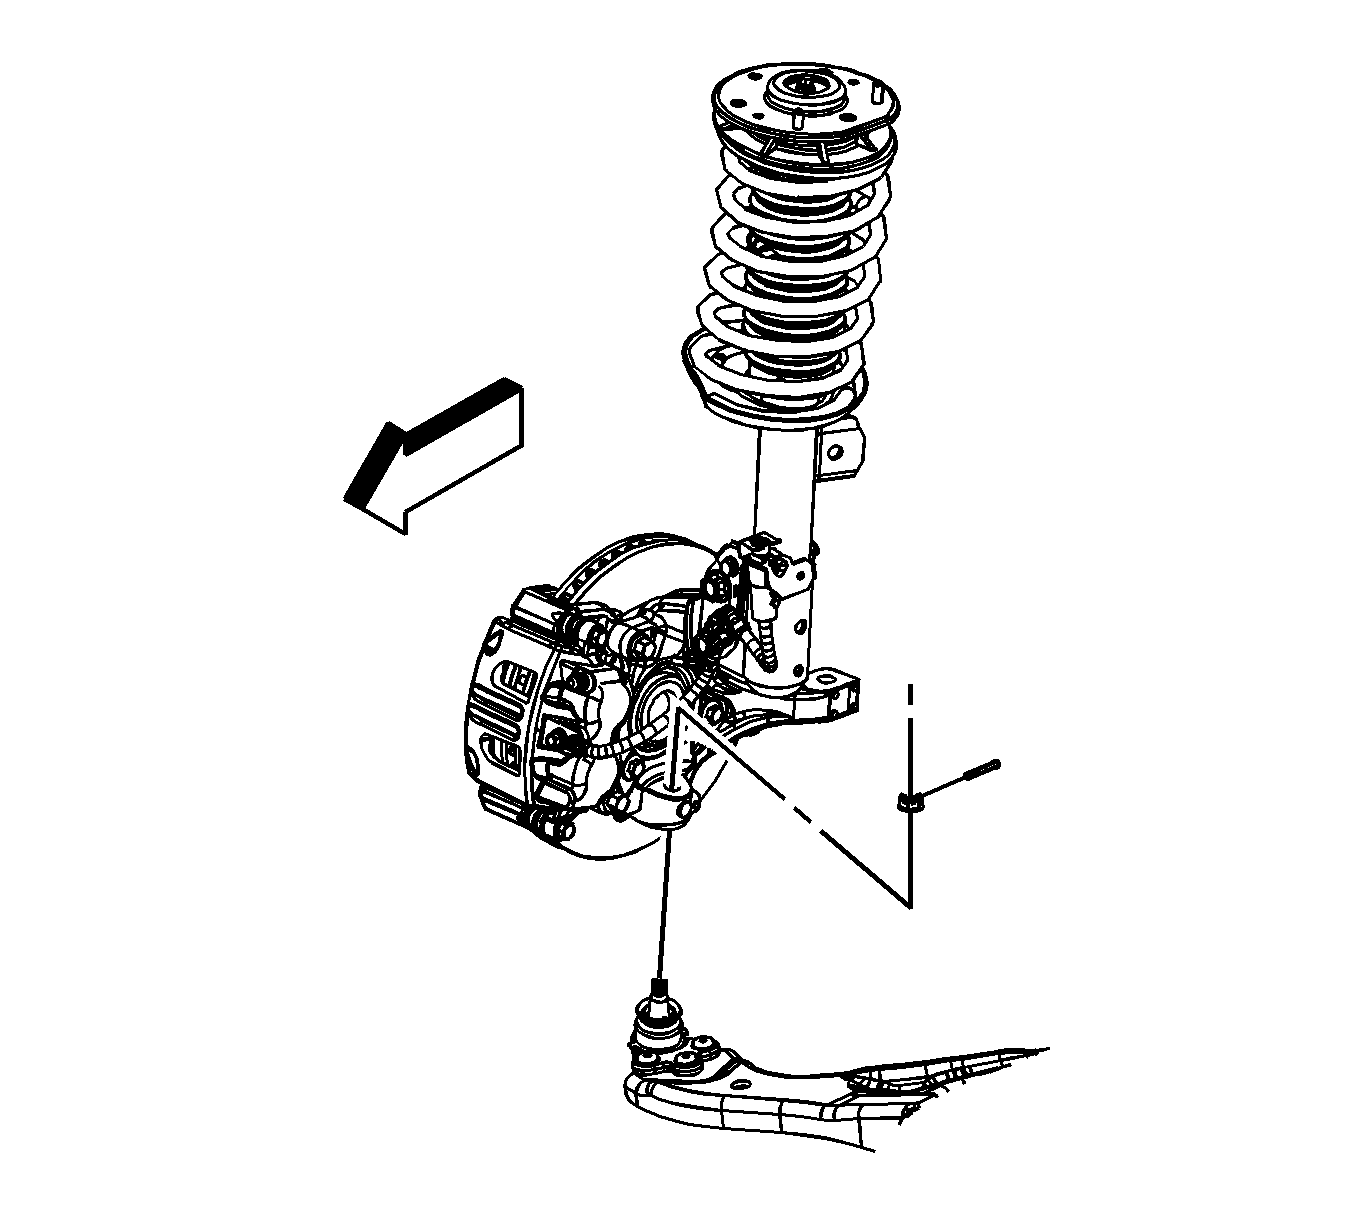
- Install the lower ball joints to the steering knuckles. Refer to
Lower Control Arm Replacement.
- Connect both left and right stabilizer links. Refer to
Stabilizer Shaft Insulator Replacement.
- Connect the outer tie rod ends to the steering knuckle. Refer to
Steering Linkage Outer Tie Rod Replacement
- Install the strut to steering knuckle retaining bolts, then tighten the bolts to
180 N·m (133 lb ft)
- Install the front brake disc calipers to the caliper mounting bracket, then tighten the bolts to
27 N·m (20 lb ft)
- Install the front catalytic converters. Refer to
Catalytic Converter Replacement - Left Side and
Catalytic Converter Replacement - Right Side.
- Connect the fuel lines to the engine. Refer to
Fuel Hose/Pipes Replacement - Chassis
- Connect the heater hoses to the engine. Refer to
Heater Inlet Hose Replacement and
Heater Outlet Hose Replacement
- Connect all necessary engine electrical connectors. Refer to
Harness Routing Views
- Connect the air conditioning evaporator outlet hose. Refer to
Evaporator Outlet Hose Replacement
- Connect the air conditioning discharge hose to the condenser. Refer to
Discharge Hose Replacement
- Connect the air conditioning suction hose. Refer to
Suction Hose Replacement
- Connect the air conditioning liquid line to the condenser. Refer to
Liquid Line Replacement
- Install the engine control module. Refer to
Engine Control Module Replacement
- Install the power inverter module. Refer to
Drive Motor Generator Power Inverter Module Removal and Installation
- Install the air deflector to the frame. Refer to
Front Bumper Fascia Air Deflector Replacement.
- Install the engine splash shields. Refer to
Engine Splash Shield Replacement.
- Install the tire and wheel assemblies. Refer to
Tire and Wheel Removal and Installation.
- Install the front compartment sight shield. Refer to
Front Compartment Sight Shields Replacement.
- Fill the coolant reservoir for the generator control module. Refer
Generator Control Module Cooling System Draining and Filling
- Fill the engine with oil. Refer to
Fluid and Lubricant Recommendations
- Install the fuel injector sight shield. Refer to
Fuel Injector Sight Shield Replacement
- Enable the hybrid high voltage system. Refer to
High Voltage Enabling
- Connect the 12 volt battery negative cable. Refer to
Battery Negative Cable Disconnection and Connection
- Check the wheel alignment. Refer to
Wheel Alignment Measurement.
Engine Replacement Without HP5
Removal Procedure
- Disconnect the negative battery cable. Refer to
Battery Negative Cable Disconnection and Connection.
- Disconnect the engine control module (ECM) connector from the under-hood fuse block.
- Disconnect ground wire from frame, near battery box.
- Remove the fuel injector sight shield. Refer to
Fuel Injector Sight Shield Replacement.
- Release the clamp from the brake booster vacuum hose connection.
- Disconnect the brake booster vacuum hose from the intake manifold.
- Remove the air cleaner assembly. Refer to
Air Cleaner Assembly Replacement.
- Discharge the fuel system. Refer to
Fuel Pressure Relief.
- Disconnect the evaporative emission (EVAP) hose/pipe from the EVAP canister purge solenoid valve. Refer to
Plastic Collar Quick Connect Fitting Service.
- Disconnect the engine fuel hose/pipe from the chassis fuel hose/pipe. Refer to
Metal Collar Quick Connect Fitting Service.
- Discharge the air conditioning (A/C) system. Refer to
Refrigerant Recovery and Recharging.
- Remove the A/C compressor hose assembly from the compressor. Cap or plug the hoses and compressor to prevent contamination. Refer to
Compressor Hose Assembly Replacement.
- Disconnect the transaxle shift control cable from the transaxle. Refer to
Range Selector Lever Cable Replacement.
- Drain the engine coolant from the cooling system. Refer to
Cooling System Draining and Filling.
- Tie the radiator, A/C condenser, and fan module assembly to the upper radiator support to keep the assembly with the vehicle when the frame and drivetrain is removed.
- Disconnect the heater hoses from the engine. Refer to
Heater Inlet Hose Replacement.
- Remove the radiator inlet hose. Refer to
Radiator Inlet Hose Replacement.
- Raise and support the vehicle. Refer to
Lifting and Jacking the Vehicle.
- Remove the radiator outlet hose. Refer to
Radiator Outlet Hose Replacement.
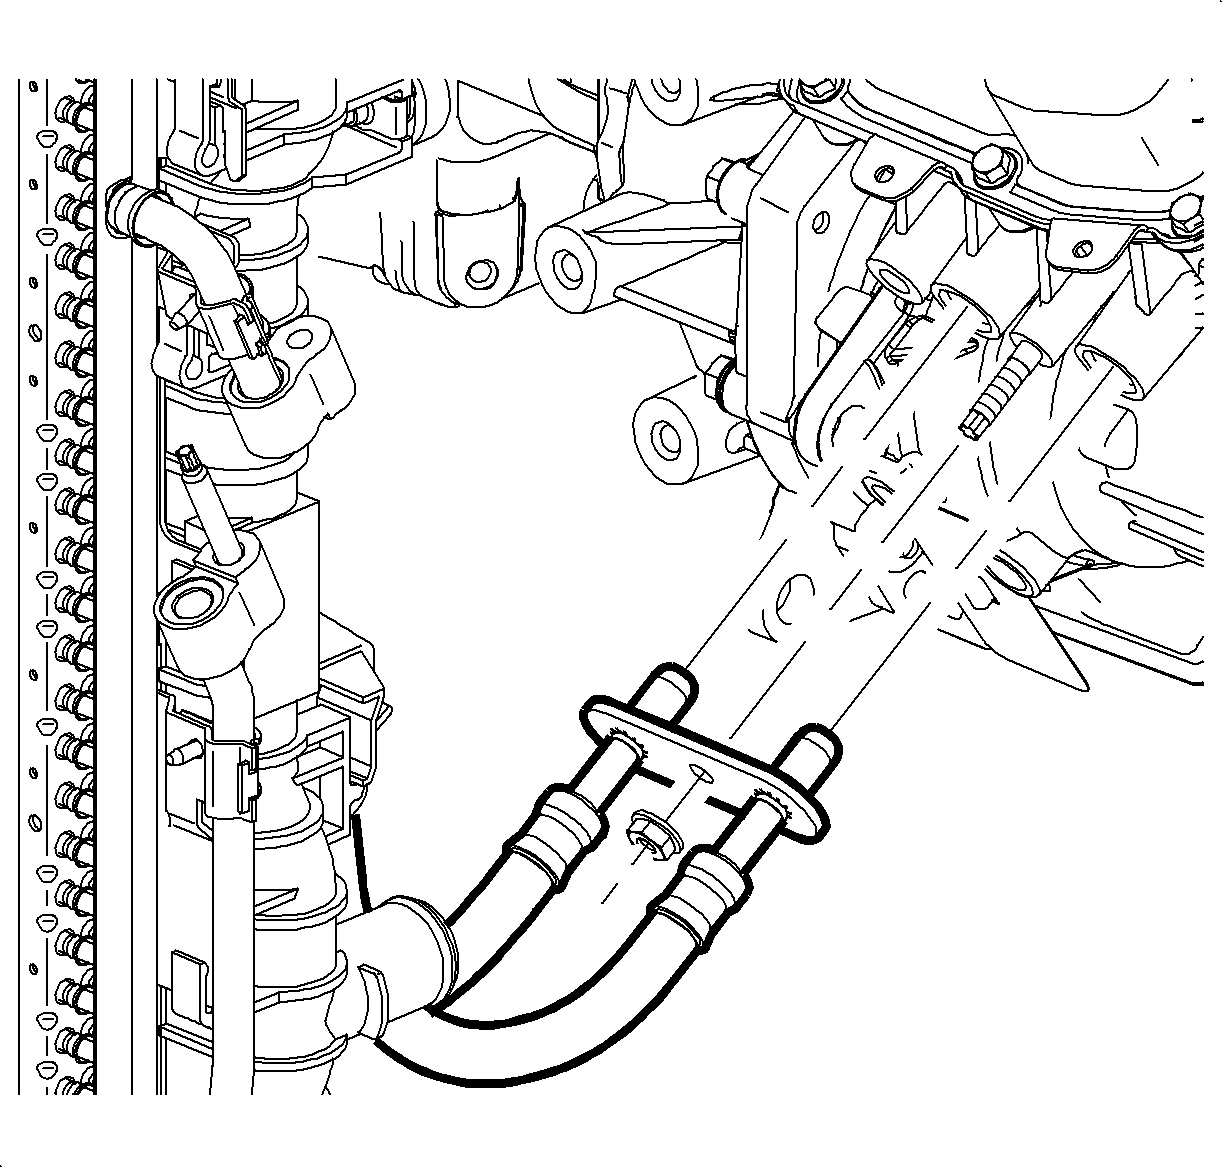
- Disconnect the transaxle oil cooler lines from the transaxle and remove the seals. Refer to
Transmission Fluid Cooler Inlet Hose Replacement and
Transmission Fluid Cooler Outlet Hose Replacement.
- Cap the transaxle oil cooler lines and plug the transaxle oil cooler line fittings to prevent loss of transmission fluid.
- Remove the catalytic converters and secure the rear half of the exhaust system to the vehicle underbody. Refer to
Exhaust Manifold Replacement - Left Side and
Exhaust Manifold Replacement - Right Side.
- Remove the front tires. Refer to
Tire and Wheel Removal and Installation.
- Remove the right and left engine splash shields. Refer to
Engine Splash Shield Replacement.
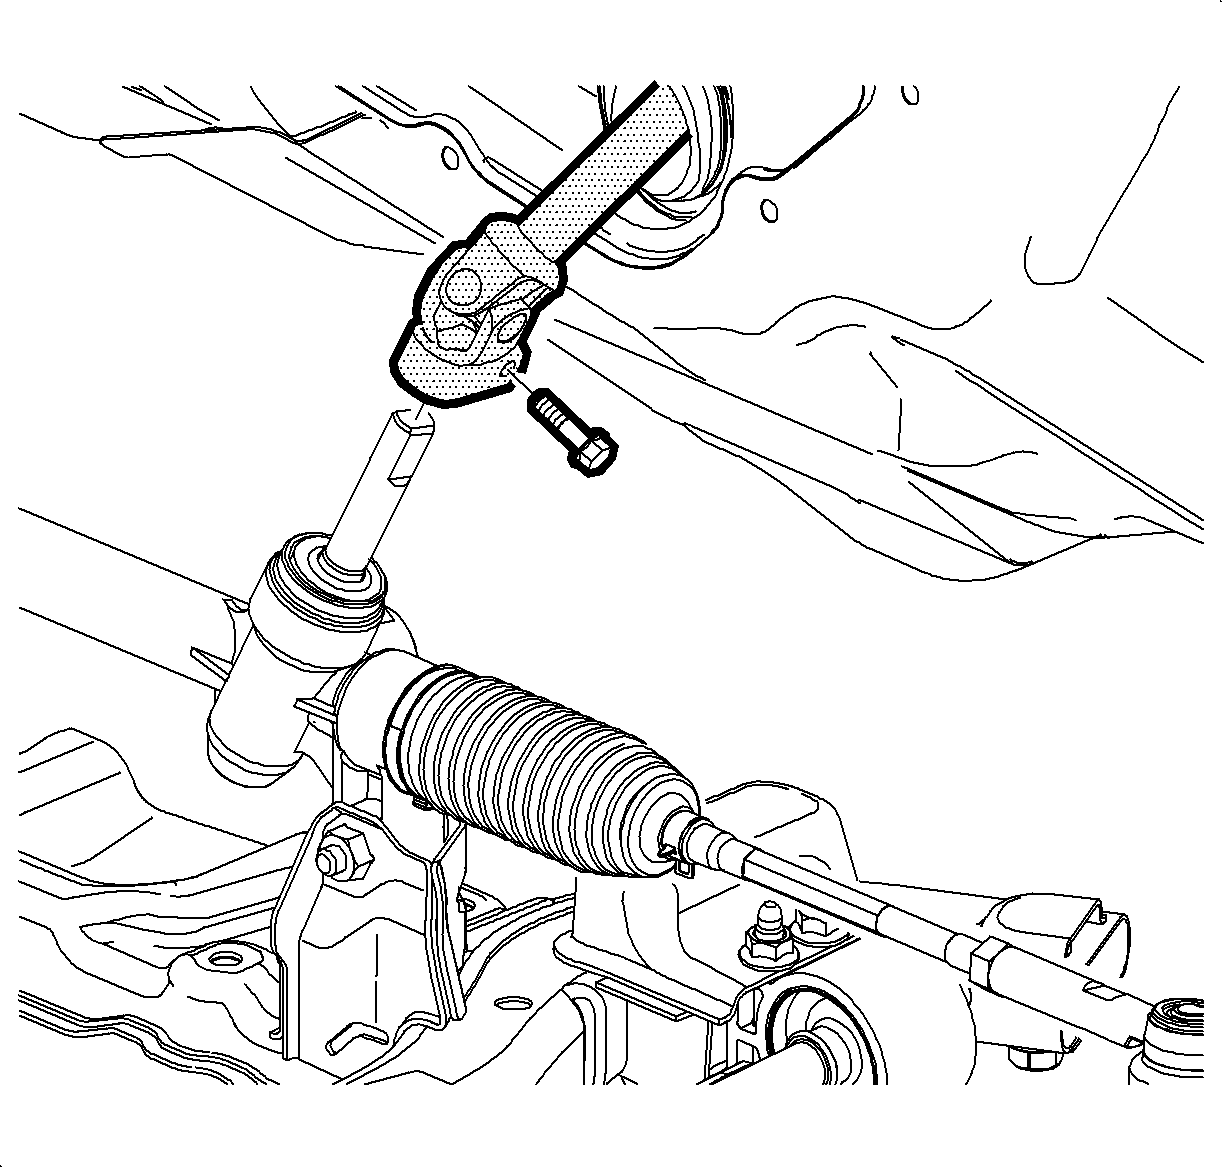
- Remove the steering intermediate shaft pinch bolt and discard the bolt.
- Disconnect the steering intermediate shaft from the steering gear.
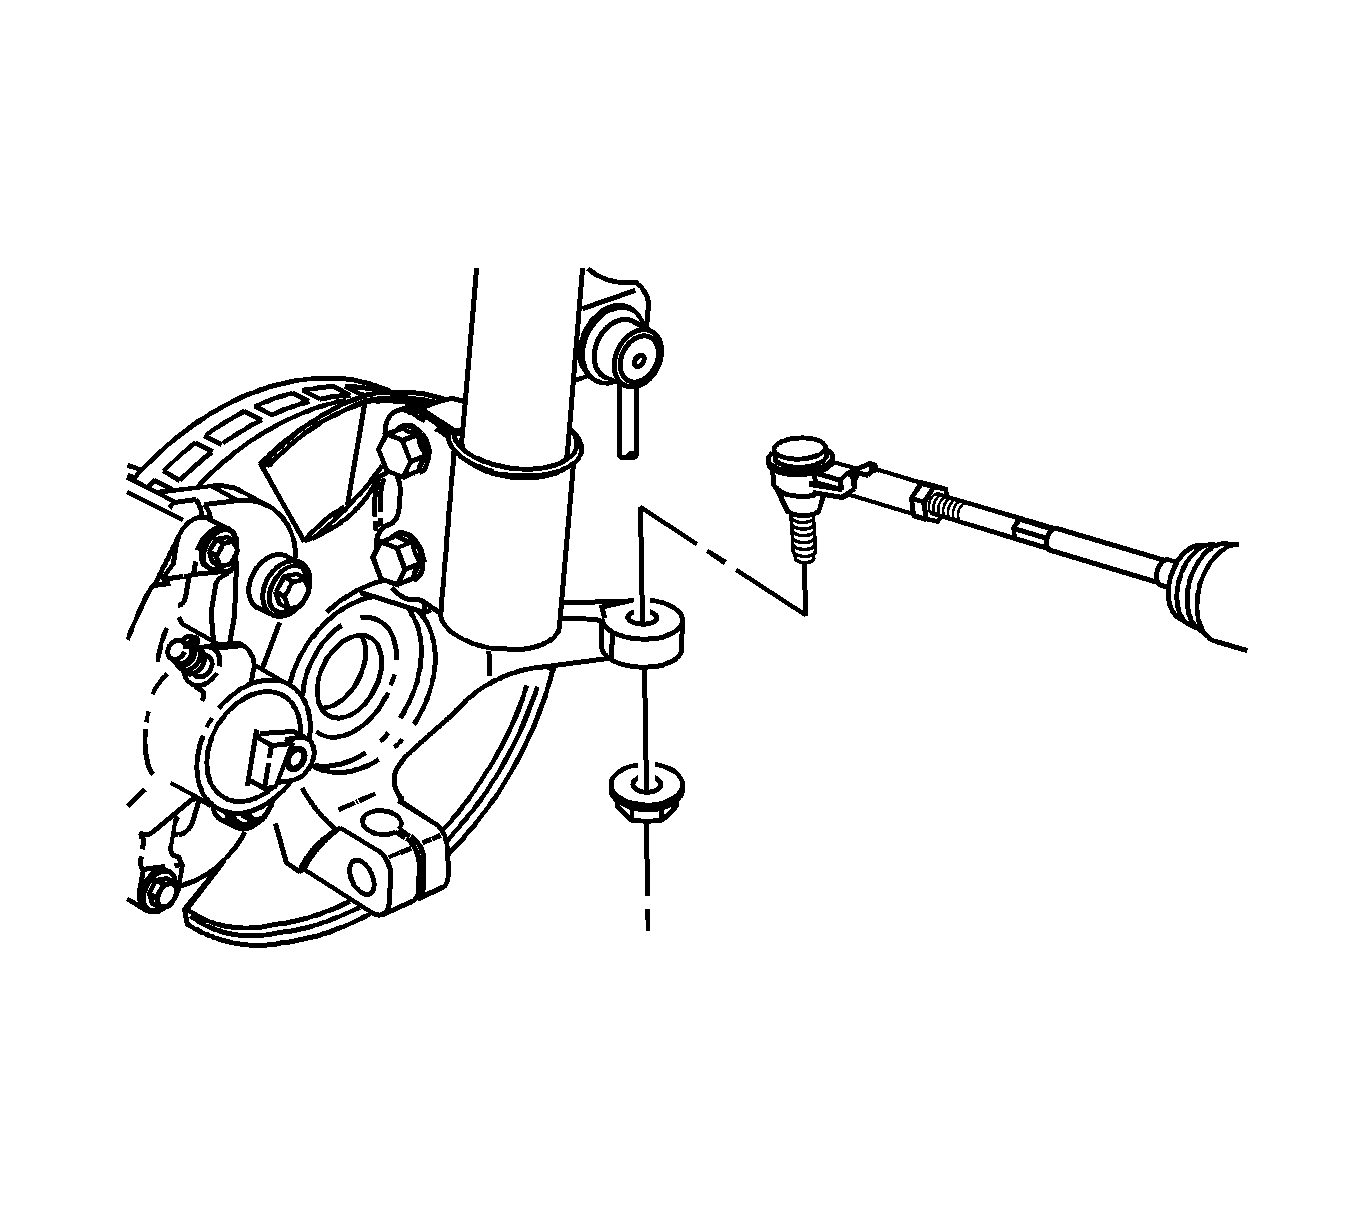
- Remove the right and left outer tie rod ends from the steering knuckles. Refer to
Steering Linkage Outer Tie Rod Replacement.
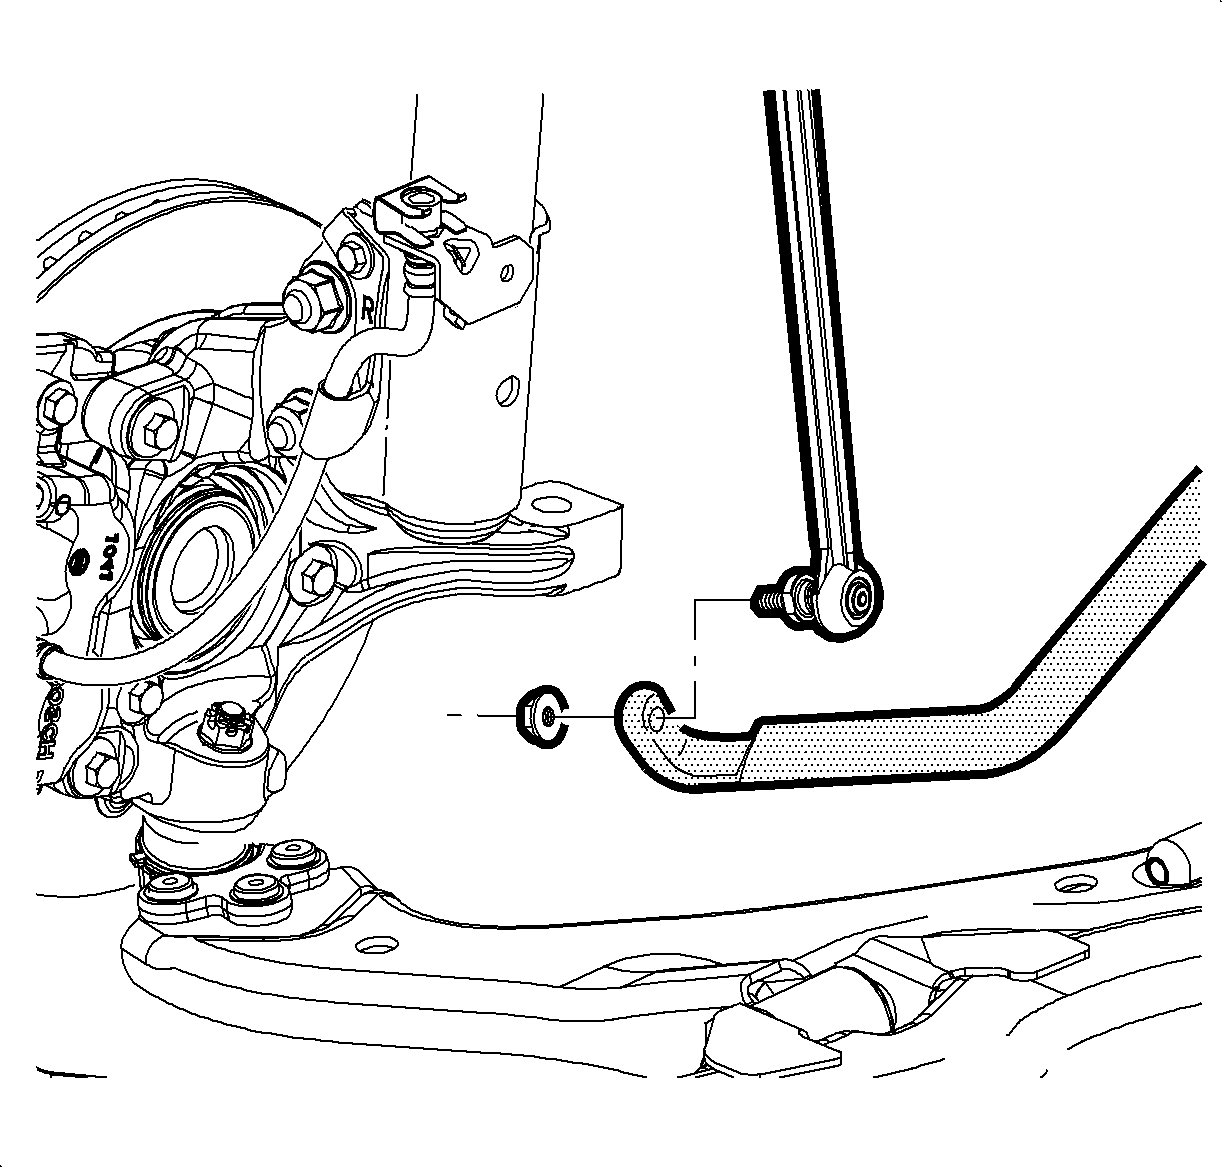
- Remove the right and left stabilizer shaft links from the stabilizer shaft. Refer to
Stabilizer Shaft Link Replacement.
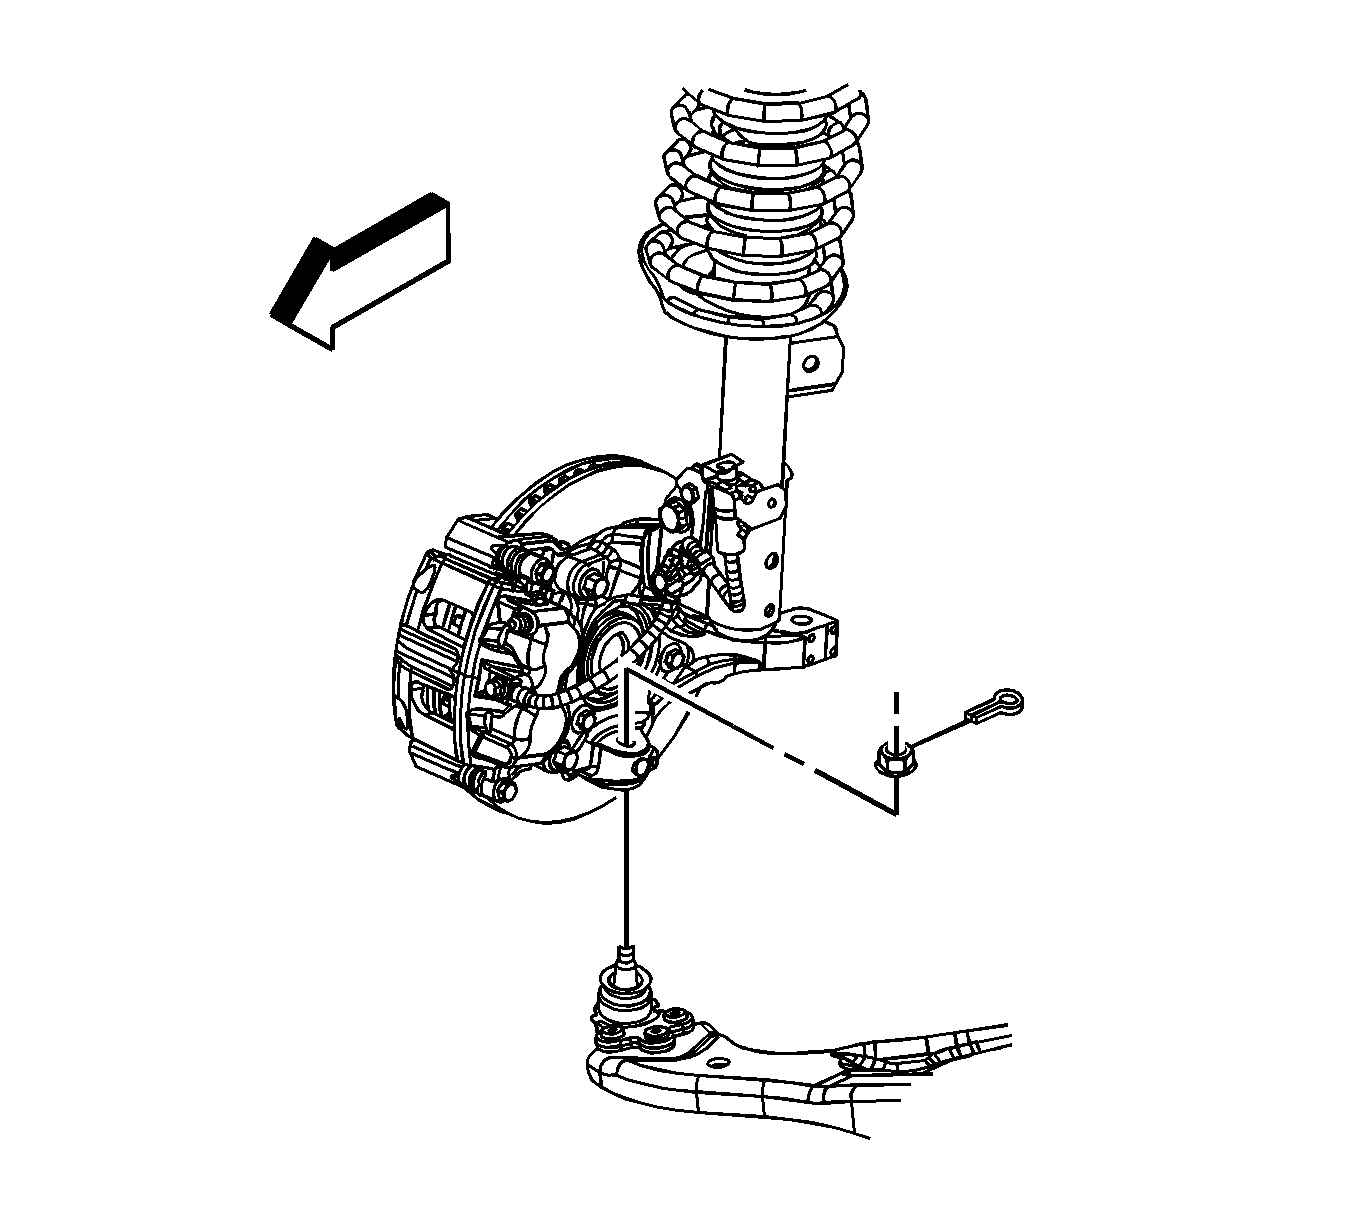
- Remove the right and left lower ball joints from the steering knuckles. Refer to
Lower Control Arm Replacement.
- On front wheel drive (FWD) models, place a drain pan under the transaxle then separate the right and left front wheel drive shafts from the transaxle. Refer to
Front Wheel Drive Shaft Replacement.
- On all wheel drive (AWD) models, remove the rear wheel driveshaft. Refer to
Rear Wheel Drive Shaft Replacement.
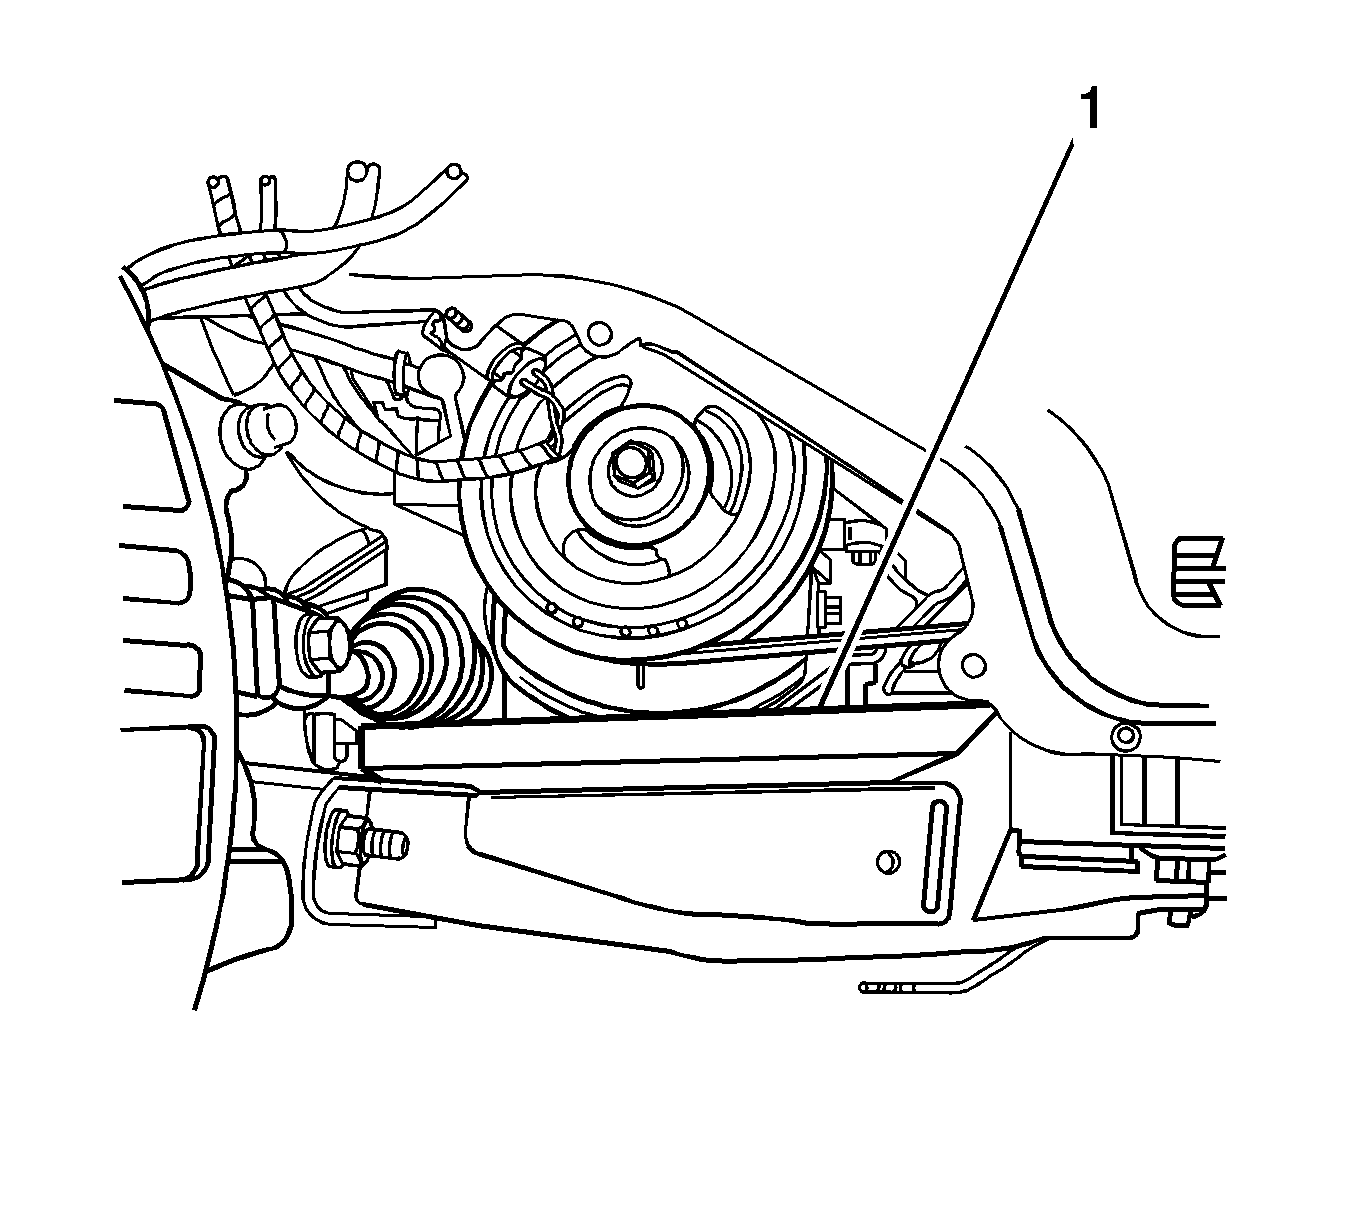
- On all models, place a block of wood (1) between the frame and the engine oil pan in order to support the engine once the bolts are removed from the right engine mount.
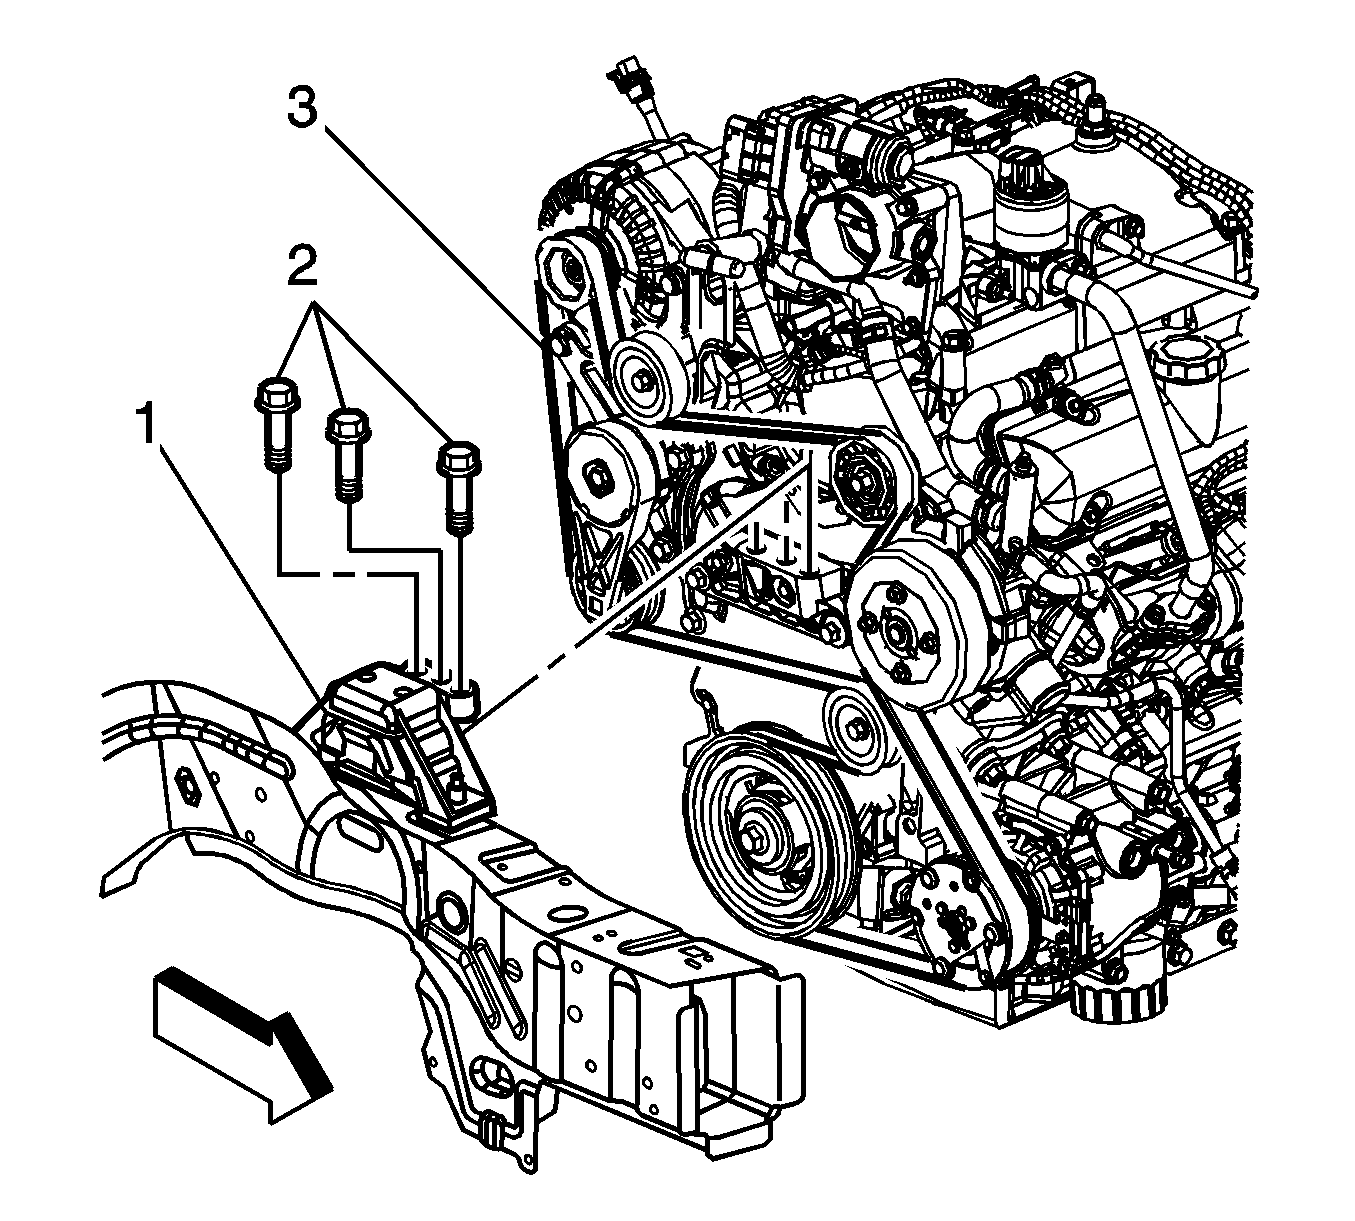
- Lower the vehicle.
- Remove the bolts (2) that secure the right engine mount (1) to the engine (3).
Note: Insure the vehicle body is secured to the hoist.
- Raise the vehicle.
- Place a universal frame support fixture or jackstands under the frame.
- Lower the vehicle until the frame contacts the frame support fixture or jackstands.
- Disconnect the wiring harness retaining clips near the right and left shock towers.
- Remove the drivetrain and front suspension frame reinforcement. Refer to
Drivetrain and Front Suspension Frame Reinforcement Replacement.
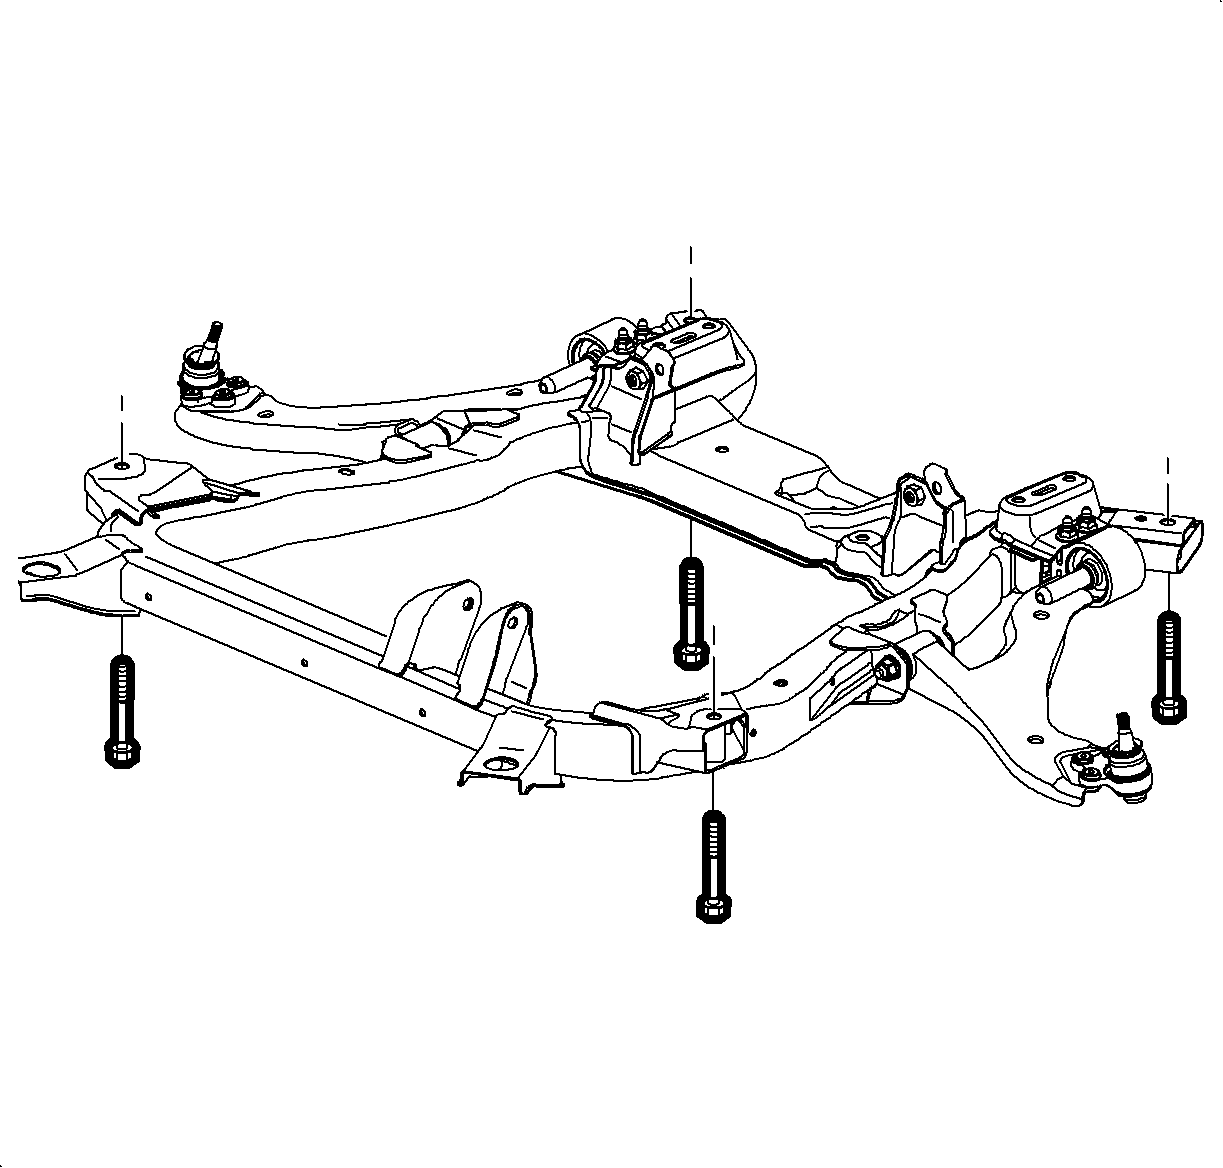
- Remove the frame-to-body bolts. Discard the bolts.
Note: Inspect for areas of body to powertrain contact or entanglement of wires and hoses while separating the vehicle body and powertrain.
- Carefully raise the vehicle body up away from the powertrain.
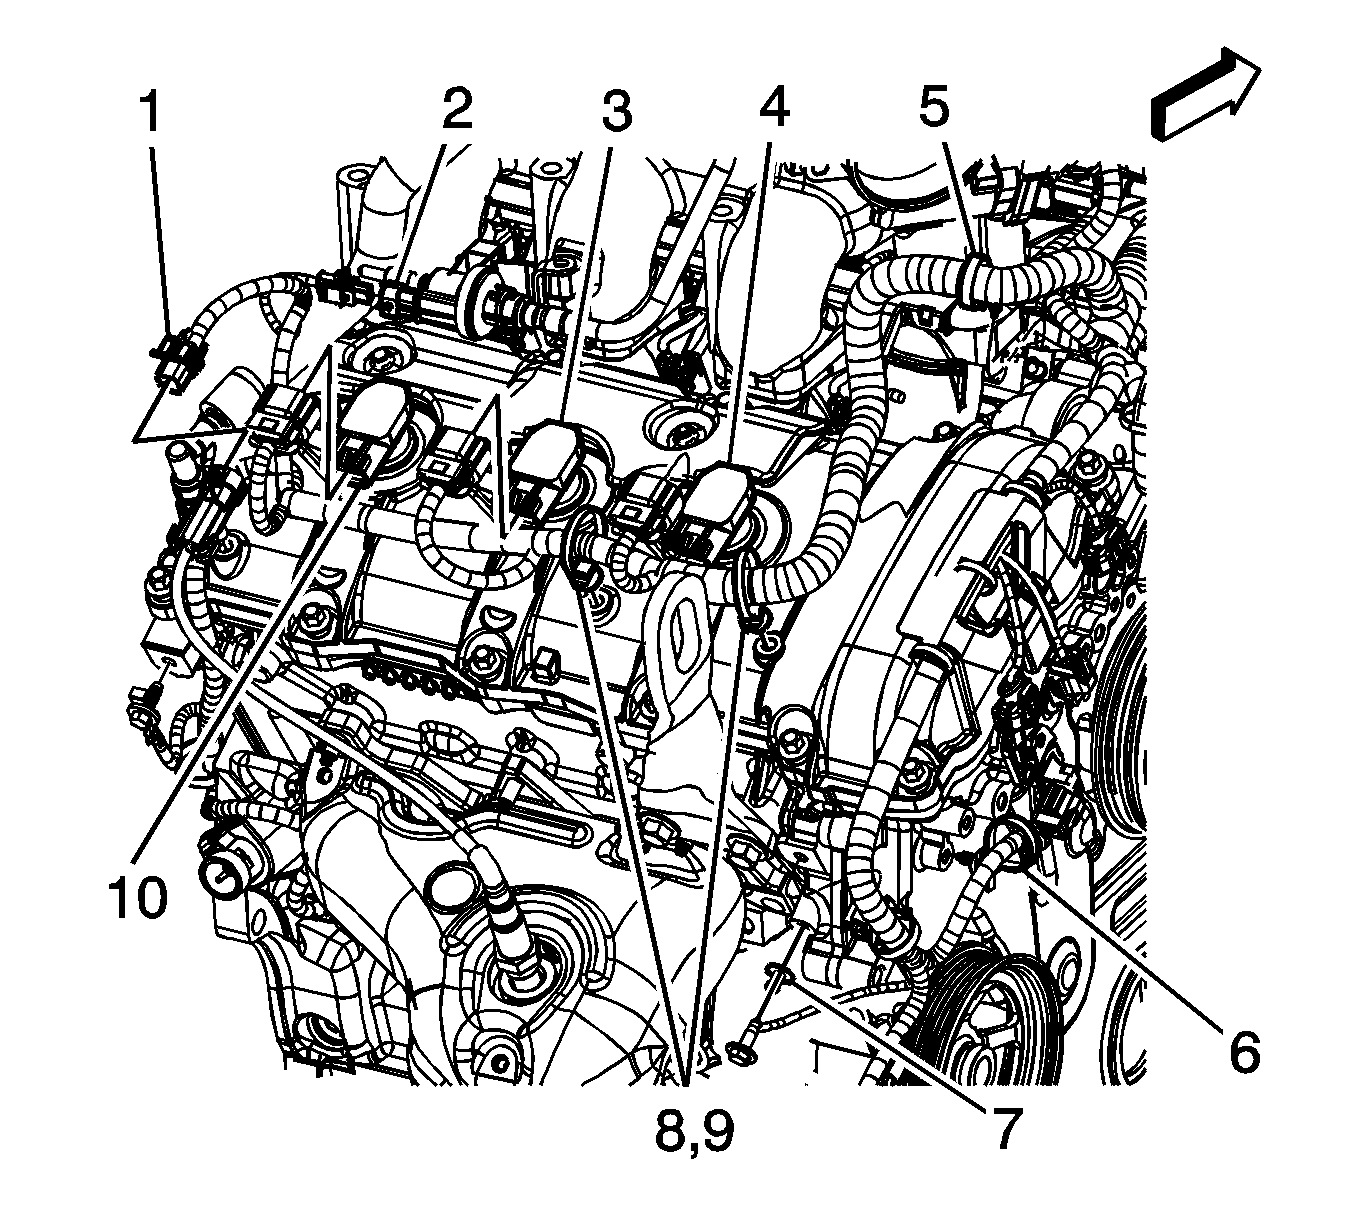
- Disconnect the engine electrical wiring harness from the following components:
| • | EVAP purge solenoid (2) |
| • | Ignition coils (3, 4, 10) |
| • | Remove wire harness from retainers (5, 6, 8, 9) |
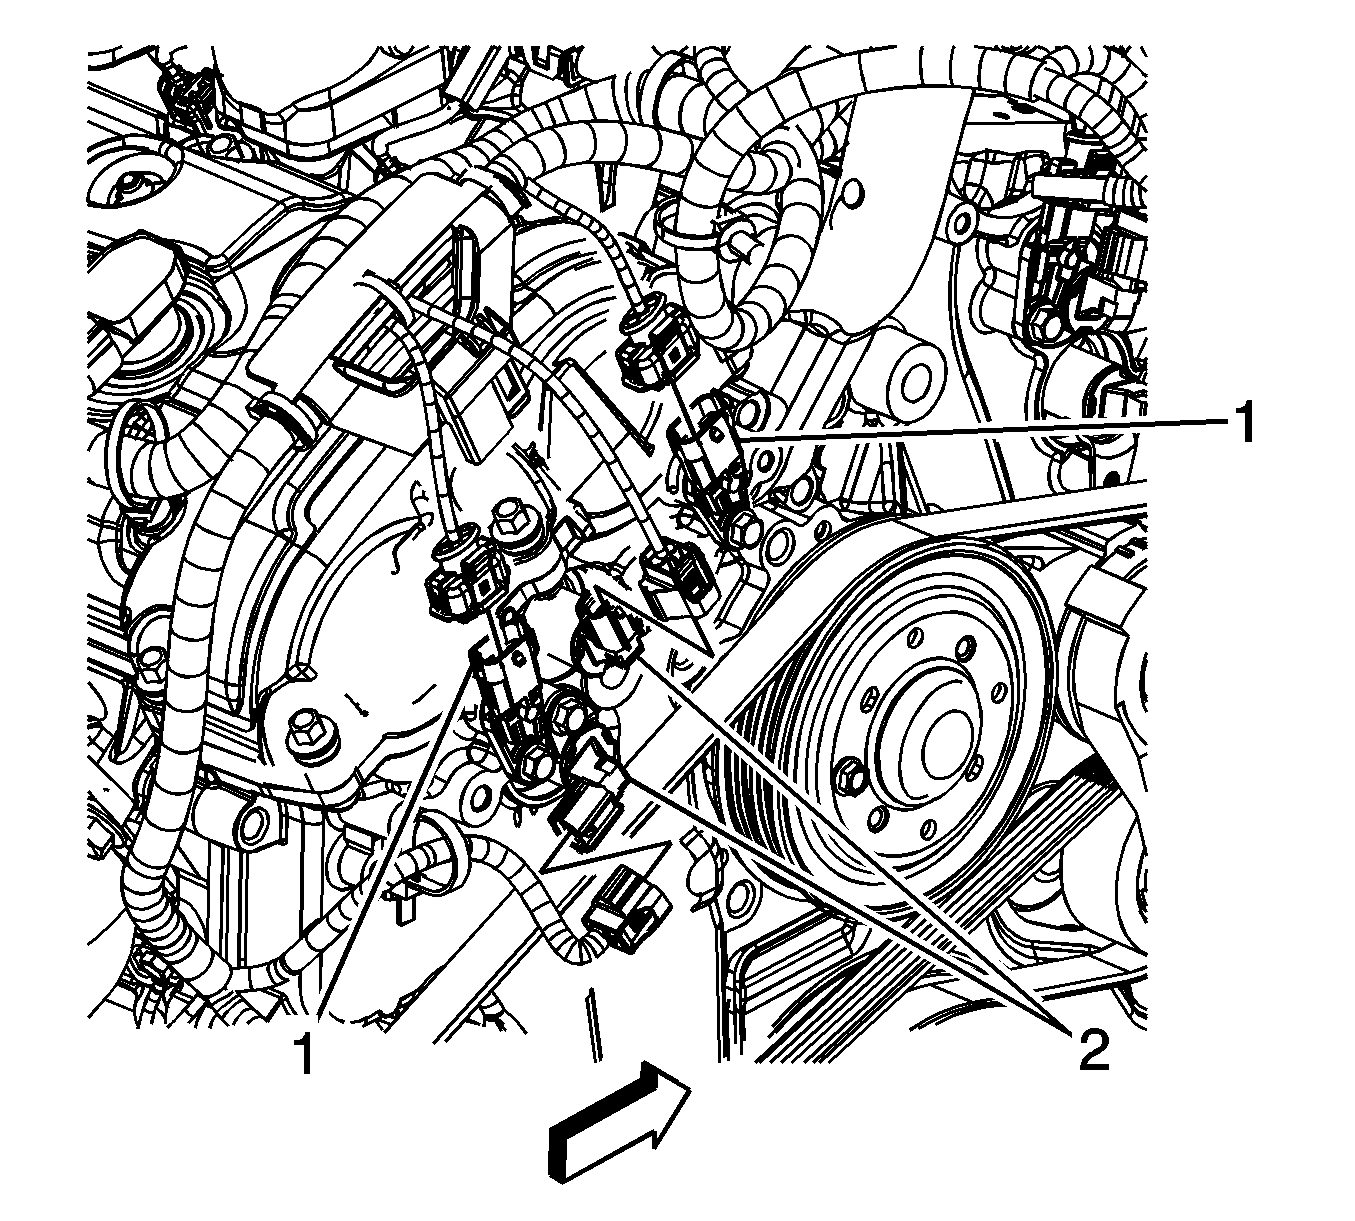
- Disconnect the left and right cylinder head engine electrical wiring harness from the following components:
| • | Camshaft position sensors (1) |
| • | Camshaft position actuators (2) |
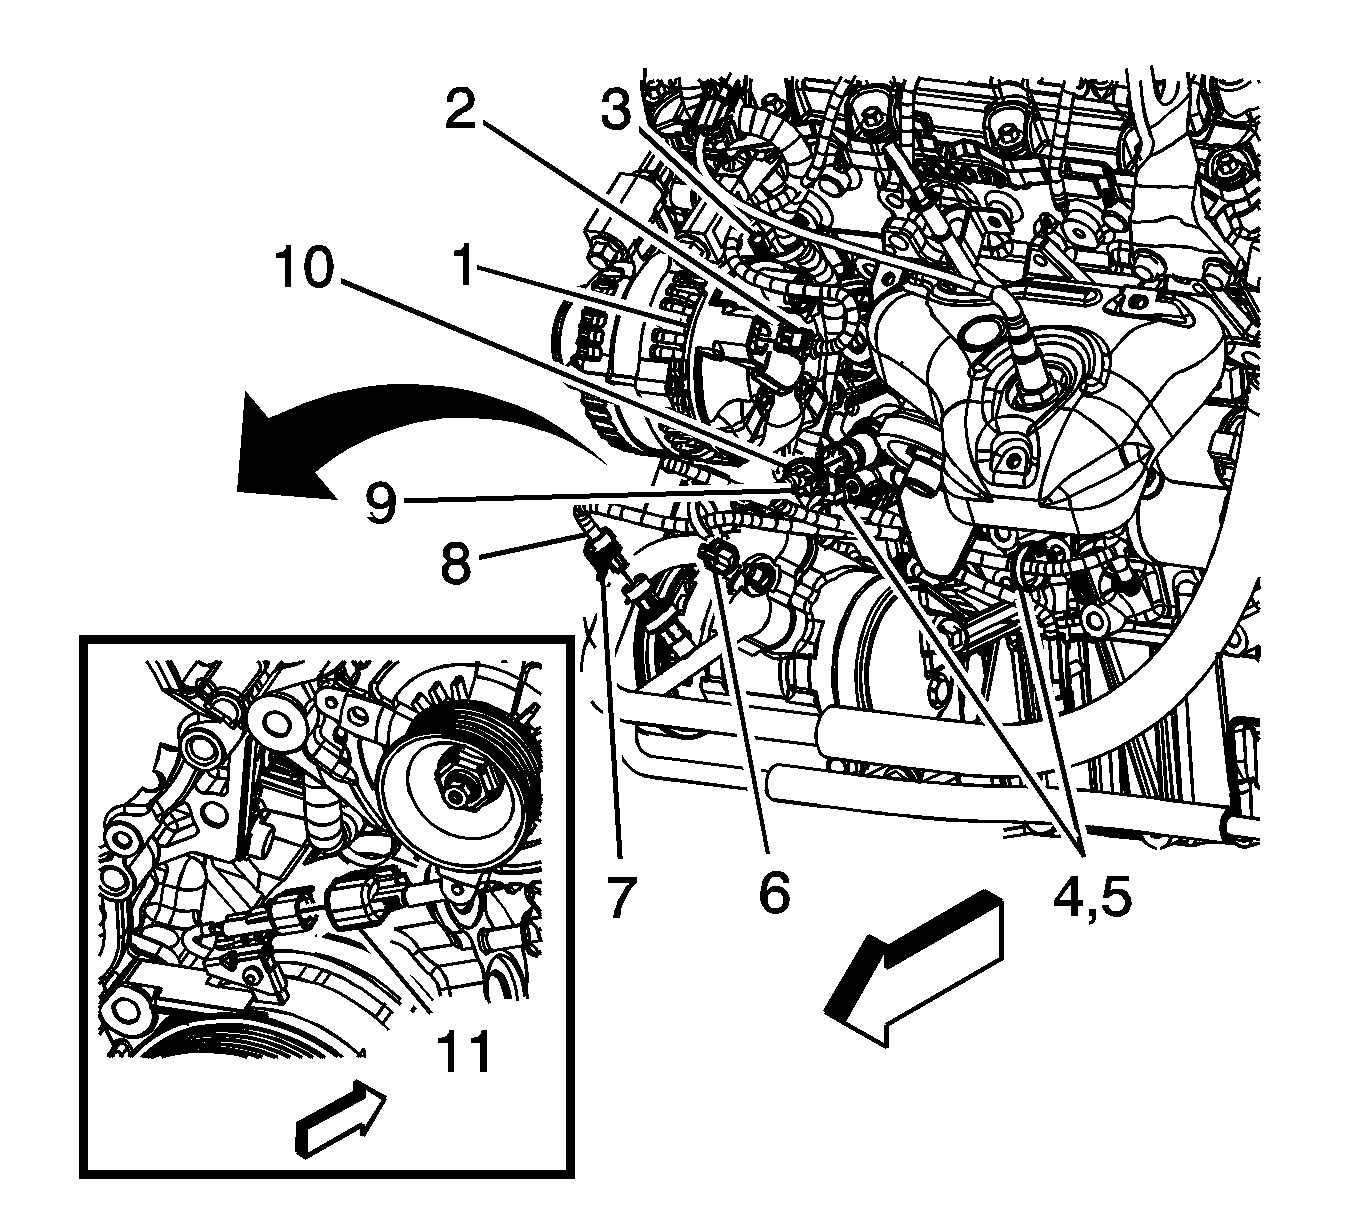
- Disconnect the engine electrical wiring harness from the following components:
| • | Retainer clips (2, 3, 4, 5, 6, 7, 9) |
| • | A/C compressor hose (8) |
| • | Oil pressure switch (10) |
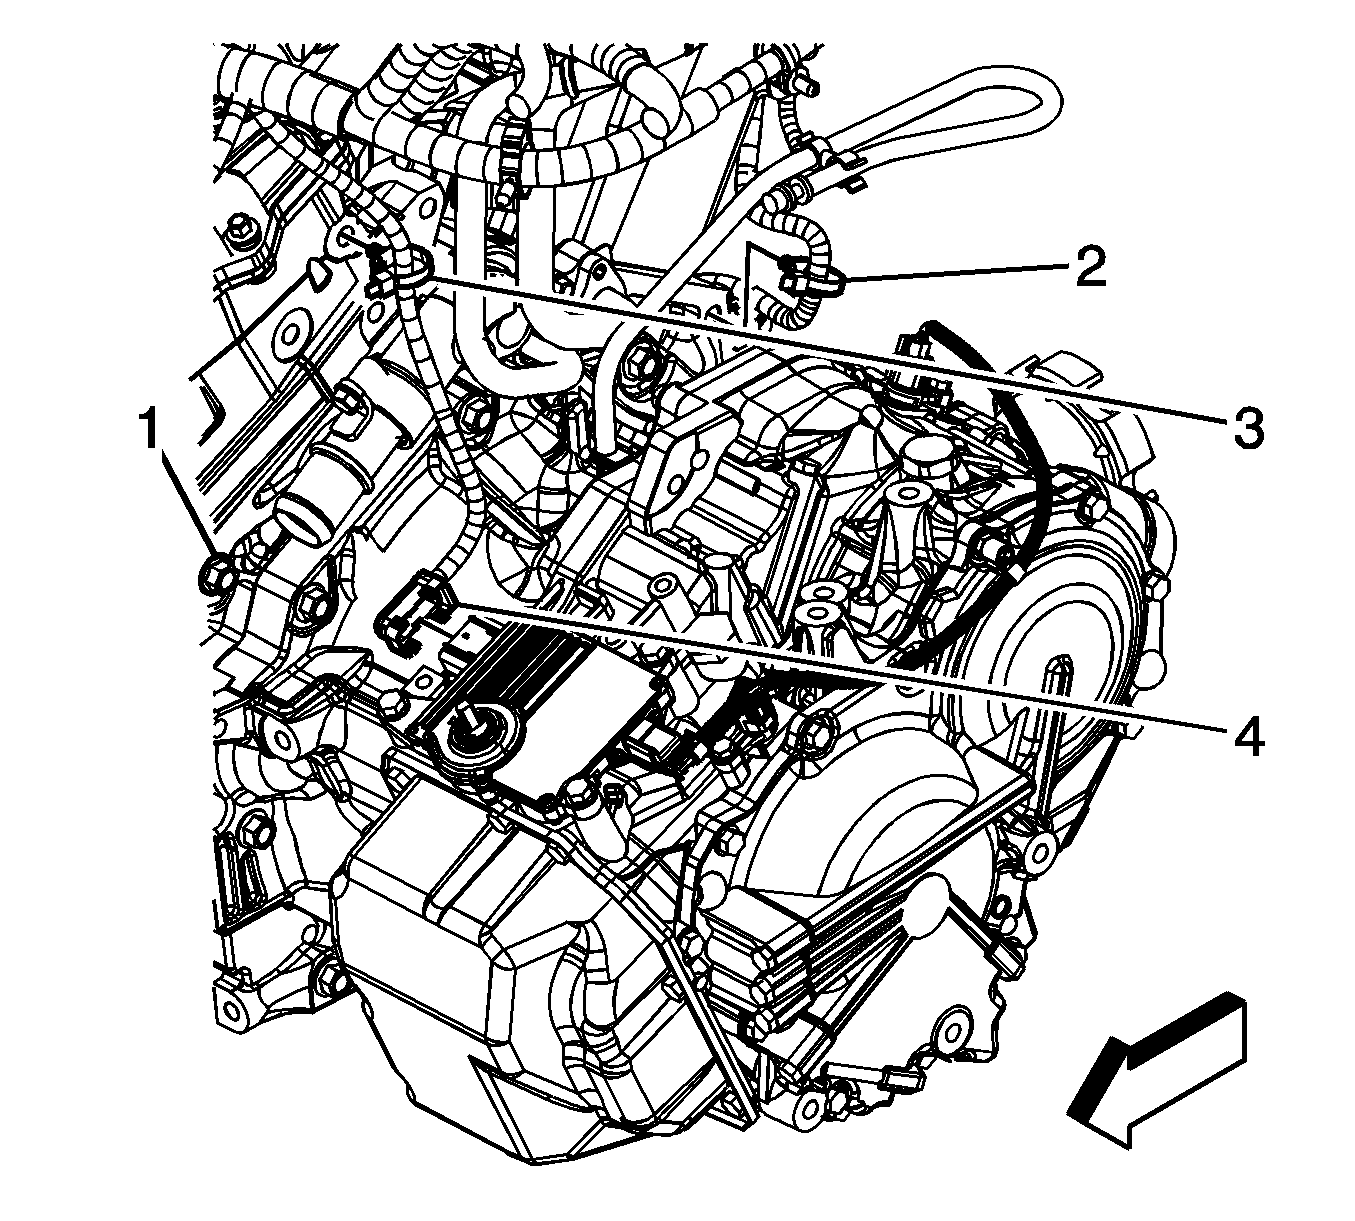
- Disconnect the engine electrical wiring harness from the following components:
| • | Transmission module (4) |
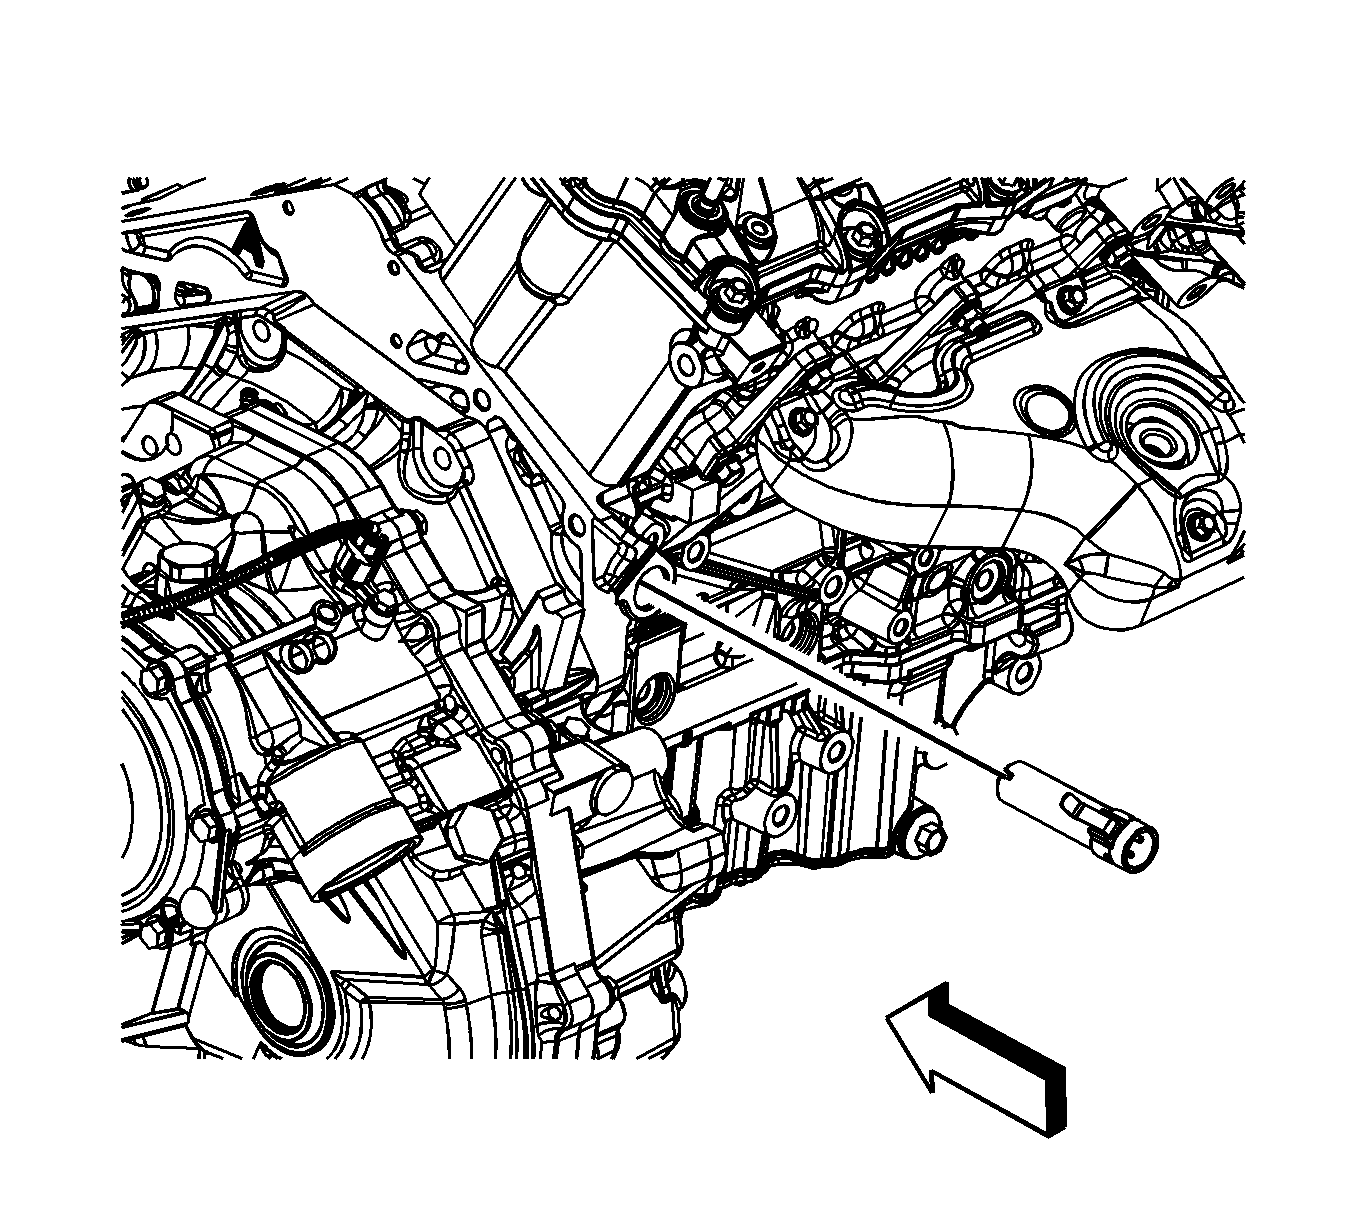
- If equipped with an engine coolant heater, disconnect the coolant heater cord.
- Remove the throttle body assembly. Refer to
Throttle Body Assembly Replacement.
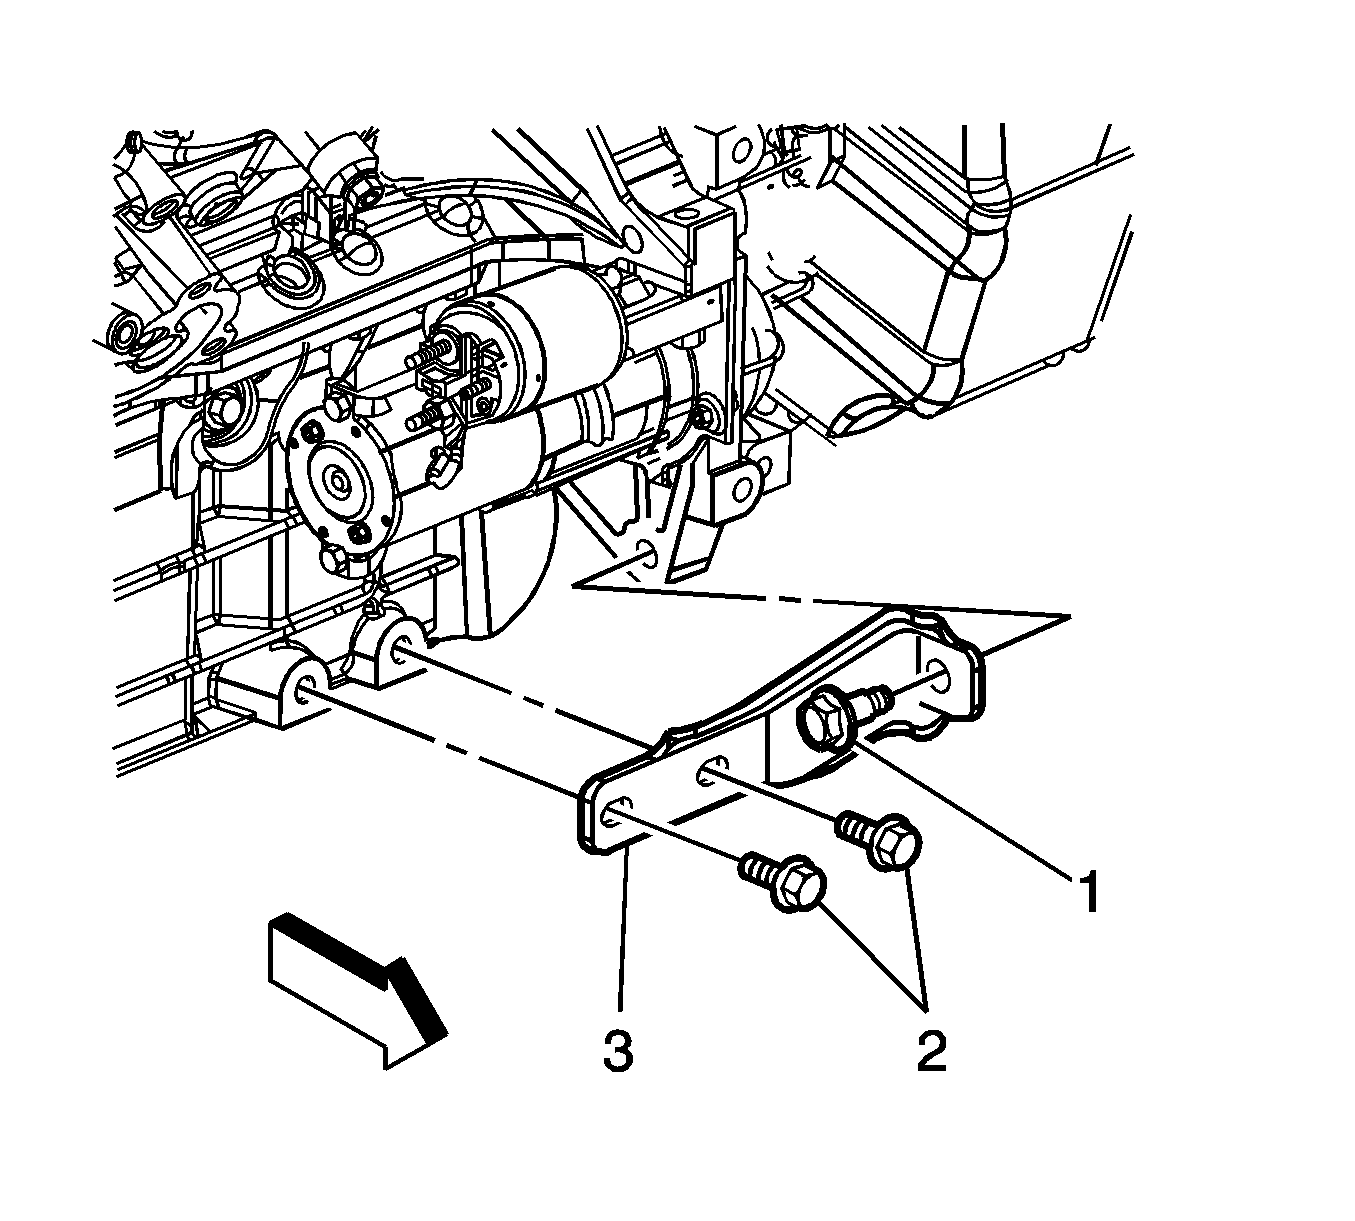
- Remove the engine-to-transaxle brace bolts (1, 2) and brace (3).
- Remove the starter motor. Refer to
Starter Motor Replacement.
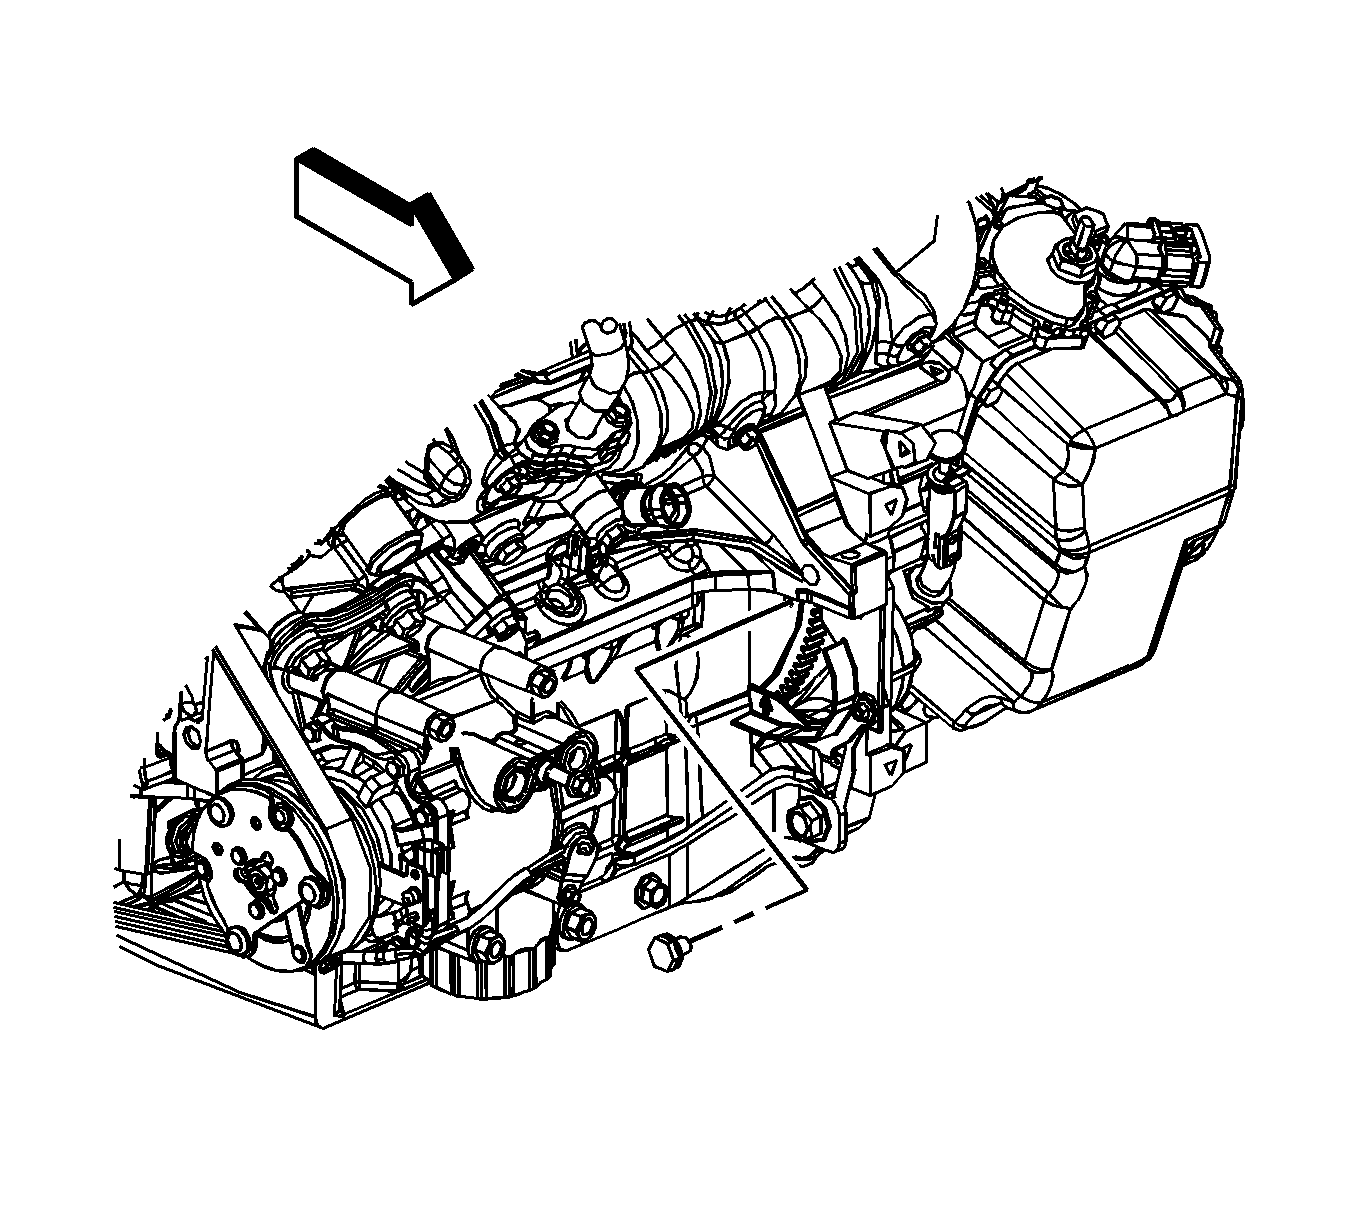
- Remove the torque converter bolts.
- Install the engine support adapters to the engine. Refer to
Engine Support Fixture.
- Support the engine weight with an engine hoist.
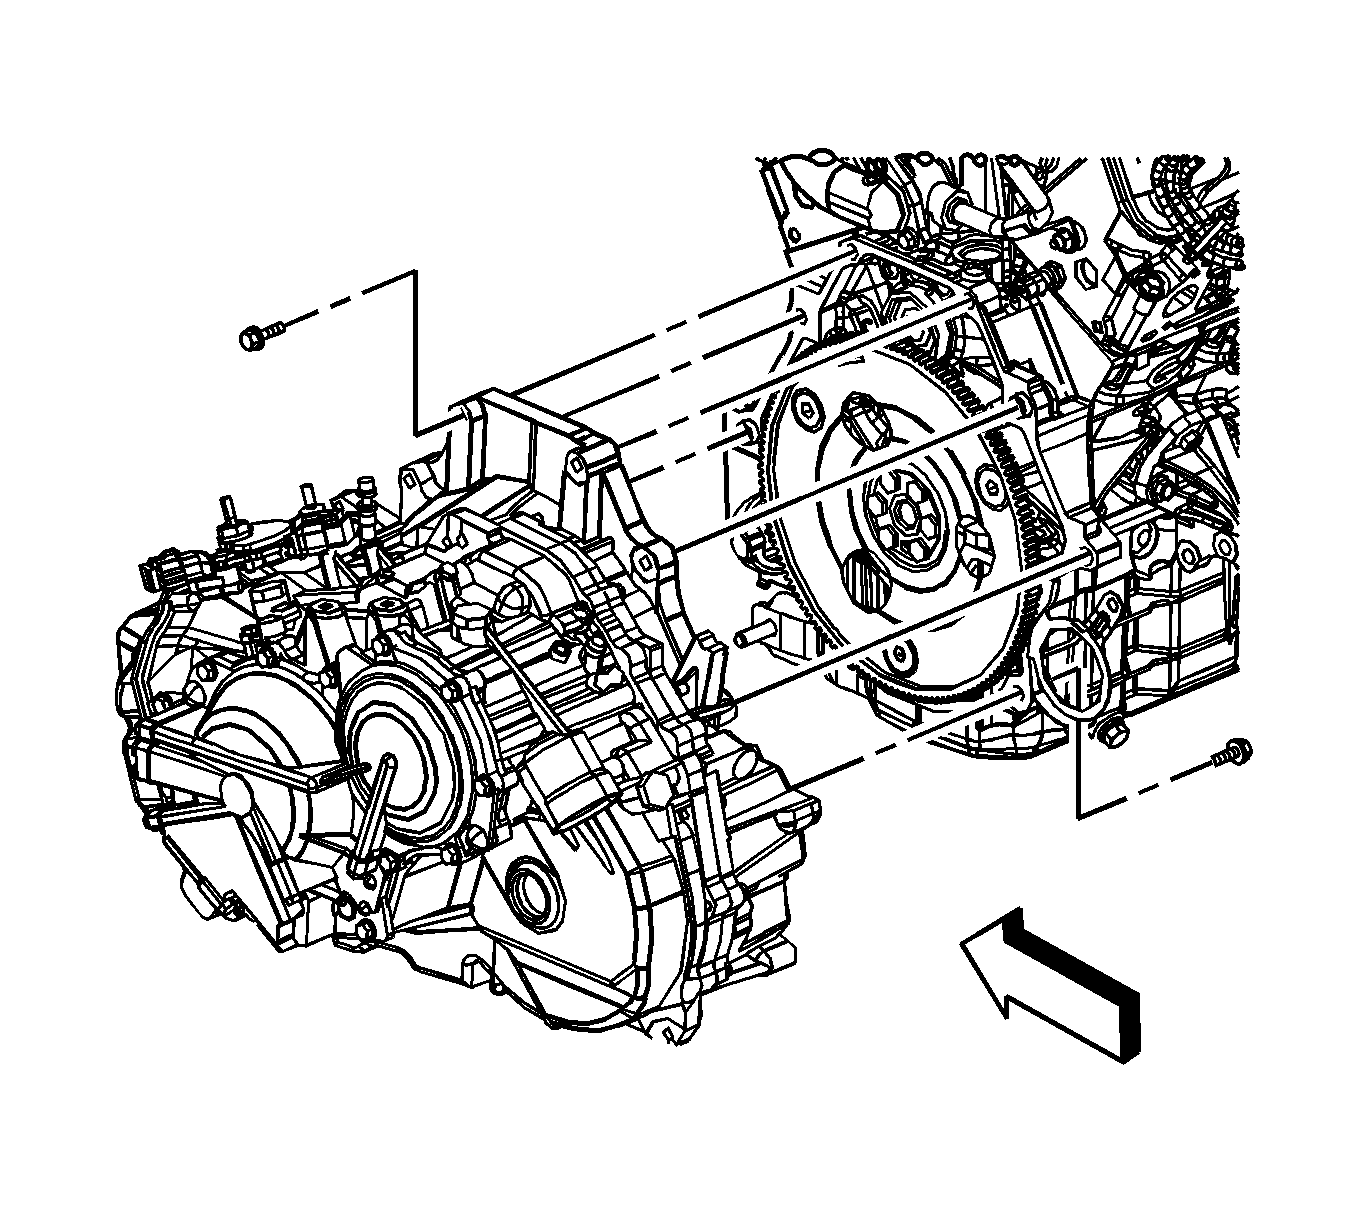
- Remove the automatic transaxle bolts.
- Separate the automatic transaxle from the engine.
- Lift the engine away from the frame and the automatic transaxle.
- Secure the engine to an engine stand.
- Remove any additional engine components as necessary. Refer to appropriate component sections in manual if needed.
Installation Procedure
- Remove the engine from the engine stand.

- Align the engine to the frame and automatic transaxle.
Caution: Refer to Fastener Caution in the Preface section.
- Install the automatic transaxle bolts and tighten to
75 N·m (55 lb ft).
- Place a block of wood between the frame and the engine oil pan in order to support the engine on the frame once the engine hoist is removed.
- Remove the engine hoist and lift chain.
- Remove the engine support adapters from the engine. Refer to
Engine Support Fixture.

- Install the torque converter bolts and tighten to
60 N·m (44 lb ft).
- Install the starter motor. Refer to
Starter Motor Replacement.

- Install the engine to transaxle brace (3) and bolts (1, 2) and tighten the bolts to
50 N·m (37 lb ft).
- Install the throttle body assembly. Refer to
Throttle Body Assembly Replacement.

- If equipped with an engine coolant heater, connect the coolant heater cord.

- Connect the engine electrical wiring harness to the following components:
| • | Transmission module (4) |
| | Tighten the bolt to
25 N·m (18 lb ft). |

- Connect the engine electrical wiring harness to the following components:
| • | Oil pressure switch (10) |
| • | A/C compressor hose (8) |
| • | Retainer clips (2, 3, 4, 5, 6, 7, 9) |
| | Tighten the nut to
13 N·m (115 lb in). |

- Connect the left and right cylinder head engine electrical wiring harness to the following components:
| • | Camshaft position actuators (2) |
| • | Camshaft position sensors (1) |

- Connect the engine electrical wiring harness to the following components:
| • | Install wire harness to retainers (5, 6, 8, 9) |
| • | Ignition coils (3, 4, 10) |
| • | EVAP purge solenoid (2) |
- Connect the wiring harness retaining clips near the right and left shock towers.

- Install NEW frame-to-body bolts and tighten to
155 N·m (114 lb ft).
- Install the drivetrain and front suspension frame reinforcement. Refer to
Drivetrain and Front Suspension Frame Reinforcement Replacement.
- Raise the vehicle up away from the frame support fixture or jackstands and remove the support fixture or jackstands from under the vehicle.
- Lower the vehicle.

- Install the bolts (2) that secure the right engine mount (1) to the engine (3). Tighten the bolts to
50 N·m (37 lb ft).
- Raise the vehicle.

- Remove the block of wood (1) between the frame and the engine oil pan used to support the engine while the bolts were removed from the right engine mount.
- On AWD models, install the rear wheel driveshaft. Refer to
Rear Wheel Drive Shaft Replacement.
- On FWD models, install the right and left front wheel drive shafts into the transaxle. Refer to
Front Wheel Drive Shaft Replacement.

- On all models, install the right and left lower ball joints to the steering knuckles. Refer to
Lower Control Arm Replacement.

- Install the right and left stabilizer shaft links to the stabilizer shaft. Refer to
Stabilizer Shaft Link Replacement.

- Install the right and left tie rod ends to the steering knuckles. Refer to
Steering Linkage Outer Tie Rod Replacement.

- Connect the steering intermediate shaft to the steering gear.
- Install a NEW pinch bolt to the steering intermediate shaft and tighten to
34 N·m (25 lb ft).
- Install the right and left engine splash shields. Refer to
Engine Splash Shield Replacement.
- Install the front tires. Refer to
Tire and Wheel Removal and Installation.
- Install the catalytic converters. Refer to
Exhaust Manifold Replacement - Left Side and
Exhaust Manifold Replacement - Right Side.

- Install new seals and connect the transaxle oil cooler lines to the transaxle. Refer to
Transmission Fluid Cooler Inlet Hose Replacement and
Transmission Fluid Cooler Outlet Hose Replacement.
- Install the radiator outlet hose. Refer to
Radiator Outlet Hose Replacement.
- Lower the vehicle.
- Install the radiator inlet hose. Refer to
Radiator Inlet Hose Replacement.
- Connect the heater hoses to the engine. Refer to
Heater Inlet Hose Replacement.
- Untie the radiator, AC condenser, and fan module assembly from the upper radiator support.
- Connect the transaxle shift control cable to the transaxle. Refer to
Range Selector Lever Cable Replacement.
- Install the AC compressor hose assembly to the compressor. Refer to
Compressor Hose Assembly Replacement.
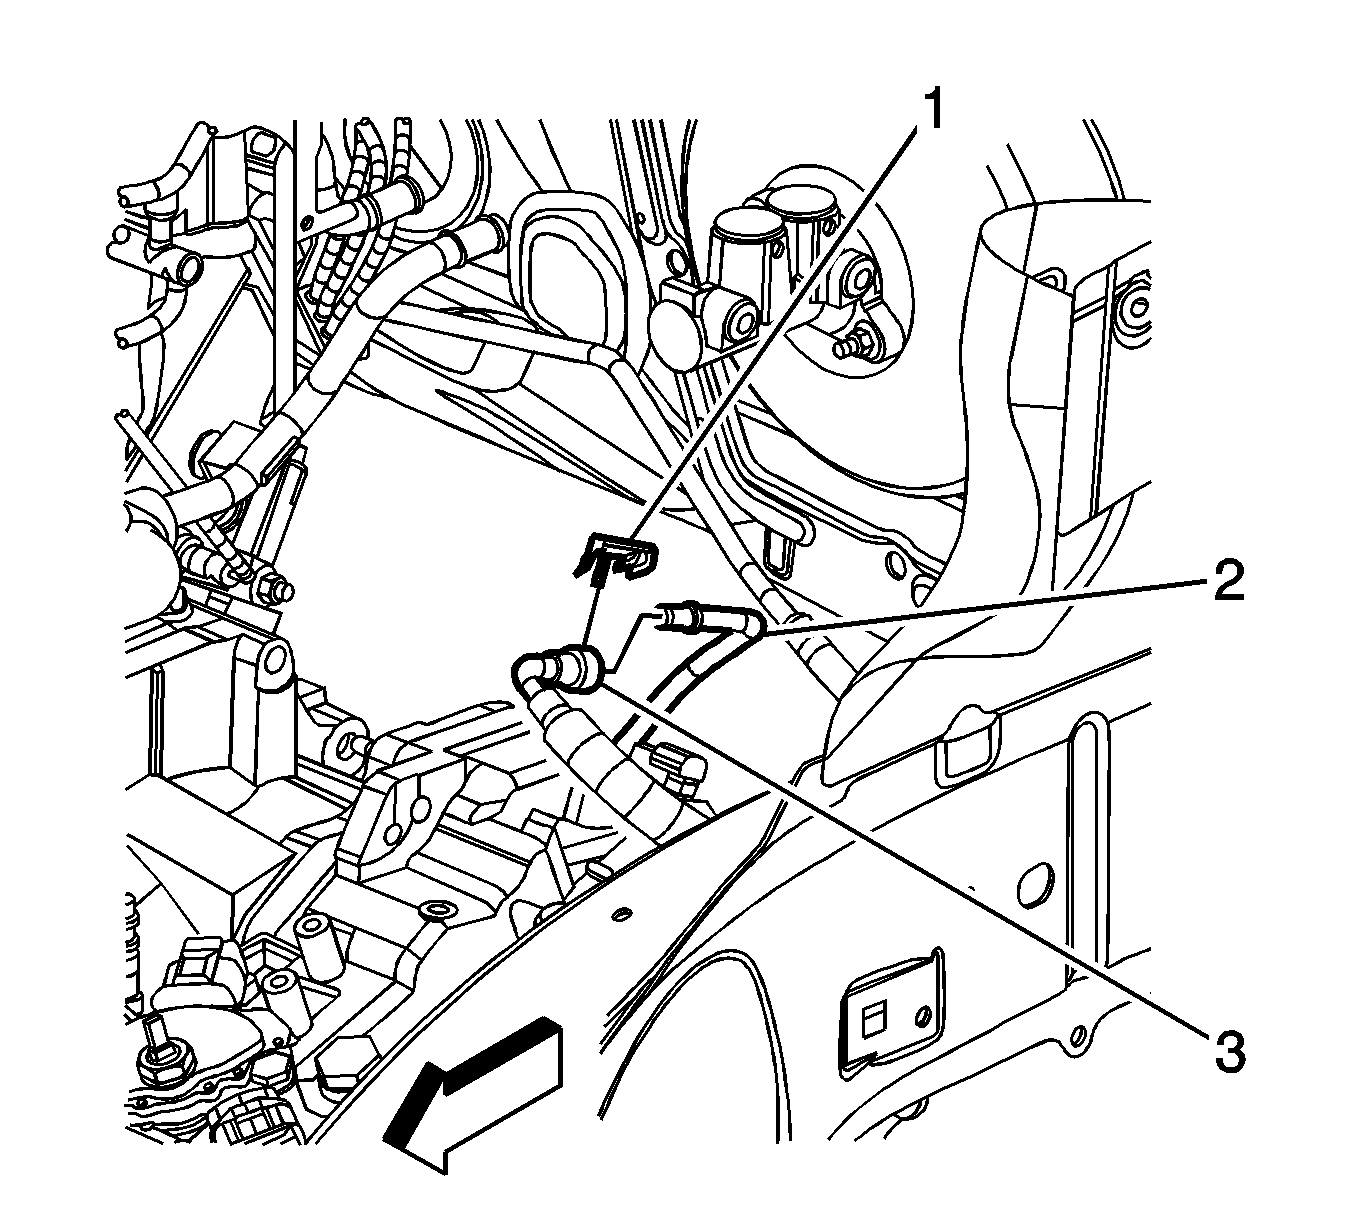
- Connect the engine fuel hose/pipe (3) to the chassis fuel hose/pipe (2). Refer to
Metal Collar Quick Connect Fitting Service.
- Connect the EVAP hose/pipe to the EVAP canister purge solenoid valve. Refer to
Plastic Collar Quick Connect Fitting Service.
- Install the air cleaner assembly. Refer to
Air Cleaner Assembly Replacement.
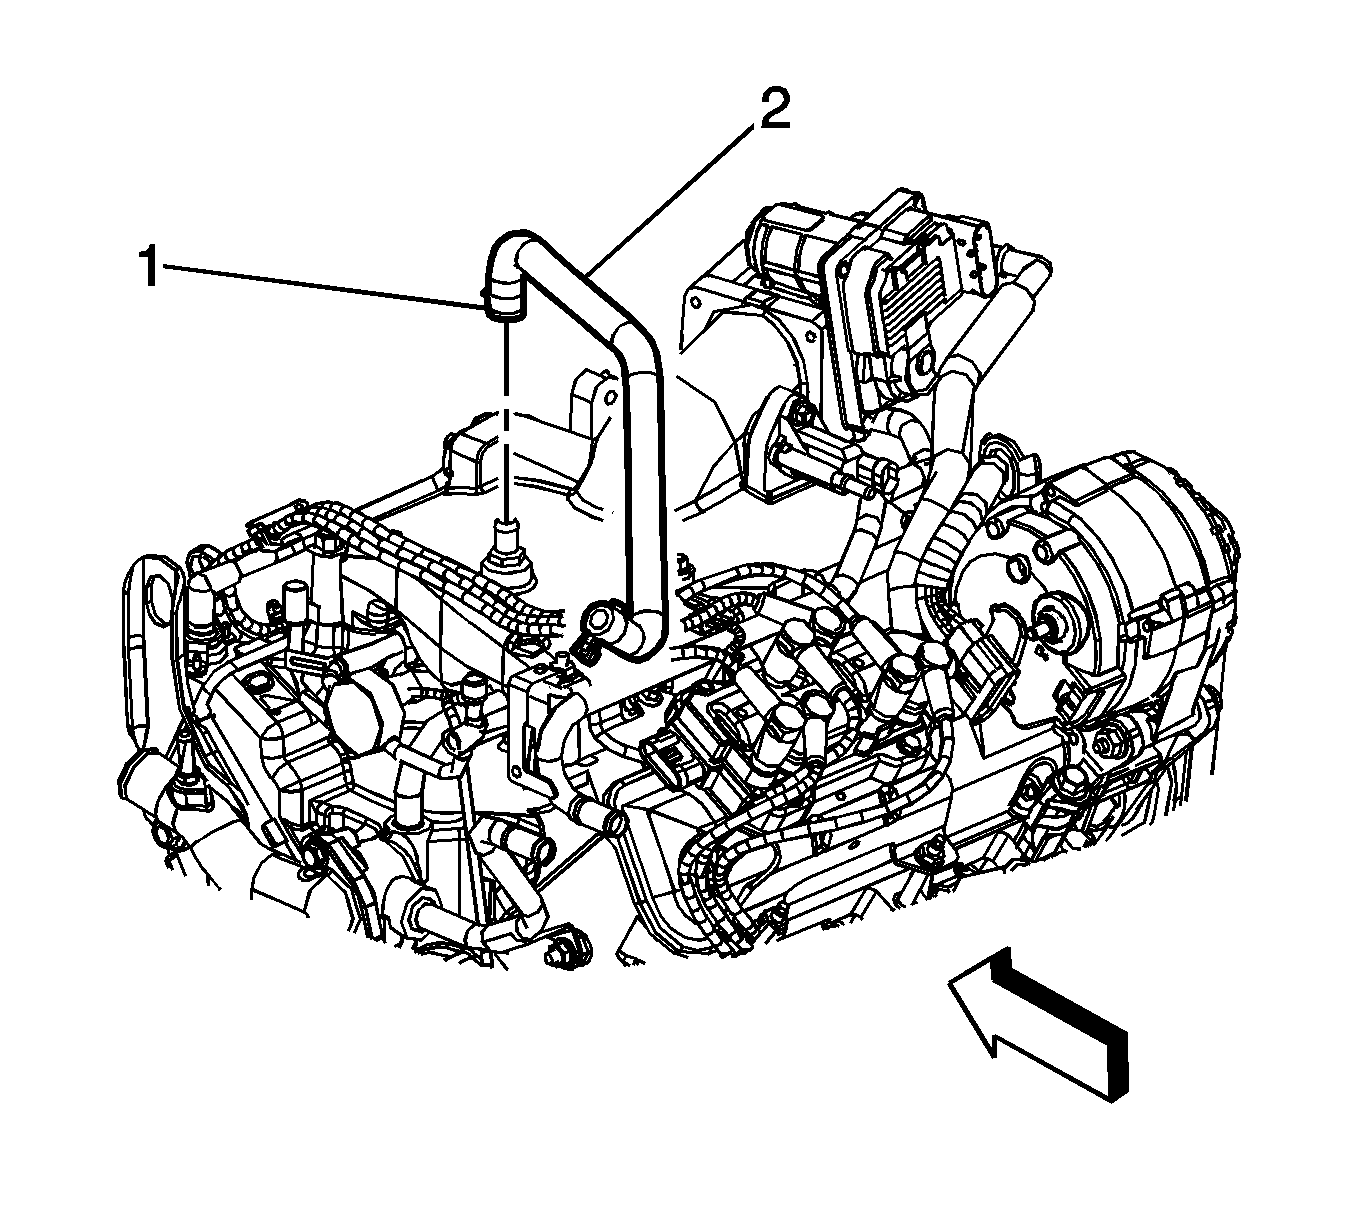
- Connect the brake booster vacuum hose (2) to the intake manifold.
- Position the clamp (1) on the brake booster vacuum hose connection.
- Connect ground wire from frame, near battery box.
- Connect the ECM connector to the under-hood fuse block.
- Install the fuel injector sight shield. Refer to
Fuel Injector Sight Shield Replacement.
- Connect the negative battery cable. Refer to
Battery Negative Cable Disconnection and Connection.
- Fill the engine with engine oil. Refer to
Approximate Fluid Capacities ,
Fluid and Lubricant Recommendations , and
Maintenance Schedule.
- Fill the engine with coolant. Refer to
Cooling System Draining and Filling.
- Check the transaxle fluid level. Refer to
Transmission Fluid Replacement.
- Charge the AC system. Refer to
Refrigerant Recovery and Recharging.
- Prime the fuel system.
| 55.1. | Cycle the ignition ON for 5 seconds then OFF for 10 seconds. Repeat cycling twice. |
| 55.2. | Crank the engine until it starts. The maximum starter motor cranking time is 20 seconds. |
| 55.3. | If the engine does not start, repeat the steps. |
- Perform the Crankshaft Position System Variation Learn procedure. Refer to
Crankshaft Position System Variation Learn.


