Instrument Cluster Lens and Bulb Replacement

| Subject: | Service Information Regarding Instrument Cluster Lens and Bulb Replacement |
| Models: | 2000 and 2001 Saturn S=Series and L-Series vehicles |
Purpose:
This bulletin provides service information on instrument cluster lens and bulb replacement.
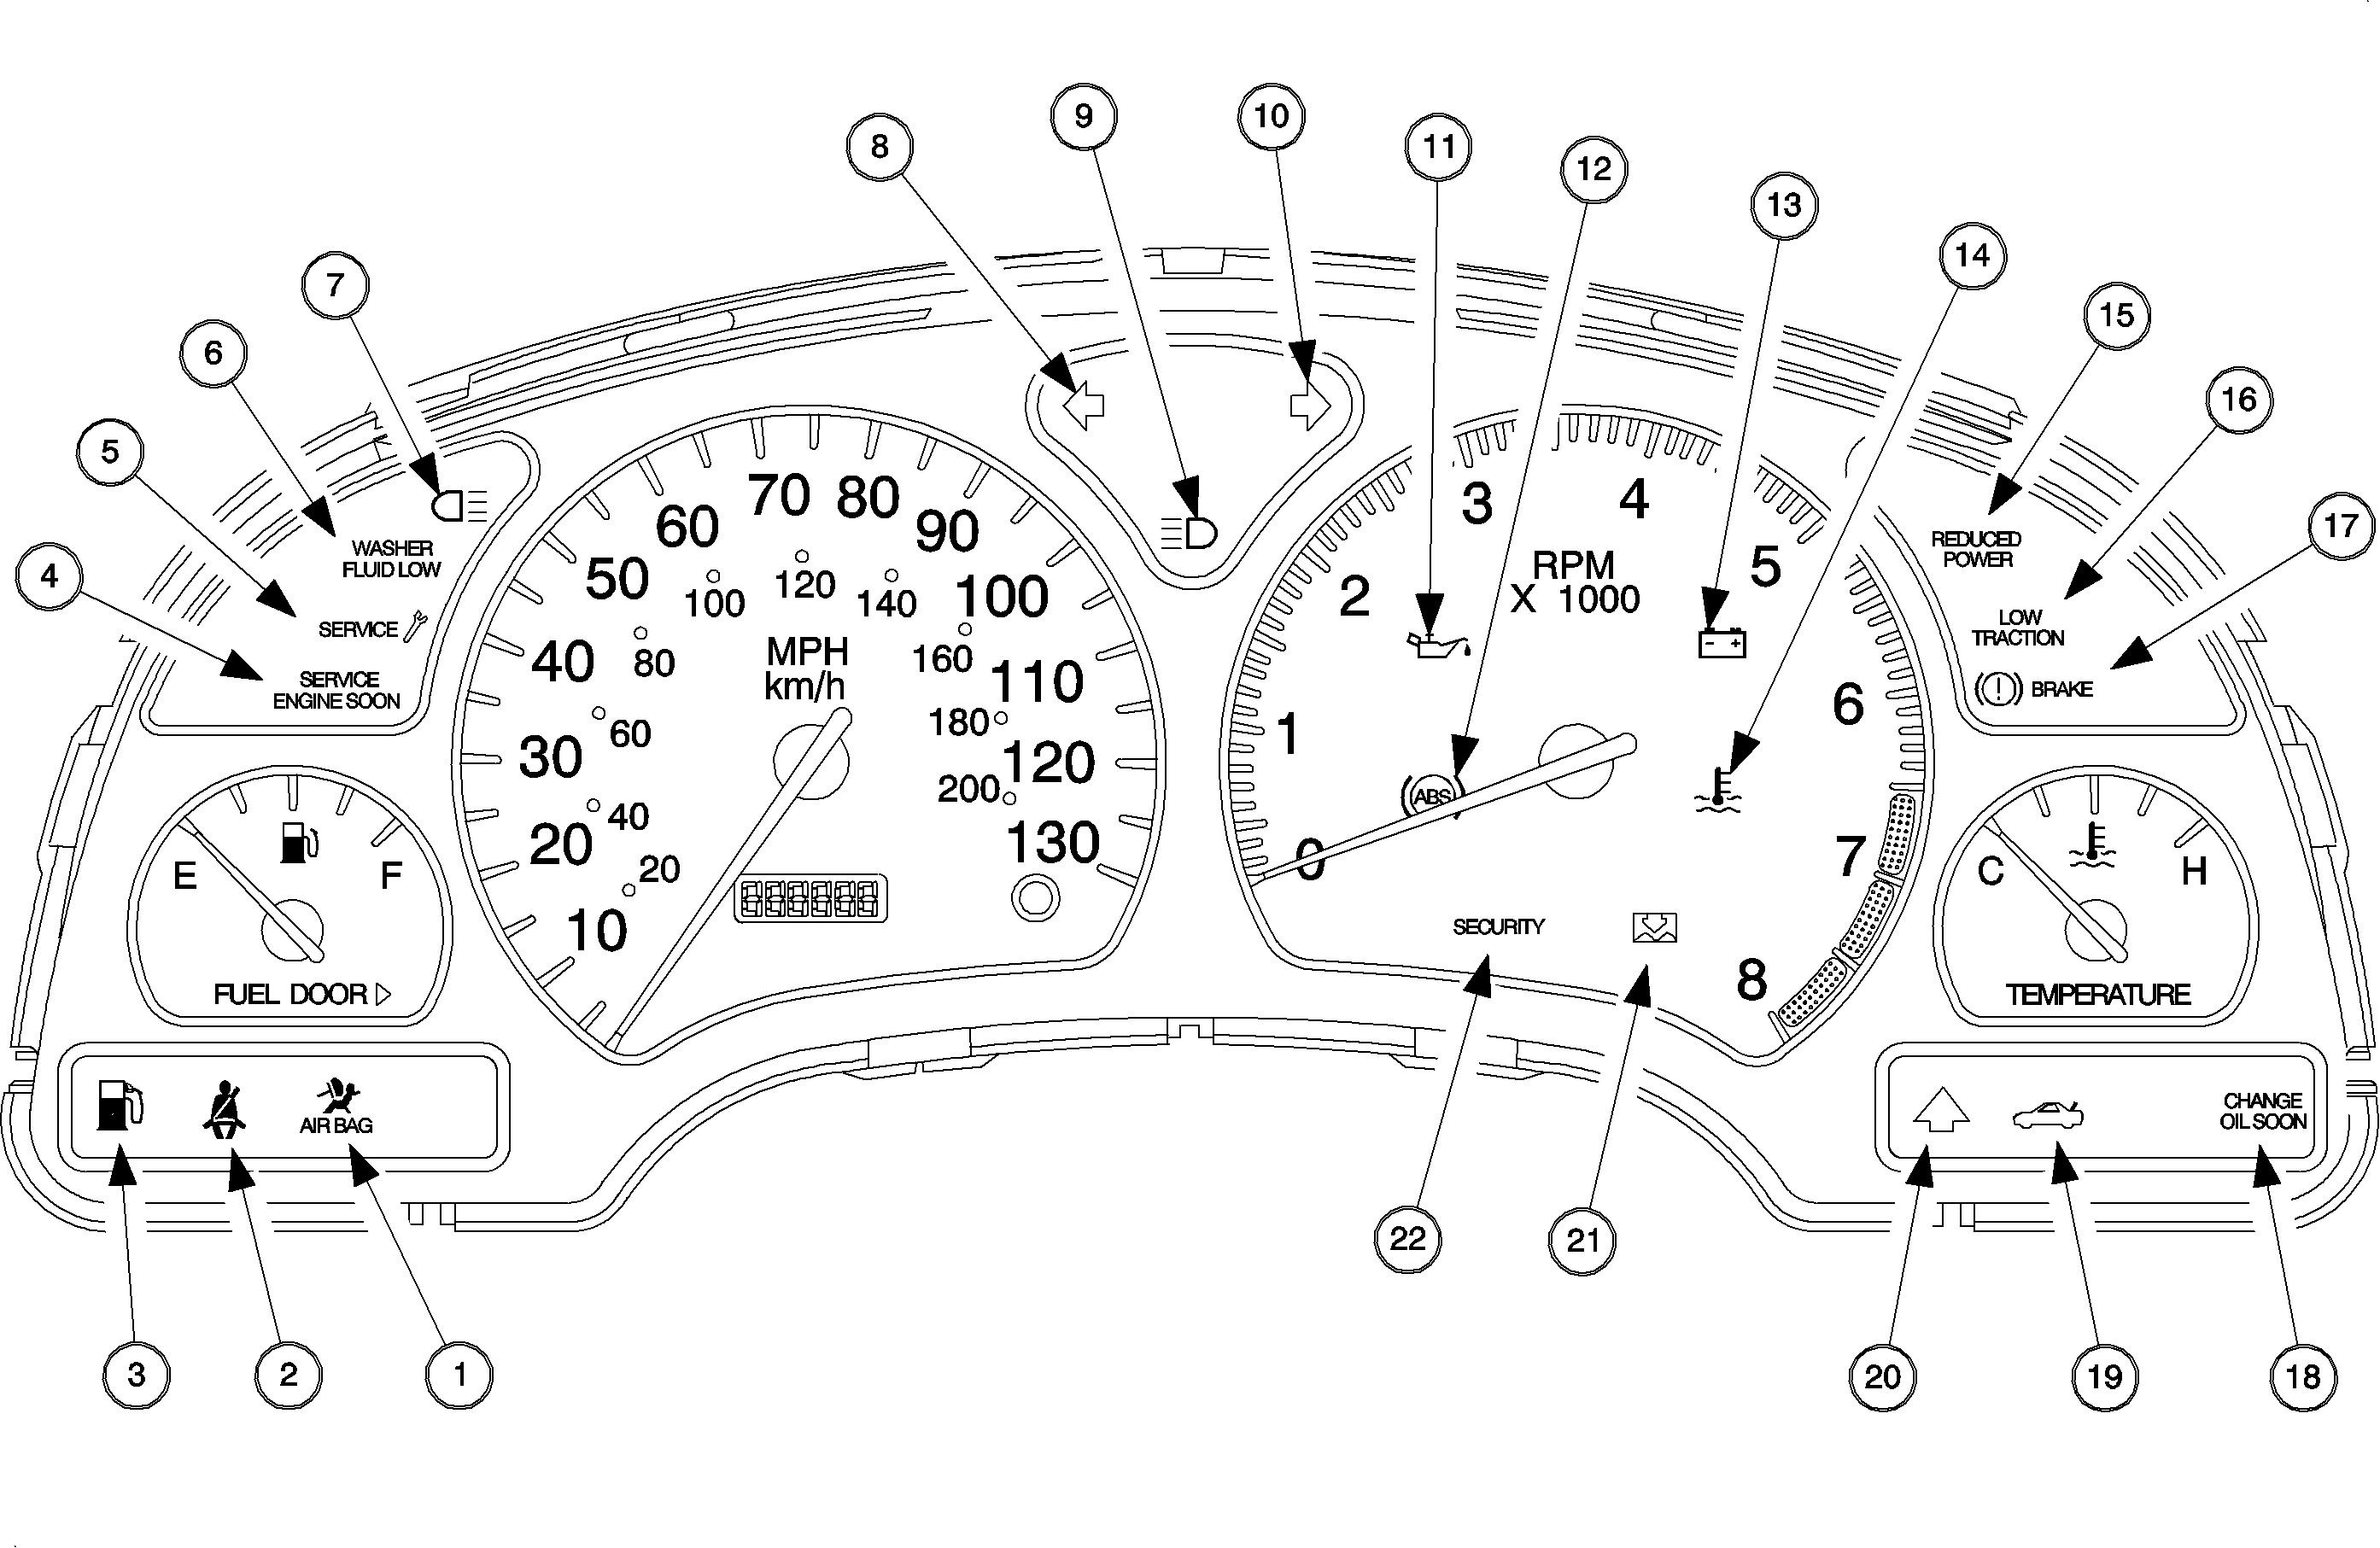
Important: Do not replace the instrument cluster assembly if the lens assembly is damaged or if one or more of the bulbs listed below are burned out.
The following instrument cluster parts are serviced separately:
| • | The instrument cluster lens assembly |
| • | The odometer backlighting bulb (white base) |
| • | The instrument cluster illumination bulbs (blue base) |
| • | The daytime running lamp (DRL) telltale bulb (blue base) |
| • | The high beam indicator bulb (blue base) |
| • | The turn signal indicator bulbs (blue base) |
All other instrument cluster telltales are illuminated by light emitting diodes (LEDs), which are integrated into the instrument cluster assembly. An LED-related failure will require the replacement or the instrument cluster assembly.
Refer to the procedure in this bulletin to replace the instrument cluster lens assembly and any serviceable bulbs.

Important: The daytime running lamp (DRL) telltale, high beam indicator and turn signal indicators all use replaceable bulbs (blue base). All other telltales utilize LEDs which are not replaceable. Additionally, the instrument cluster contains 6 replaceable bulbs (blue base) for illumination and one replaceable bulb (white base) for odometer backlighting.
Important: The daytime running lamp (DRL) telltale, high beam indicator and turn signal indicators all use replaceable bulbs (blue base). All other telltales utilize LEDs which are not replaceable. Additionally, the instrument cluster contains 6 replaceable bulbs (blue base) for illumination and one replaceable bulb (white base) for odometer backlighting.

Instrument Cluster Lens--Removal Procedure
Notice:
• Failure to use the anti-static mat SA9502Z properly may result in damage
to the cluster electronics. • Do not touch or bump the pointers of the gages. If a pointer is moved
from its position, the calibration of the gage will be affected and the gage will
no longer be accurate. If a pointer is moved, the cluster assembly will need to be
replaced.
Important:
• It is strongly recommended that rubber gloves (e.g. surgical gloves) be
worn while performing removal and installation procedures to prevent grease, smudges,
scratches and fingerprints. • If the lens/mask gets dirty, it can be cleaned by following the procedures
in the 2000 Body/Electrical Volume II Service Manual. If a dial face gets dirty, it
can be cleaned by using a glass cleaner and lint free rag.
- Remove the instrument panel cluster assembly.
- Thoroughly clean your hands with soap and water to remove any oil or other substances which could damage the cluster. If unable to clean your hands, an alternative is to wear surgical gloves.
- Place anti-static mat SA9502Z down on the work area. In order to ground the mat, connect the alligator clip to a large metal object (e.g. work bench) making sure that the attaching point is a bare metal surface and not painted or coated. Also, put the wrist strap around one of your wrists.
- Place a clean, dry, soft cloth on top of the anti-static mat.
- Place the instrument panel cluster assembly face down on the clothe and the anti-static mat.
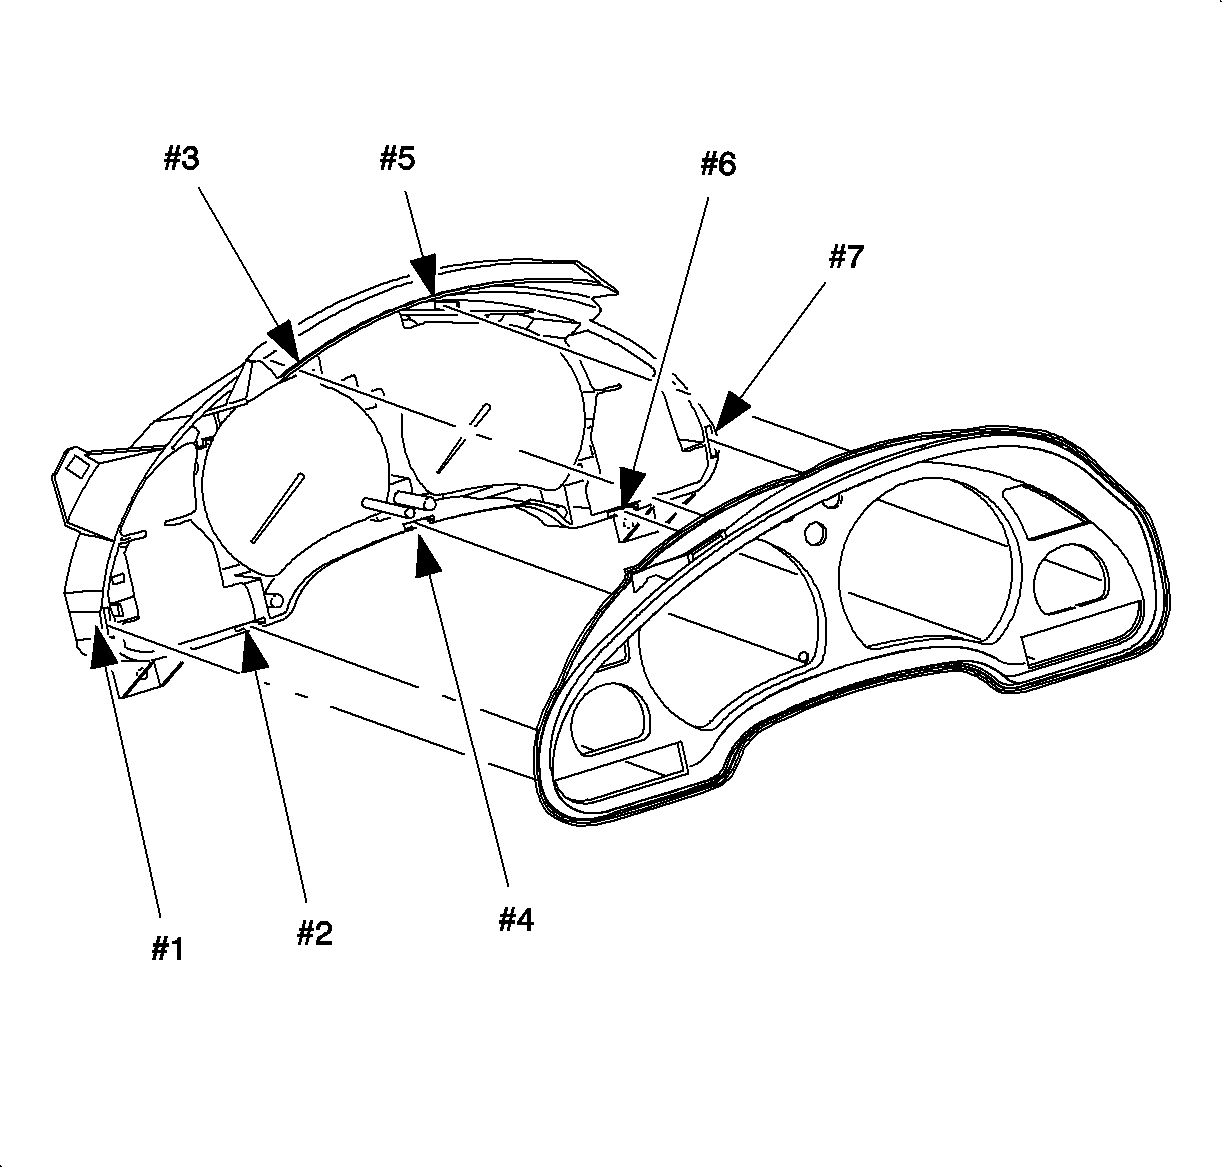
- With the end of the housing (white portion of the cluster) in one hand and the lens/mask assembly (black portion of the cluster) in the other hand, disengage the clip#1 with one hand while separating the lens/mask assembly from the housing with the other.
- Repeat for clips#2 through #7.
| • | On S-Series, refer to Instrument Cluster Removal procedure in the Instrumentation/Driver Information section of the 2000 S-Series Body/Electrical Volume II service manual. |
| • | On L-Series, refer to I/P Cluster Removal procedure in the Instrumentation/Driver Information section of the 2000 L-Series Body/Electrical Volume II service manual. |
Installation Procedure
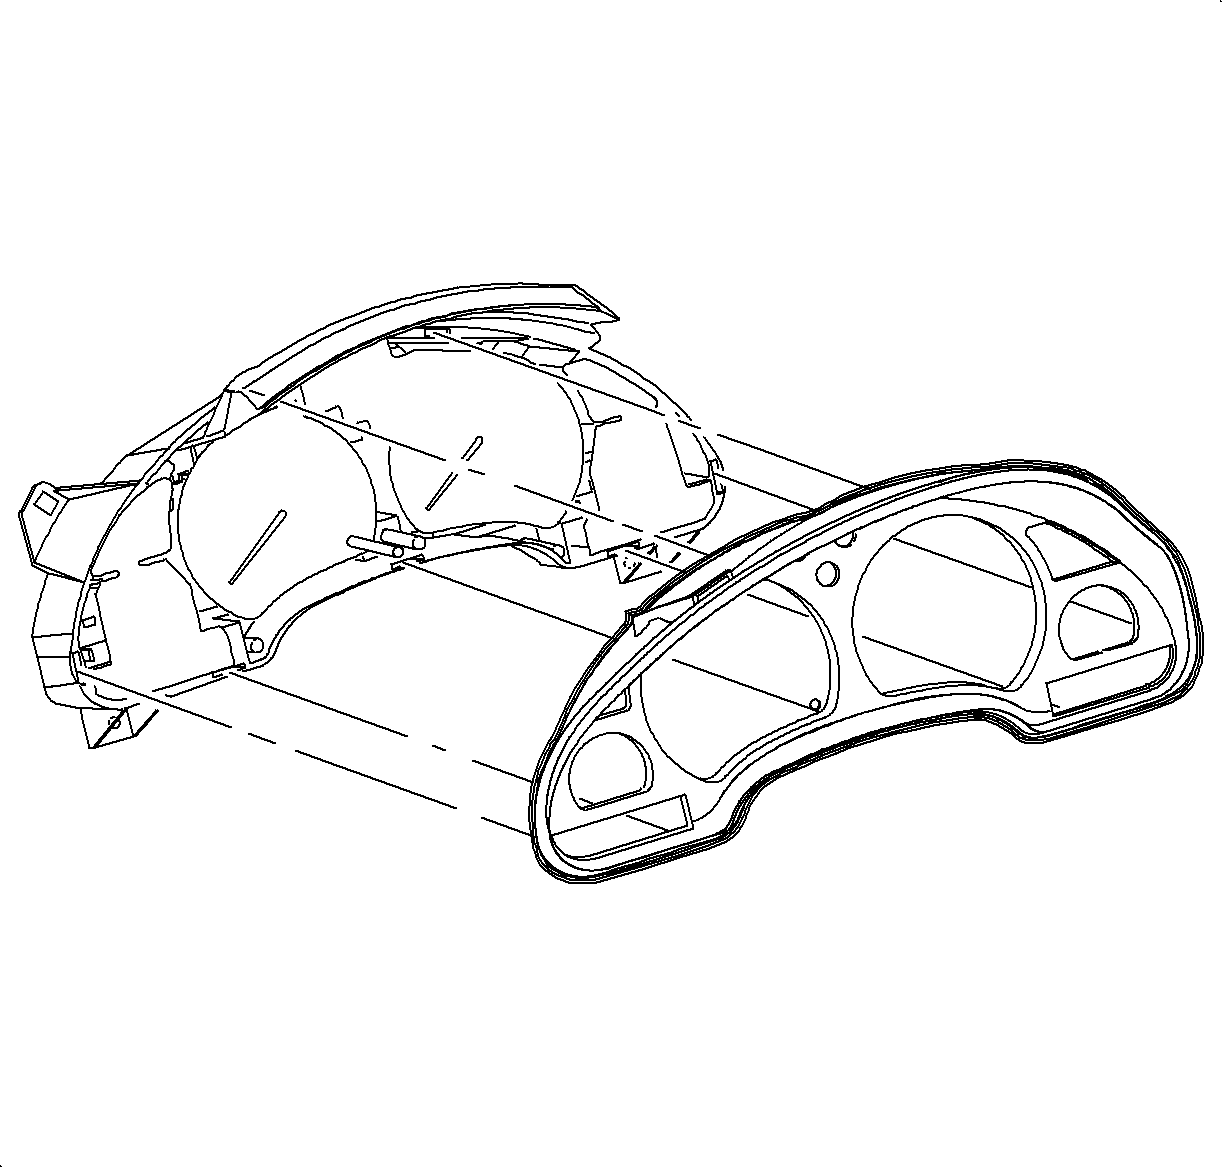
- Holding the lens/mask assembly by the ends and face up, align the reset knob with the hole in the lens.
- Start the lens/mask tabs into the slots in the housing and at the top of the cluster seat 2 housing tabs into the lens/mask slots.
- Press down on top of the lens/mask around the edge to fully seat all clips.
- Inspect that all clips are seated correctly and that there is no debris or markings on the lens or dial faces.
- Install the instrument panel cluster assembly.
| • | On S-Series, refer to Instrument Cluster Installation procedure in the Instrument/Driver information section of the 2000 S-Series Body/Electrical Volume II service manual. |
| • | On L-Series, refer to I/P Cluster Installation procedure in the Instrument/Driver information section of the 2000 L-Series Body/Electrical Volume II service manual. |
Instrument Cluster Bulbs -- Removal Procedure
Notice: Failure to use the anti-static mat SA9502Z properly may result in damage to the cluster electronics.
Important:
• It is strongly recommended that rubber gloves (e.g. surgical gloves) be
worn while performing removal and installation procedures to prevent grease, smudges,
scratches and fingerprints. • If the lens/mask gets dirty, it can be cleaned by following the procedures
in the 2000 Body/Electrical Volume II Service Manual. If a dial face gets dirty, it
can be cleaned by using a glass cleaner and lint free rag.
- Remove the instrument panel cluster assembly.
- Thoroughly clean your hands with soap and water to remove any oil or other substances which could damage the cluster. If unable to clean your hands, an alternative is to wear surgical gloves.
- Place anti-static mat SA9502Z down on the work area. In order to ground the mat, connect the alligator clip to a large metal object (e.g. work bench) making sure that the attaching point is a bare metal surface and not painted or coated. Also, put the wrist strap around one of your wrists.
- Place a clean, dry, soft cloth on top of the anti-static mat.
- Place the instrument panel cluster assembly face down on the clothe and the anti-static mat.
- To remove the bulb, rotate the bulb base ¼ turn counter clockwise using a ¼ socket or small flat-blade screwdriver.
| • | On S-Series, refer to Instrument Cluster Removal procedure in the Instrumentation/Driver Information section of the 2000 S-Series Body/Electrical Volume II service manual. |
| • | On L-Series, refer to I/P Cluster Removal procedure in the Instrumentation/Driver Information section of the 2000 L-Series Body/Electrical Volume II service manual. |
Installation Procedure
- To replace the bulb, rotate the bulb base ¼ turn clockwise using a ¼ socket or small flat-blade screwdriver.
- Install the instrument panel cluster assembly.
Refer to Parts Requirements in this bulletin for correct bulb part numbers.
| • | On S-Series, refer to Instrument Cluster Installation procedure in the Instrument/Driver information section of the 2000 S-Series Body/Electrical Volume II service manual. |
| • | On L-Series, refer to I/P Cluster Installation procedure in the Instrument/Driver information section of the 2000 L-Series Body/Electrical Volume II service manual. |
Parts Requirements:
Part Number | Description |
|---|---|
21019273 | Bulb -- Inst Cstr, Odometer (white base) |
21019274 | Bulb -- Inst Cstr, Illumination (blue base) -- Illumination, DRL, High Beam, Turn Signal |
21024703 | Lens Asm -- Cluster |
Claim Information:
To receive credit for this repair during the warranty coverage period, submit a claim through the Saturn Dealer System using the appropriate Electronic Labor Time Guide for the correct Labor Operation Code N0627 Bulbs, Lamp, Instrument Panel Cluster -- One or all-- Replace, or N4115 Lens, Instrument Cluster -- Replace.
