Air Conditioning Compressor Replacement 2.4L (LAX)
Removal Procedure
- Discharge and recover the refrigerant. Refer to Refrigerant Recovery and Recharging.
- Remove the right engine splash shield. Refer to Engine Splash Shield Replacement - Right Side.
- Remove the drive belt. Refer to Drive Belt Replacement.
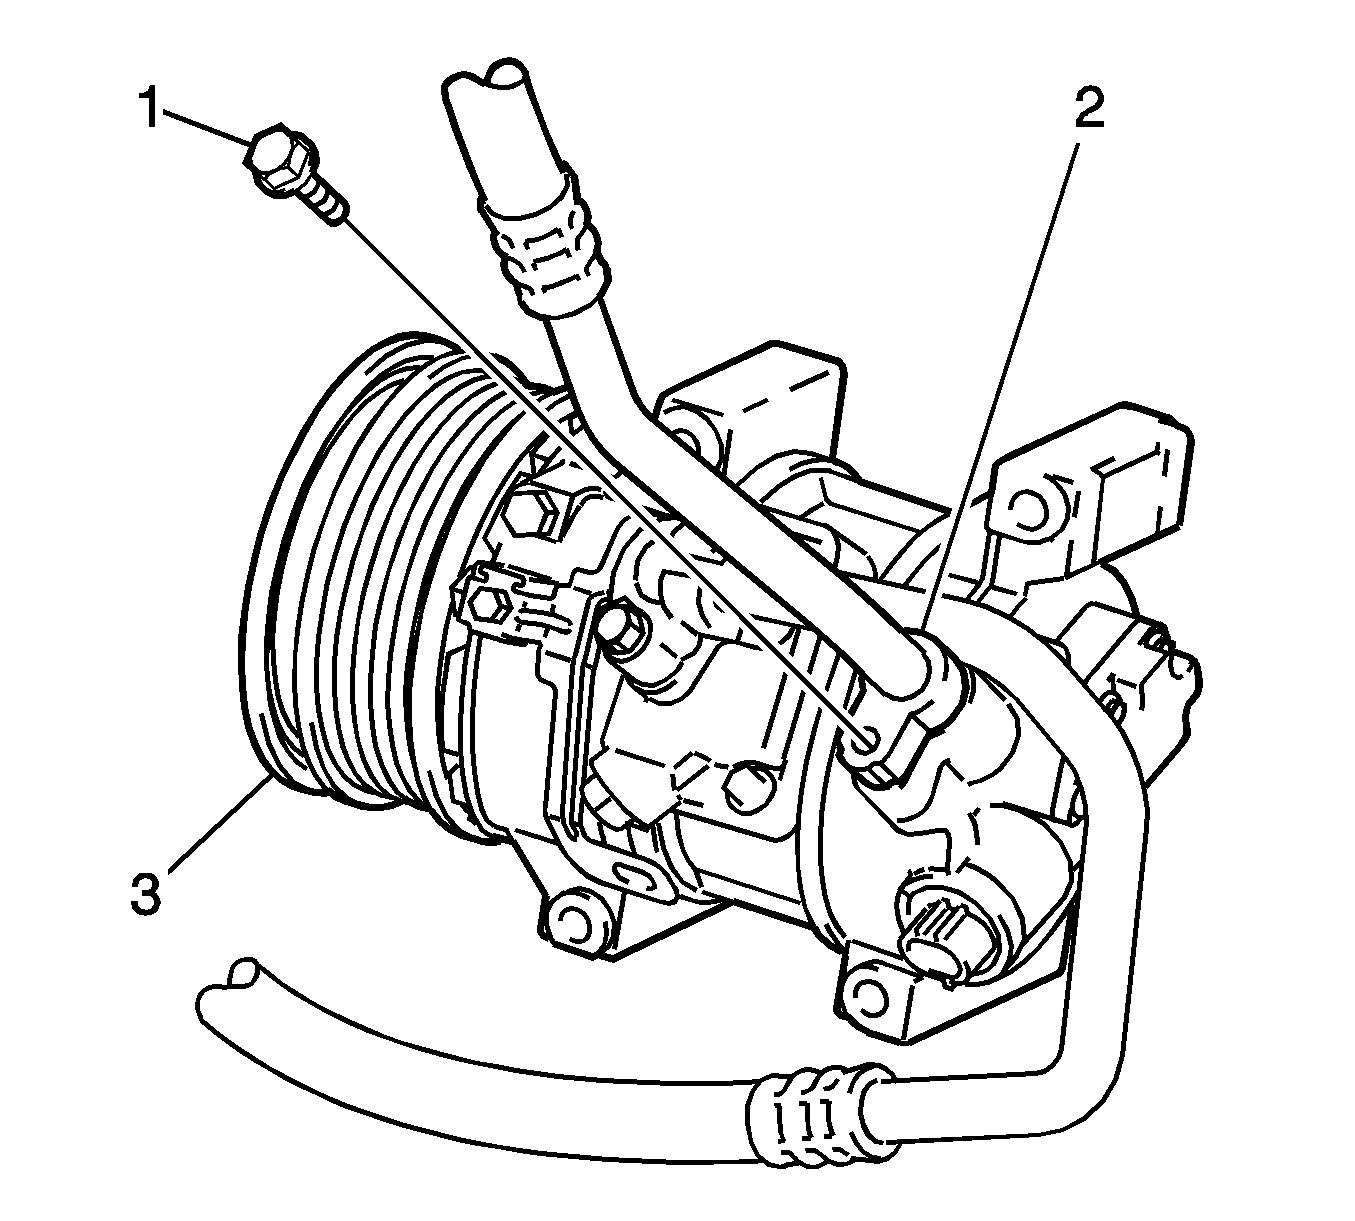
- Remove the bolt (1) and disconnect the suction hose assembly (2) from the compressor (3).
- Remove the O-ring from the suction hose.
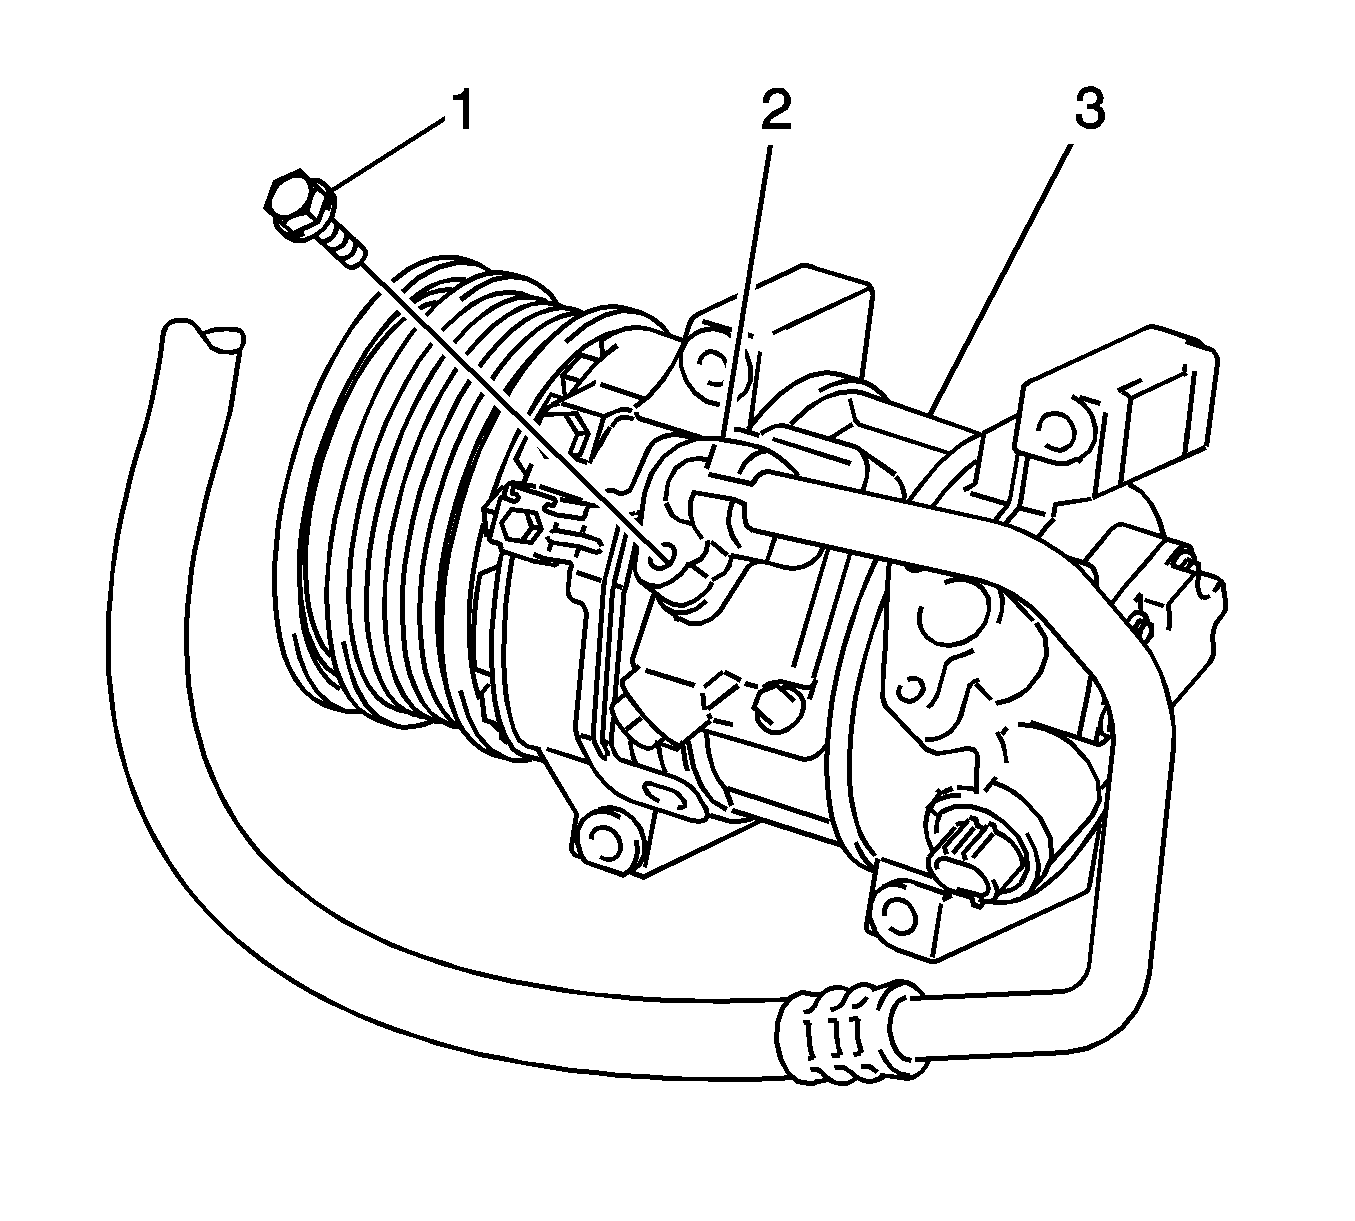
- Remove the bolt (1) and disconnect the discharge hose assembly (2) from the compressor (3).
- Remove the discharge hose assembly (2) from the compressor (3).
- Remove the O-ring from the discharge hose.
- Disconnect the electrical connector.
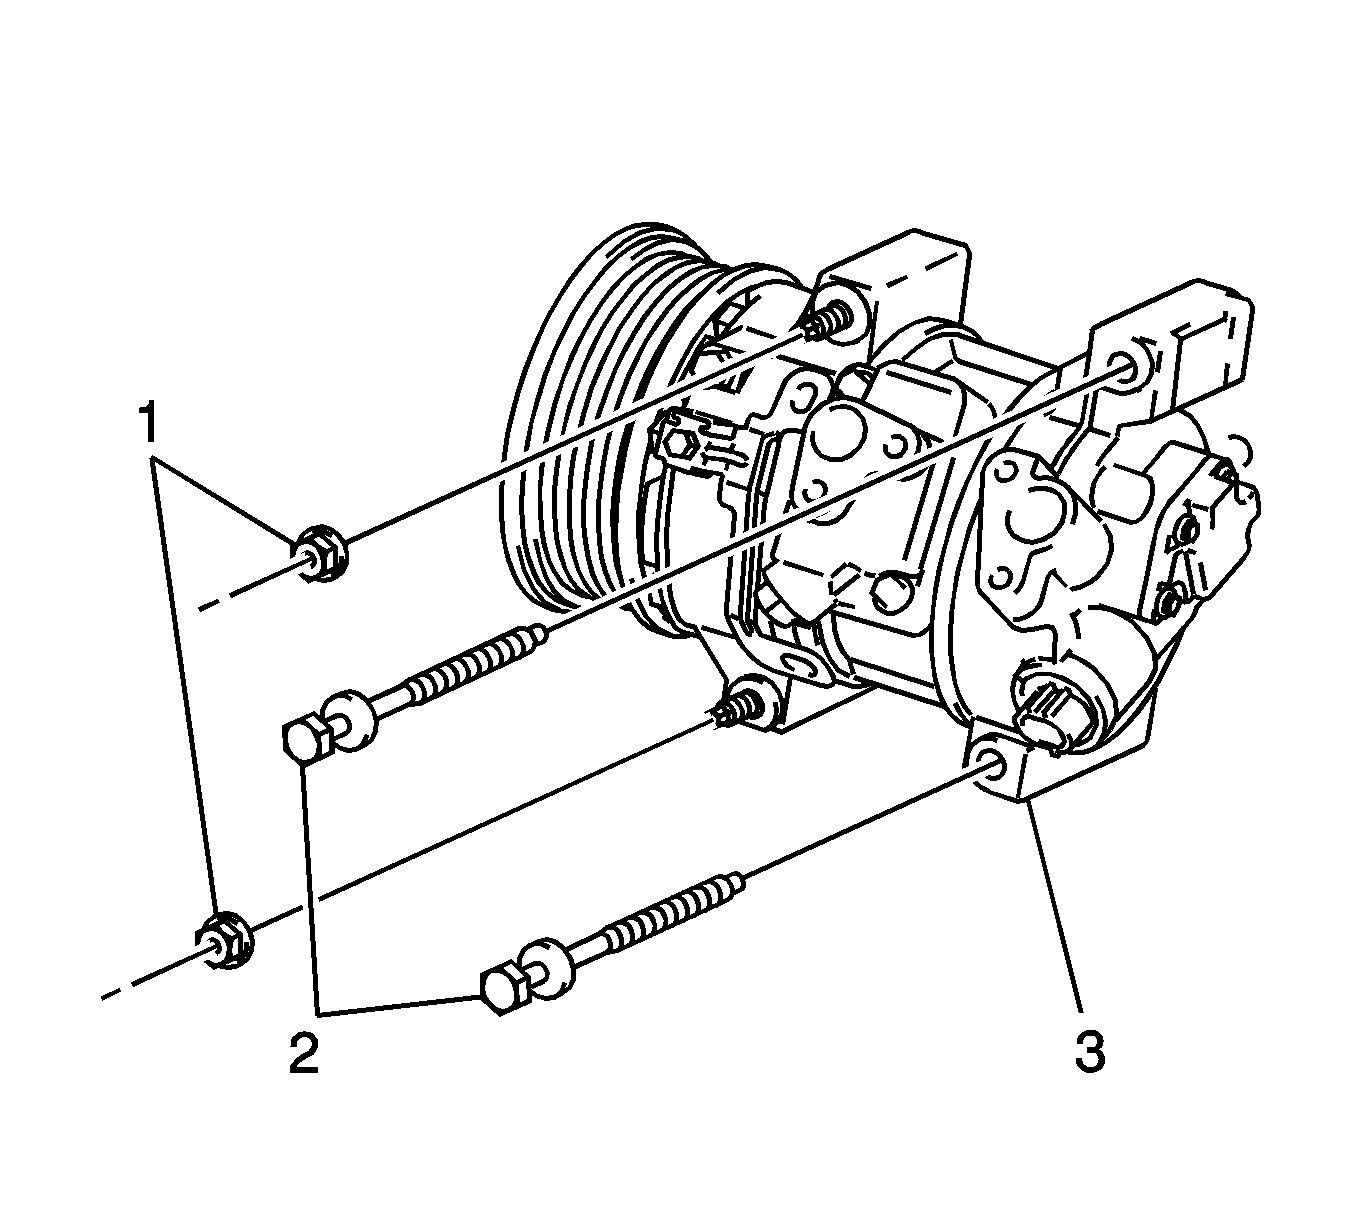
- Remove the two bolts (2) from the compressor (3).
- Remove the two nuts (1) from the compressor (3).
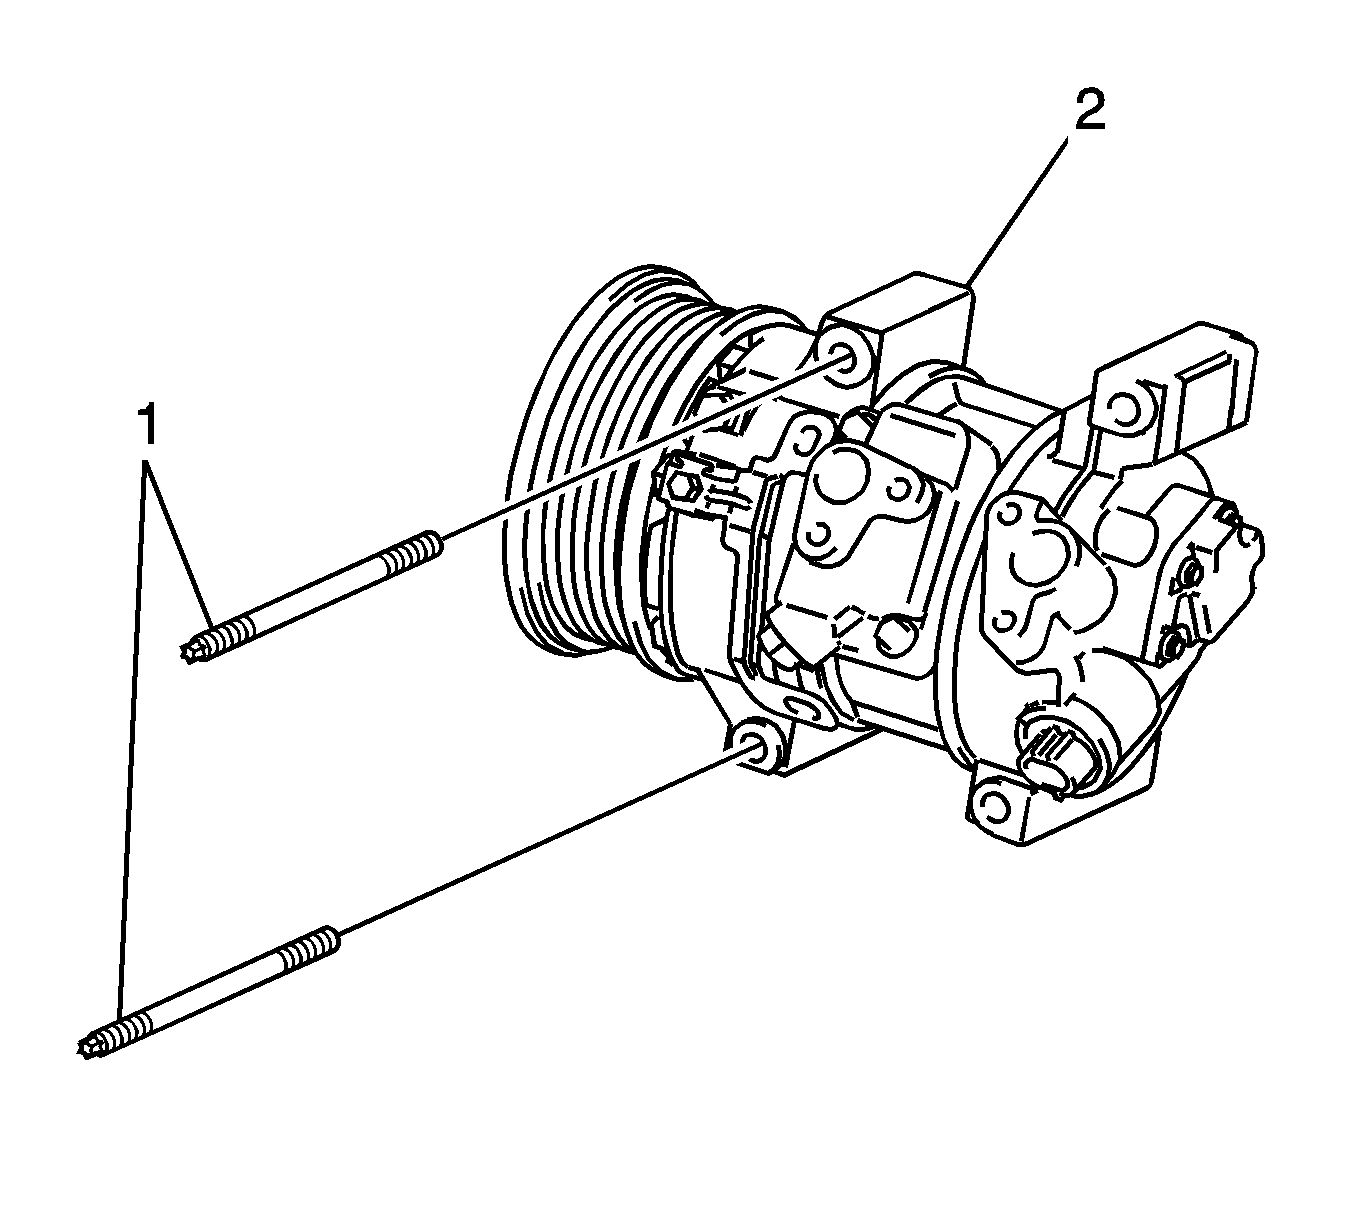
- Remove the two stud bolts (1) and the compressor (2) from the vehicle.
- If the compressor is to be replaced, drain and measure the amount of oil in the compressor.
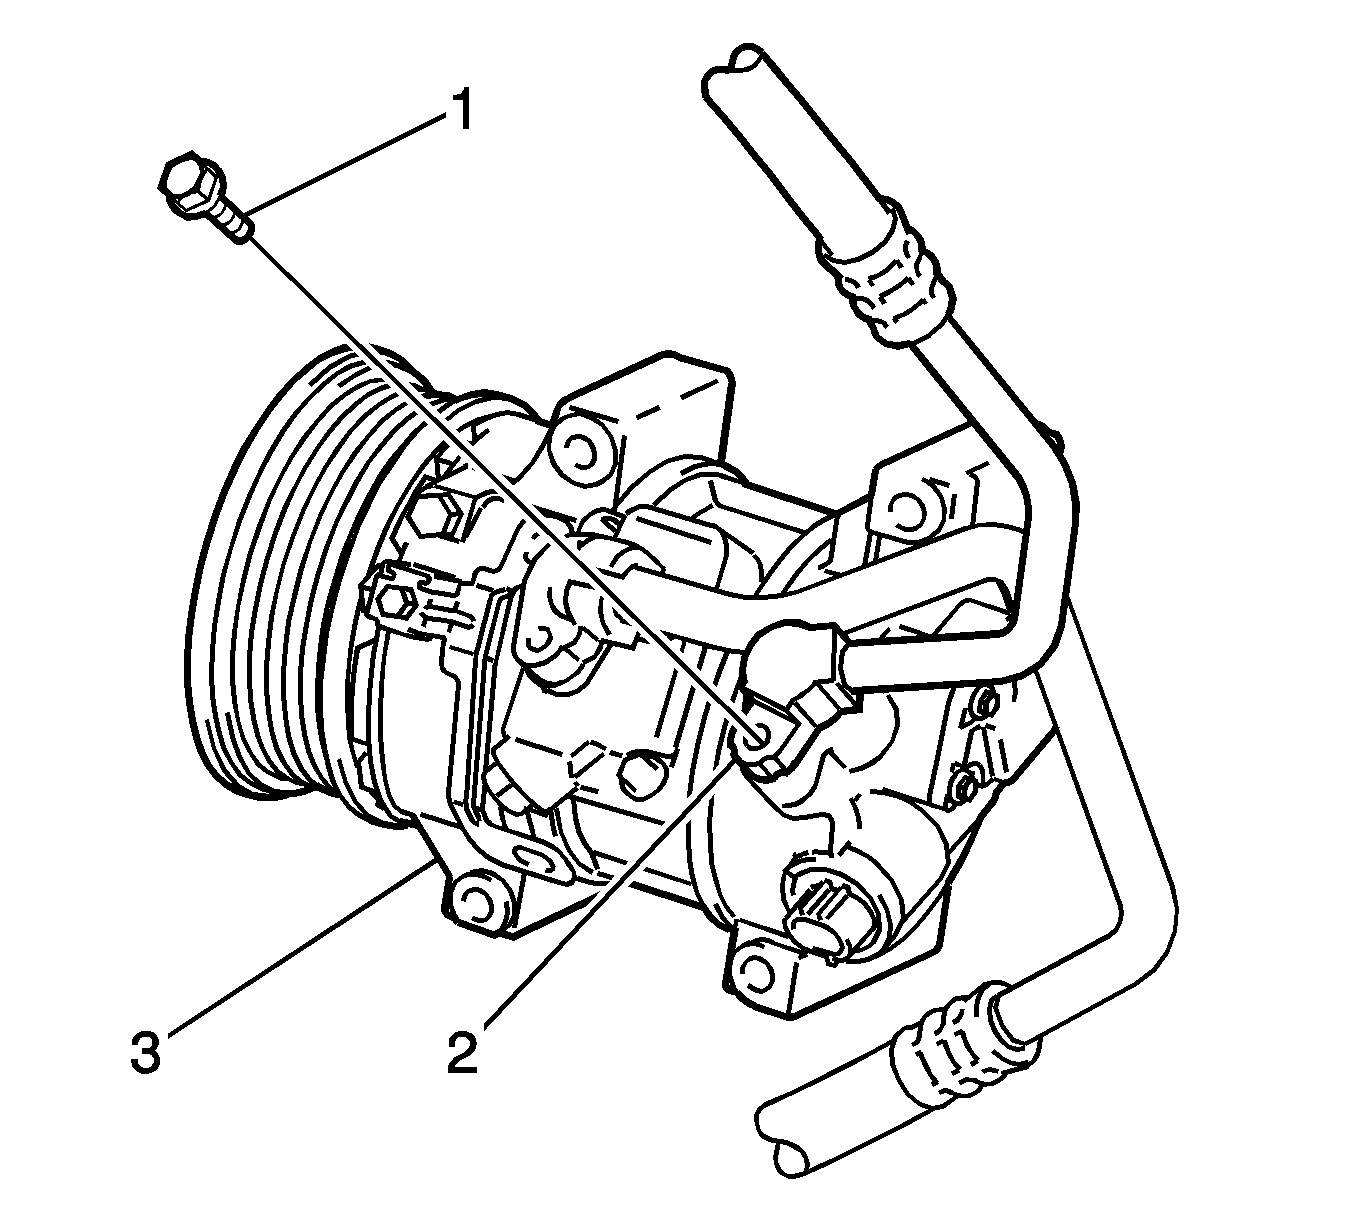
Note: Cap the open fittings to prevent dirt and moisture from entering the refrigeration system.
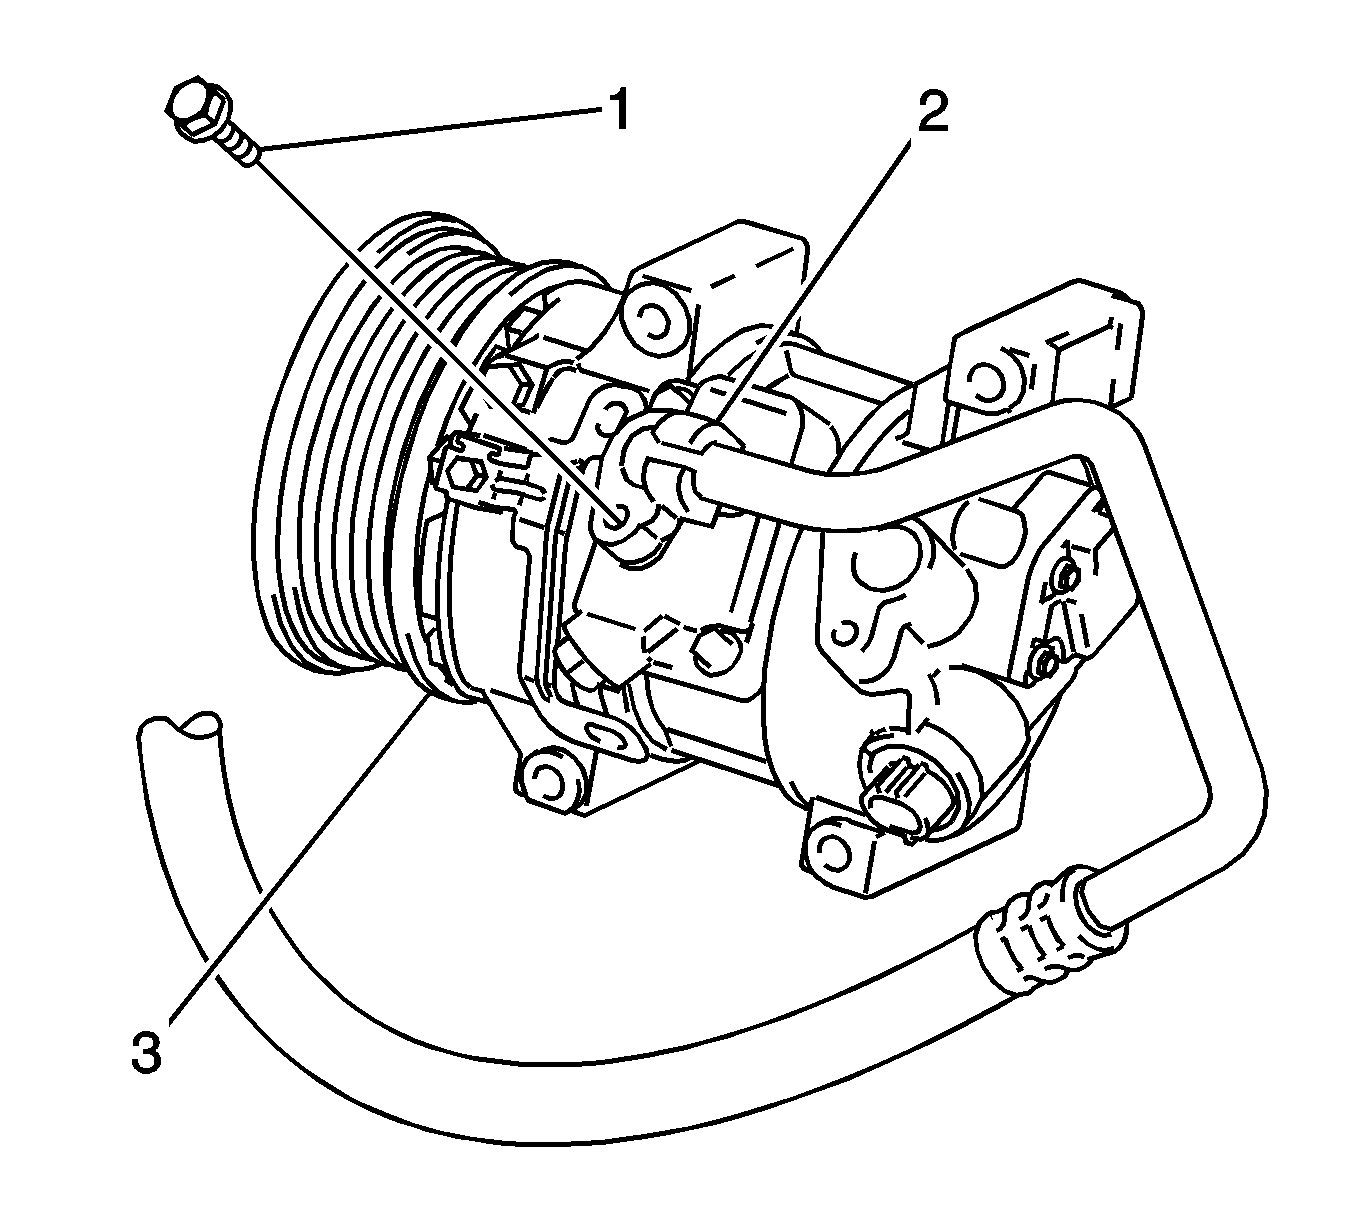
Note: Cap the open fittings to prevent dirt and moisture from entering the refrigeration system.
Installation Procedure
- Drain the PAG oil from the old compressor into the clean calibrated measuring container. Drain from the crankcase and from the rear head ports. Record the amount of oil removed from the old compressor.
- Drain the PAG oil from the new compressor into the clean calibrated measuring container. Drain from the crankcase and from the rear head ports.
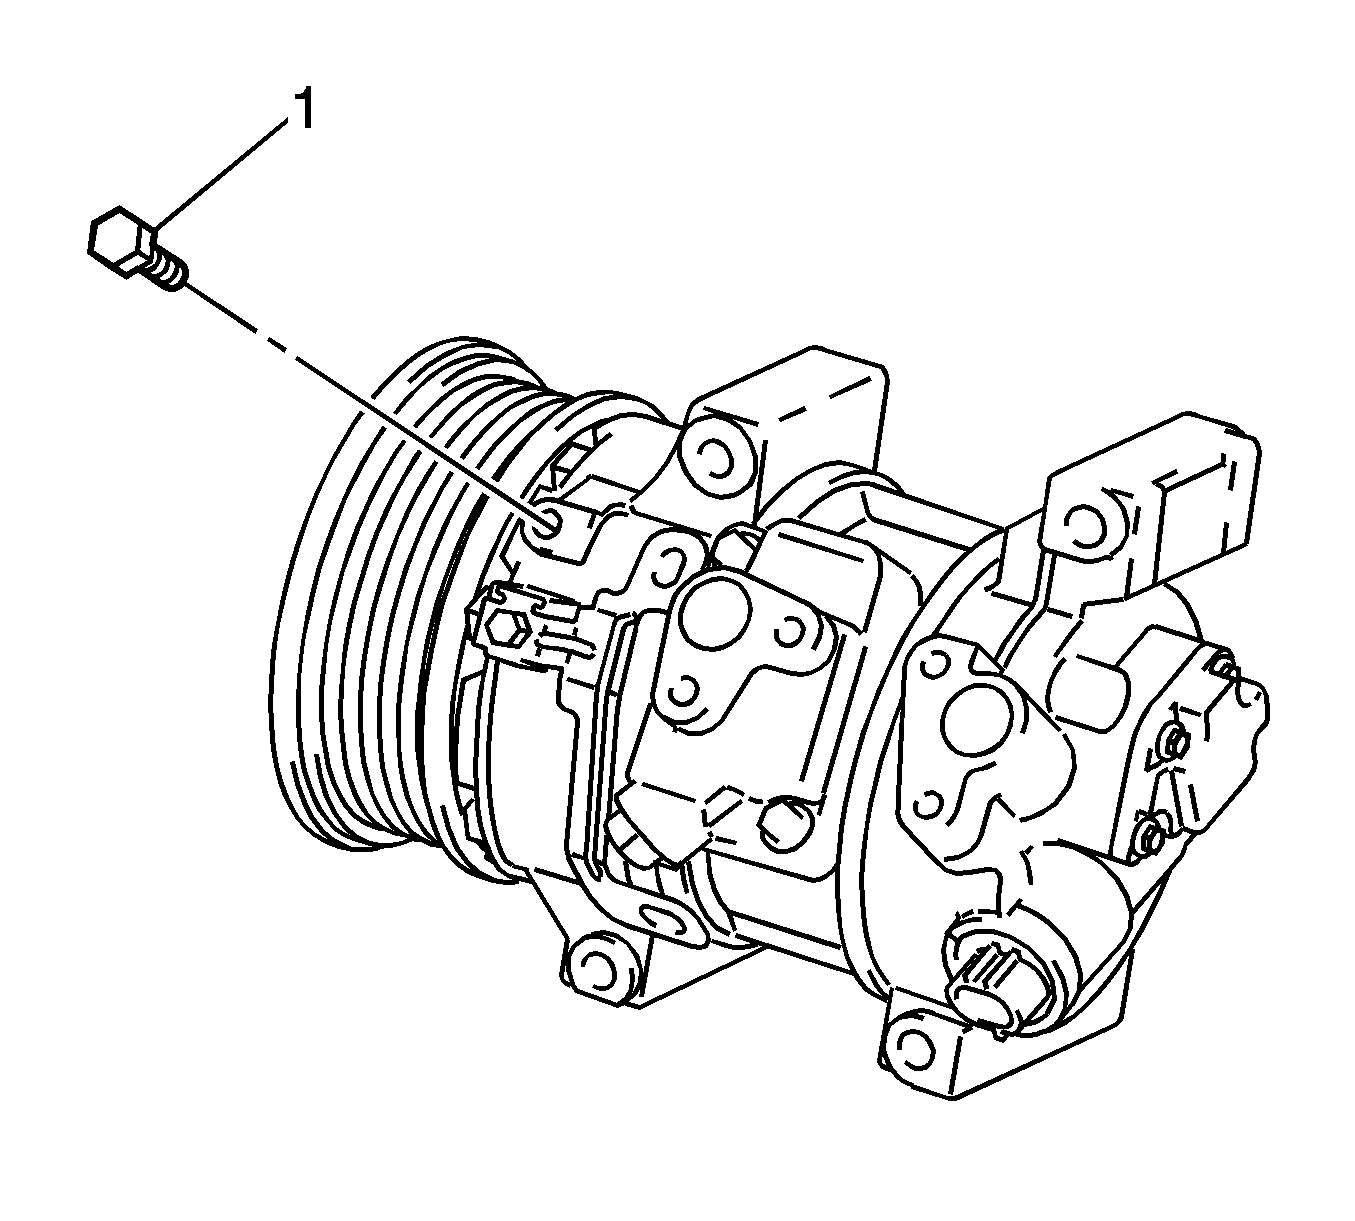
- Install the crankcase oil drain bolt (1) to the compressor.
- Rotate the clutch driver 3 times to lubricate the internal swashplate and the piston shoes.
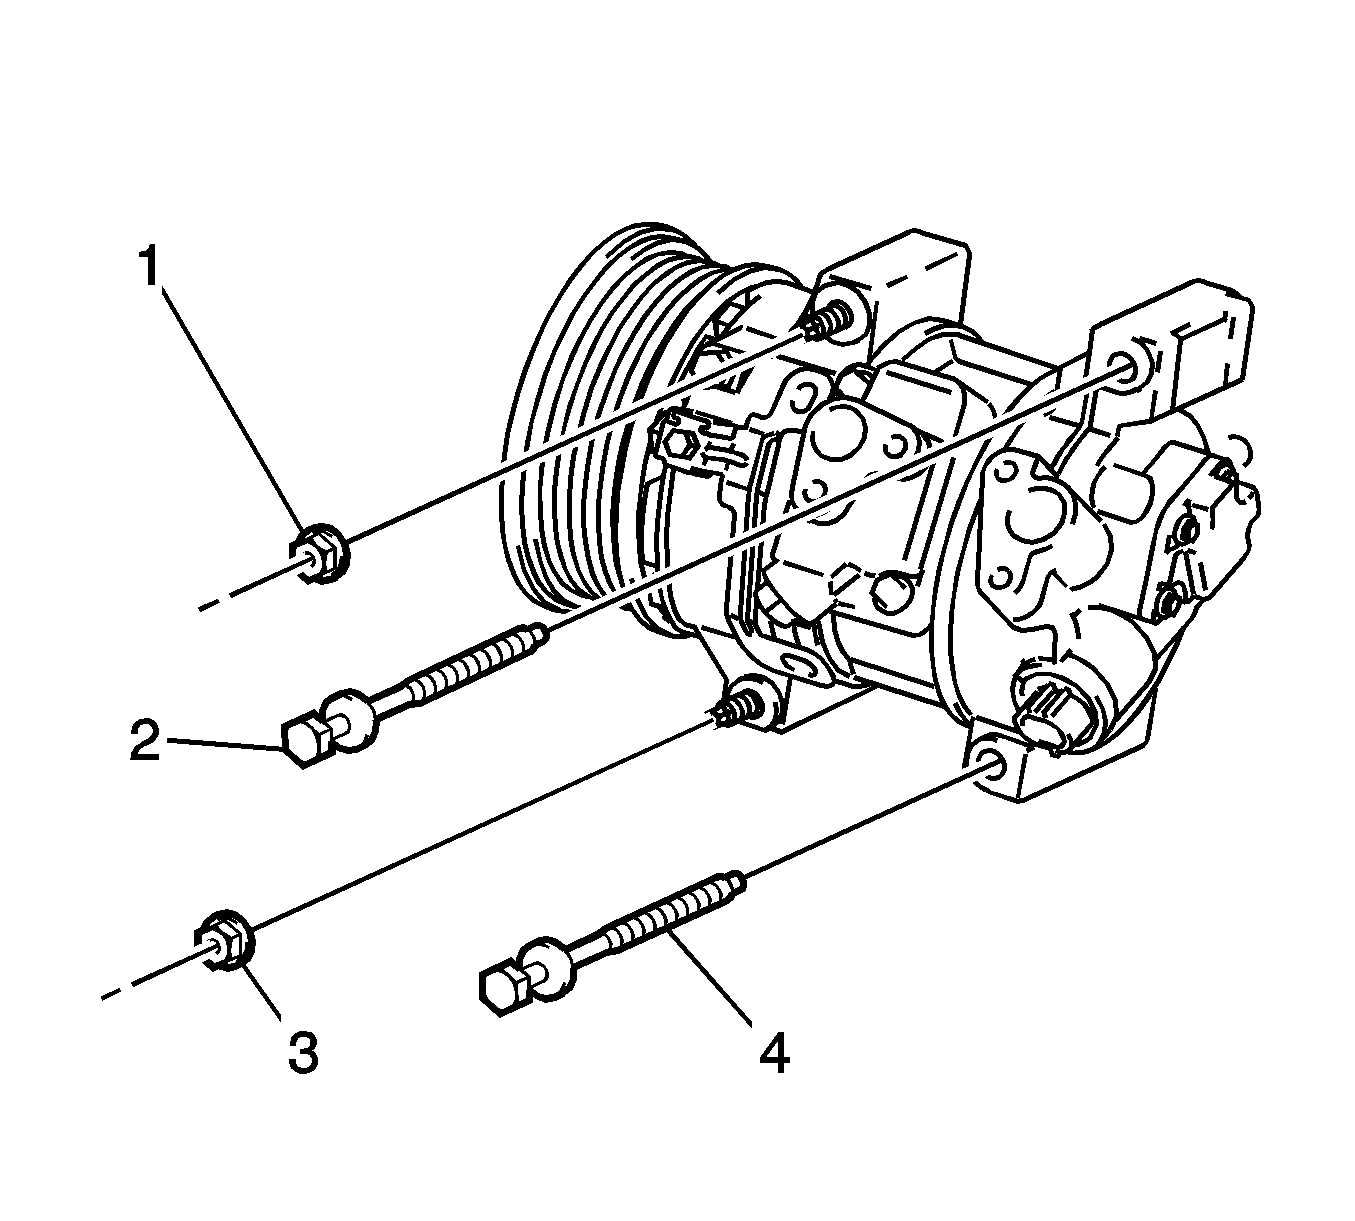
- Install the two stud bolts (1) and the compressor (2) to the vehicle.
- Install the upper nut (1) to the compressor.
- Install the lower nut (3) to the compressor
- Install the upper bolt (2) to the compressor.
- Install the lower bolt (4) to the compressor.
- Install new O-rings lubricated with mineral base 525 viscosity refrigerant oil to the compressor and discharge hose assembly.
- Install the discharge hose assembly (2) to the compressor (3).
- Install the bolt (1) and connect the discharge hose assembly (2) to the compressor (3).
- Install new O-rings lubricated with mineral base 525 viscosity refrigerant oil to the compressor and suction hose assembly.
- Install the bolt (1) and connect the suction hose assembly (2) to the compressor (3).
- Install the compressor serpentine drive belt. Refer to Drive Belt Replacement.
- Install the right engine splash shield. Refer to Engine Splash Shield Replacement - Right Side.
- Lower the vehicle.
- Connect the compressor clutch electrical connector.
- Evacuate and recharge the A/C system. Refer to Refrigerant Recovery and Recharging.
- Operate the A/C system and test for refrigerant leaks. Refer to Leak Testing.
Caution: Do not mix refrigerant oils. Use of incorrect refrigerant oil will cause compressor failure.
The CVC compressor uses a low viscosity refrigerant oil, GM P/N 12378526 (Canadian P/N 88900060).Note: NEW CVC compressor assemblies are shipped with a full poly-alkylene glycol (PAG) refrigerant oil charge. Use of the incorrect PAG oil can result in compressor failure.
| • | If the amount of old oil drained from the old compressor is less than or equal to 95 ml (3.2 oz), add 95 ml (3.2 oz) of new oil into the new compressor through the crankcase bolt hole. |
| • | If the amount of old oil drained from the old compressor is greater than 95 ml (3.2 oz), add the equivalent amount of new oil into the new compressor through the crankcase bolt hole. Refer to Refrigerant System Capacities. |
Caution: Refer to Fastener Caution in the Preface section.
Tighten
Tighten the drain bolt (1) to 16 N·m (12 lb ft).

Tighten
Tighten the stud bolts to 9.8 N·m (87 lb in).
Tighten
Tighten the compressor nut to 25 N·m (18 lb ft).
Tighten
Tighten the compressor nut to 25 N·m (18 lb ft).
Tighten
Tighten the compressor bolt to 25 N·m (18 lb ft).
Tighten
Tighten the compressor bolt to 25 N·m (18 lb ft).

Tighten
Tighten the discharge hose bolt to 9.8 N·m (87 lb in).

Tighten
Tighten the suction hose bolt to 9.8 N·m (87 lb in).
Air Conditioning Compressor Replacement 1.8L (LAY)
Removal Procedure
- Discharge and recover the refrigerant. Refer to Refrigerant Recovery and Recharging.
- Remove the right engine splash shield. Refer to Engine Splash Shield Replacement - Right Side.
- Remove the drive belt. Refer to Drive Belt Replacement.
- Remove the bolt (1) and disconnect the suction hose assembly (2) from the compressor (3).
- Remove the O-ring from the suction hose.
- Remove the bolt (1) and disconnect the discharge hose assembly (2) from the compressor (3).
- Remove the discharge hose assembly (2) from the compressor (3).
- Remove the O-ring from the discharge hose.
- Disconnect the electrical connector.
- Remove the two bolts (2) from the compressor (3).
- Remove the two nuts (1) from the compressor (3).
- Remove the two stud bolts (1) and the compressor (2) from the vehicle.
- If the compressor is to be replaced, drain and measure the amount of oil in the compressor.
Note: Cap the open fittings to prevent dirt and moisture from entering the refrigeration system.
Note: Cap the open fittings to prevent dirt and moisture from entering the refrigeration system.


Installation Procedure
- Drain the PAG oil from the old compressor into the clean calibrated measuring container. Drain from the crankcase and from the rear head ports. Record the amount of oil removed from the old compressor.
- Drain the PAG oil from the new compressor into the clean calibrated measuring container. Drain from the crankcase and from the rear head ports.
- Install the crankcase oil drain bolt (1) to the compressor.
- Rotate the clutch driver 3 times to lubricate the internal swashplate and the piston shoes.
- Install the two stud bolts (1) and the compressor (2) to the vehicle.
- Install the upper nut (1) to the compressor.
- Install the lower nut (3) to the compressor
- Install the upper bolt (2) to the compressor.
- Install the lower bolt (4) to the compressor.
- Install new O-rings lubricated with mineral base 525 viscosity refrigerant oil to the compressor and discharge hose assembly.
- Install the discharge hose assembly (2) to the compressor (3).
- Install the bolt (1) and connect the discharge hose assembly (2) to the compressor (3).
- Install new O-rings lubricated with mineral base 525 viscosity refrigerant oil to the compressor and suction hose assembly.
- Install the bolt (1) and connect the suction hose assembly (2) to the compressor (3).
- Install the compressor serpentine drive belt. Refer to Drive Belt Replacement.
- Install the right engine splash shield. Refer to Engine Splash Shield Replacement - Right Side.
- Lower the vehicle.
- Connect the compressor clutch electrical connector.
- Evacuate and recharge the A/C system. Refer to Refrigerant Recovery and Recharging.
- Operate the A/C system and test for refrigerant leaks. Refer to Leak Testing.
Caution: Do not mix refrigerant oils. Use of incorrect refrigerant oil will cause compressor failure.
The CVC compressor uses a low viscosity refrigerant oil, GM P/N 12378526 (Canadian P/N 88900060).Note: NEW CVC compressor assemblies are shipped with a full poly-alkylene glycol (PAG) refrigerant oil charge. Use of the incorrect PAG oil can result in compressor failure.
| • | If the amount of old oil drained from the old compressor is less than or equal to 95 ml (3.2 oz), add 95 ml (3.2 oz) of new oil into the new compressor through the crankcase bolt hole. |
| • | If the amount of old oil drained from the old compressor is greater than 95 ml (3.2 oz), add the equivalent amount of new oil into the new compressor through the crankcase bolt hole. Refer to Refrigerant System Capacities. |
Caution: Refer to Fastener Caution in the Preface section.

Tighten
Tighten the drain bolt (1) to 16 N·m (12 lb ft).

Tighten
Tighten the stud bolts to 9.8 N·m (87 lb in).

Tighten
Tighten the compressor nut to 25 N·m (18 lb ft).
Tighten
Tighten the compressor nut to 25 N·m (18 lb ft).
Tighten
Tighten the compressor bolt to 25 N·m (18 lb ft).
Tighten
Tighten the compressor bolt to 25 N·m (18 lb ft).

Tighten
Tighten the discharge hose bolt to 9.8 N·m (87 lb in).

Tighten
Tighten the suction hose bolt to 9.8 N·m (87 lb in).
