Rear Axle Replacement Except All Wheel Drive and GT
Removal Procedure
- Disconnect the negative battery cable. Refer to
Battery Negative Cable Disconnection and Connection.
- Raise and support the vehicle. Refer to
Lifting and Jacking the Vehicle.
- Disconnect the 2 rear park brake cables from the rear brakes. Refer to
Parking Brake Rear Cable Replacement.
- Disconnect the 2 connectors from the 2 rear wheel speed sensors.

- Remove the bolt (1) from the left rear speed sensor wire clamp.
- Disengage the clamps and separate the left rear speed sensor wire from the rear twist beam axle.
- Remove the bolt from the right rear speed sensor wire clamp.
- Disengage the clamps and separate the right rear speed sensor wire from the rear axle.

- Remove the bolt (1) and separate the left rear brake hose from the rear axle.
- Remove the bolt and separate the right rear brake hose from the rear axle.
- Remove the rear brakes and the brake shields. Refer to
Rear Brake Shield Replacement.
- Remove the stabilizer shaft and the bushing. Refer to
Stabilizer Shaft Replacement.

- Support the rear axle with blocks of wood (2) and jacks (3).
- Remove the following components in order to separate the 2 shock absorbers from the rear axle:

- Hold the nut and remove the bolt (3) from the left rear axle bracket.

- Hold the nut and remove the bolt (1) from the right rear axle bracket.
- Remove the rear axle from the vehicle.
- If you need to replace the bushings, use paint in order to place match marks on the 2 notches on the bushings and on the rear axle.
- If you need to replace the bushings, use a press in order to remove the rear axle bushings.
Installation Procedure

- If you removed the bushings, align the arrow mark on a new bushing with the match mark on the rear twist beam axle. Ensure the new bushing is in the same
position as the old bushing.
Specification
The specification (a) is 0.88 ±3 degrees.
- If you removed the bushings, use a press in order to install the bushings.

- Raise and support the rear axle with blocks of wood (1) and jacks (2).

Note: Do not tighten the nuts or the bolts yet. The weight of the vehicle must be on the tire and wheel assemblies before tightening the nuts and the bolts.
- Install, but do not tighten, the bolt (3) and the nut in order to retain the left side of the rear axle (1) to the body.

- Install, but do not tighten, the bolt (1) and the nut in order to retain the right side of the rear axle to the body.

- Install, but do not tighten, the following components in order to retain the 2 shock absorbers to the rear axle:
- Install the stabilizer shaft and the bushing. Refer to
Stabilizer Shaft Replacement.
- Install the rear brakes and the brake shields. Refer to
Rear Brake Shield Replacement.
Caution: Refer to Fastener Caution in the Preface section.

- Install the bolt (1) in order to retain the left rear brake hose to the rear axle. Tighten the bolt to
29 N·m (21 lb ft).
- Install the bolt in order to retain the right rear brake hose to the rear axle. Tighten the bolt to
29 N·m (21 lb ft).
- Install the 2 rear park brake cables to the rear brakes. Refer to
Parking Brake Rear Cable Replacement.
- Adjust the park brake system. Refer to
Parking Brake Adjustment.

- Engage the clamps (2) on the left rear speed sensor wire.
- Install the bolt (1) in order to retain the left rear speed sensor wire to the rear axle. Tighten the bolt to
8 N·m (71 lb in).
- Connect the left rear speed sensor connector.
- Engage the clamps on the right rear speed sensor wire.
- Install the bolt in order to retain the right rear speed sensor wire to the rear axle. Tighten the bolt to
8 N·m (71 lb in).
- Connect the right rear speed sensor connector.
- Remove the jacks and lower the vehicle.
- Raise and support the vehicle on an alignment rack or a lift that places the weight of the vehicle on the tires. Refer to
Lifting and Jacking the Vehicle.
- With the weight of the vehicle on the tires, push down on the rear bumper 3 times.

- Hold the nut and tighten the bolt (3) that retains the left side of the
rear axle to the body. Tighten the bolt to
85 N·m (63 lb ft).

- Hold the nut and tighten the bolt (1) that retains the right side of the rear axle to the body. Tighten the bolt to
85 N·m
(63 lb ft).

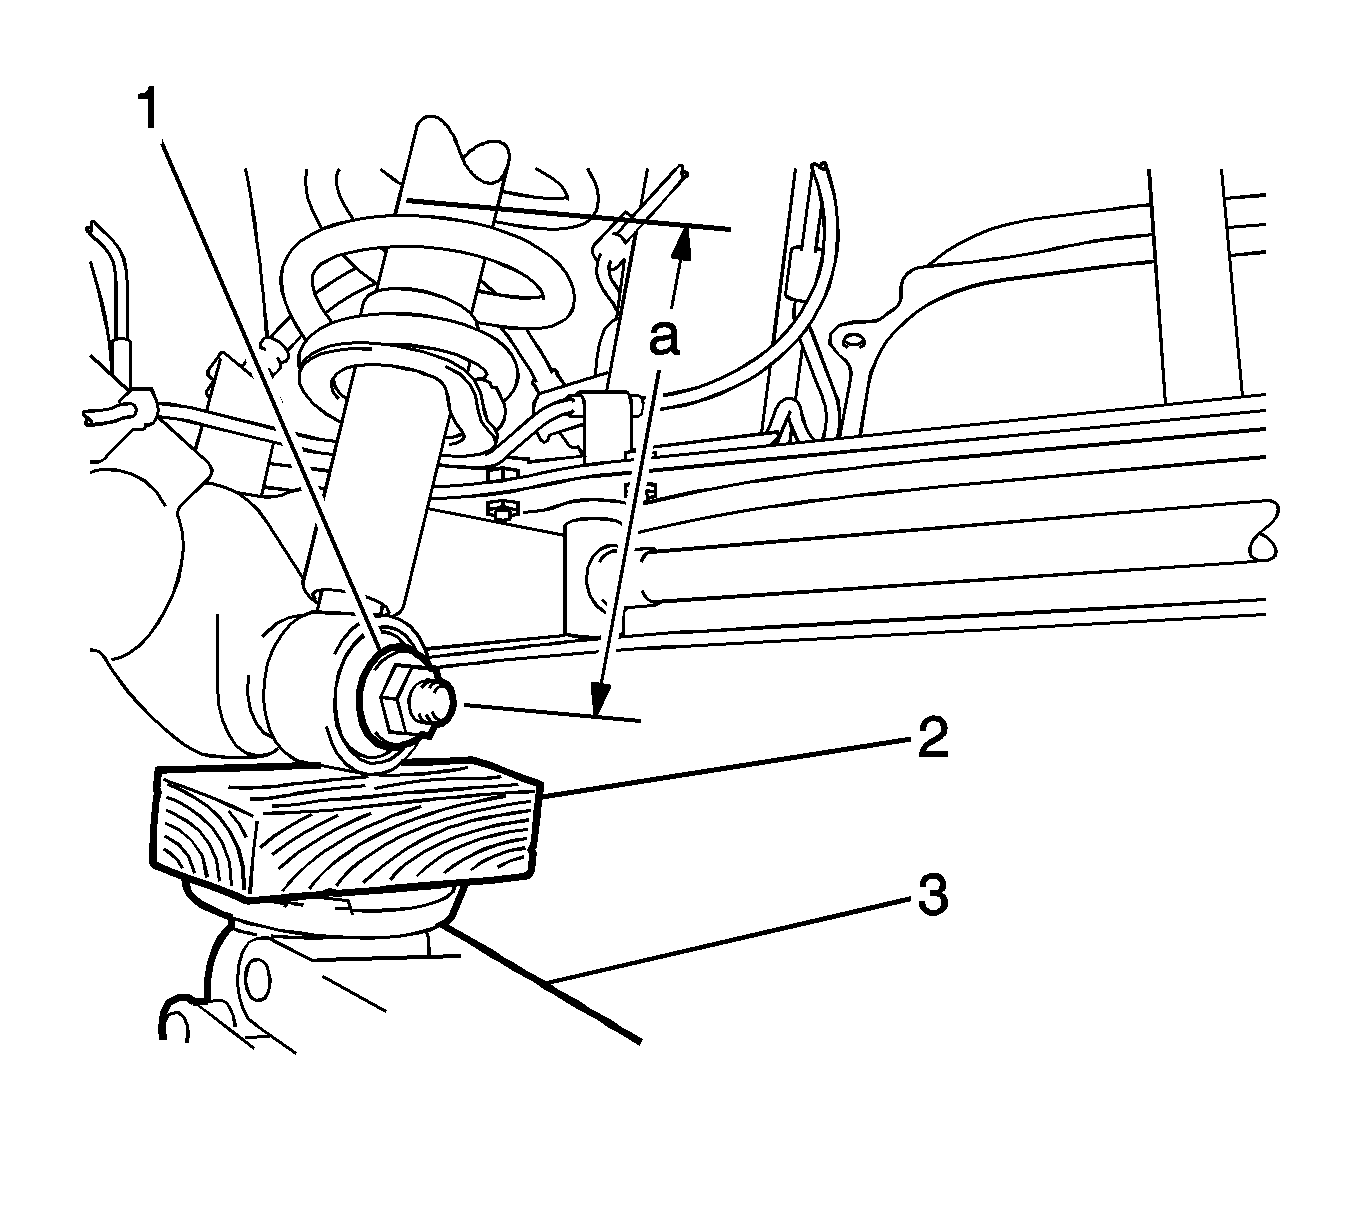
- Ensure the shock absorbers and the coil springs are compressed to the specification. If necessary, use blocks of wood (2) and jacks (3) in
order to raise the rear axle. If necessary, add weight, or even add an assistant to the rear seat.
Specification
The distance (a) is 206 mm (8.11 in).
- Tighten the 2 nuts that retain the shock absorbers to the rear axle. Tighten the nuts to
80 N·m (59 lb ft).
- Connect the negative battery cable. Refer to
Battery Negative Cable Disconnection and Connection.
- Bleed the brake system. Refer to
Hydraulic Brake System Bleeding.
- Perform the vehicle system check. Refer to
Diagnostic System Check - Vehicle.
- Measure the rear wheel alignment and perform the zero point calibrations. Refer to
Wheel Alignment Measurement.
- Lower the vehicle.


