Testing Procedure
Tools Required
| • | J 23688 Coolant Tester (Fahrenheit Scale) |
| • | J 26568 Coolant Tester (Centigrade Scale) |
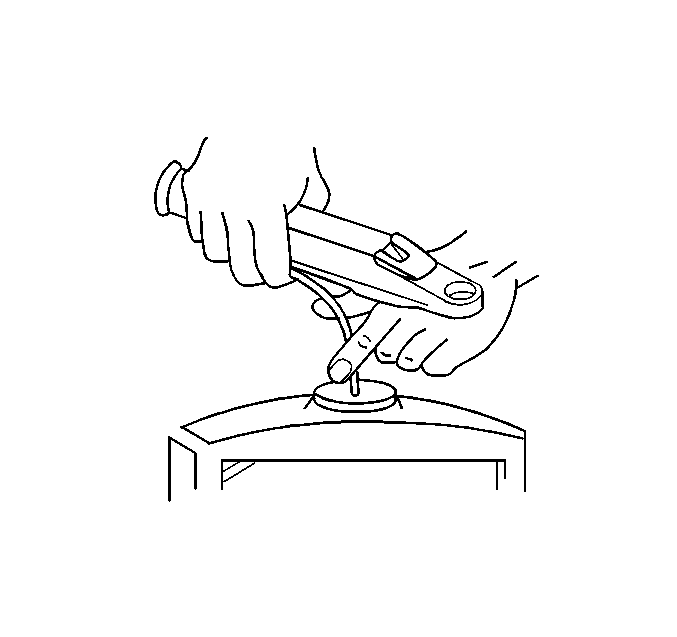
- Release the tip of the pump from the housing of the J 23688 or the J 26568 .
- Do not remove the clear plastic pump from the J 23688 or the J 26568 .
- Remove the surge tank/radiator cap.
- Insert the tip of the pump into the surge tank/radiator. The tip of the pump must be below the level of the coolant.
- Press the bulb. Release the pump bulb in order to obtain a sample of the coolant.
- Bend the tube around the J 23688 or the J 26568 . Insert the tip of the pump into the cover plate opening.
- Press the pump bulb. Allow a few drops to fall onto the measuring surface. Do not open the plastic cover when taking readings because any water evaporation will change the reading.
- Point the coolant concentration tester toward any light source. Look into the eyepiece.
- If the readings are not clear, properly clean and dry the measuring surface. Conduct a new test. Make sure there is enough fluid on the measuring surface.
Important:
• Before each use, swing back the plastic cover at the slanted end
of the coolant tester, exposing the measuring window and the bottom of the
plastic cover. • Wipe the measuring window dry with a tissue or a clean, soft cloth. • Close the plastic cover.
Caution: As long as there is pressure in the cooling system, the temperature can be considerably higher than the boiling temperature of the solution in the radiator without causing the solution to boil. Removal of the pressure cap while the engine is hot and pressure is high will cause the solution to boil instantaneously -- possibly with explosive force -- spewing the solution over the engine, fenders and the person removing the cap.


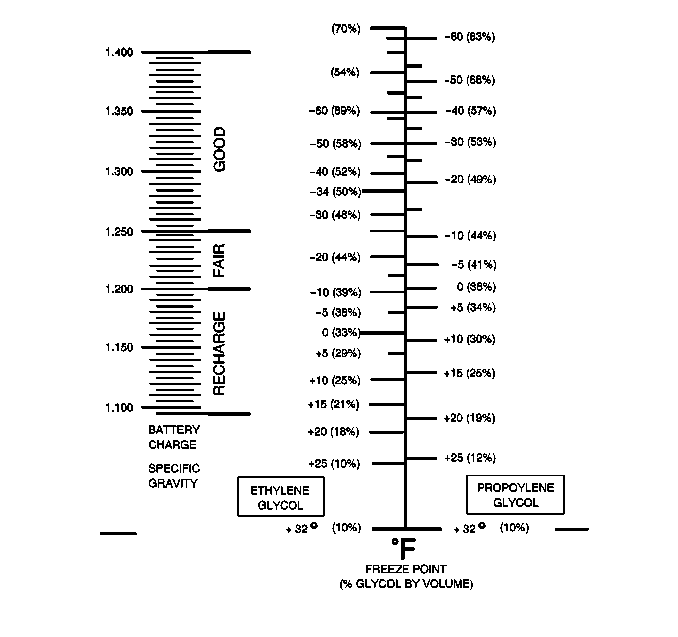
| • | The coolant protection reading is at the point where the dividing line between light and dark crosses the scale. Antifreeze protection is the scale on the right. |
| • | The temperature scale is reversed from a standard thermometer scale. Below zero readings are on the upper half of the scale. |

Coolant Concentration Testers
Some coolant manufacturers have started to mix different types of glycol into their coolant formulations. Propylene glycol is the most common new ingredient. A hydrometer will not always provide a correct measurement of freeze protection when anything other than ethylene glycol and water is being tested. The degree of inaccuracy will vary depending on the proportion other glycols present in the coolant.
All GM vehicles are produced with coolant you can accurately measure with a hydrometer. However, when the type and quality of the coolant being measured is unknown, such as a vehicle that has accumulated mileage, use a refractometer.
Use coolant testers J 26568 or J 23688 in order to check the antifreeze protection of the coolant. The markings of the refractometer must be correct. Unless J 23688 or J 26568 has a provision for temperature correction, test the temperature at which J 26568 or J 23688 is calibrated. If the coolant is warmer or cooler, the reading may be incorrect. Follow the manufacturer's directions on using J 26568 or J 23688 .
Calibrating Testers
J 23688 and J 26568 are factory calibrated and sealed. The testers should not require adjustment. If adjustment is required, do the following adjust procedure:
- Make sure J 23688 and J 26568 is between 21-29°C (70-85°F).
- Using distilled water, take a reading. If the reading departs from a 0°C (32°F) reading on the scale, make a correction by adjusting the screw on the bottom of J 23688 and J 26568 .
- Remove the sealant covering the screw.
- Turn the screw in the direction necessary to adjust the reading to the 0°C (32°F) line.
- Reseal the screw using a silicone sealant.
Important: Do not remove the screw from J 23688 and J 26568 .
