Removal Procedure
- Remove the left and right side front weatherstrips. Refer to Folding Top Side Front Weatherstrip Replacement .
- Remove the left and right side front weatherstrip retainers. Refer to Folding Top Side Front Weatherstrip Retainer Replacement .
- Open and support the folding top.
- Remove the folding top cover number 1 bow retainer. Refer to Folding Top Cover Number 1 Bow Retainer Replacement .
- Fold back the front and side edge of the folding top cover by releasing the retainer strips to expose the latch, springs and cables.
- Remove the folding top front latch if required. Refer to Folding Top Front Latch Replacement .
- Disconnect the cables and springs from the number 1 bow. Refer to Folding Top Cover Rear Side Tension Cable Replacement or Folding Top Cover Front Side Tension Cable Replacement .
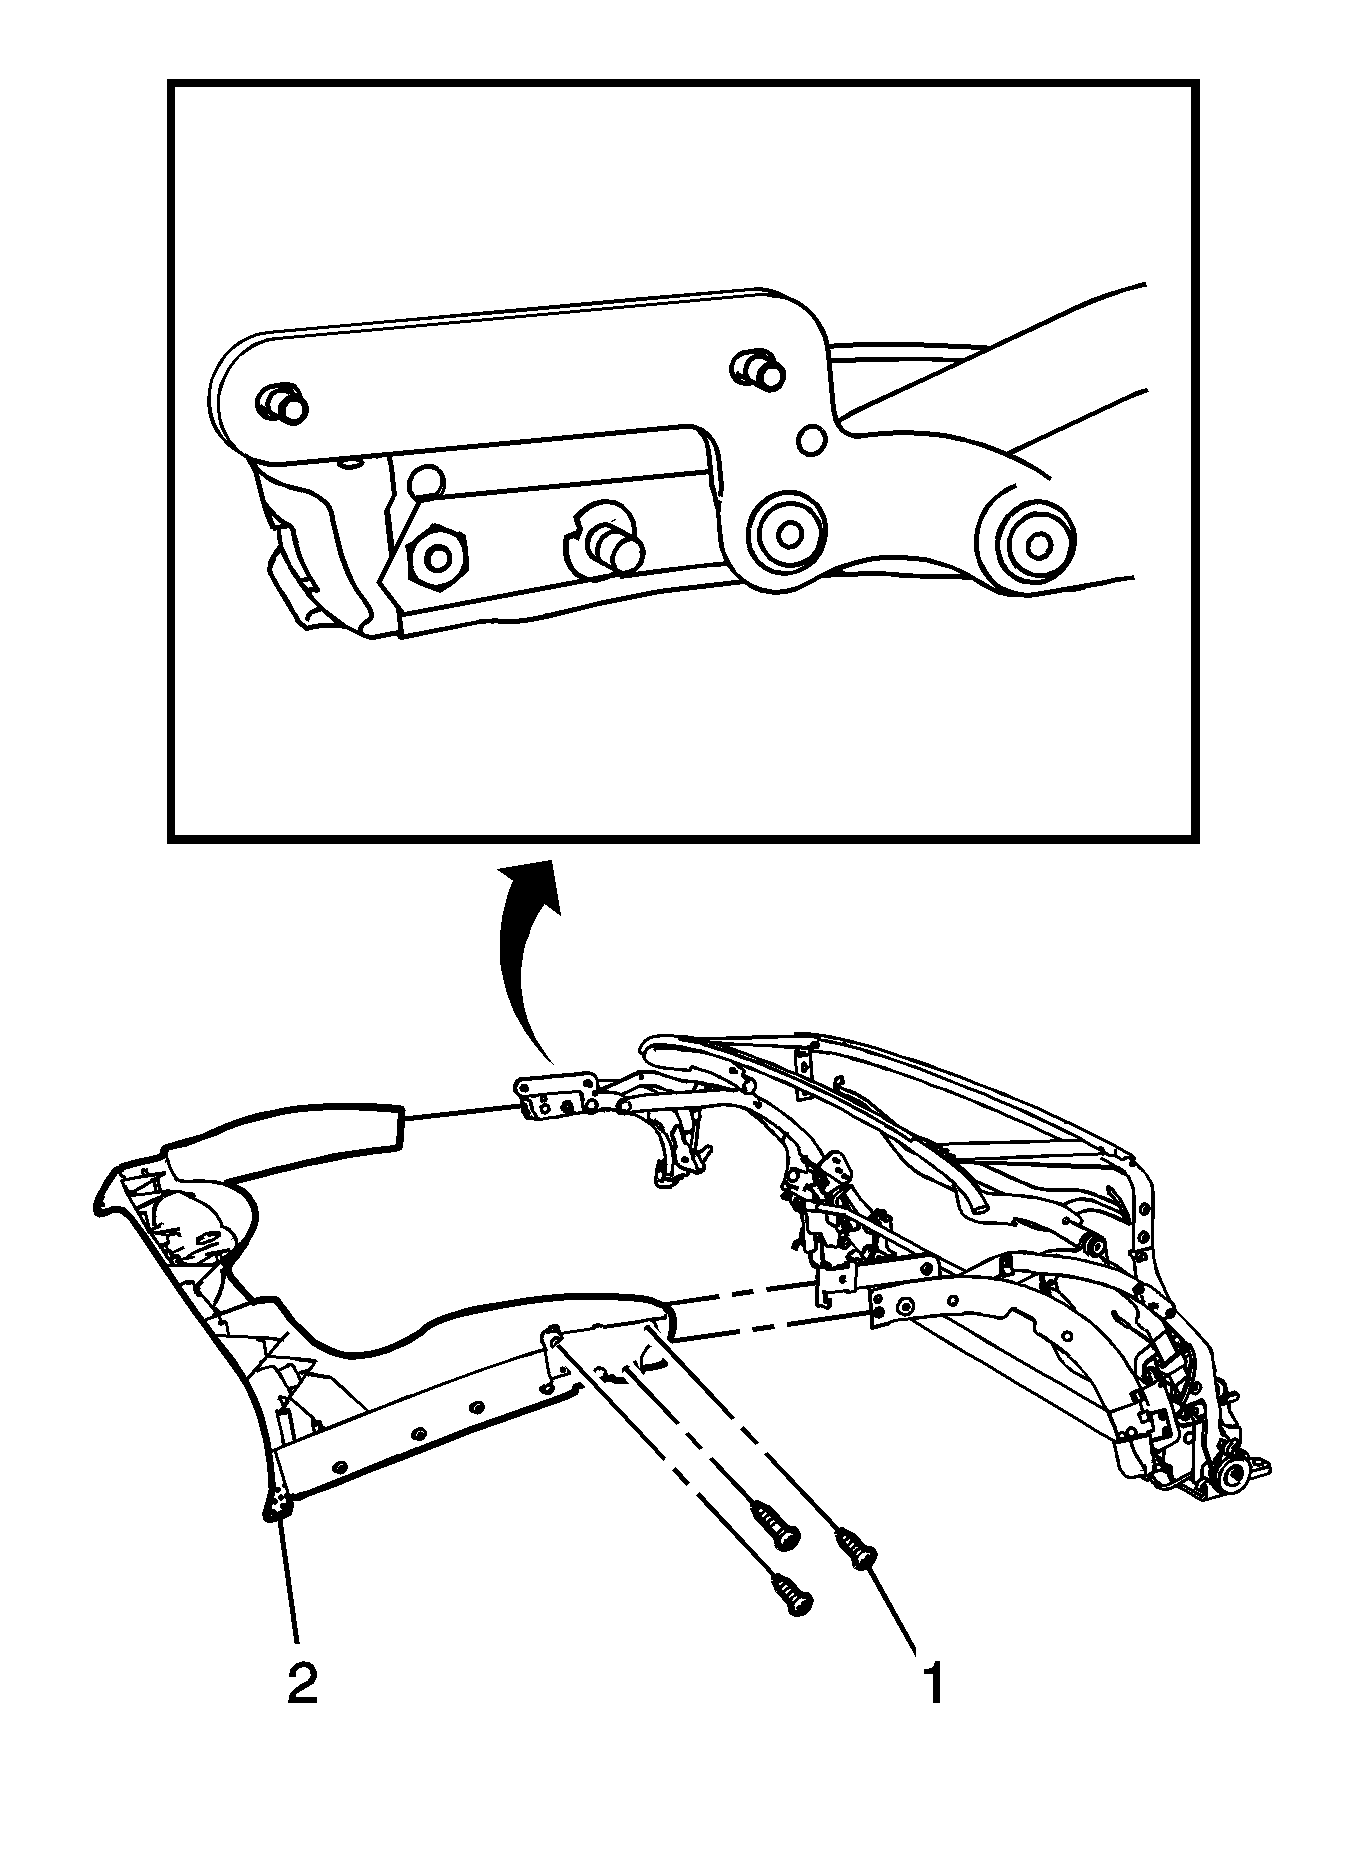
- With the aid of an assistant, remove the screws (1) from the folding top number 1 bow panel rear mounting point.
- With the aid of an assistant, remove the folding top number 1 bow panel (2) from midrear mounting point.

Important: The folding top will be required to be opened and supported.
Important: The folding top cover retainer flaps are glued to the front side rail and to the number 1 bow .
Installation Procedure
- With the aid of an assistant, loose fit folding top number 1 bow panel (2).
- Position folding top number 1 bow panel for best fit.
- Close and latch the top.
- Tighten the screws (1) to the folding top number 1 bow panel midrear mounting point.
- Connect the cables and springs to the number 1 bow. Refer to Folding Top Cover Rear Side Tension Cable Replacement or Folding Top Cover Front Side Tension Cable Replacement .
- Install the folding top front latch if required. Refer to Folding Top Front Latch Replacement .
- Reposition the front and side edge of the folding top cover retainer strips and glue into position. Use 3M™ trim glue or equivalent.
- Install the left and right side front weatherstrip retainers. Refer to Folding Top Side Front Weatherstrip Retainer Replacement .
- Install the left and right side front weatherstrips. Refer to Folding Top Side Front Weatherstrip Replacement .
- Install the folding top cover number 1 bow retainer. Refer to Folding Top Cover Number 1 Bow Retainer Replacement .
- Inspect the folding top for proper fit and operation. Refer to Folding Top Adjustment .

Notice: Refer to Fastener Notice in the Preface section.
Tighten
Tighten the screws to 10 N·m (89 lb in).
Important: The old adhesive must be removed and follow the manufacture directions for the new adhesive.
Removal Procedure
- Remove the left and right side front weatherstrips. Refer to Folding Top Side Front Weatherstrip Replacement .
- Remove the left and right side front weatherstrip retainers. Refer to Folding Top Side Front Weatherstrip Retainer Replacement .
- Open and support the folding top.
- Remove the folding top cover number 1 bow retainer. Refer to Folding Top Cover Number 1 Bow Retainer Replacement .
- Fold back the front and side edge of the folding top cover by releasing the retainer strips to expose the latch, springs and cables.
- Remove the folding top front latch if required. Refer to Folding Top Front Latch Replacement .
- Disconnect the cables and springs from the number 1 bow. Refer to Folding Top Cover Rear Side Tension Cable Replacement or Folding Top Cover Front Side Tension Cable Replacement .
- With the aid of an assistant, remove the screws (1) from the folding top number 1 bow panel rear mounting point.
- With the aid of an assistant, remove the folding top number 1 bow panel (2) from midrear mounting point.

Important: The folding top will be required to be opened and supported.
Important: The folding top cover retainer flaps are glued to the front side rail and to the number 1 bow .
Installation Procedure
- With the aid of an assistant, loose fit folding top number 1 bow panel (2).
- Position folding top number 1 bow panel for best fit.
- Close and latch the top.
- Tighten the screws (1) to the folding top number 1 bow panel midrear mounting point.
- Connect the cables and springs to the number 1 bow. Refer to Folding Top Cover Rear Side Tension Cable Replacement or Folding Top Cover Front Side Tension Cable Replacement .
- Install the folding top front latch if required. Refer to Folding Top Front Latch Replacement .
- Reposition the front and side edge of the folding top cover retainer strips and glue into position. Use 3M™ trim glue or equivalent.
- Install the left and right side front weatherstrip retainers. Refer to Folding Top Side Front Weatherstrip Retainer Replacement .
- Install the left and right side front weatherstrips. Refer to Folding Top Side Front Weatherstrip Replacement .
- Install the folding top cover number 1 bow retainer. Refer to Folding Top Cover Number 1 Bow Retainer Replacement .
- Inspect the folding top for proper fit and operation. Refer to Folding Top Adjustment .

Notice: Refer to Fastener Notice in the Preface section.
Tighten
Tighten the screws to 10 N·m (89 lb in).
Important: The old adhesive must be removed and follow the manufacture directions for the new adhesive.
