Step
| Action
| Value(s)
| Yes
| No
|
DEFINITION: The automatic level control (ALC)
compressor operates (runs), but the system exhibits the one or more of the
following conditions:
| • | The ALC system does not raise the rear of the vehicle. |
| • | The compressor runs frequently or constantly. |
| • | The inflator is operating but the available air pressure is not
adequate. |
|
1
| Did you perform the ALC diagnostic system check?
| --
| Go to
Step 2
| Go to
Automatic Level Control System Operation Check
|
2
|
- Inspect the entire ALC system for disconnected or damaged ALC
system hoses or connectors. Repair or replace the components as necessary.
- Turn the ignition OFF.
- Disconnect the air hose from one of the rear shock absorbers.
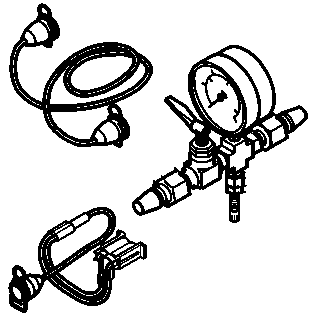
- Connect the J 22124-B
between the shock absorber and the shock absorber air hose.
- Open the J 22124-B
toggle valve (up position).
Important:
| • | The trim height sensor MUST be adjusted properly. |
| • | The vehicle MUST be supported by the suspension. |
| • | The vehicle rear MUST be loaded with approximately 181 kg
(400 lb). |
- Turn the ignition ON.
- Apply service air pressure to the J 22124-B
service valve until the J 22124-B
gauge shows the specified value.
Do both of the rear corners of the vehicle rise?
| 759 kPa (110 psi)
| Go to
Step 3
| Go to
Step 17
|
3
| Observe the J 22124-B
gauge for 1 minute.
Important: After one minute, the pressure may fall TO the specified value. This
is acceptable.
Does the system pressure drop BELOW the specified value?
| 620 kPa (90 psi)
| Go to
Step 4
| Go to
Step 10
|
4
|
- Remove the air filter hose end from the underbody
- Apply service air pressure to the J 22124-B
service valve until the J 22124-B
gauge shows the specified value.
Do you hear air pressure escaping through the air filter hose?
| 759 kPa
(110 psi)
| Go to
Step 5
| Go to
Step 9
|
5
|
- Disconnect the compressor electrical connector.
- Connect a test light between the compressor electrical connector
terminals B and C.
Is the test light on?
| --
| Go to
Step 6
| Go to
Step 8
|
6
|
- Disconnect the trim height sensor electrical connector.
- Inspect CKT 320 for a short to ground.
- Repair the short as necessary.
Does the customer concern still exist?
| --
| Go to
Step 7
| System OK
|
7
| If CKT 320 is not shorted, replace the trim height
sensor. Refer to
Automatic Level Control Sensor Replacement
.
Does the customer concern still exist?
| --
| Go to
Automatic Level Control System Operation Check
| System OK
|
8
| The vent solenoid
valve is stuck open. Replace the compressor head. Refer to
Automatic Level Control Air Compressor Head Replacement
.
Does the customer concern still exist?
| --
| Go to
Automatic Level Control System Operation Check
| System OK
|
9
|
- Apply service air pressure to the J 22124-B
service valve until the J 22124-B
gauge shows the specified value.
- Use a stethoscope (if available) in order to inspect the ALC system
for AUDIBLE indications of air pressure leak(s) and/or apply a soap and water
solution to all of the ALC system components in order to inspect the ALC system
for VISUAL indications of air pressure leak(s). Inspect the following components:
- Repair or replace the leaking component(s) as necessary.
Does the customer concern still exist?
| 759 kPa (110 psi)
| Go to
Automatic Level Control System Operation Check
| System OK
|
10
|
- With the ALC system holding air pressure, disconnect the air hose
from the air dryer.
- Inspect the J 22124-B
gauge.
Does the rear of the vehicle lower and the air pressure escape?
| --
| Go to
Step 12
| Go to
Step 11
|
11
|
- Inspect the inflator solenoid (if applicable) and the air hoses
between the shock absorbers and the compressor for any air path restrictions.
- Repair or replace the components as necessary.
Does the customer concern still exist?
| --
| Go to
Automatic Level Control System Operation Check
| System OK
|
12
|
- Connect the air hose to the air dryer.
- Disconnect the compressor electrical connector.
- Using fused jumpers, connect the ALC compressor electrical connector
terminals A and E to B+, and connect terminals D and G to ground.
- Allow the compressor to run until the J 22124-B
gauge shows the specified value.
Does the compressor develop the specified system pressure?
| 759 kPa (110 psi)
| Intermittent
Condition
Go to
Automatic Level Control System Operation Check
| Go to
Step 13
|
13
|
- Disconnect the fused jumper from terminal E in order to stop the
compressor motor.
- Disconnect the air filter hose (compressor inlet) from the air
compressor.
- Connect the fused jumper to terminal E in order to allow the compressor
motor to run.
Does the compressor now develop the specified system pressure?
| 759 kPa
(110 psi)
| Go to
Step 14
| Go to
Step 15
|
14
| Replace
the air filter hose. Refer to
Automatic Level Control Air Filter Hose Replacement
.
Does the customer concern still exist?
| | Go to
Automatic Level Control System Operation Check
| System OK
|
15
|
- Disconnect the fused jumper from terminal E in order to stop the
compressor motor.
- Remove the air dryer and install a known good air dryer to the
compressor. Refer to
Automatic Level Control Air Dryer Replacement
.
- Connect the fused jumper to terminal E in order to allow the compressor
motor to run.
Does the compressor now develop the specified system pressure?
| 759 kPa
(110 psi)
| System OK
| Go to
Step 16
|
16
| Replace the compressor. Refer to
Air Compressor Replacement
.
Does the customer concern still exist?
| --
| Go to
Automatic Level Control System Operation Check
| System OK
|
17
|
- Inspect the air hoses between the shock absorbers and the compressor
for restrictions and leaks.
- If the air hoses are in good condition, replace the shock absorber(s)
that did not inflate. Refer to
Shock Absorber Replacement
in Rear Suspension.
Does the customer concern still exist?
| --
| Go to
Automatic Level Control System Operation Check
| System OK
|
