Air Conditioning Compressor Replacement 3.6L Engine
Special Tools
J 39400 Halogen Leak Tester
Removal Procedure
- Disconnect the battery negative cable. Refer to Battery Negative Cable Disconnection and Connection.
- Recover the refrigerant. Refer to Refrigerant Recovery and Recharging.
- Remove the air filter assembly. Refer to Air Cleaner Assembly Replacement.
- Remove the accessory drive belt or air conditioning drive belt. Refer to Drive Belt Replacement.
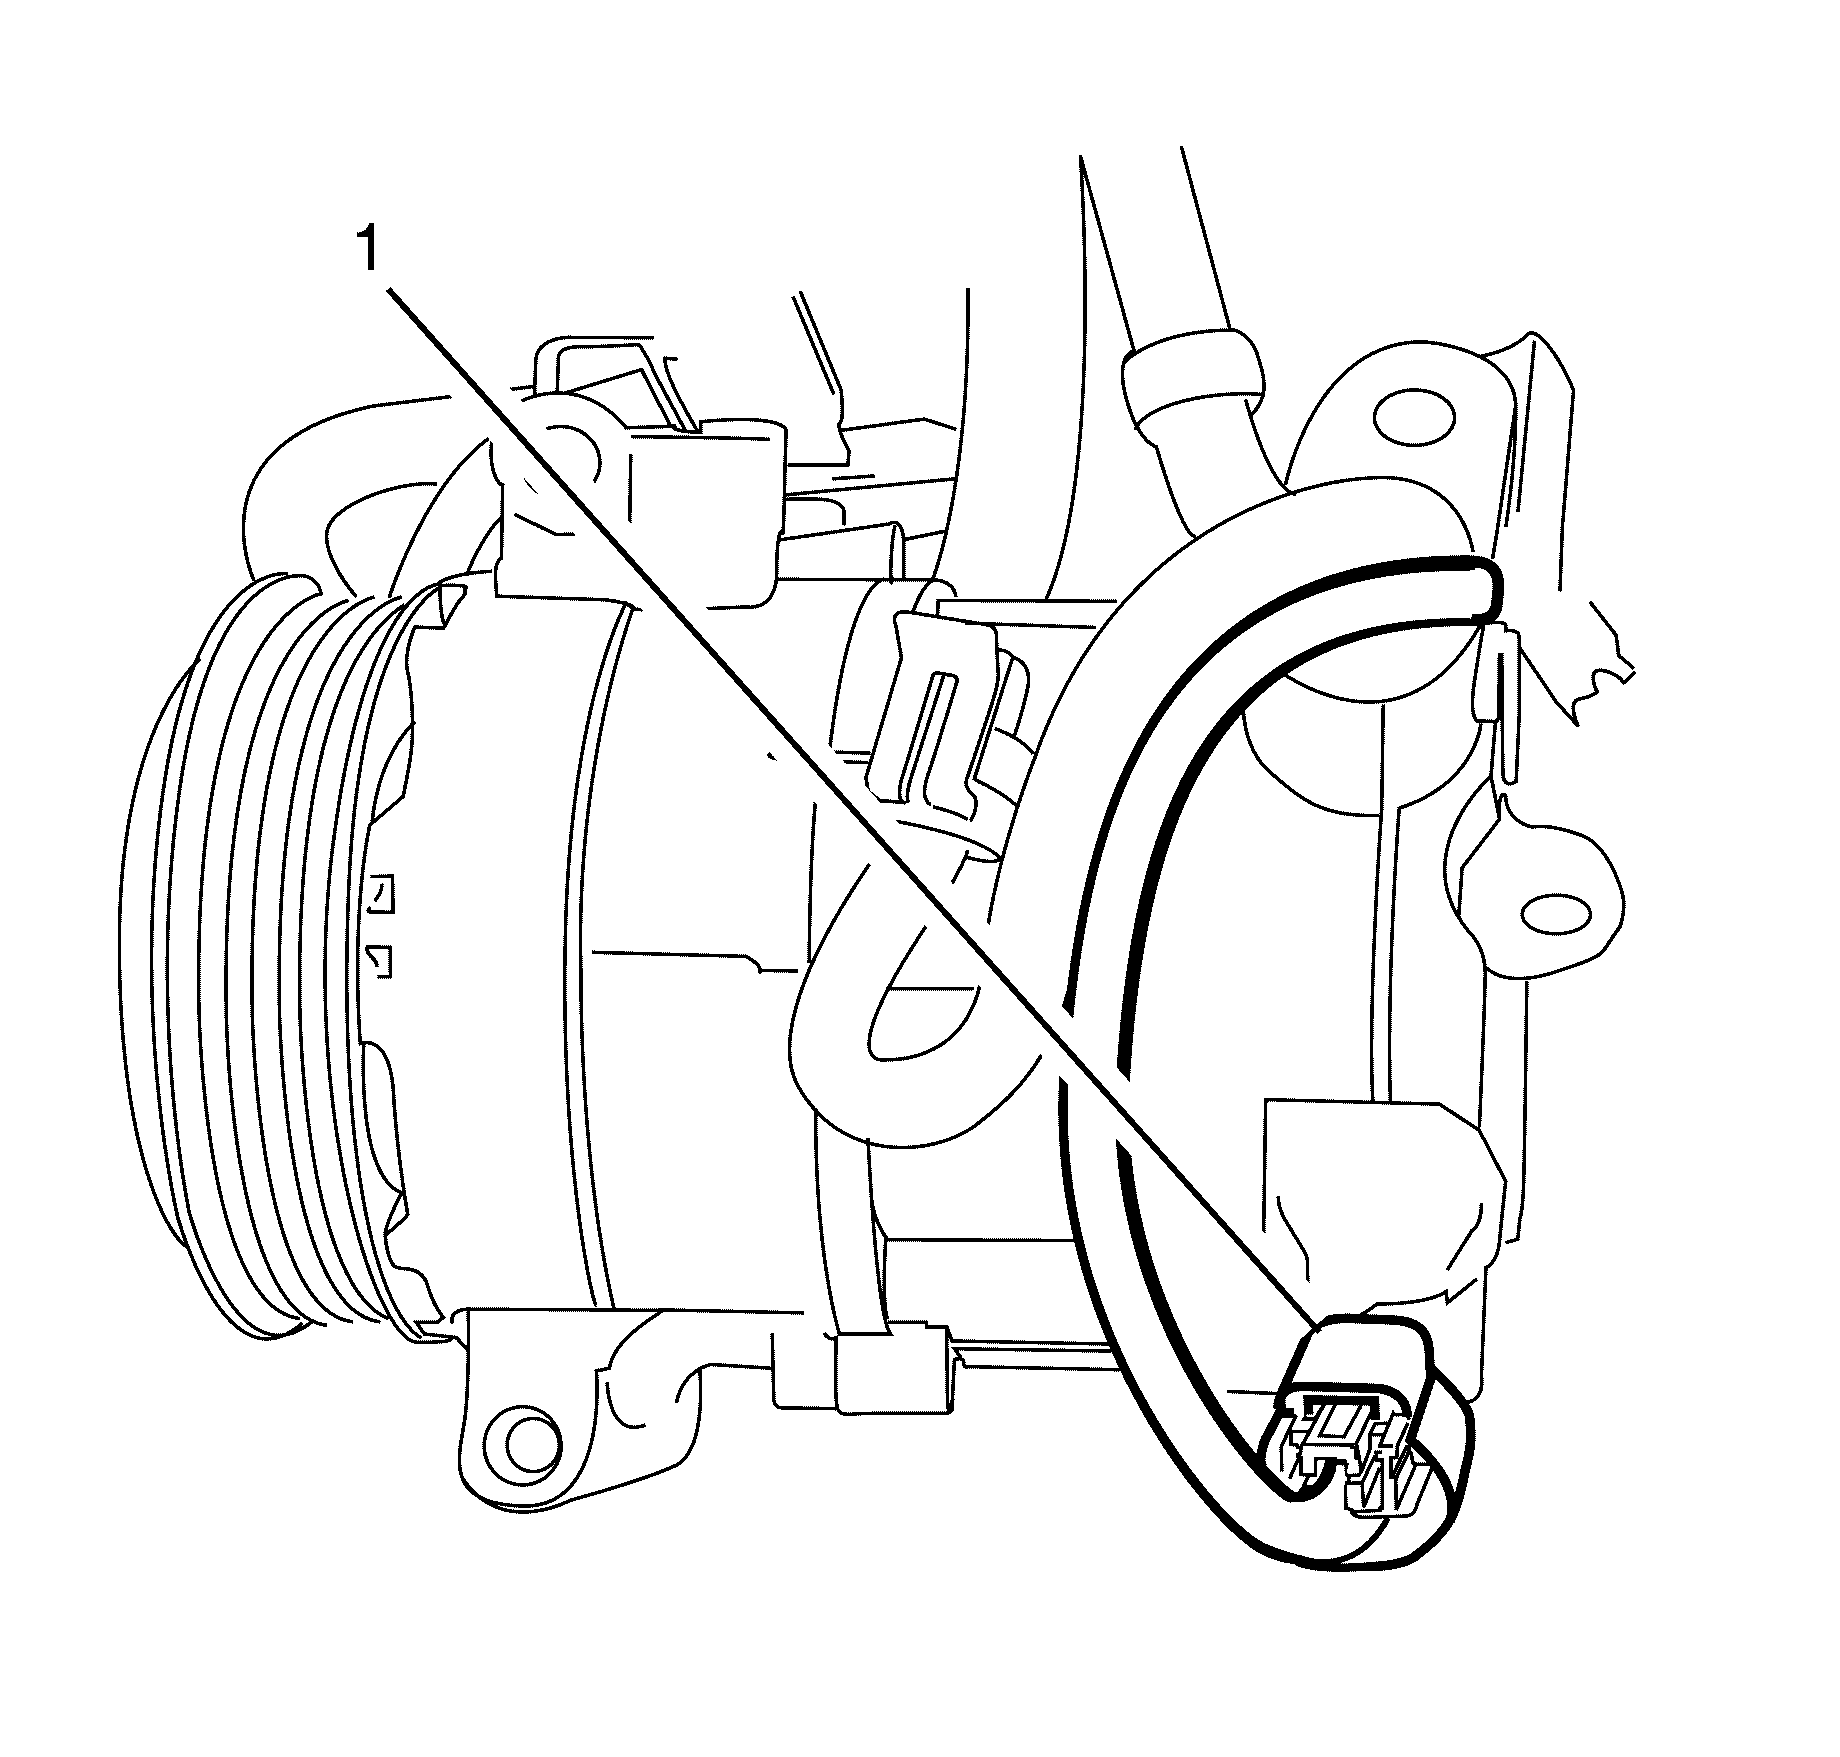
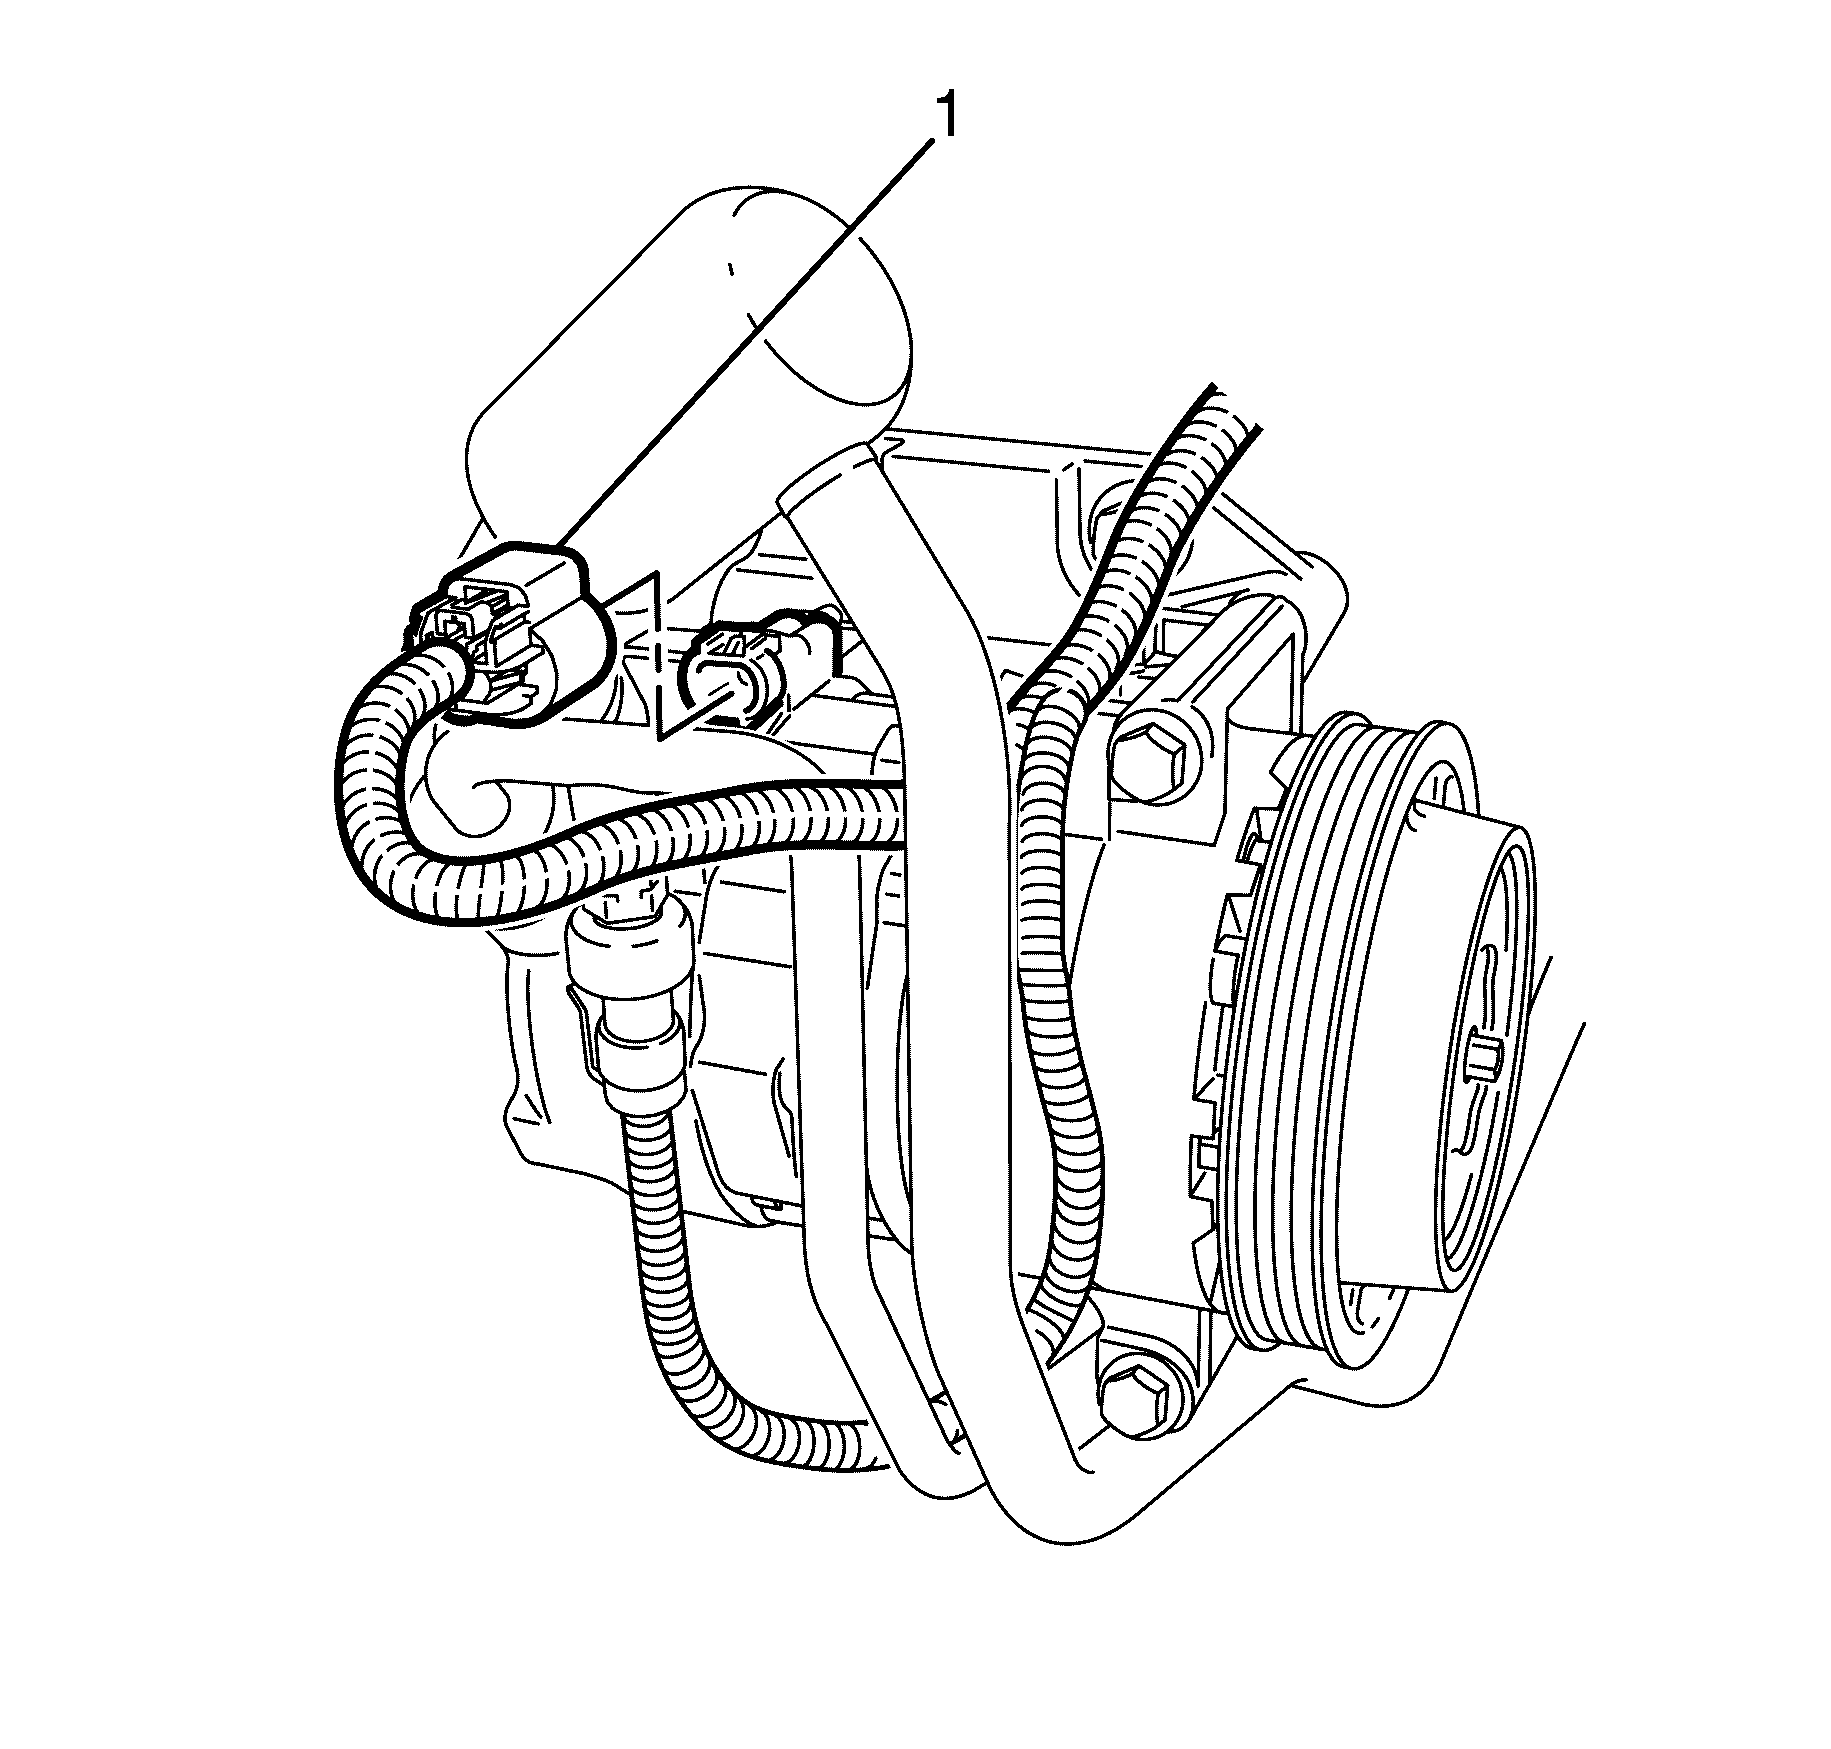
- Disconnect the compressor electrical connector (1).
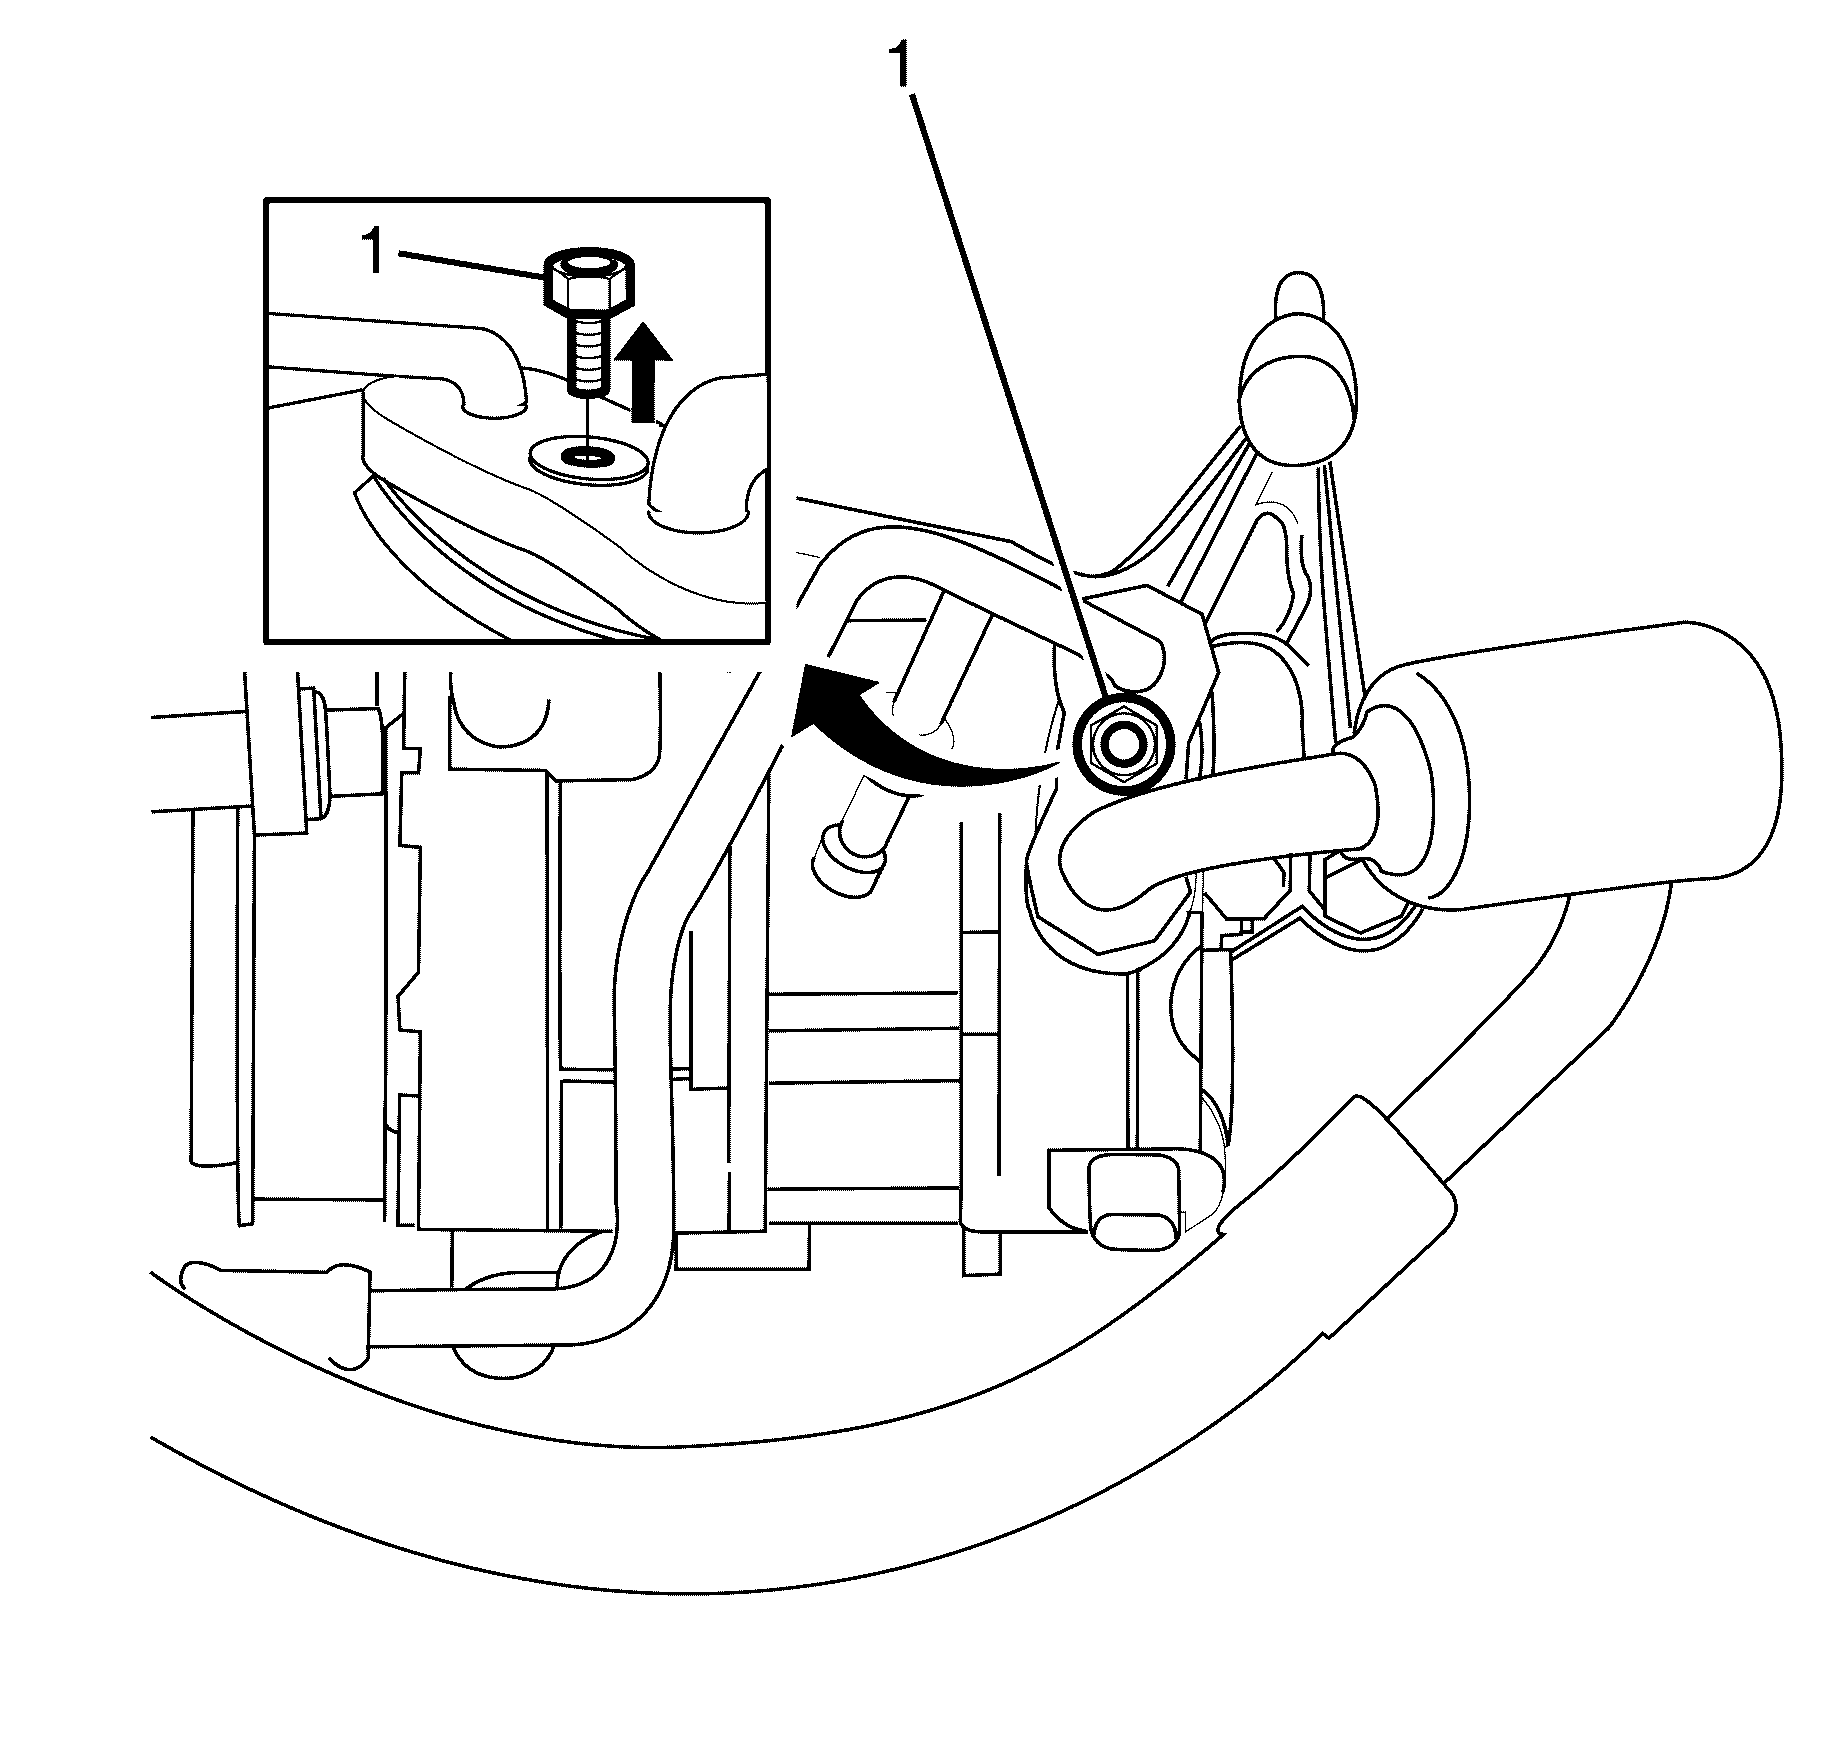
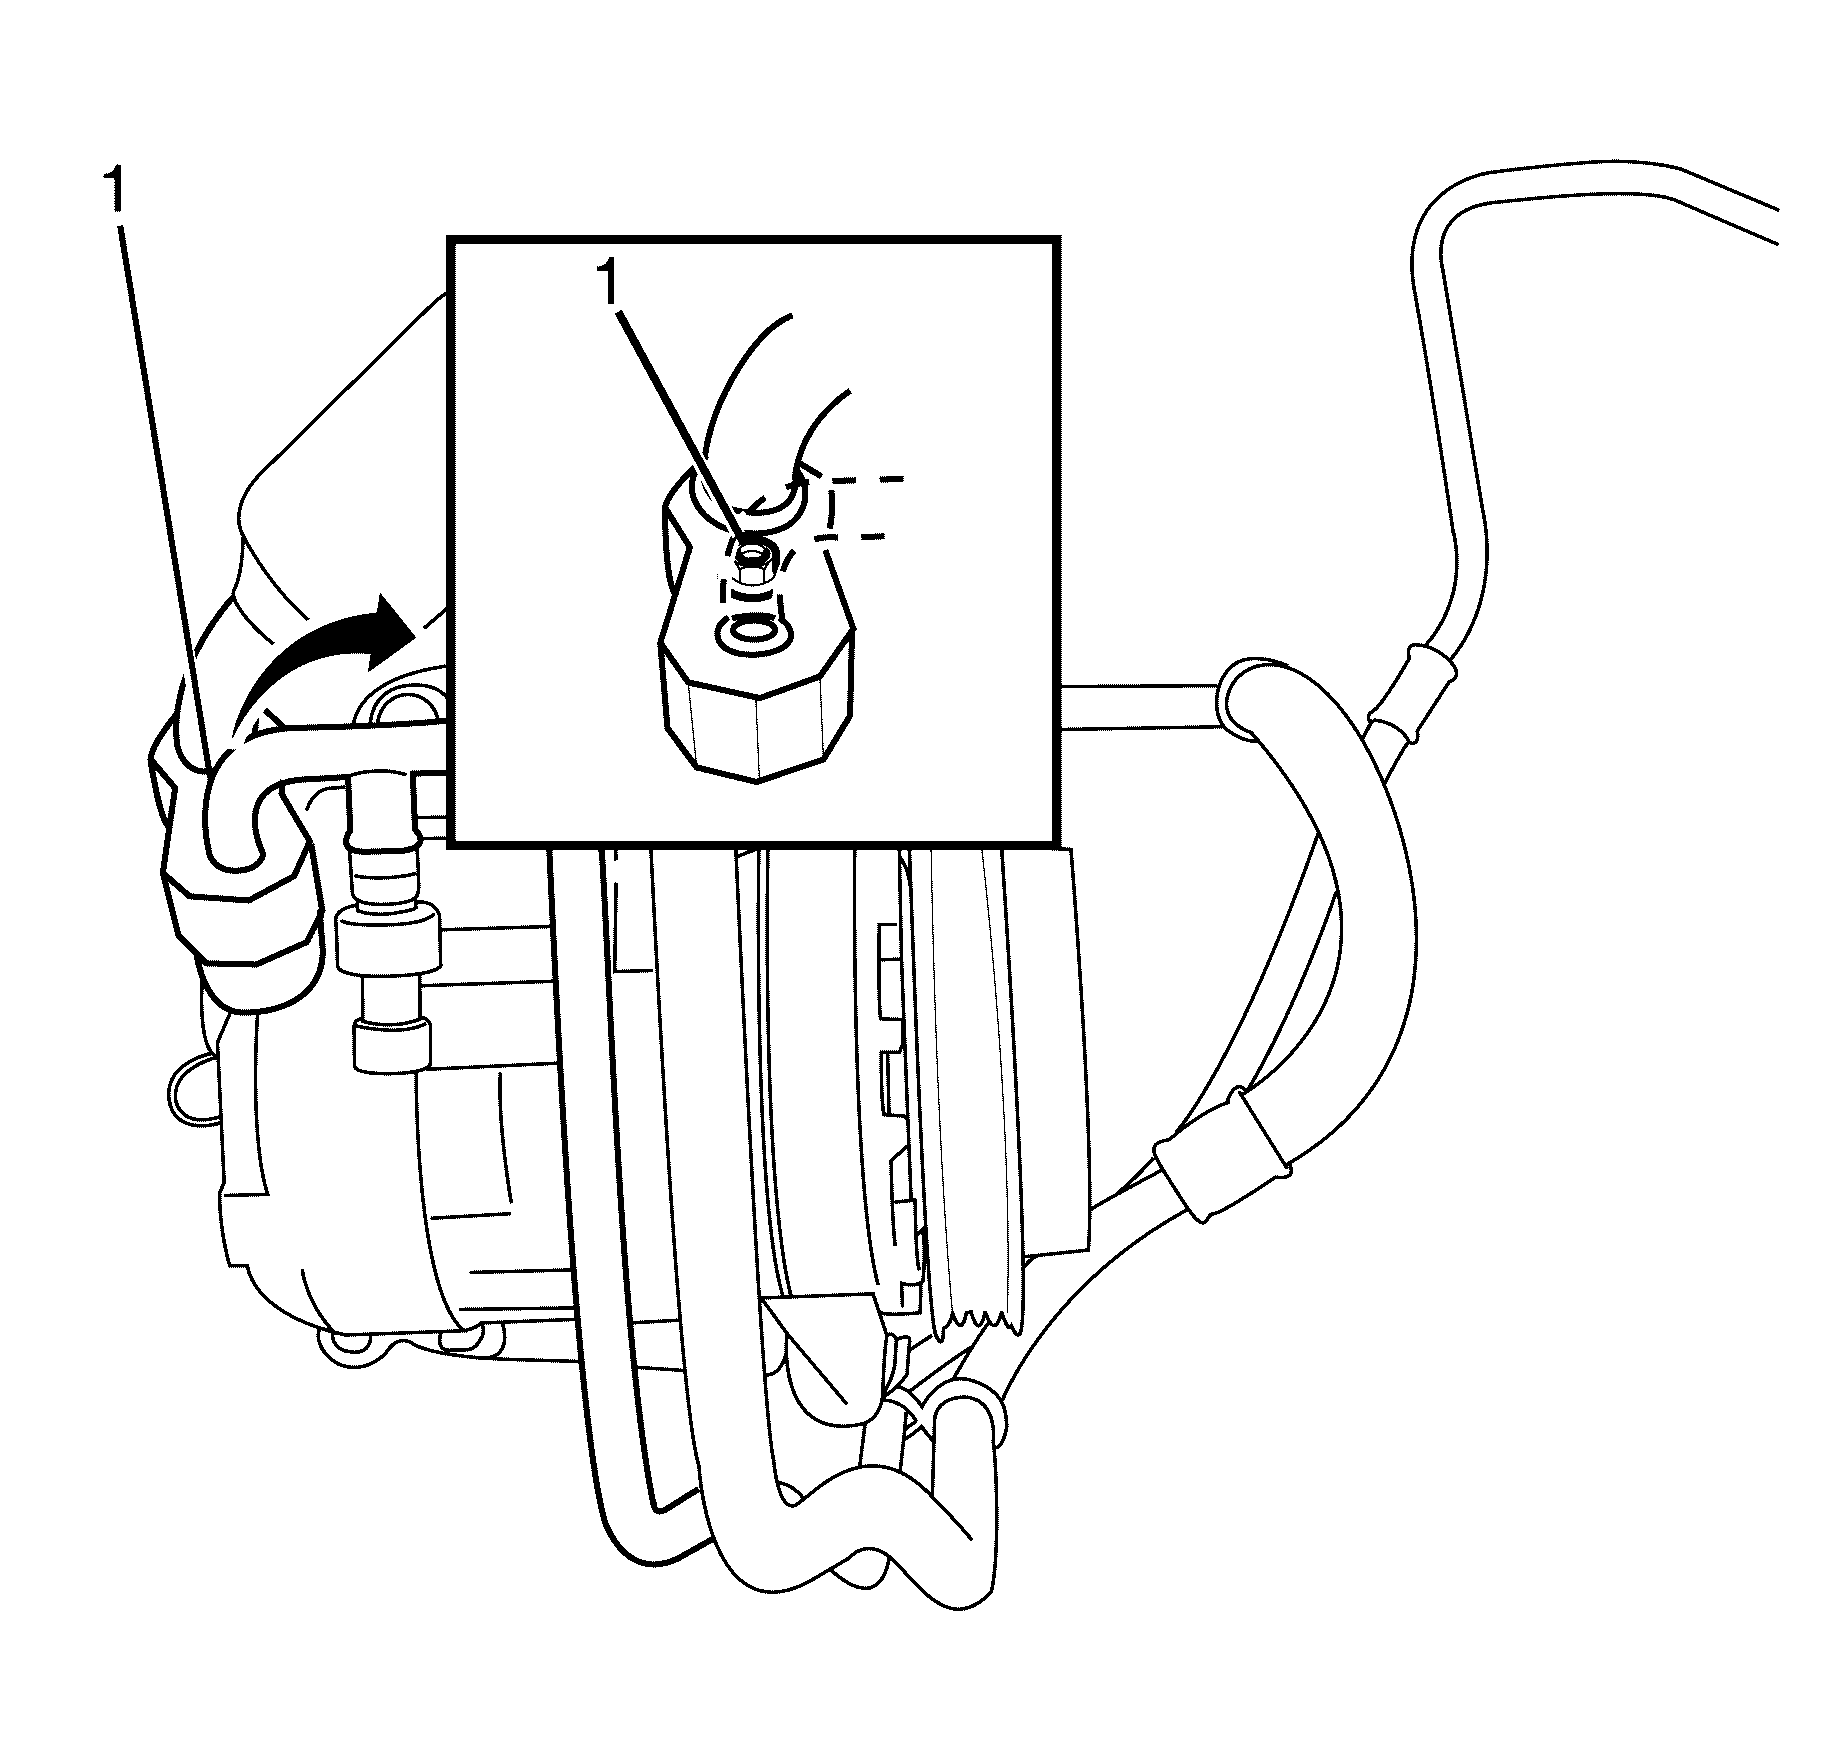
- Remove the suction/discharge pipes pad to compressor retaining bolt (1).
- Disconnect the suction/discharge pipe pad (1) from the compressor (3).
- Remove the sealing washers (2). Refer to Sealing Washer Replacement.
- Cap or plug the suction/discharge pipe pad (1) and the ports on the compressor (3).
- Raise and support the vehicle. Refer to Lifting and Jacking the Vehicle.
- Remove the compressor to compressor mounting bracket retaining bolts (1).
- Remove the compressor (2) from compressor mounting bracket (3).
Warning: Refer to Safety Glasses Warning in the Preface section.
Warning: Refer to Battery Disconnect Warning in the Preface section.
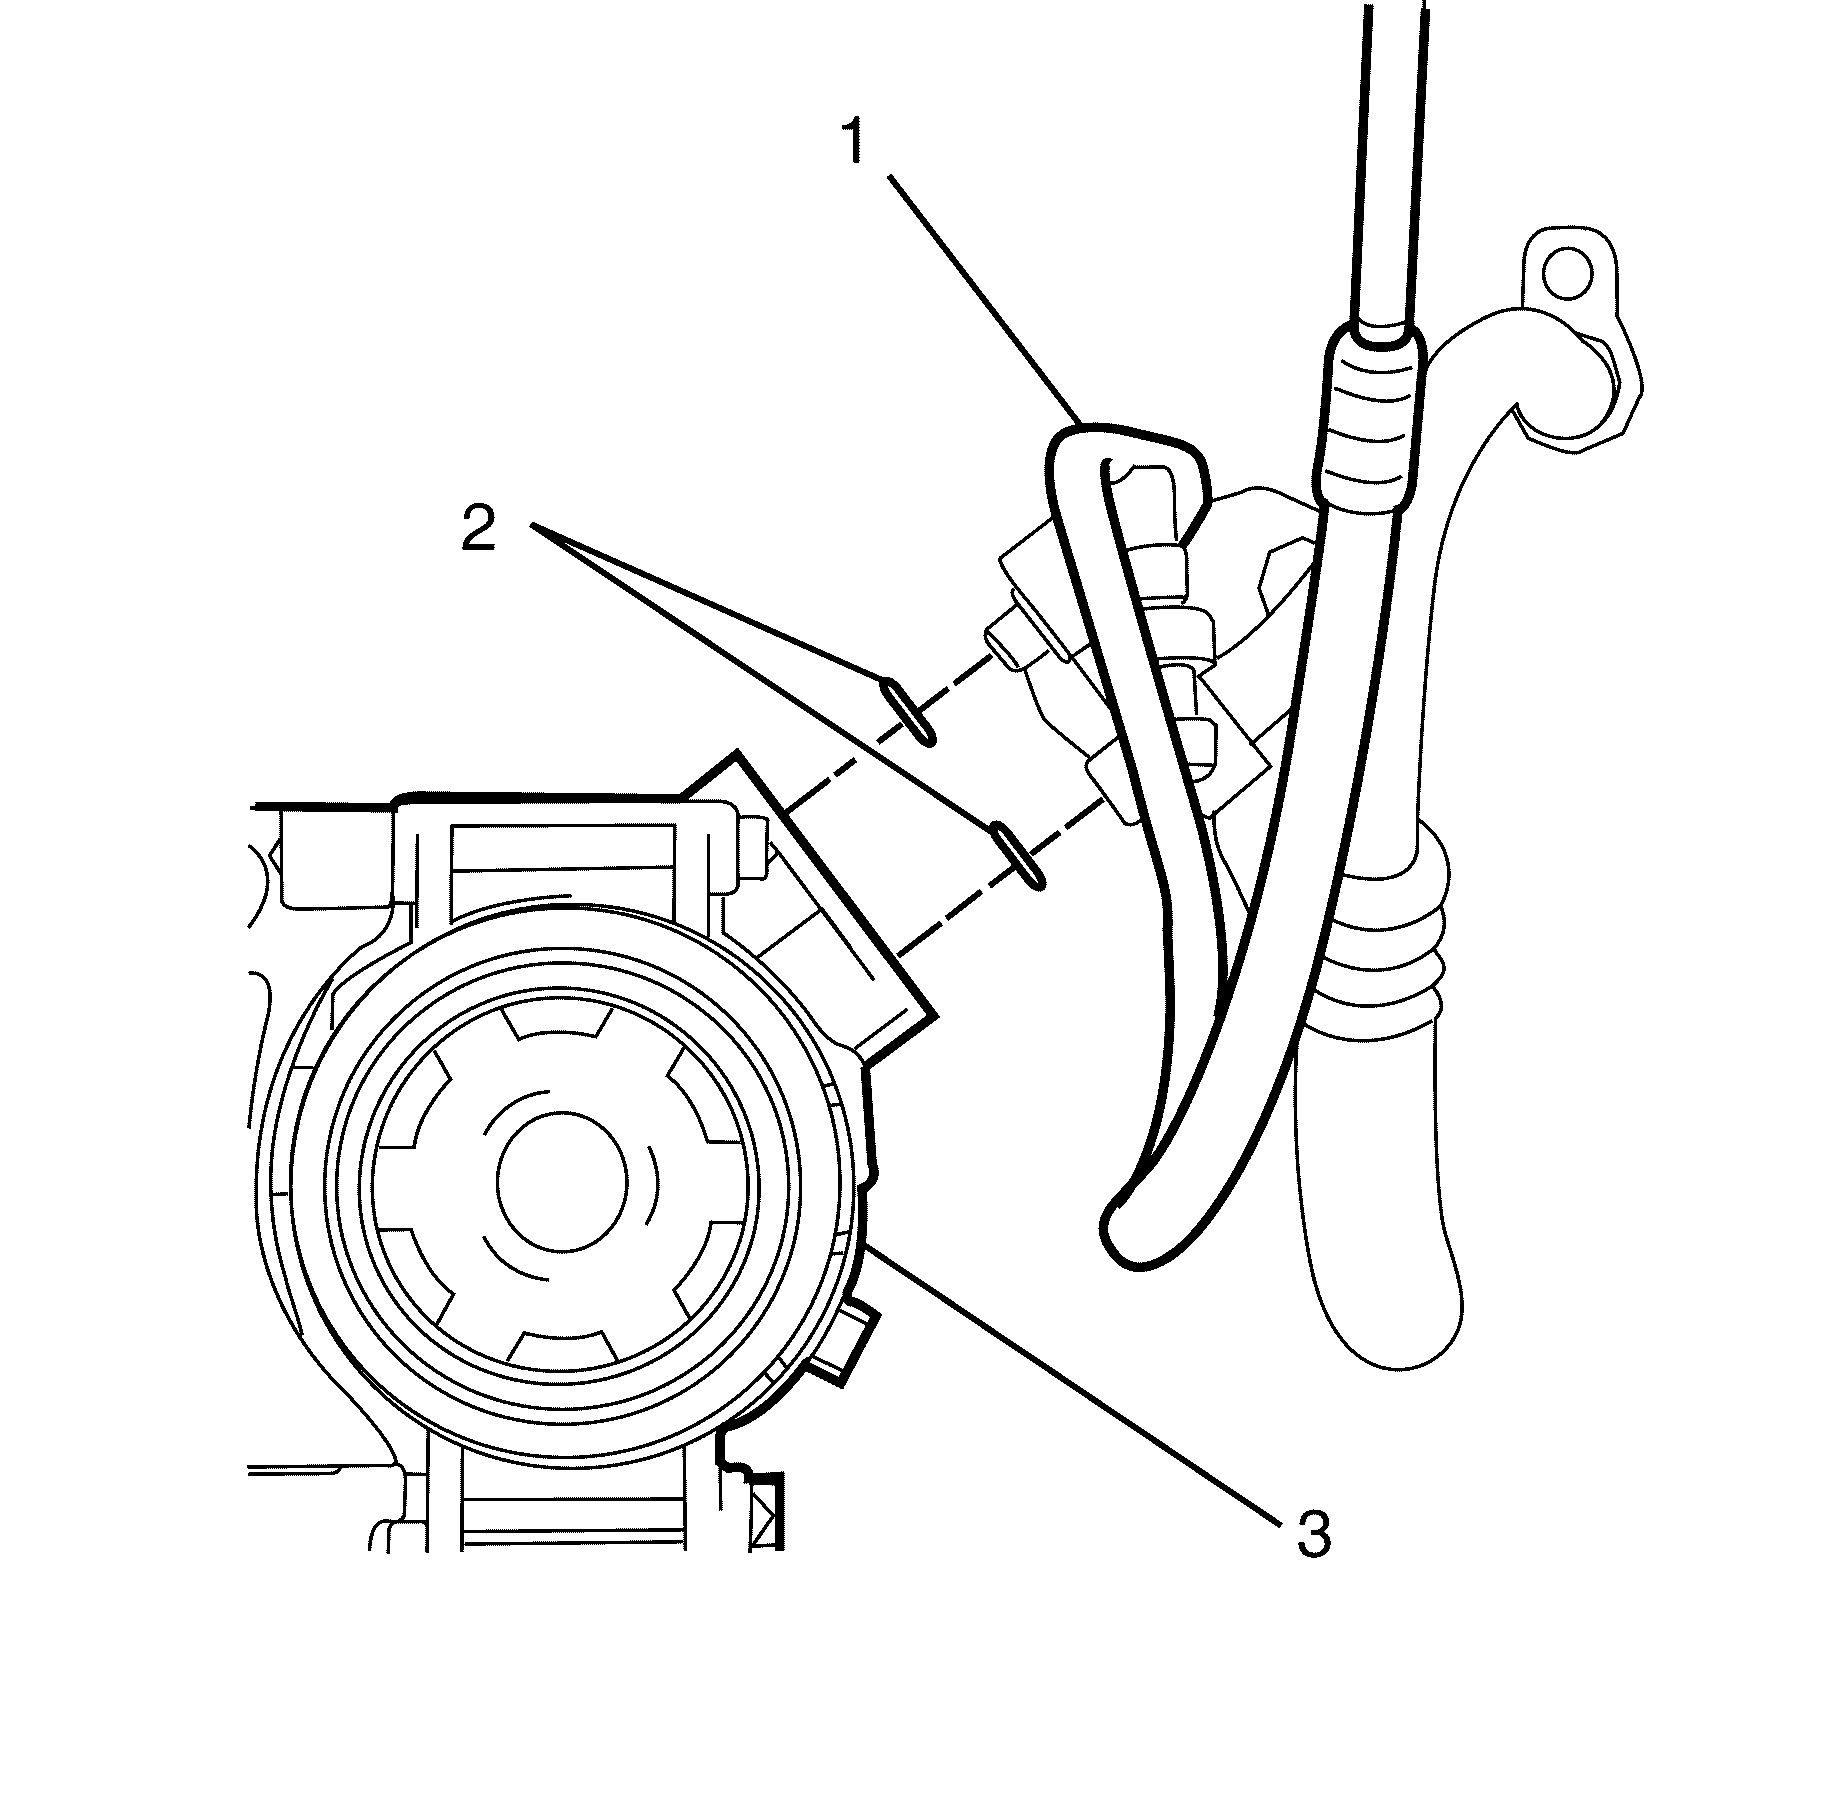
Notet: The sealing washers (2) are a single use item and must be discarded after use.
Discard the sealing washers.
Note: Cover any opening of the A/C system with a suitable cap or tape immediately, to prevent absorption of moisture from the atmosphere.
Danger: To avoid any vehicle damage, serious personal injury or death when major components are removed from the vehicle and the vehicle is supported by a hoist, support the vehicle with jack stands at the opposite end from which the components are being removed and strap the vehicle to the hoist.
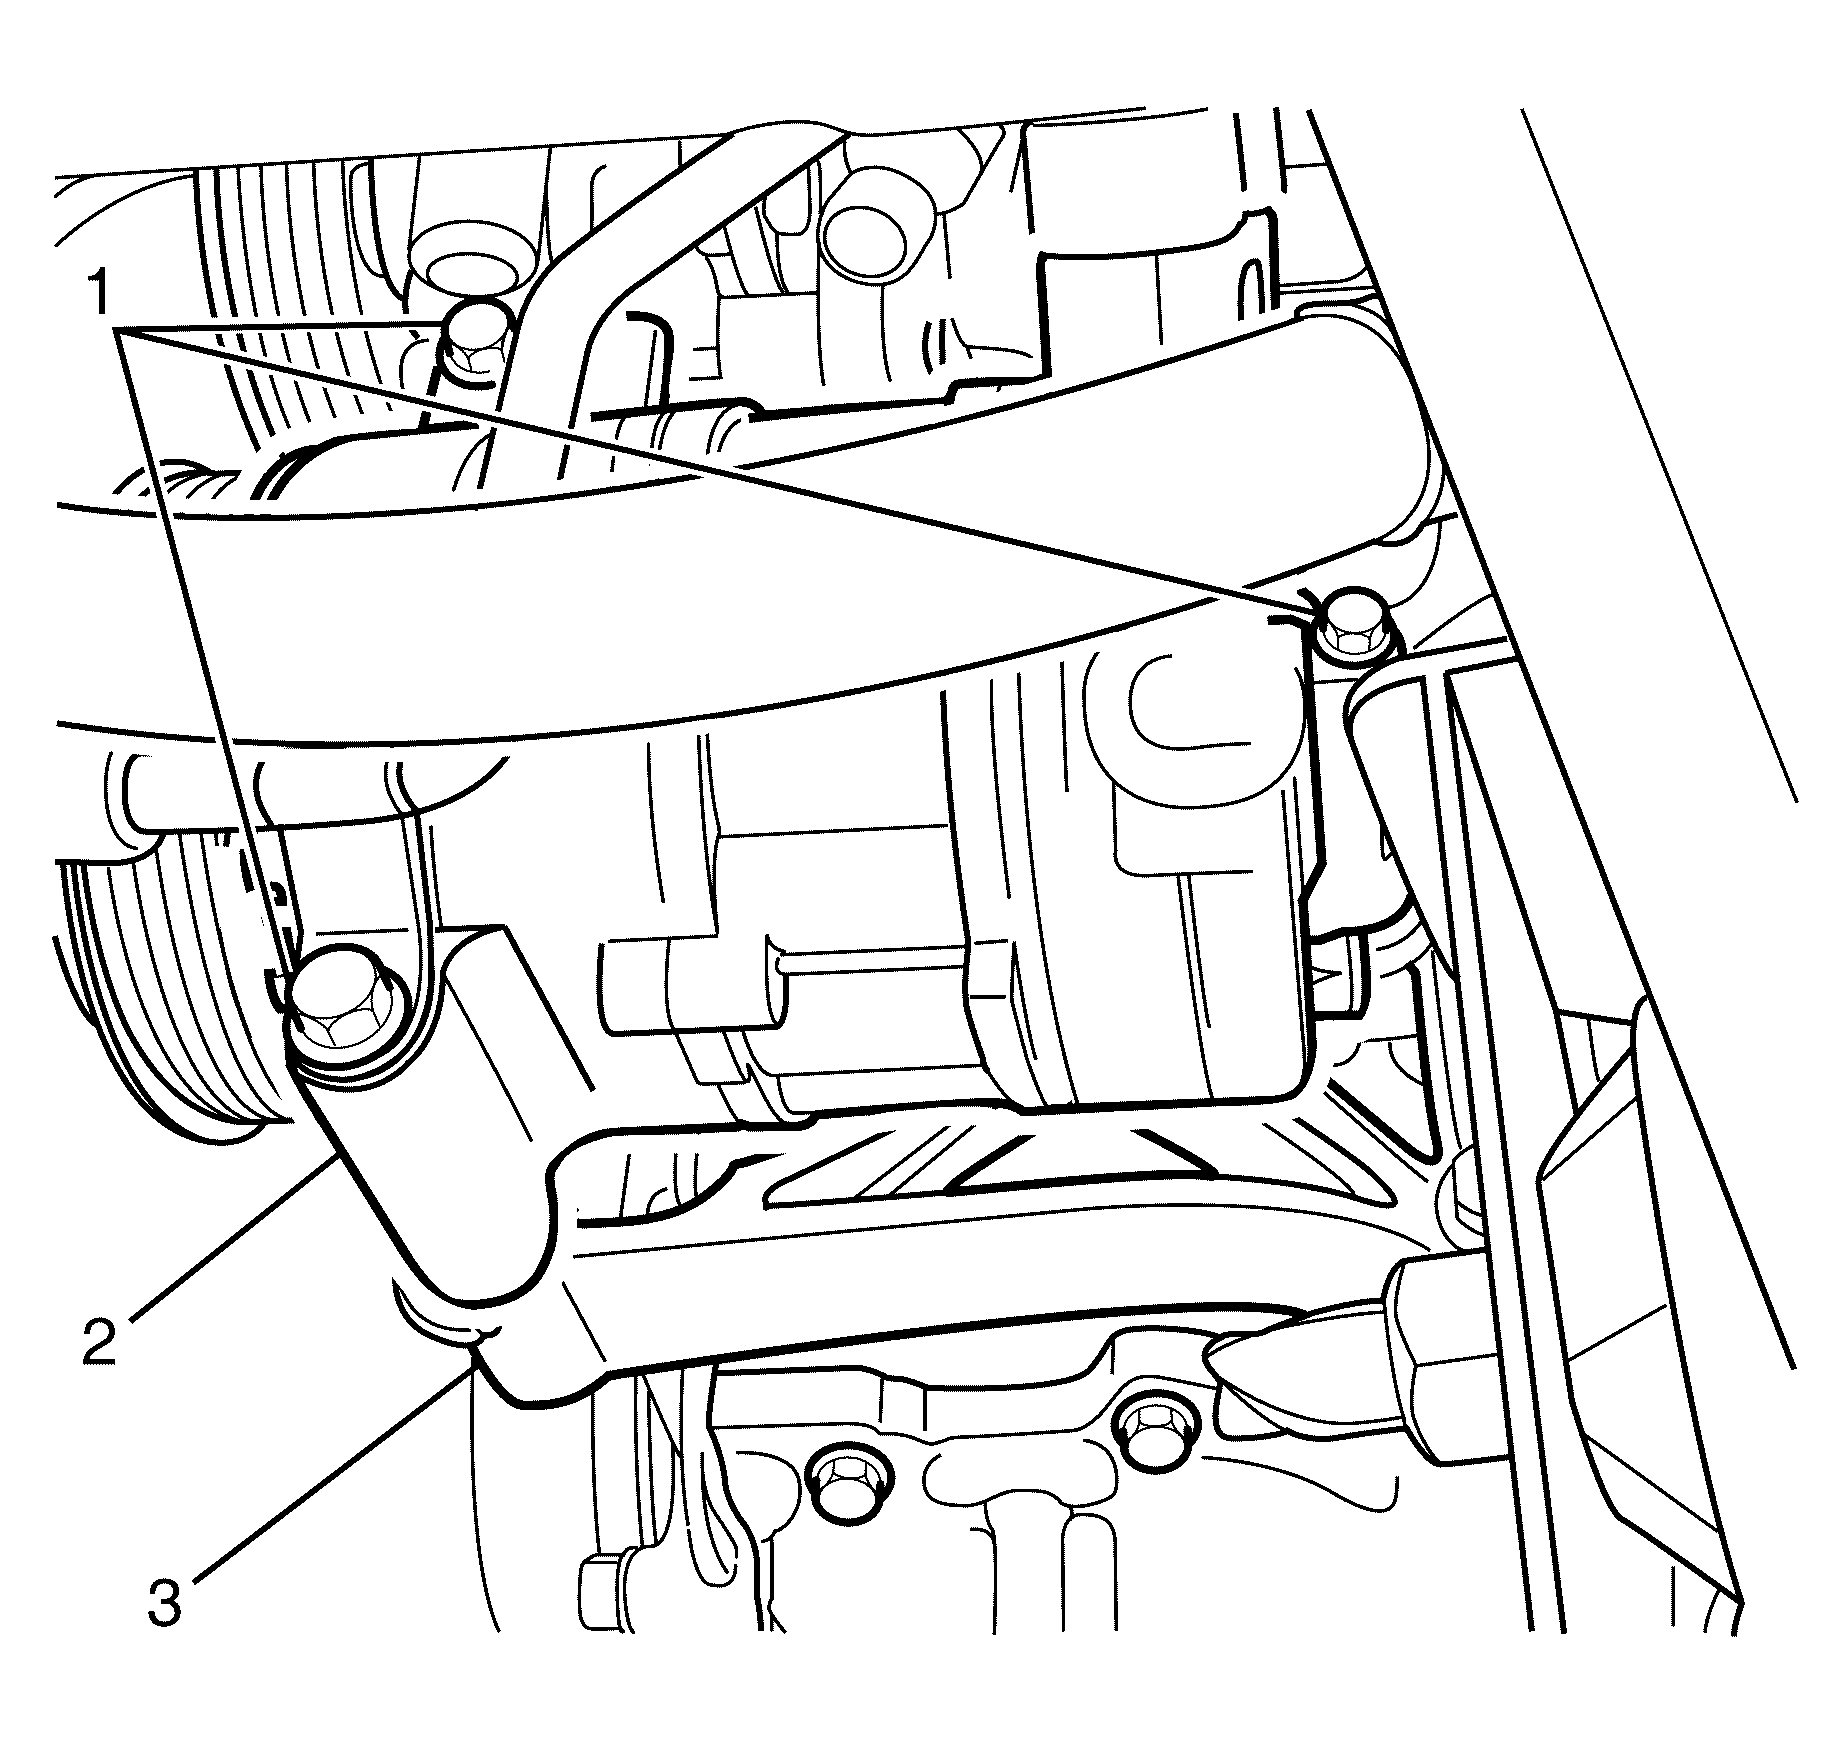
Note: The compressor (2) must be supported before removing the compressor to compressor mounting bracket retaining bolts (1).
Note: Remove the compressor (2) from the compressor mounting bracket (3) by sliding forwards and then upwards out of the engine compartment.
Installation Procedure
- If you are replacing the compressor, balance the compressor oil. Refer to Air Conditioning Compressor Oil Balancing.
- Install the compressor (2) to the compressor mounting bracket (3).
- Install the compressor to compressor mounting bracket retaining bolts (1) and tighten to 22 N·m (16 lb ft).
- Lower the vehicle.
- Remove the plugs or caps from the suction/discharge pipe pad (1) and the ports on the compressor (3).
- Install two NEW sealing washers (2). Refer to Sealing Washer Replacement.
- Connect the suction/discharge pipes (1) to the compressor (3).
- Install the suction/discharge pipe pad to compressor retaining bolt (1) and tighten to 22 N·m (16 lb ft).
- Install the compressor electrical connector (1).
- Install the accessory drive belt or air conditioning drive belt. Refer to Drive Belt Replacement.
- Install the air filter assembly. Refer to Air Cleaner Assembly Replacement.
- Evacuate and recharge the refrigerant system. Refer to Refrigerant Recovery and Recharging.
- Connect the battery negative cable. Refer to Battery Negative Cable Disconnection and Connection l.
- Leak test the fitting of the repaired or reinstalled component using the J 39400 .

Caution: Refer to Fastener Caution in the Preface section.

Note: DO NOT coat the NEW sealing washers (2) with oil, they must be fitted dry. The use of mineral oil will render the sealing washers (2) useless, as the sealing washers (2) WILL swell causing refrigerant to leak out.


Air Conditioning Compressor Replacement 6.0L Engine
Special Tools
J 39400 Halogen Leak Tester
Removal Procedure
- Disconnect the battery negative cable. Refer to Battery Negative Cable Disconnection and Connection.
- Recover the refrigerant. Refer to Refrigerant Recovery and Recharging.
- Remove the radiator air deflector. Refer to Cooling Fan and Shroud Replacement.
- Remove the air filter assembly. Refer to Air Cleaner Assembly Replacement.
- Remove the A/C drive belt. Refer to Air Conditioning Compressor Belt Replacement.
- Disconnect the compressor electrical connector (1).
- Remove the suction/discharge pipes pad to compressor retaining bolt (1).
- Disconnect the suction/discharge pipes (1) from the compressor (3).
- Remove the sealing washers (2). Refer to Sealing Washer Replacement.
- Cap or plug the suction/discharge pipes (1) and the ports on the compressor (3).
- Remove the compressor to compressor bracket retaining bolts (1).
- Remove the compressor (2) from the compressor bracket (3).
Warning: Refer to Safety Glasses Warning in the Preface section.
Warning: Refer to Battery Disconnect Warning in the Preface section.
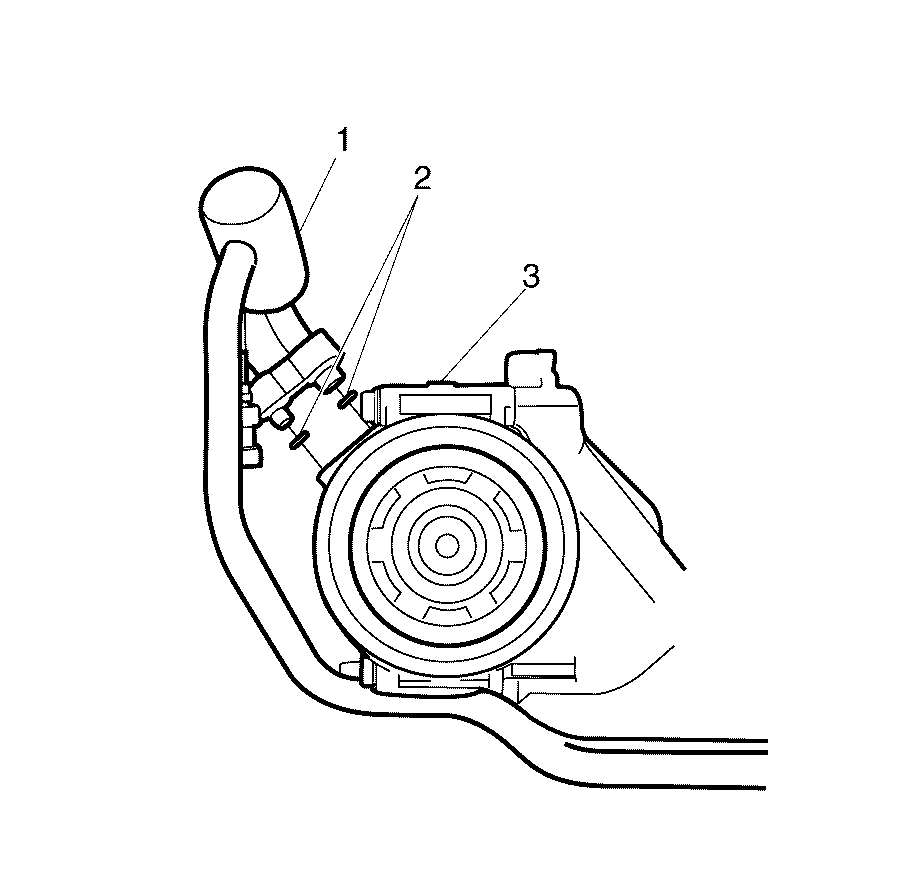
Note: The sealing washers (2) are a single use item and must be discarded after use.
Discard the sealing washers
Note: Cover any opening of the A/C system with a suitable cap or tape immediately, to prevent absorption of moisture from the atmosphere.
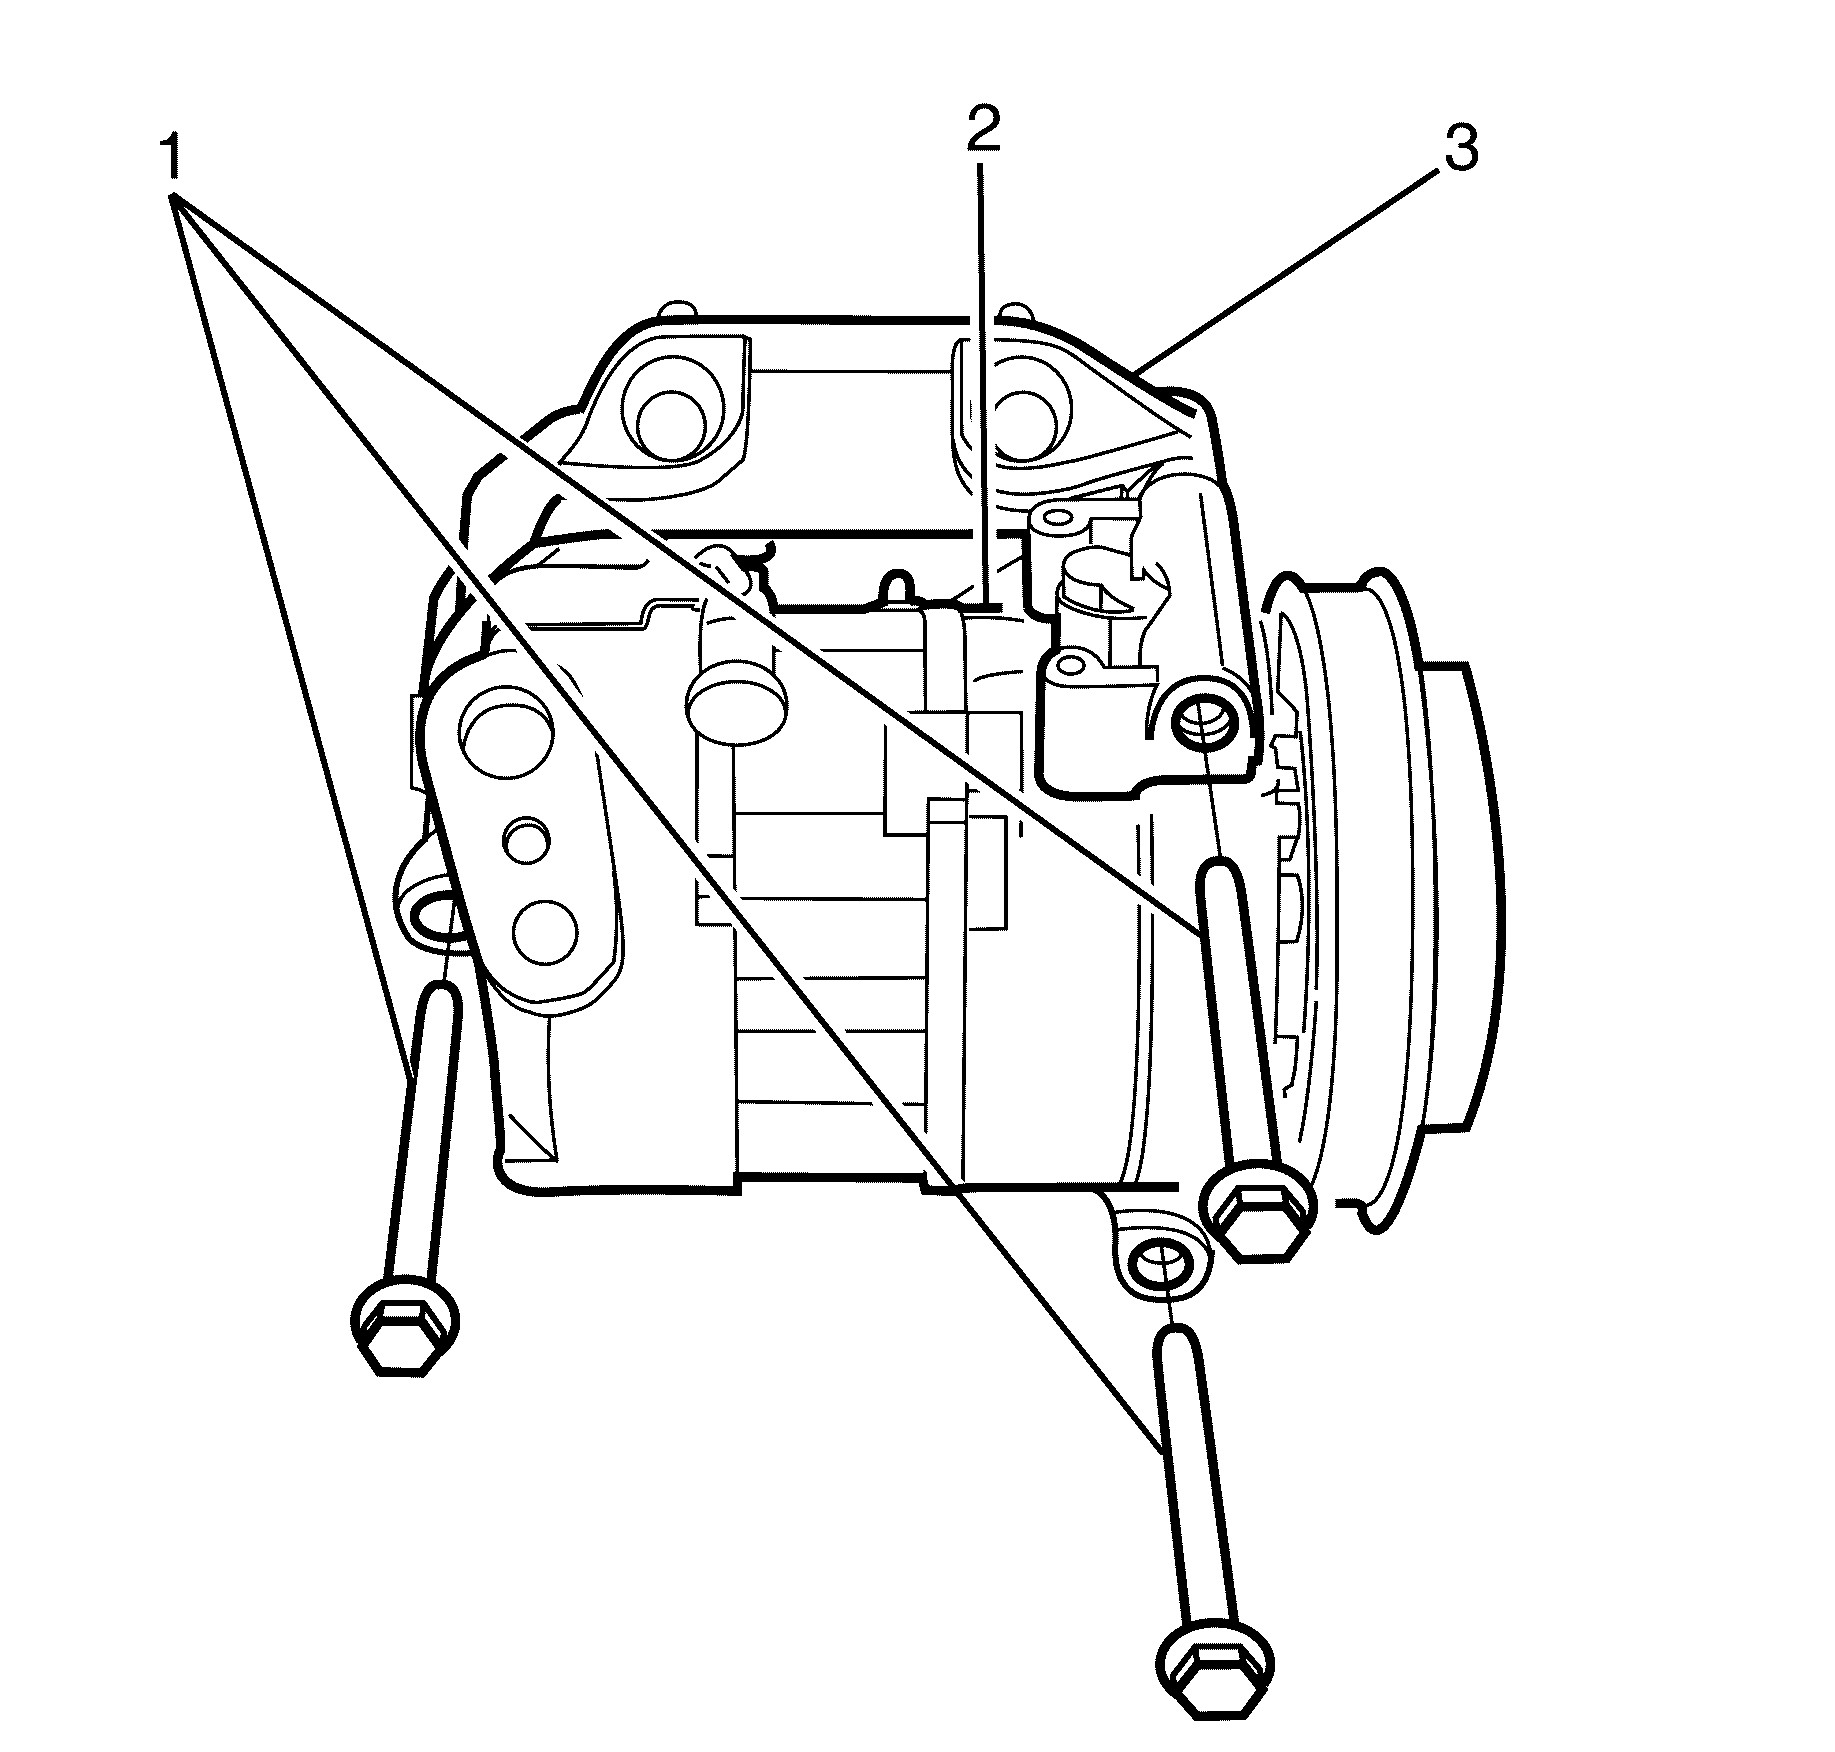
Note: Remove the compressor (2) from the compressor mounting bracket (3) by sliding forwards and than tilting upwards out of the engine compartment.
Installation Procedure
- If you are replacing the compressor, balance the compressor oil. Refer to Air Conditioning Compressor Oil Balancing.
- Install the compressor (2) to the compressor mounting bracket (3).
- Install the compressor to compressor mounting bracket retaining bolts (1) and tighten to 22 N·m (16 lb ft).
- Remove the plugs or caps from the suction/discharge pipes (1) and the ports on the compressor (3).
- Install two NEW sealing washers (2). Refer to Sealing Washer Replacement.
- Connect the suction/discharge pipes (1) to the compressor (3)
- Install the suction/discharge pipes pad to compressor retaining bolt (1) and tighten to 22 N·m (16 lb ft).
- Connect the compressor electrical connector (1).
- Install the drive belt, Refer to Air Conditioning Compressor Belt Replacement.
- Install the radiator air deflector. Refer to Cooling Fan and Shroud Replacement.
- Install the air filter assembly. Refer to Air Cleaner Assembly Replacement.
- Connect the battery negative cable. Refer to Battery Negative Cable Disconnection and Connection.
- Evacuate and recharge the refrigerant system. Refer to Refrigerant Recovery and Recharging.
- Leak test the fitting of the repaired or reinstalled component using the J 39400 .

Caution: Refer to Fastener Caution in the Preface section.

Note: DO NOT coat the NEW sealing washers (2) with oil, they must be fitted dry. The use of mineral oil will render the sealing washers (2) useless, as the sealing washers (2) WILL swell causing refrigerant to leak out.


