Liquid Line Replacement 3.6L Engine
Removal Procedure
- Recover the refrigerant Refer to Refrigerant Recovery and Recharging.
- Disconnect the battery negative cable. Refer to Battery Negative Cable Disconnection and Connection.
- Remove the air filter assembly. Refer to Air Cleaner Assembly Replacement.
- Remove the radiator air baffle and deflector. Refer to Radiator Air Upper Baffle and Deflector Replacement.
- Raise and support the vehicle. Refer to Lifting and Jacking the Vehicle.
- Remove the front air deflector. Refer to Front Air Deflector Replacement.
- Remove the liquid pipe to the condenser port retaining nut (1).
- Disconnect the liquid pipe (1) from the condenser port (3).
- Remove the sealing washer (2). Refer to Sealing Washer Replacement.
- Cap or plug the liquid pipe (1) and the condenser port (3).
- Lower the vehicle.
- Detach the left engine cover (1) from the outer retaining clip (2).
- Detach the left engine cover (1) from the ball stud (2).
- Remove the left engine cover (1).
- Disconnect the vacuum hose (1) and the vacuum brake booster check valve (3) from the vacuum brake booster (2).
- Detach the vacuum hose (1) from the bulkhead mounted vacuum hose retaining bracket (4) and position aside.
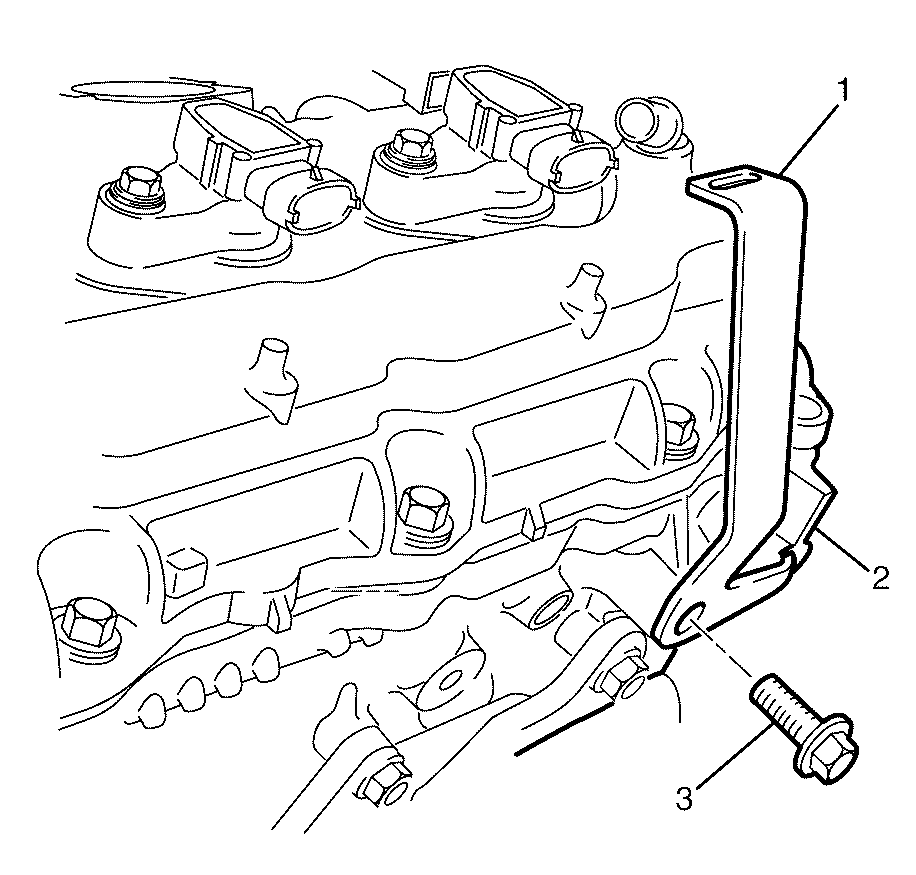
- Remove the left engine cover mounting bracket to cylinder head retaining bolt (3).
- Remove the left engine cover mounting bracket (1) from the cylinder head (2).
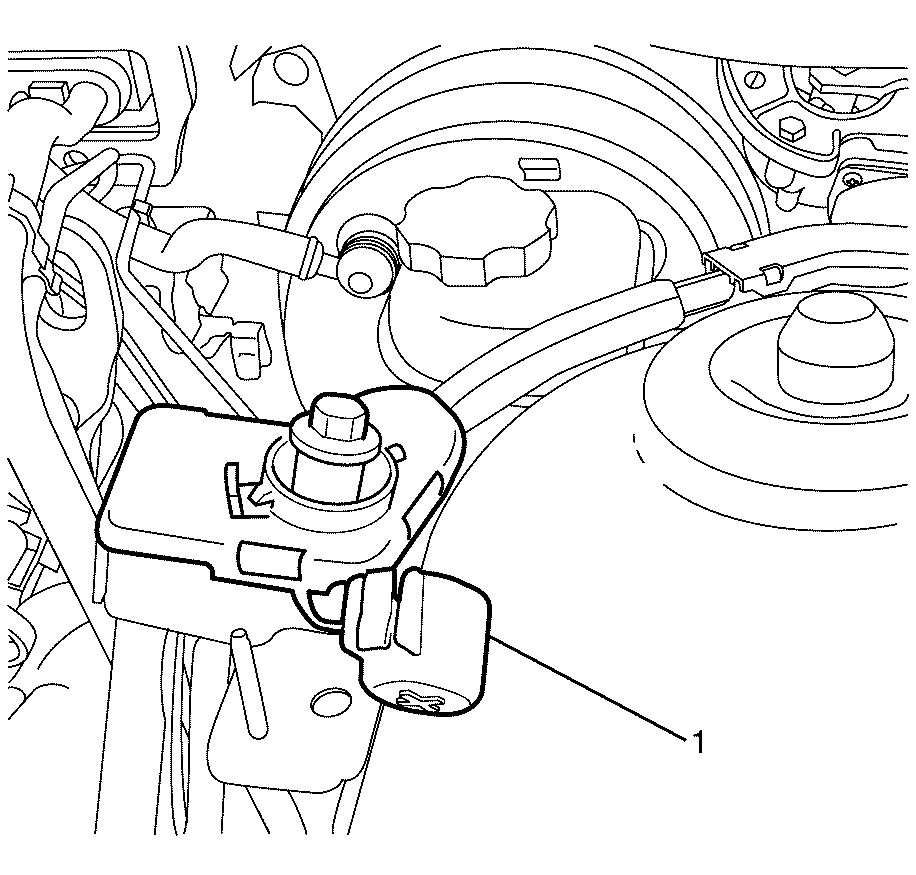
- Remove the remote battery positive post cover (1).
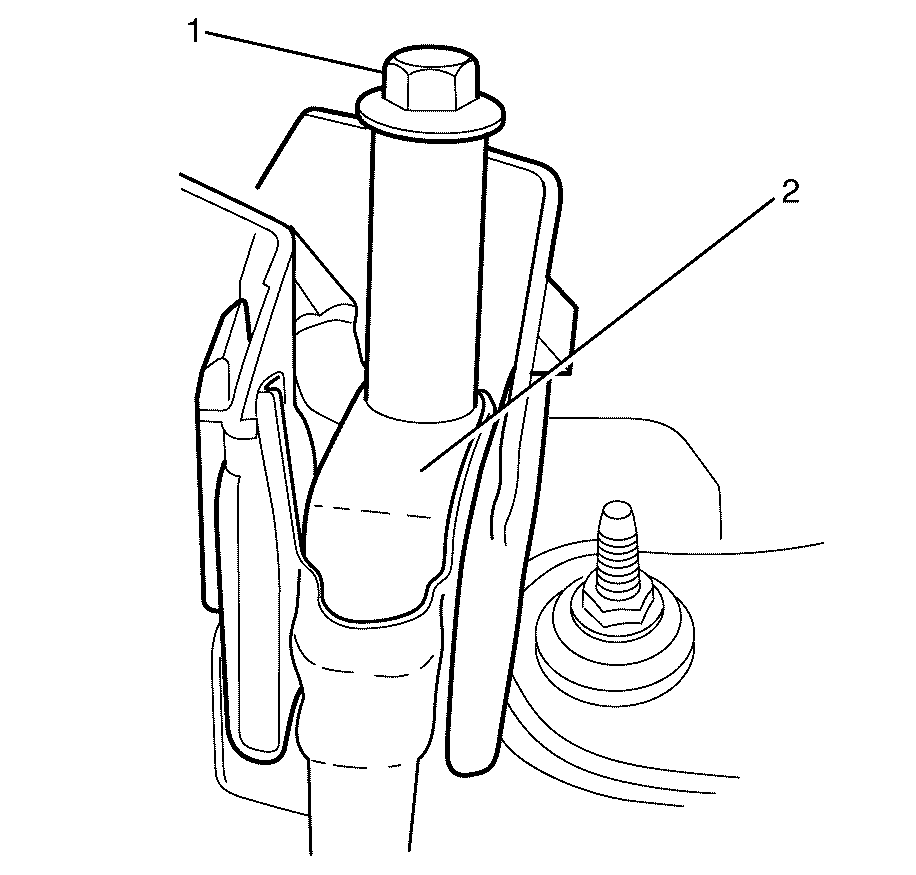
- Remove the remote battery positive post to wiring harness retaining bolt (1).
- Remove the starter motor power cable (2) and position aside.
- Remove the suction pipe upper to suction pipe lower retaining nut (1).
- Remove the suction pipe/liquid pipe retaining clip to left front chassis rail retaining bolt (3).
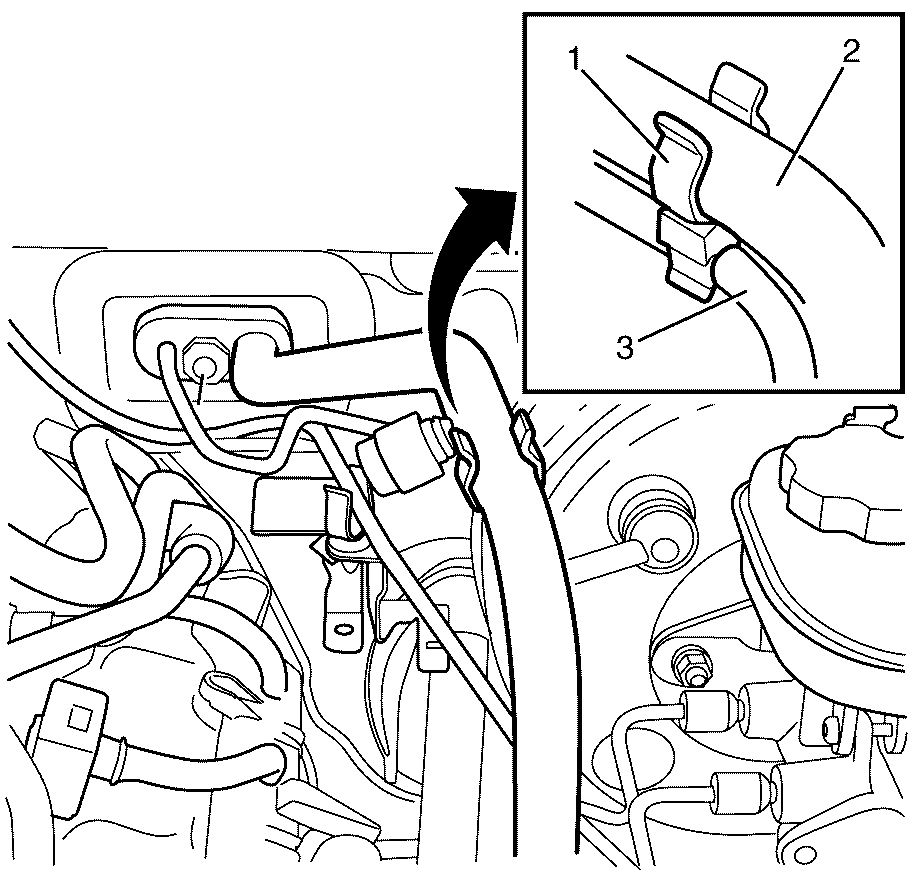
- Detach the liquid pipe (1) from the suction pipe/liquid pipe retaining clip (2).
- Disconnect the suction pipe upper (1) from suction pipe lower (2).
- Remove the sealing washer (3). Refer to Sealing Washer Replacement.
- Cap or plug the suction pipe upper (1) and the suction pipe lower (2).
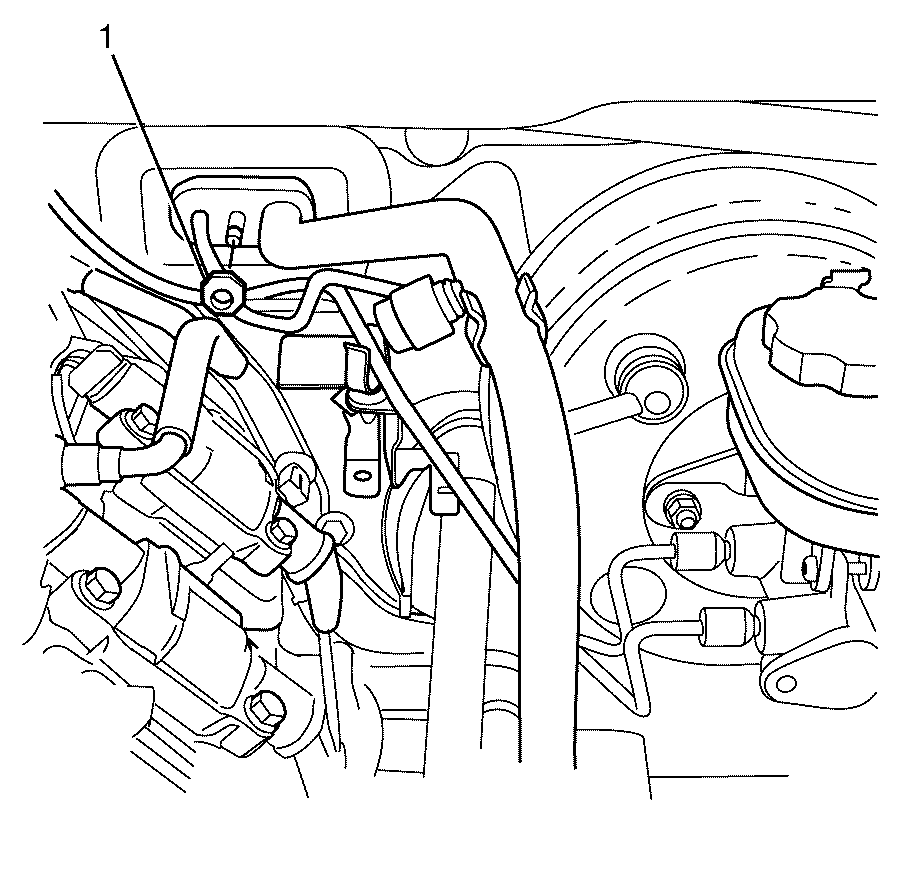
- Remove the suction pipe/liquid pipe pad to TX valve retaining nut (1).
- Disconnect the suction pipe/liquid pipe pad (3) from the TX valve (1).
- Remove the sealing washers (2). Refer to Sealing Washer Replacement.
- Cap or plug the suction pipe (4), liquid pipe (5) and the TX valve (1).
- Remove the liquid pipe (5) from the suction pipe/liquid pipe pad (3).
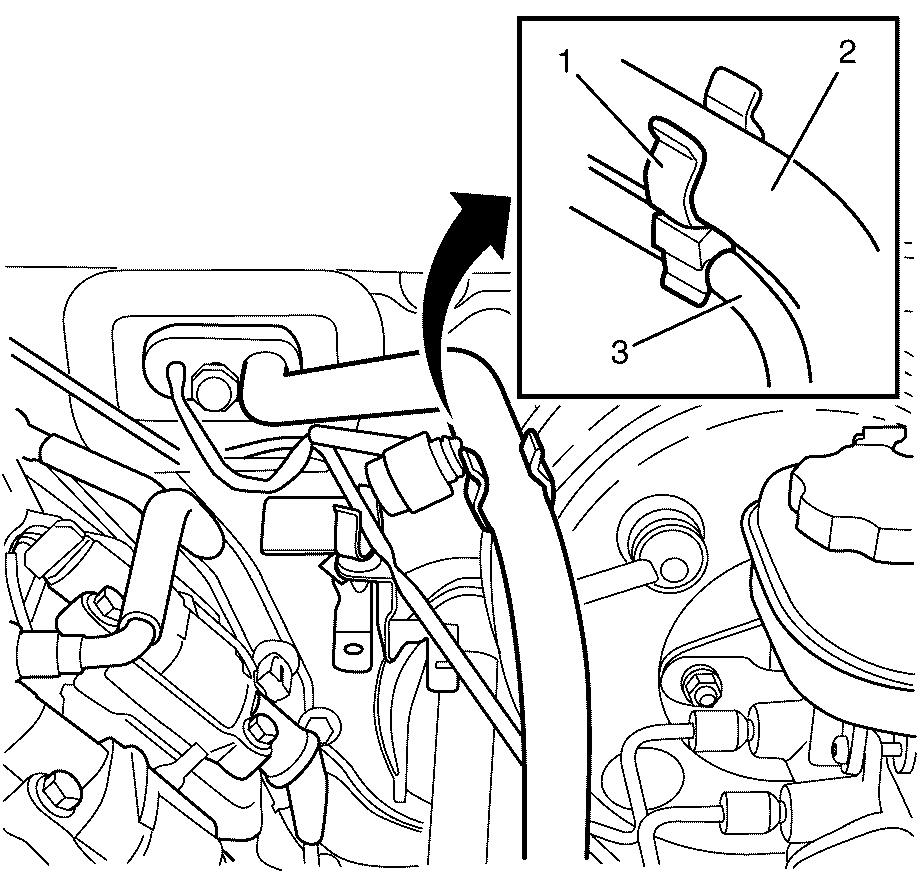
- Detach the suction pipe (2) and the liquid pipe (3) from the suction pipe/liquid pipe retaining clip (1).
- Remove the suction pipe (2) from the engine compartment.
Warning: Refer to Safety Glasses Warning in the Preface section.
Warning: Refer to Battery Disconnect Warning in the Preface section.
Danger: To avoid any vehicle damage, serious personal injury or death when major components are removed from the vehicle and the vehicle is supported by a hoist, support the vehicle with jack stands at the opposite end from which the components are being removed and strap the vehicle to the hoist.
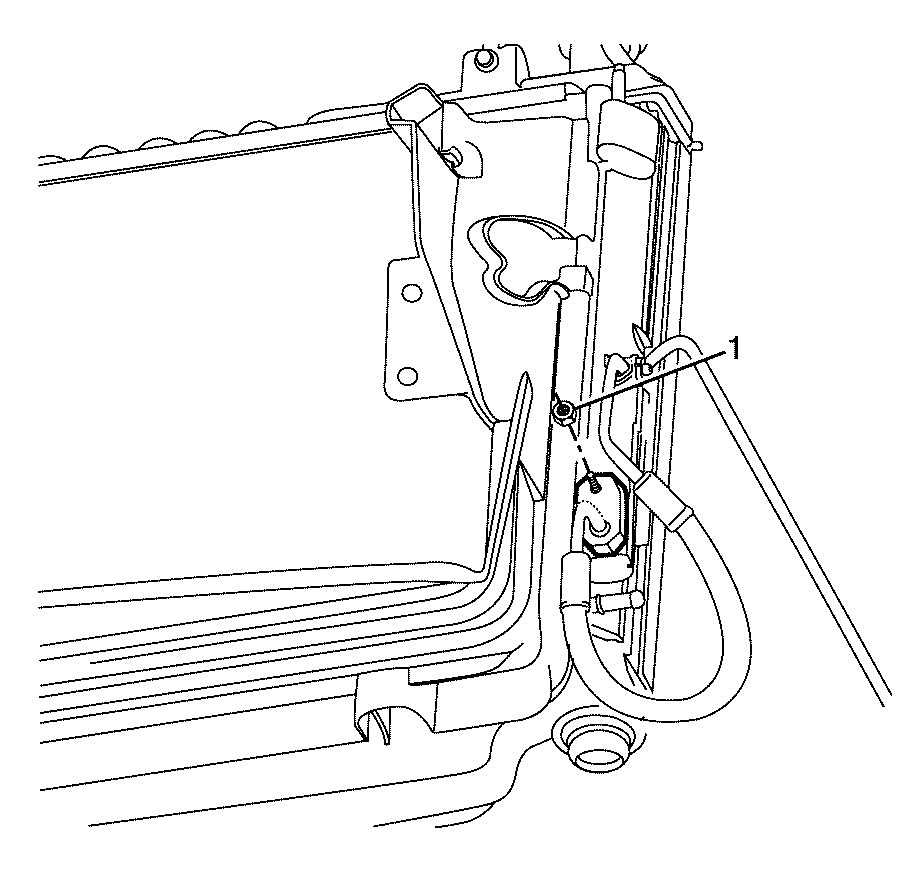
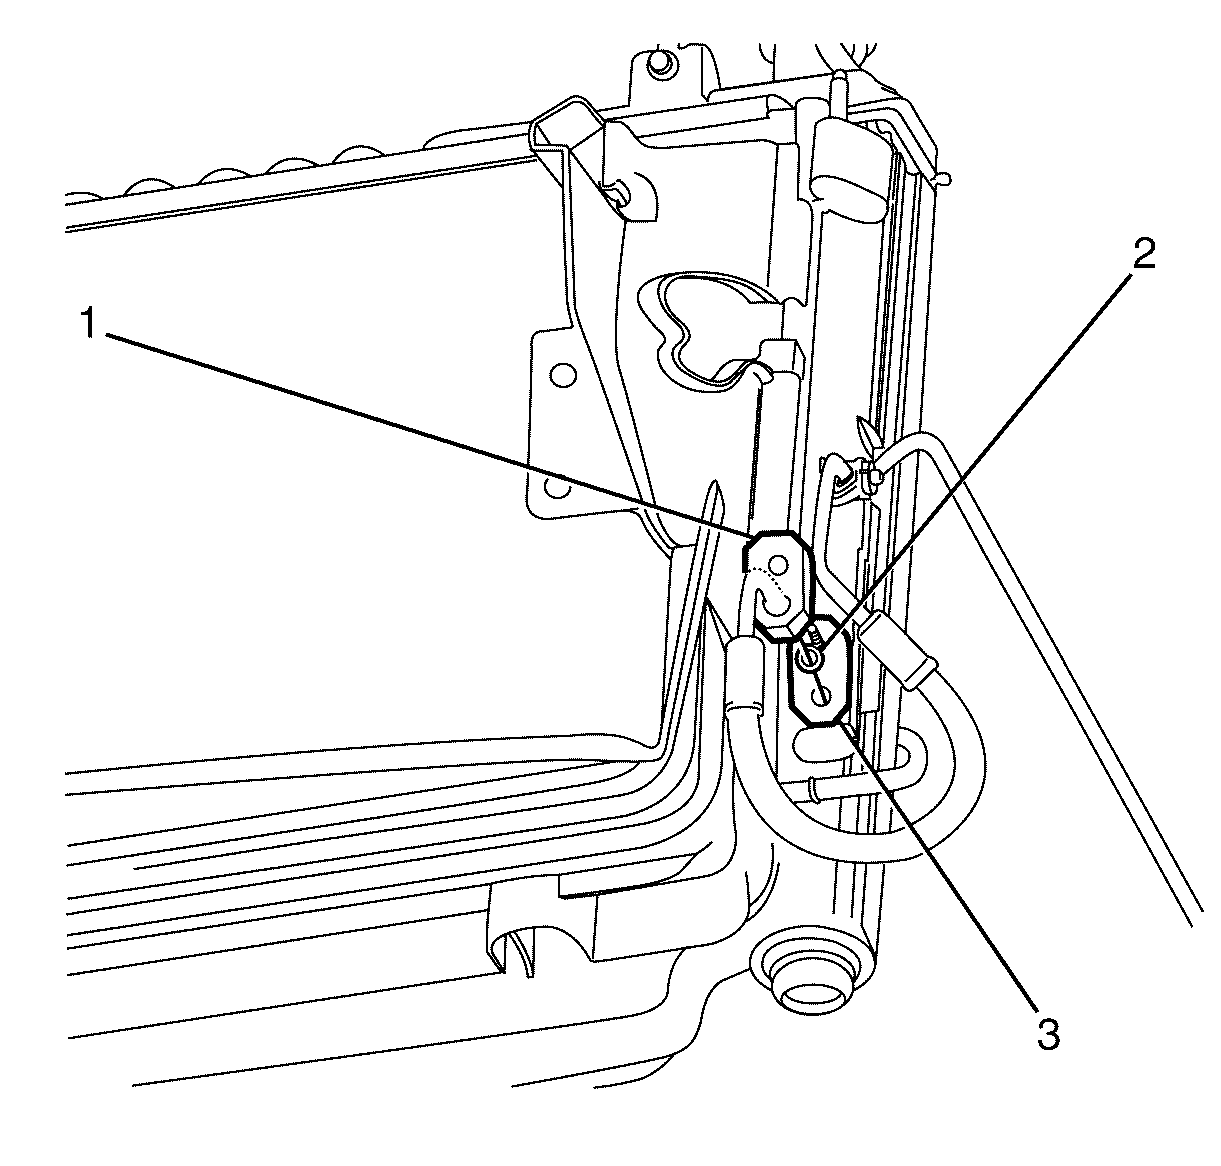
Note: The sealing washer (2) is a single use item and must be discarded after use.
Discard the sealing washer
Note: Cover any opening of the A/C system with a suitable cap or tape immediately, to prevent absorption of moisture from the atmosphere.
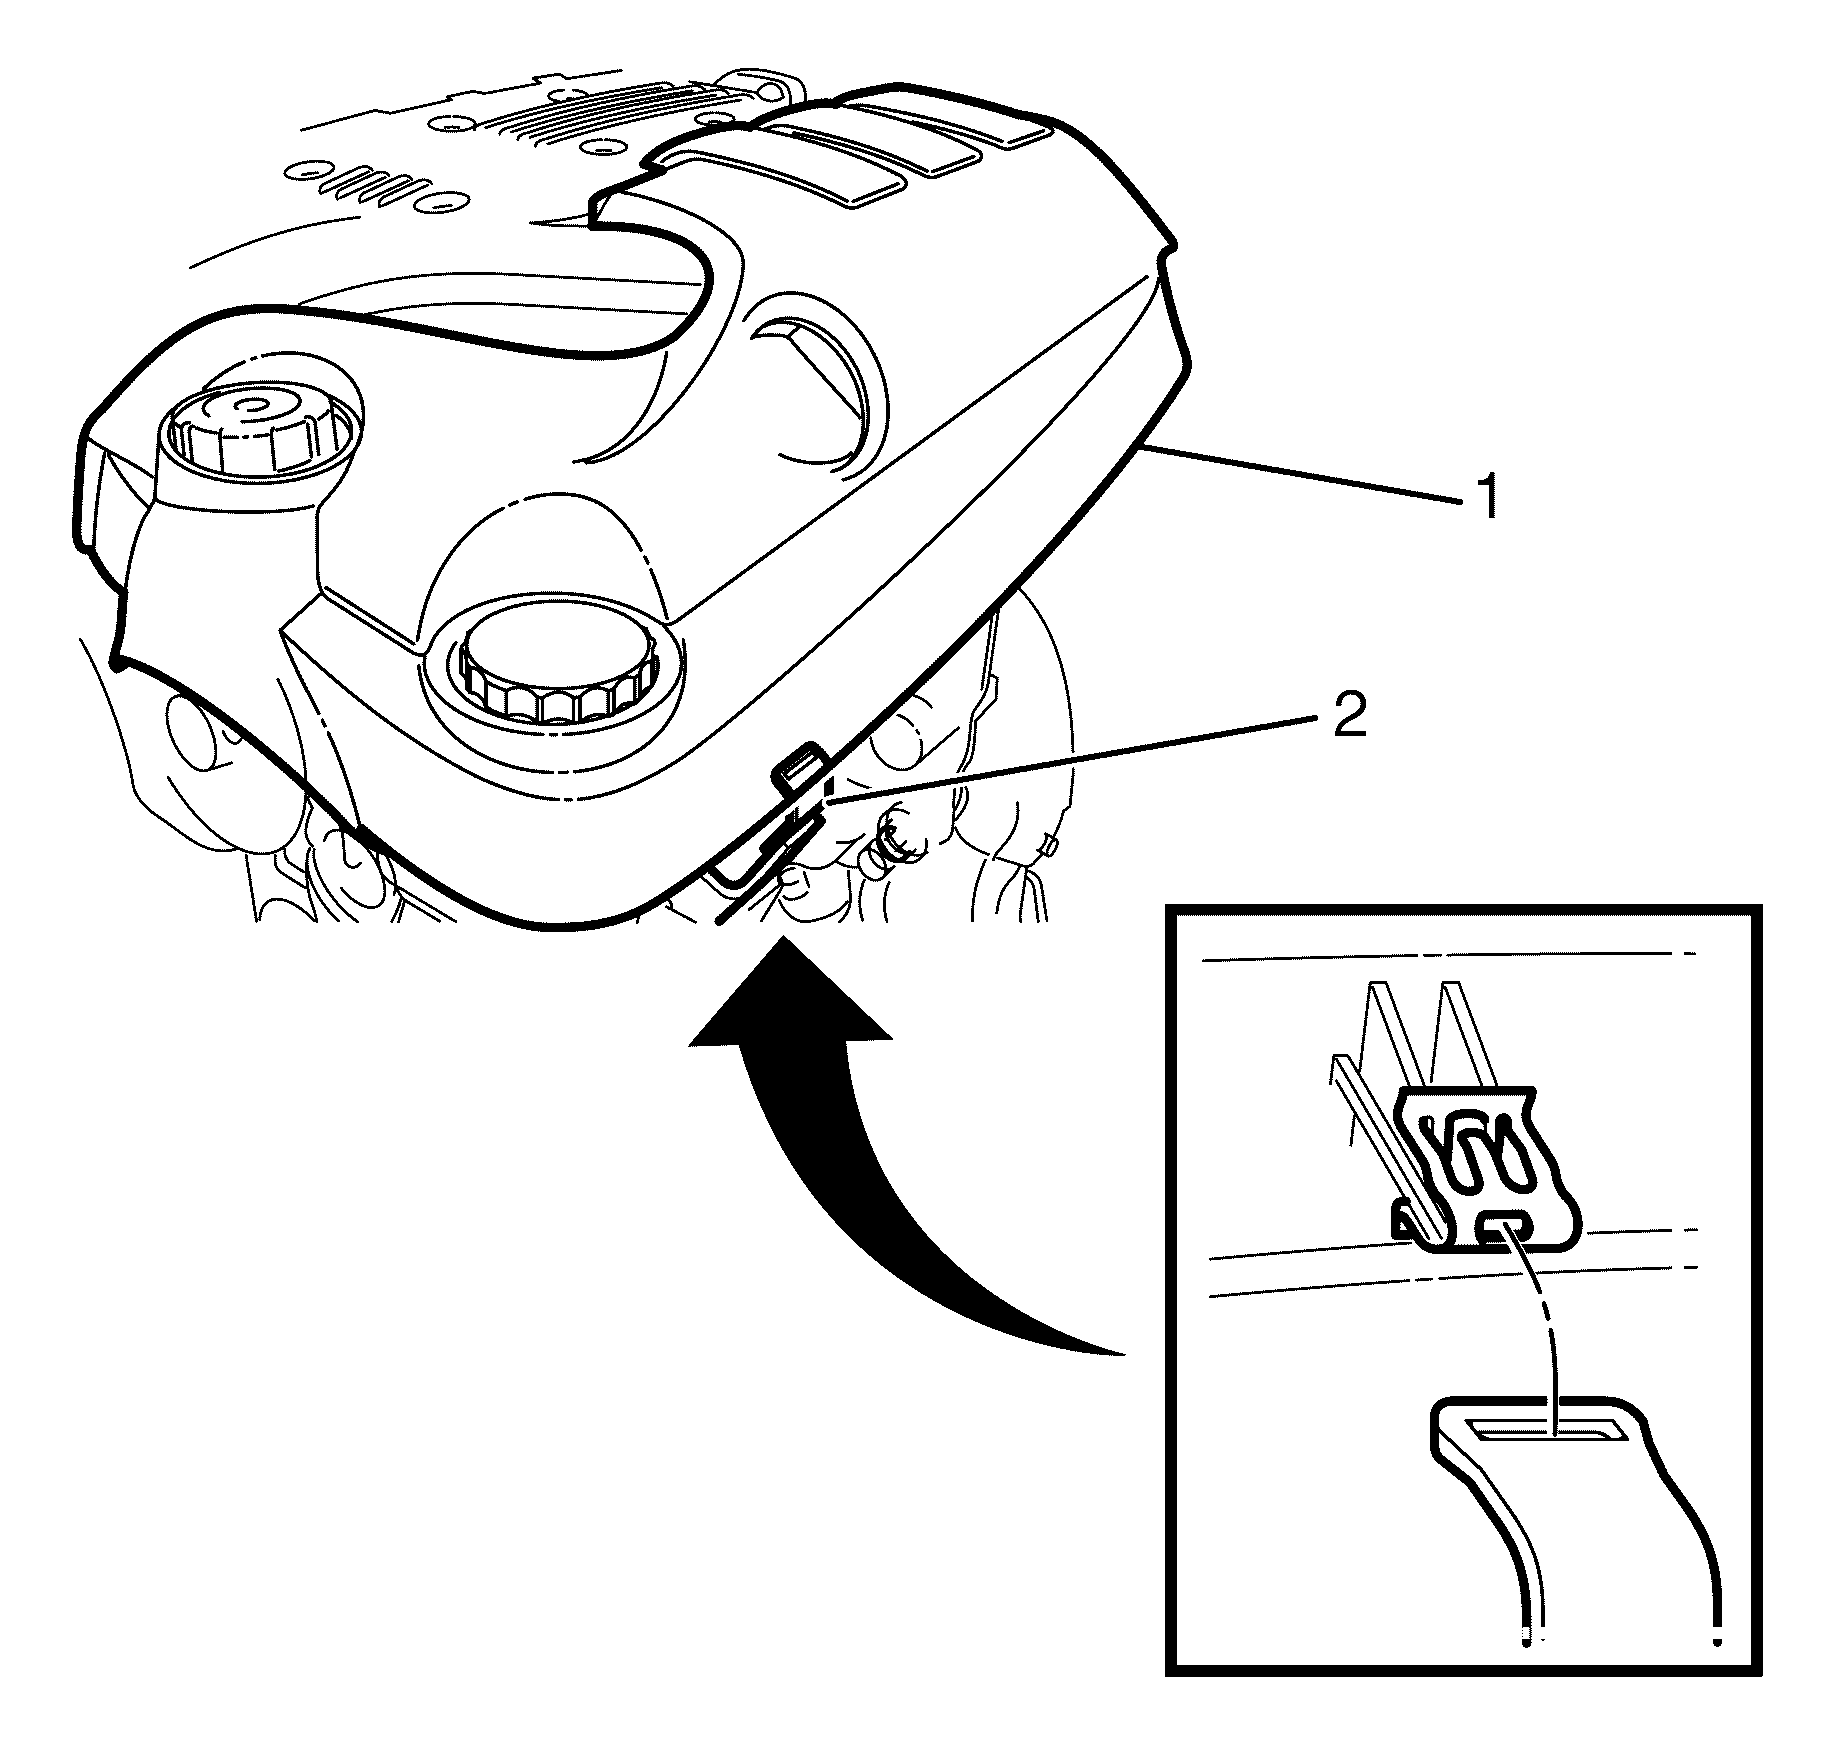
Note: The left engine cover has one front and one rear outer retaining clip.
Note: Grasp and pry the left engine cover (1) upwards to detach the left engine cover (1) from the outer retaining clip (2).
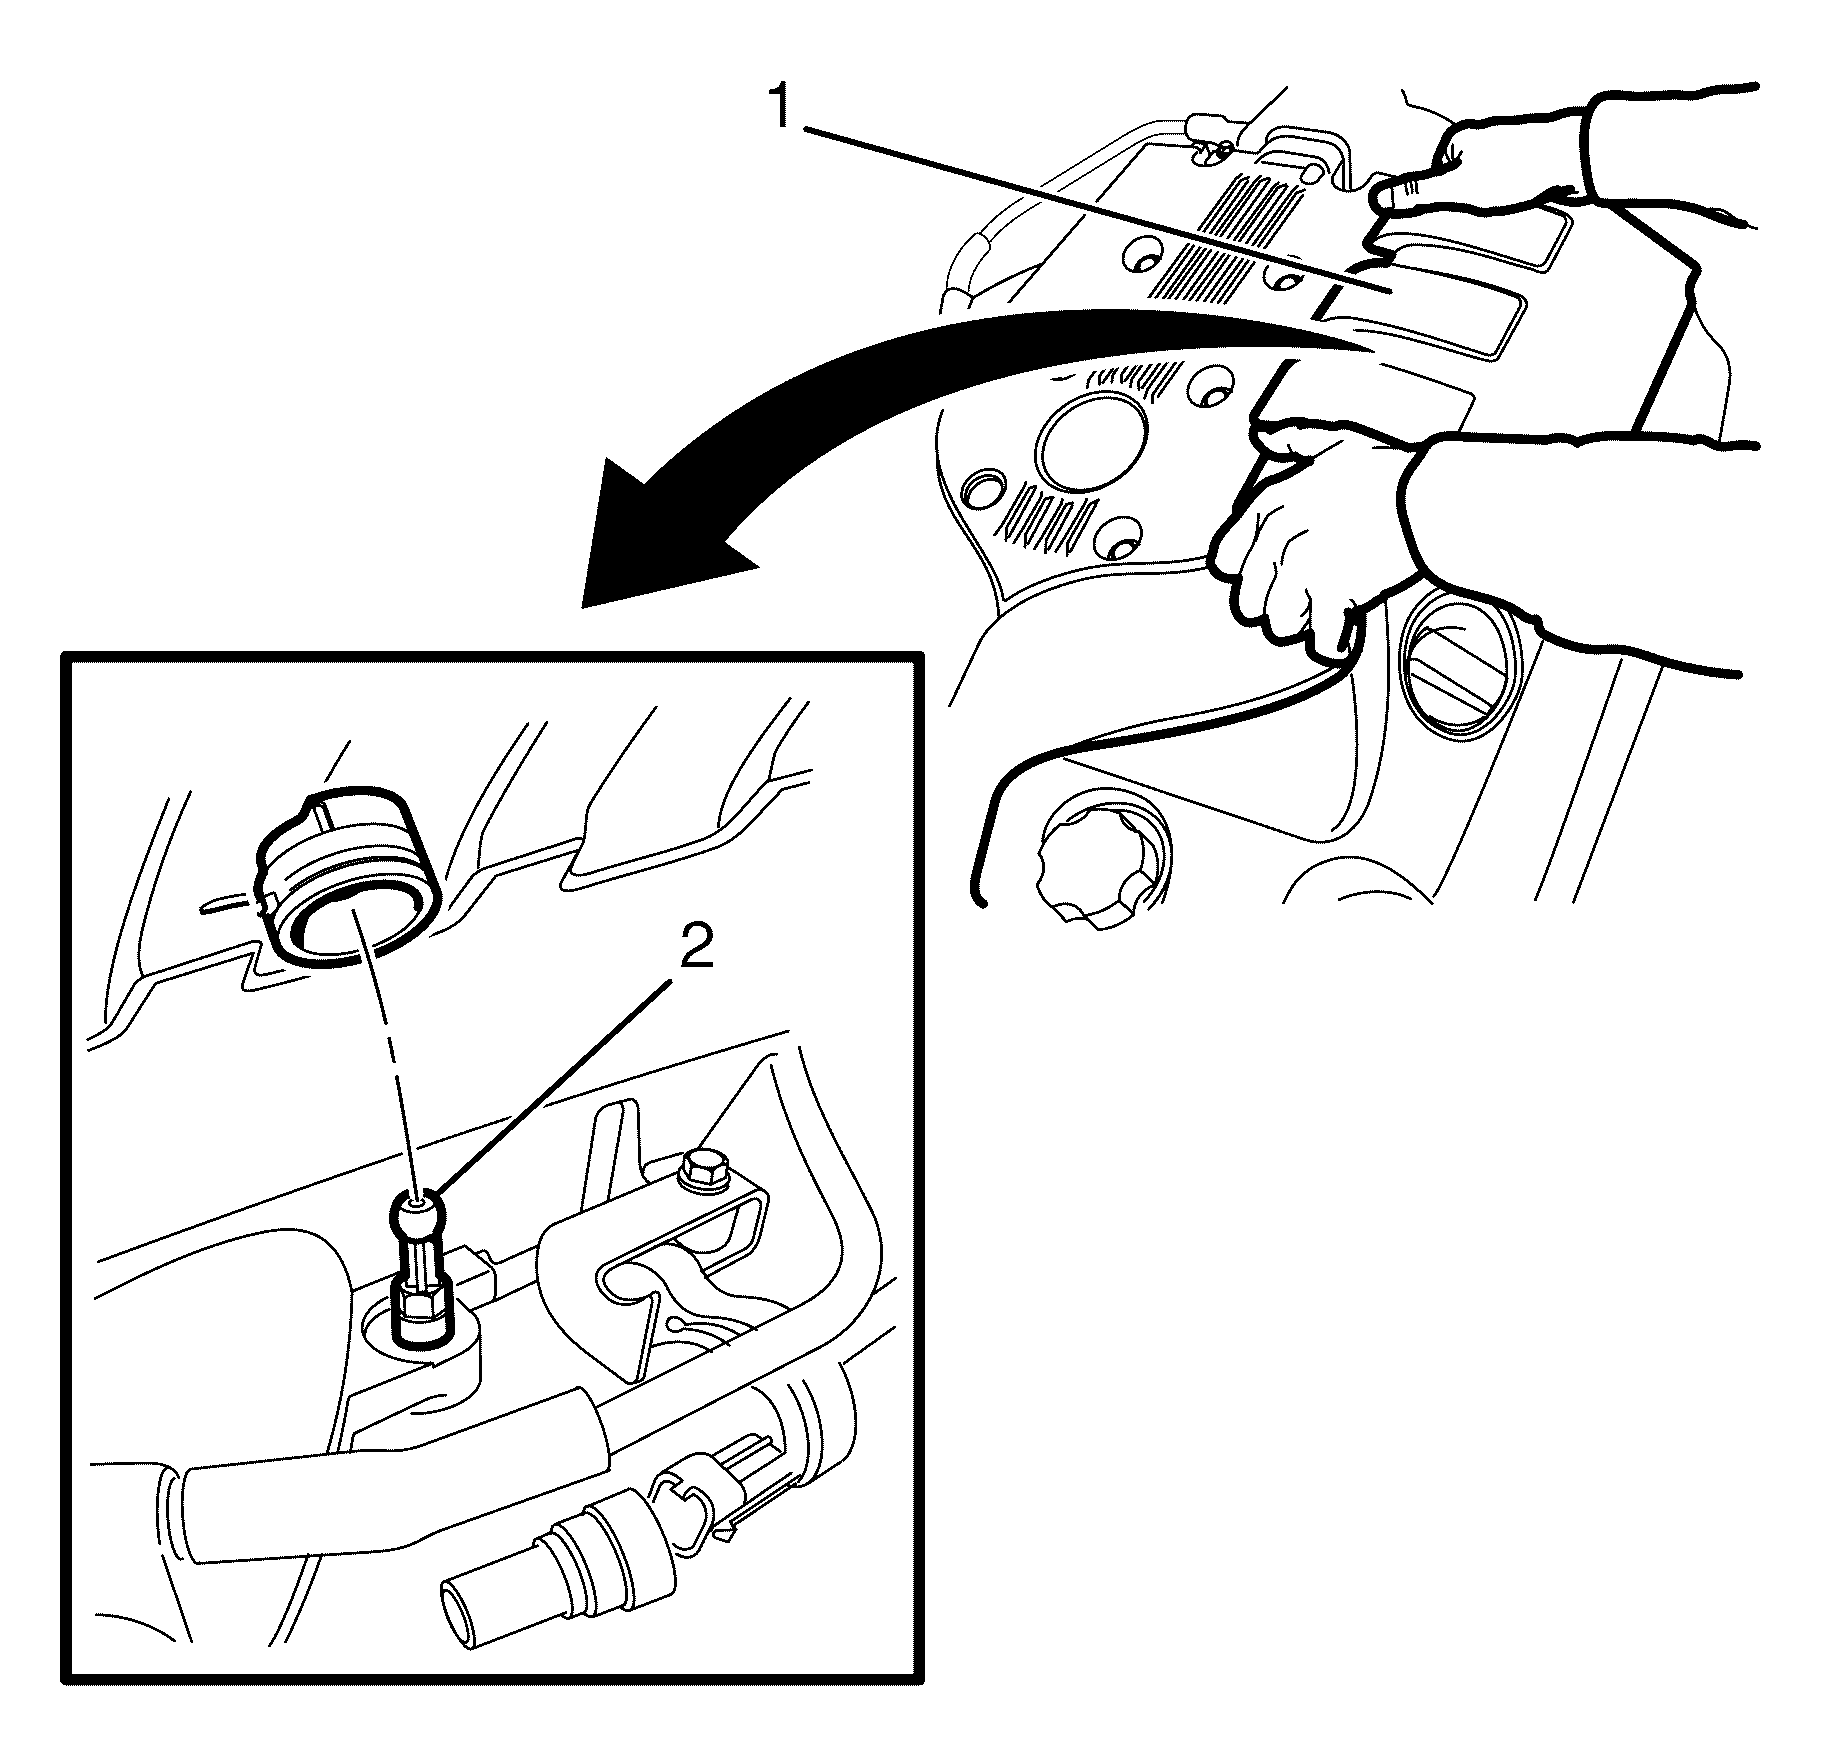
Note: Disengage the left engine cover (1) from the ball stud (2) by pulling up firmly on the rear and front of the left engine cover (1).



Note: The sealing washer (3) is a single use item and must be discarded after use.
Discard the sealing washer
Note: Cover any opening of the A/C system with a suitable cap or tape immediately, to prevent absorption of moisture from the atmosphere.


Note: The sealing washers (2) are a single use item and must be discarded after use.
Discard the sealing washers
Note: Cover any opening of the A/C system with a suitable cap or tape immediately, to prevent absorption of moisture from the atmosphere.
Installation Procedure
- Install the liquid pipe (5) to the suction pipe/liquid pipe pad (3).
- Remove the plugs or caps from the suction pipe (4), liquid pipe (5) and the TX valve (1).
- Install NEW sealing washers (2). Refer to Sealing Washer Replacement.
- Position the suction pipe/liquid pipe pad (3) to the TX Valve (1).
- Install the suction pipe/liquid pipe pad to TX valve retaining nut (1) and tighten to 22 N·m (16 lb ft).
- Raise the vehicle.
- Remove the plugs or caps from the suction pipe liquid pipe (1) and the condenser port (3).
- Install a NEW sealing washer (2). Refer to Sealing Washer Replacement.
- Connect the liquid pipe (1) to the condenser port (3).
- Install the liquid pipe to condenser port retaining nut (1) and tighten to 22 N·m(16 lb ft).
- Install the air deflector front. Refer to Front Air Deflector Replacement.
- Lower the vehicle.
- Remove the plugs or caps from the suction pipe upper (1) and the suction pipe lower (2).
- DO NOT coat the NEW sealing washer (3) with oil, they must be fitted dry. The use of mineral oil will render the sealing washer (3) useless, as the sealing washer (3) WILL swell causing refrigerant to leak out.
- Install the suction pipe upper (1) to the suction pipe lower (2).
- Attach the liquid pipe (1) to the suction pipe/liquid pipe retaining clip (2).
- Install the suction pipe/liquid pipe retaining clip to left front chassis rail retaining bolt (3).
- Install the suction pipe upper to suction pipe lower retaining nut (1) and tighten to 22 N·m ( 16 lb ft).
- Install the starter motor positive cable (2) to the remote battery positive post (3).
- Install the remote battery positive post to wiring harness retaining bolt (1) and tighten to 15 N·m (11 lb ft).
- Install the remote battery positive post cover (1).
- Attach the suction pipe (2) and the liquid pipe (3) to the suction pipe/liquid pipe retaining clip (1).
- Connect the vacuum hose (1) and the vacuum brake booster check valve (3) to the vacuum brake booster (2).
- Attach the vacuum hose (1) to the bulkhead mounted vacuum hose retaining bracket (4).
- Install the left engine cover mounting bracket (1) to the cylinder head (2).
- Install the left engine cover mounting bracket to cylinder head retaining bolt (3) and tighten to 35 N·m (26 lb in).
- Position the left engine cover (1) over the intake manifold so the grommet is aligned with the ball stud (2).
- Attach the left engine cover (1) to the ball stud (2).
- Attach the left engine cover (1) to the outer retaining clip (2).
- Install the air filter assembly. Refer to Air Cleaner Assembly Replacement.
- Install the radiator air baffle and deflector. Refer to Radiator Air Upper Baffle and Deflector Replacement.
- Connect the battery negative cable. Refer to Battery Negative Cable Disconnection and Connection.
- Evacuate and recharge the A/C system. Refer to Refrigerant Recovery and Recharging.
- Leak test the condenser pipe connections. Refer to Leak Testing.

Note: DO NOT coat the NEW sealing washers (2) with oil, they must be fitted dry. The use of mineral oil will render the sealing washers (2) useless, as the sealing washers (2) WILL swell causing refrigerant to leak out.
Caution: Refer to Fastener Caution in the Preface section.


Note: DO NOT coat the NEW sealing washer (2) with oil, they must be fitted dry. The use of mineral oil will render the sealing washer (2) useless, as the sealing washer (2) WILL swell causing refrigerant to leak out.


Install a NEW sealing washer (3). Refer to Sealing Washer Replacement.


Note: Make sure the clips on the remote battery positive post cover (1) are engaged to avoid an induced rattle condition.


Note: Press the left engine cover (1) down firmly near the ball stud to attach the left engine cover (1) to the ball stud (2).

Note: The left engine cover (1) has one front and one rear outer retaining clip (2).
Note: Press the left engine cover (1) down firmly near the outer retaining clips to attach the left engine cover (1) to the outer retaining clip (2).
Liquid Line Replacement 6.0L Engine
Removal Procedure
- Recover the refrigerant. Refer to Refrigerant Recovery and Recharging.
- Disconnect the battery negative cable. Refer to Battery Negative Cable Disconnection and Connection.
- Remove the air filter assembly. Refer to Air Cleaner Assembly Replacement.
- Remove the radiator air baffle and deflector. Refer to Radiator Air Upper Baffle and Deflector Replacement.
- Remove the engine cover. Refer to Engine Cover Replacement.
- Raise and support the vehicle. Refer to Lifting and Jacking the Vehicle.
- Remove the front air deflector. Refer to Front Air Deflector Replacement.
- Remove the liquid pipe to the condenser port retaining nut (1).
- Disconnect the liquid pipe (1) from the condenser port (3).
- Remove the sealing washer (2). Refer to Sealing Washer Replacement.
- Cap or plug the liquid pipe (1) and the condenser port (3).
- Disconnect the vacuum hose (1) and the vacuum brake booster check valve (3) from the vacuum brake booster (2).
- Detach the vacuum hose (1) from the bulkhead mounted vacuum hose retaining bracket (4) and position aside.
- Remove the remote battery positive post cover (1).
- Remove the remote battery positive post to wiring harness retaining bolt (1).
- Remove the starter motor power cable (2) and position aside.
- Remove the suction pipe upper to suction pipe lower retaining nut (1).
- Remove the suction pipe/liquid pipe retaining clip to left front chassis rail retaining bolt (3).
- Detach the liquid pipe (1) from the suction pipe/liquid pipe retaining clip (2).
- Disconnect the suction pipe upper (1) from suction pipe lower (2).
- Remove the sealing washer (3). Refer to Sealing Washer Replacement.
- Cap or plug the suction pipe upper (1) and the suction pipe lower (2).
- Detach the suction pipe (2) and the liquid pipe (3) from the suction pipe/liquid pipe retaining clip (1).
- Remove the suction pipe/liquid pipe pad to TX Valve retaining nut (1).
- Disconnect the suction pipe/liquid pipe pad (3) from the TX valve (1).
- Remove the sealing washers (2). Refer to Sealing Washer Replacement.
- Cap or plug the suction pipe (4), liquid pipe (5) and the TX valve (1).
- Remove the liquid pipe (5) from the suction pipe/liquid pipe pad (3).
- Remove the liquid pipe (5) from the engine compartment
Warning: Refer to Safety Glasses Warning in the Preface section.
Warning: Refer to Battery Disconnect Warning in the Preface section.
Danger: To avoid any vehicle damage, serious personal injury or death when major components are removed from the vehicle and the vehicle is supported by a hoist, support the vehicle with jack stands at the opposite end from which the components are being removed and strap the vehicle to the hoist.


Note: The sealing washer (2) is a single use item and must be discarded after use.
Discard the sealing washer
Note: Cover any opening of the A/C system with a suitable cap or tape immediately, to prevent absorption of moisture from the atmosphere.


Note: The sealing washer (3) is a single use item and must be discarded after use.
Discard the sealing washer
Note: Cover any opening of the A/C system with a suitable cap or tape immediately, to prevent absorption of moisture from the atmosphere.
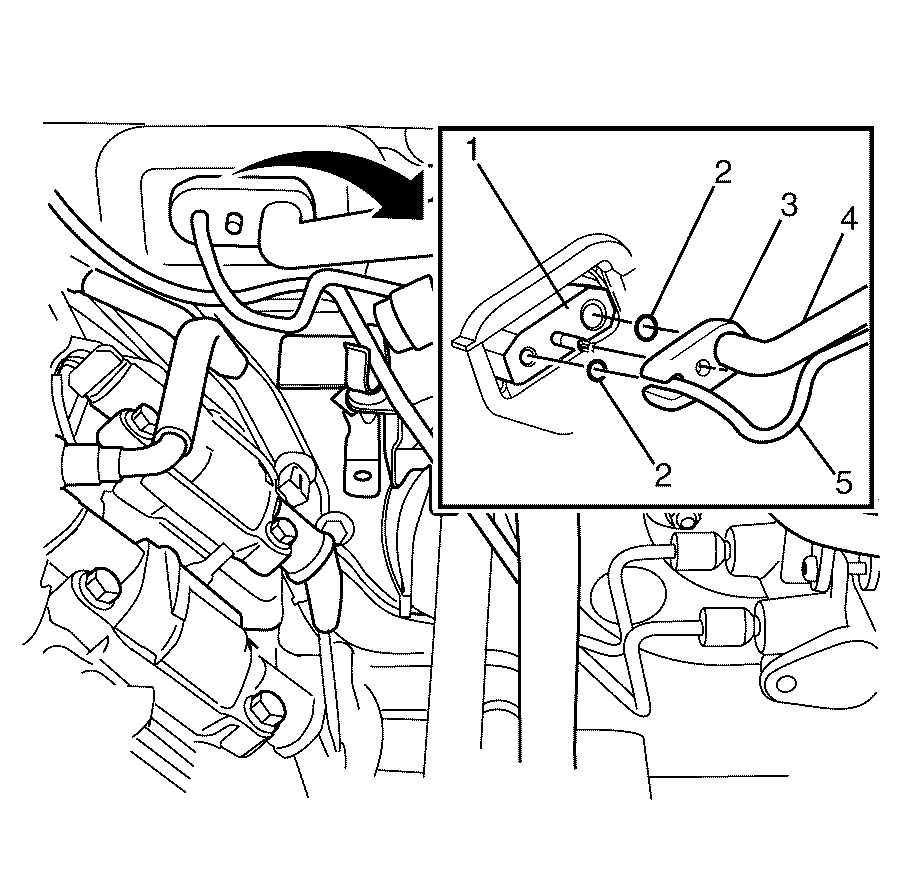
Note: The sealing washers (2) are a single use item and must be discarded after use.
Discard the sealing washers
Note: Cover any opening of the A/C system with a suitable cap or tape immediately, to prevent absorption of moisture from the atmosphere.
Installation Procedure
- Install the liquid pipe (5) to the suction pipe/liquid pipe pad (3).
- Remove the plugs or caps from the suction pipe (4), liquid pipes (5) and the TX valve (1).
- Install NEW sealing washers (2). Refer to Sealing Washer Replacement.
- Position the suction pipe/liquid pipe pad (3) to the TX Valve (1).
- Install the suction pipe/liquid pipe pad to TX valve retaining nut (1) and tighten to 22 N·m (16 lb ft).
- Raise the vehicle.
- Remove the plugs or caps from the suction pipe liquid pipe (1) and the condenser port (3).
- Install a NEW sealing washer (2). Refer to Sealing Washer Replacement.
- Connect the liquid pipe (1) to the condenser port (3).
- Install the liquid pipe to condenser port retaining nut (1) and tighten to 22 N·m (16 lb ft).
- Install the front air deflector. Refer to Front Air Deflector Replacement.
- Remove the plugs or caps from the suction pipe upper (1) and the suction pipe lower (2).
- Install a NEW sealing washer (3). Refer to Sealing Washer Replacement.
- Install the suction pipe upper (1) to the suction pipe lower (2).
- Attach the liquid pipe (1) to the suction pipe/liquid pipe retaining clip (2).
- Install the suction pipe/liquid pipe retaining clip to left front chassis rail retaining bolt (3).
- Install the suction pipe upper to suction pipe lower retaining nut (1) and tighten to 22 N·m ( 16 lb ft).
- Install the starter motor positive cable (2) to the remote battery positive post (3).
- Install the remote battery positive post to wiring harness retaining bolt (1) and tighten to 15 N·m (11 lb ft).
- Install the remote battery positive post cover (1).
- Attach the suction pipe (2) and the liquid pipe (3) to the suction pipe/liquid pipe retaining clip (1).
- Connect the vacuum hose (1) and the vacuum brake booster check valve (3) to the vacuum brake booster (2).
- Attach the vacuum hose (1) to the bulkhead mounted vacuum hose retaining bracket (5).
- Install the radiator air baffle and deflector. Refer to Radiator Air Upper Baffle and Deflector Replacement.
- Install the air filter assembly. Refer to Air Cleaner Assembly Replacement.
- Install the engine cover. Refer to Engine Cover Replacement.
- Connect the battery negative cable. Refer to Battery Negative Cable Disconnection and Connection.
- Evacuate and recharge the A/C system. Refer to Refrigerant Recovery and Recharging.
- Leak test the liquid line pipe connections. Refer to Leak Testing.

Note: DO NOT coat the NEW sealing washers (2) with oil, they must be fitted dry. The use of mineral oil will render the sealing washers (2) useless, as the sealing washers (2) WILL swell causing refrigerant to leak out.
Caution: Refer to Fastener Caution in the Preface section.


Note: DO NOT coat the NEW sealing washer (2) with oil, they must be fitted dry. The use of mineral oil will render the sealing washer (2) useless, as the sealing washer (2) WILL swell causing refrigerant to leak out.


Note: DO NOT coat the NEW sealing washer (3) with oil, they must be fitted dry. The use of mineral oil will render the sealing washer (3) useless, as the sealing washer (3) WILL swell causing refrigerant to leak out.


Note: Make sure the clips on the remote battery positive post cover (1) are engaged to avoid an induced rattle condition.


