For 1990-2009 cars only
Removal Procedure
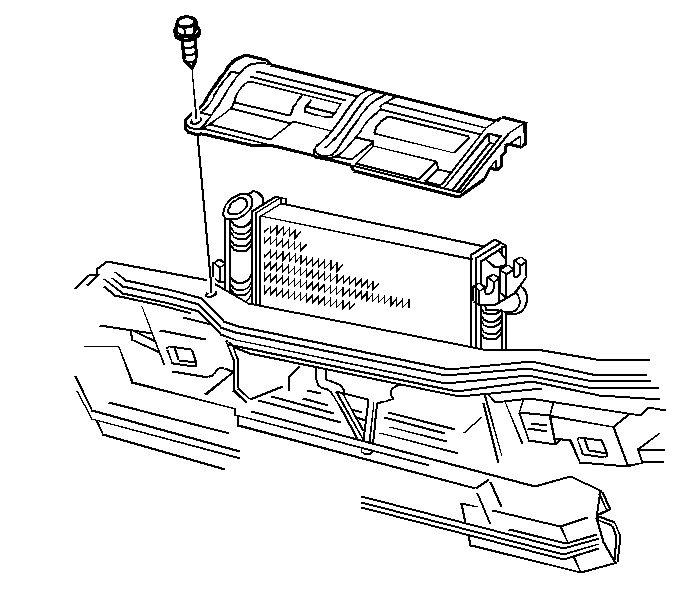
- Remove the hold down bolts and the air box cover (Pontiac WS6).
- Remove the air filter (Pontiac WS6).
- Remove the air intake duct and the air cleaner.
- Remove the electrical connector from the air temperature sensor (Pontiac WS6).
- Remove the vent hose clamp and the vent hose from the lower air box (Pontiac WS6).
- Remove the clamp attaching the rubber shoulder from the lower air box to the mass air flow sensor (Pontiac WS6).
- Remove the bolt attaching the lower air box to the radiator support (Pontiac WS6).
- Remove the lower air box from the vehicle (Pontiac WS6).
- Raise the vehicle. Support the vehicle. Refer to General Vehicle Lifting and Jacking in General Information.
- Drain the engine coolant. Refer to Cooling System Draining and Filling .
- Disconnect the electrical connectors at the electric engine coolant fans.
- Remove the radiator upper mounting panel.
- Remove the electric engine coolant fans. Refer to Electric Cooling Fan .
- Remove the transmission oil cooler lines. Refer to Oil Cooler Lines Replacement in Automatic Transmission.
- Remove the coolant level indicator module, if equipped. Refer to Coolant Level Indicator Module Replacement .
- Lower the vehicle.
- Loosen the receiver dehydrator bracket, if required.
- Remove the lower radiator hose at the water pump.
- Remove the upper radiator hose.
- Remove the overflow tube.
- Remove the radiator from the condenser.
- Remove the radiator.

Installation Procedure
- Install the radiator. Ensure that the radiator is seated on the radiator insulators.
- Install the radiator to the condenser.
- Install the overflow tube.
- Install the upper radiator hose.
- Install the lower radiator hose to the water pump.
- Tighten the receiver dehydrator bracket, if required.
- Raise the vehicle. Support the vehicle. Refer to General Vehicle Lifting and Jacking in General Information.
- Install the coolant level indicator module, if equipped. Refer to Coolant Level Indicator Module Replacement .
- Install the transmission oil cooler lines. Refer to Oil Cooler Lines Replacement in Automatic Transmission.
- Install the electric engine coolant fans. Refer to Electric Cooling Fan .
- Install the radiator upper mounting panel.
- Install the radiator upper mounting panel bolts.
- Connect the electrical connectors to the electric engine coolant fans.
- Add engine coolant. Refer to Cooling System Draining and Filling .
- Lower the vehicle.
- Install the lower air box to the vehicle (Pontiac WS6).
- Install the bolts attaching the lower air box to the vehicle (Pontiac WS6).
- Install the clamp attaching the rubber shoulder from the lower air box to the mass air flow sensor (Pontiac WS6).
- Install the vent hose and the vent hose clamp to the lower air box (Pontiac WS6).
- Connect the electrical connector to the air temperature sensor (Pontiac WS6).
- Install the air cleaner and the air intake duct.
- Install the air filter (Pontiac WS6).
- Install the air box cover and the hold down bolts (Pontiac WS6).
- Run the engine until a normal operating temperature is reached, then inspect the radiator for leaks.

Notice: Use the correct fastener in the correct location. Replacement fasteners must be the correct part number for that application. Fasteners requiring replacement or fasteners requiring the use of thread locking compound or sealant are identified in the service procedure. Do not use paints, lubricants, or corrosion inhibitors on fasteners or fastener joint surfaces unless specified. These coatings affect fastener torque and joint clamping force and may damage the fastener. Use the correct tightening sequence and specifications when installing fasteners in order to avoid damage to parts and systems.
Tighten
Tighten the bolts to 12 N·m (106 lb in).
