SERVICE MANUAL UPDATE-SEC. 10 DOORS/LOCKS/WINDOWS SERV. PROC

SUBJECT: SECTION 10-6 REVISED DOOR SERVICE PROCEDURES
MODELS/YEARS: 1991-93 NINETY EIGHT AND 1992-93 EIGHTY EIGHT MODELS
The following service procedures correct errors in body Section 10-6 in the following service manuals.
DOOR HARDWARE - WATER DEFLECTOR: 1992 Ninety Eight Service Manual, page 10-6-6 o Use the 1993 Eighty Eight/Ninety Eight Service Manual, page 10-6-7.
INSIDE REMOTE HANDLE: 1992 Ninety Eight Service Manual, page 10-6-10 o Use the 1993 Eighty Eight/Ninety Eight Service Manual, page 10-6-11.
DOOR MODULE - FRONT: 1992 Ninety Eight Service Manual, page 10-6-10 o Use the 1993 Eighty Eight/Ninety Eight Service Manual, page 10-6-11.
DOOR LOCK MECHANISM: 1992 Ninety Eight Service Manual, page 10-6-11 o Use the 1993 Eighty Eight/Ninety Eight Service Manual, page 10-6-11 & 12.
DOOR WINDOW - FRONT DOOR: 1992 Ninety Eight Service Manual, page 10-6-12 o Use the 1993 Eighty Eight/Ninety Eight Service Manual, page 10-6-13.
DOOR WINDOW ADJUSTMENT - FRONT AND REAR DOOR: 1991-92 Ninety Eight Bulletin 92-U-02 o Use the material on page 3 of this bulletin.
POWER WINDOW CONTROL (EXPRESS DOWN) MODULE: 1992 Ninety Eight Service Manual, page 10-6-13 Use the 1993 Eighty Eight/Ninety Eight Service Manual, page 10-6-14.
ACTUATOR - POWER WINDOW: 1991 Ninety Eight Service Manual, page 10-6-12 and 13. o Use the material on page 4 of this bulletin.
1992 Ninety Eight Service Manual, page 10-6-13. o Use the material on page 4 of this bulletin.
DOOR HARDWARE - WATER DEFLECTOR: 1992 Eighty Eight Service Manual, page 10-6-4 o Use the 1993 Eighty Eight/Ninety Eight Service Manual, page 10-6-7.
INSIDE REMOTE HANDLE: 1992 Eighty Eight Service Manual, page 10-6-8 o Use the 1993 Eighty Eight/Ninety Eight Service Manual, page 10-6-11.
DOOR MODULE - FRONT: 1992 Eighty Eight Service Manual, page 10-6-8 and 9 o Use the l993 Eighty Eight/Ninety Eight Service Manual, page l0-6-11.
DOOR LOCK MECHANISM: 1992 Eighty Eight Service Manual, page 10-6-10 o Use the 1993 Eighty Eight/Ninety Eight Service Manual, page 10-6-11 & 12.
DOOR WINDOW - FRONT DOOR: 1992 Eighty-Eight Service Manual, page 10-6-11 o Use the 1993 Eighty Eight/Ninety Eight Service Manual, page 10-6-13.
DOOR WINDOW ADJUSTMENT - FRONT AND REAR DOOR: 1992 Eighty Eight Bulletin 92-U-02 o Use the material on page 3 of this bulletin.
POWER WINDOW CONTROL (EXPRESS DOWN) MODULE: 1992 Eighty Eight Service Manual, page 10-6-12 o Use the 1993 Eighty Eight/Ninety Eight Service Manual, page 10-6-14.
ACTUATOR - POWER WINDOW 1992 Eighty-Eight Service Manual, page 10-6-12 o Use the material on page 4 of this bulletin.
DOOR WINDOW ADJUSTMENT - FRONT AND REAR DOOR: 1993 Ninety Eight/Eighty Eight Service Manual, page 10-6-13 and 14 o Use the material on page 3 of this builetin.
ACTUATOR - POWER WINDOW: 1993 Ninety-Eight/Eighty-Eight Service Manual, page 10-6-14 and 15 o Use the material on page 4 of this bulletin.
Please mark references to this bulletin in your service manuals.
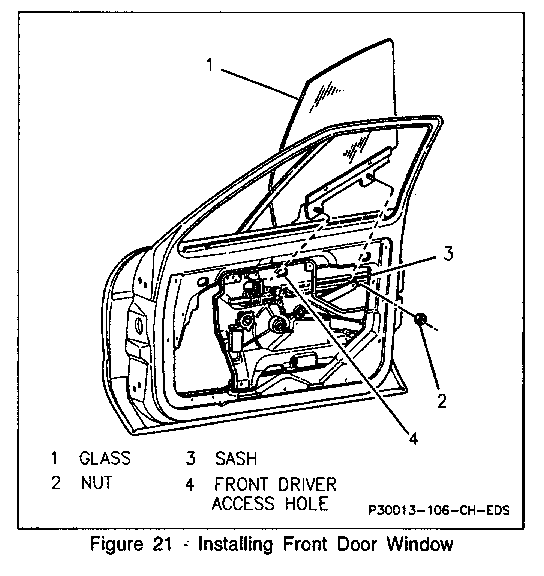
Door Window Adjustment
Front Door Figure 1
Adjust
1. Be sure window is in full up position.
2. Disconnect negative battery cable. Refer to GENERAL INFORMATION (SECTION OA).
3. Remove trim panel and water deflector. Refer to procedure in this section.
4. Loosen front run channel bolts.
5. Loosen window-to-module sash nuts.
6. Move glass studs rearward in module sash.
7. Tighten front run channel upper bolt in middle of slot. Tighten lower bolt.
8. Connect negative battery cable and raise window to full up position.
9. Pry up on window sash using front driver access hole.
10. Tighten rear window to module sash nut then tighten front window to sash nut.
11. Install water deflector and trim panel. Refer to procedure in this section.
12. Cycle window up and down to check operation.
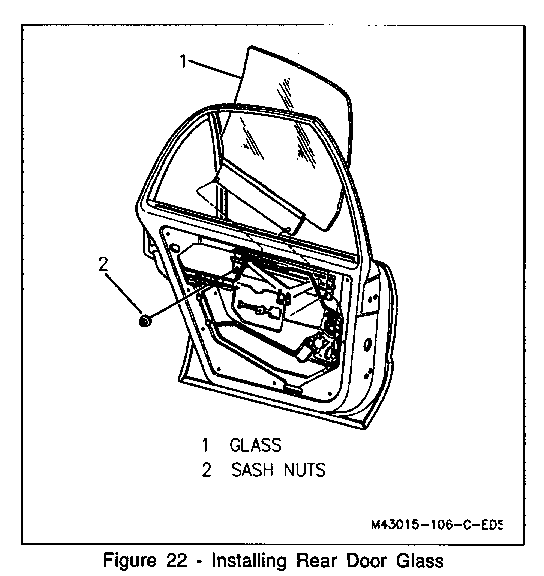
Rear Door Figure 2
Adjust
1. Be sure window is in full up position.
2. Disconnect negative battery cable. Refer to GENERAL INFORMATION (SECTION OA).
3. Remove trim panel and water deflector. Refer to procedure in this section.
4. Loosen front run channel upper bolt.
5. Loosen window-to-module sash nuts.
6. Grasp window and move it forward and upward into seal to assure full engagement of window to run channel.
7. Tighten window-to-module sash nuts.
8. Tighten front run channel bolts.
9. Install water deflector and trim panel. Refer to procedure in this section.
10. Connect negative battery cable.
11. Cycle window up and down to check operation.
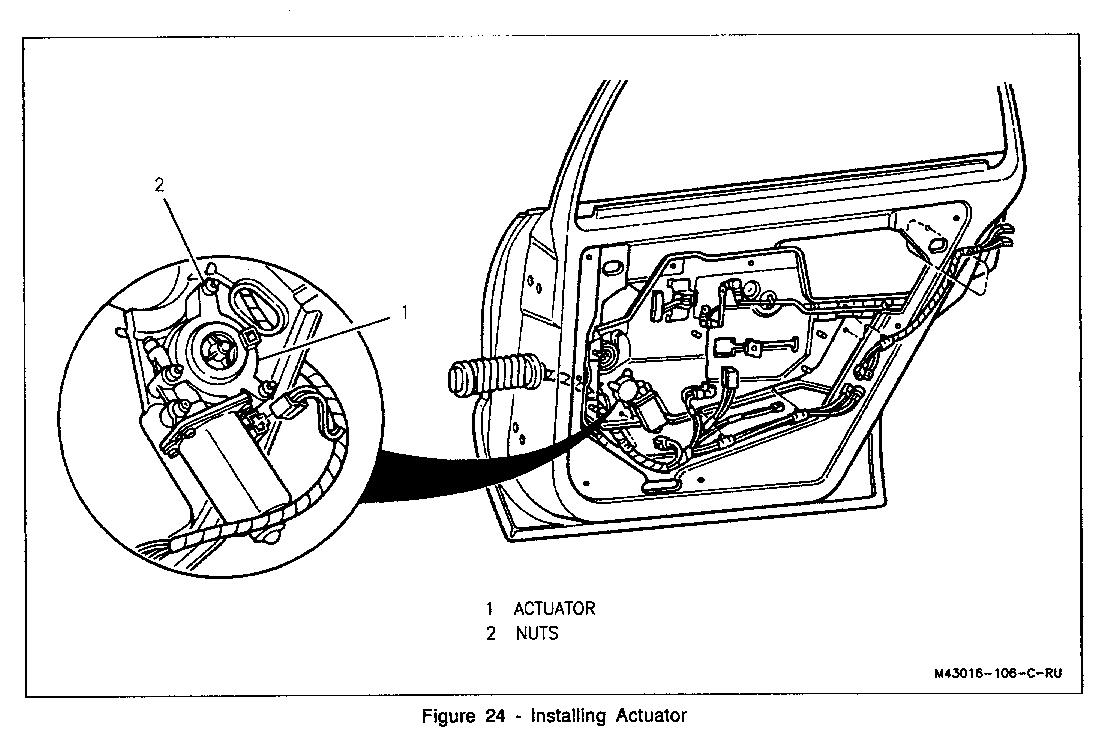
Actuator - Power Window Figure 3 Remove or Disconnect
1. Ensure window is 1 inch below full up position.
CAUTION:
If door module assembly is removed from vehicle, relieve tension on actuator spring using tool J 38864 or equivalent. Failure to relieve tension on actuator spring could cause the crossarm assembly to suddenly spring closed when removing power window actuator, resulting in personal injury.
2. Negative battery cable. Refer to GENERAL INFORMATION (SECTION OA). 3. Trim panel and water deflector. Refer to procedures in this section. 4. Nuts. 5. Actuator.
Install or Connect
1. Actuator. 2. Nuts. ' 3. Water deflector and trim panel. Refer to procedures in this section. 4. Negative battery cable.


General Motors bulletins are intended for use by professional technicians, not a "do-it-yourselfer". They are written to inform those technicians of conditions that may occur on some vehicles, or to provide information that could assist in the proper service of a vehicle. Properly trained technicians have the equipment, tools, safety instructions and know-how to do a job properly and safely. If a condition is described, do not assume that the bulletin applies to your vehicle, or that your vehicle will have that condition. See a General Motors dealer servicing your brand of General Motors vehicle for information on whether your vehicle may benefit from the information.
