REAR SUSPENSION NOISE THUMP CLUNK (NEW BALL JOINT)

MODELS/YEARS: 1985 NINETY-EIGHT
Some 1985 Ninety-Eight models may experience a "thumping", "clunking" or "loose lumber" noise from the trunk or rear suspension areas when driving over small bumps (i.e., washboard road surfaces, rough/broken pavement, etc.). This noise may be more noticeable in cold ambient temperatures (less than 32 DEG F).
Comments may also be made of a "wheel drop" noise when a rear wheel drops into a pot hole and the strut bottoms out in maximum extended position. This is a normal condition which will be more noticeable if the rear trim height is above specification.
If a "loose lumber" or "clunk" condition is encountered, first inspect the rear suspension components and fasteners for proper installation and torque specifications. Check the Electronic Level Control (ELC) system for proper operation. The ELC system is in exhaust mode at curb height. In exhaust mode, the air dryer retention valve should hold minimum air pressure in the struts. Minimum air pressure calibration was 7-14 psi on early built cars and 20 psi on all others. Feel the strut bag in exhaust mode to determine that minimum air pressure is present. If all suspension components are properly installed and the ELC system is working properly, the following steps should be taken:
A. NON-SLEEVED LOWER CONTROL ARM BALL JOINT
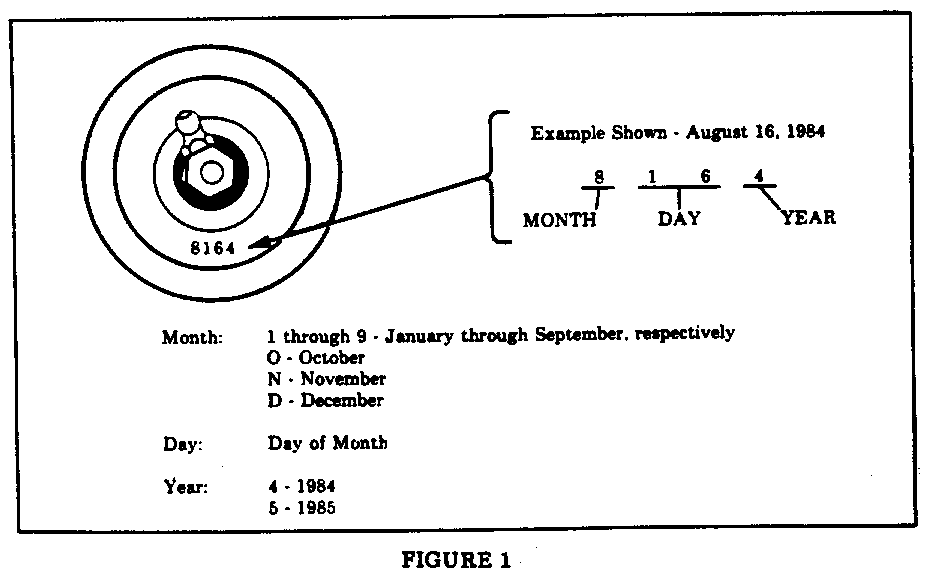
1. Inspect both rear lower control arm ball joint date codes. Each ball joint is stamped with a four-digit date code, located on the lower ball joint cover near the grease fitting. The date code describes the month, day and year the ball joint was manufactured, and may be interpreted as shown in Figure 1.
2. Ball joints with date codes 6204 (June 20, 1984) and later were produced with a nylon leeve for noise reduction. Ball joints with date codes earlier than 6204 should be eplaced with service ball joint kit, WDDGM part no. 9769581. Except for date code nformation, there is no visible difference between sleeved and non-sleeved ball joints.
B. UPPER STRUT MOUNT NOISE
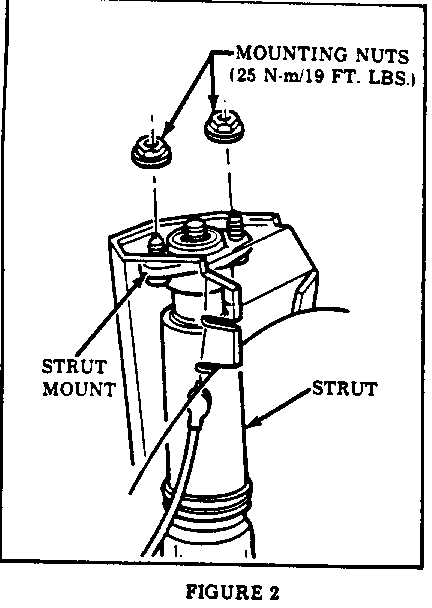
Replace both rear upper strut mounts using WDDGM mount kit, part no. 22062510. Each kit contains one replacement mount (identified by a daub of orange paint) and a complete set of mounting hardware. Two mount kits are required.
The following procedure should be used for strut mount replacement:
1. To remove the upper strut mount, it is necessary to support the rear lower control arms outboard enough so that coil spring tension does not load the strut.
2. Position car on a hoist capable of raising rear of car by supporting rear control arms just inboard of ball joint. A frame contact hoist may be used by properly lifting the car, then lowering the rear of the car onto low jack stands placed as far outboard as possible under the rear control arms, just against the inside of the tires.
3. Inside the trunk, remove the upper trim covers to expose strut mounting stud nuts. Trim covers are retained with finger nuts above the spare tire. On some early cars, nuts which require an 11 mm socket were used.
4. Using a 13 mm wrench, loosen the upper strut mounting stud nuts (two on each strut) to determine that the strut is not loaded by spring. DO NOT REMOVE NUTS AT THIS TIME.
5. Remove wheel and tire assembly.
6. Fasten a chain or similar restraint around coil of spring and fasten to inner part of control arm. This is to prevent spring from disiodging in the event that the control arm is lowered too far.
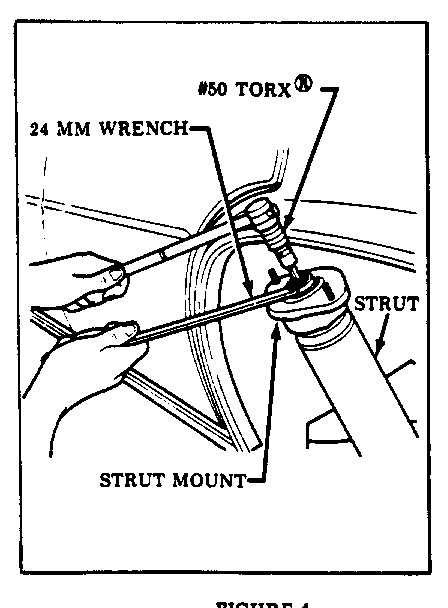
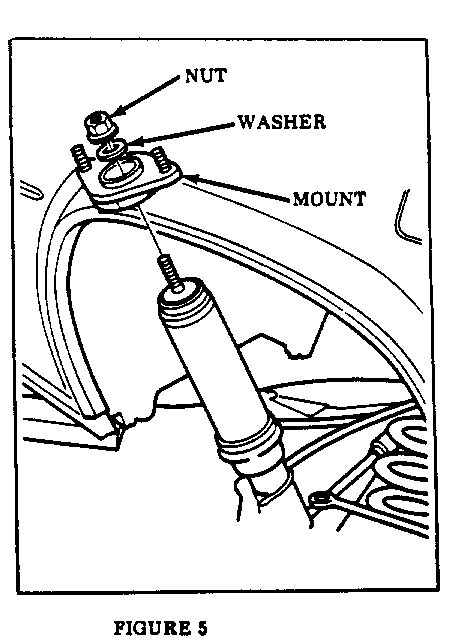
7. To replace strut mount, remove two upper strut mounting stud nuts, disconnect the air line at shock, compress and rotate the strut outboard just clearing the quarter panel to gain access to remove the strut shaft nut. Hold the strut shaft nut with a 15/16" box end wrench. Using an impact or socket wrench and a size 50 Torx socket or Kent-Moore striker socket J-23457, remove strut shaft from nut. Replace mount with the new mount and washer provided . The shaft nut may be reused. Tighten shaft nut to 85 N - m (62 lbs. ft.). See Figure 2.
8. Reassemble strut into tower. Tighten strut mounting stud nuts to 25 N - m (20 lbs. ft.).
9. Connect air shock line.
10. The shocks must be recharged with air prior to driving the car. This may be done by "popping" apart the level valve link socket at the right rear control arm and activating the leveling valve with the ignition key on.
11. Remove restraint from spring.
12. Reinstall wheel and tire assembly and trunk trim.
WARRANTY INFORMATION
Labor Labor Trouble Description Operation Hours Code ----------- --------- ------- ---- Ball Joint, Rear Control Arm, E5580 .8 40 Right - Replace
Ball Joint, Rear Control Arm, E5581 .8 40 Left - Replace
Mount, Rear Strut, Both - E5747 1.3 40 Replace

General Motors bulletins are intended for use by professional technicians, not a "do-it-yourselfer". They are written to inform those technicians of conditions that may occur on some vehicles, or to provide information that could assist in the proper service of a vehicle. Properly trained technicians have the equipment, tools, safety instructions and know-how to do a job properly and safely. If a condition is described, do not assume that the bulletin applies to your vehicle, or that your vehicle will have that condition. See a General Motors dealer servicing your brand of General Motors vehicle for information on whether your vehicle may benefit from the information.
