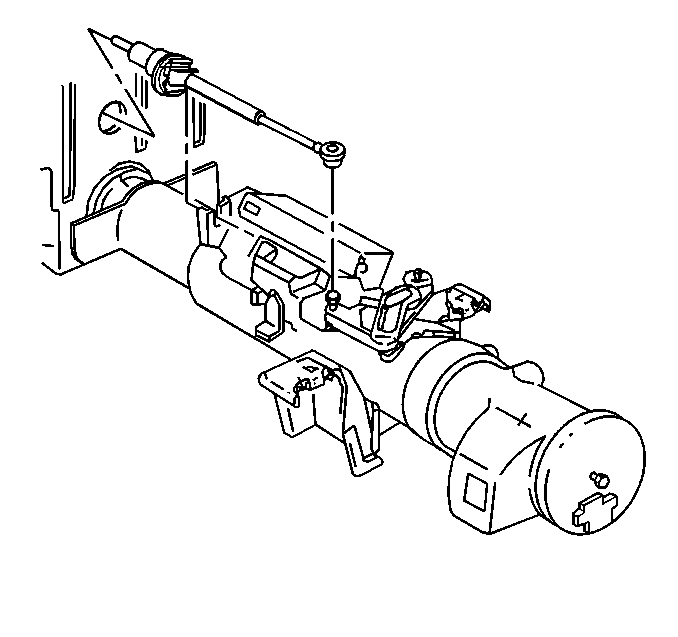
Removal Procedure
Caution: Unless directed otherwise, the ignition and start switch must be in the OFF or LOCK position, and all electrical loads must be OFF before servicing any electrical component. Disconnect the negative battery cable to prevent an electrical spark should a tool or equipment come in contact with an exposed electrical terminal. Failure to follow these precautions may result in personal injury and/or damage to the vehicle or its components.
Notice: The wheels of the vehicle must be straight ahead and the steering column in the LOCK position before disconnecting the steering column or intermediate shaft from the steering gear. Failure to do so will cause the SIR coil assembly to become uncentered, which may cause damage to the coil assembly.
- Disconnect the negative battery cable. Refer to Battery Negative Cable Disconnection and Connection in Engine Electrical.
- Disable the SIR. Refer to Disabling the SIR System in SIR.
- Remove the inflatable restraint steering wheel module. Refer to Steering Wheel Inflator Module Replacement .
- Remove the steering wheel. Refer to Steering Wheel Replacement .
- Remove the left hand instrument panel insulator. Refer to Instrument Panel Insulator Replacement in Instrument Panel, Gauges and Console.
- Remove the trim panel below the steering column.
- Push the top of intermediate shaft seal down in order to access the upper intermediate shaft coupling and the upper intermediate steering shaft bolt.
- Remove the upper intermediate steering shaft bolt.
- Remove the transaxle shift cable from the ball stud on the steering column by depressing the two tabs. If the vehicle is equipped with a floor shift, remove the park lock cable. Refer to Park Lock Cable Replacement in Automatic Transaxle.
- Remove the transaxle shift cable casing from the steering column bracket by depressing two tabs.
- Remove the lower steering column bolts.
- Remove the upper steering column bolts.
- Lower the column to the seat in order to perform some unit repair operations.
- Disconnect the electrical connector.
- Loosen the screw and separate the two halves.
- Withdraw the lower end of the steering column shaft from the upper intermediate steering shaft coupling.
- Remove the steering column.
Important: In the event of a deployment, inspect the coil wire for scorching, melting, or other damage due to excessive heat.

Important: Once the steering column is removed from the vehicle, the column is extremely susceptible to damage. Dropping the column assembly on its end could collapse the steering shaft or loosen the plastic injections that maintain column rigidity. Leaning on the column assembly could cause the jacket to bend or deform. Any of the above damage could impair the columns collapsible design. If it is necessary to remove the steering wheel, refer to Steering Wheel. Under no condition should the end of the shaft be hammered on, as hammering could loosen the plastic injections which maintain column rigidity.
Important: It may be necessary to spread the coupling clamp with a flat bladed tool in order to withdraw the steering shaft.
Installation Procedure
- Install the steering column.
- Insert the lower end of the column shaft into the upper intermediate shaft coupling.
- Connect the steering column electrical connector.
- Tighten the screw in order to draw the two halves together.
- Install the transaxle shift cable casing to the steering column bracket.
- Install the transaxle shift cable to the ball stud on the steering column. If the vehicle is equipped with a floor shift, install the park lock cable. Refer to Park Lock Cable Replacement in Automatic Transaxle.
- Install the transaxle shift cable casing to the shift cam ball stud and column bracket on the park lock cable.
- Install the upper and lower steering column bolts.
- Install the upper intermediate steering shaft bolt into the upper intermediate steering shaft coupling.
- Pull up the intermediate shaft seal over the lower column until the seal locks in place.
- Install the trim panel below the steering column.
- Install the left hand instrument panel insulator. Refer to Instrument Panel Insulator Replacement in Instrument Panel, Gauges and Console.
- Install the steering wheel. Refer to Steering Wheel Replacement .
- Install the inflatable restraint steering wheel module. Refer to Steering Wheel Inflator Module Replacement .
- Connect the negative battery cable. Refer to Battery Negative Cable Disconnection and Connection in Engine Electrical.
- Enable the SIR. Refer to Enabling the SIR System in SIR.

Tighten
Tighten the upper steering column bolts to 7 N·m (62 lb in).
Tighten
Tighten the lower steering column bolts to 17 N·m (13 lb ft).
Important: When you install the steering column to the intermediate shaft, verify that the shaft is seated prior to the pinch bolt installation. If the bolt is inserted into the coupling before the shaft installation, the two mating shafts may disengage.
Tighten
Tighten the upper intermediate steering shaft bolt to 48 N·m
(35 lb ft).
