Removal Procedure
Tools Required
| • | J 28467-360 Universal Support Fixture |
| • | J 28467-94 Engine Support Fixture Adapters |
| • | J 28467-330 Engine Support Adapters |
| • | J 28467-350 Engine Support Fixture Adapter |
| • | J 41160 Transmission Jack Adapter |
- Disconect the negative battery cable.
- Remove the shift control cable and the bracket at the transmission.
- Remove the manual shaft lever and the transmission range selector switch.
- Install the J 28467-360 . Load the support fixture by tightening the wing nuts several turns in order to take the weight of the powertrain off of the mounts and the frame.
- Drain the cooling system. Refer to Cooling System Draining and Filling in Engine Cooling.
- Remove the vacuum line at the brake booster.
- Remove the transmission vent hose.
- Disconnect the following electrical connectors:
- Disconnect the upper transmission cooler line at the radiator.
- Disconnect the lower transmission cooler line at the transmission.
- Remove the retaining bracket nut at the transmission.
- Disconnect the coolant bypass pipe at the thermostat housing. Set the pipe aside.
- Raise the vehicle. Support the vehicle. Refer to Lifting and Jacking the Vehicle in General Information.
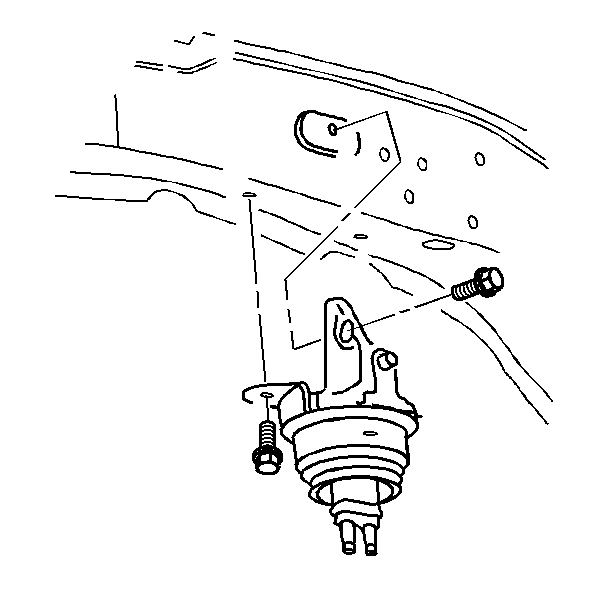
- Remove the right transmission mount bolts.
- Remove the left transmission mount bolts.
- Remove the left and right front tire and wheel. Refer to Tire and Wheel Removal and Installation in Tires and Wheels.
- Remove the left and right front splash shield.
- Remove both tie rod cotter pins and nuts and separate both tie rods from the steering knuckles. Refer to Stabilizer Shaft Replacement in Front Suspension.
- Remove both lower ball joint cotter pins and nuts and separate both ball joints from the steering knuckles. Refer to Lower Control Arm Ball Joint Replacement in Front Suspension.
- Remove the left and right drive axle nuts and remove the drive axles from the hubs.
- Remove both drive axles from the transmission. Refer to Wheel Drive Shaft Replacement in Drive Axle.
- Remove the engine oil pan to transmission brace.
- Remove the torque converter cover. Refer to Torque Converter Cover Replacement .
- Remove the flywheel to converter bolts. Mark the flywheel to converter position so that you can replace the converter in the same position. Refer to Engine Flywheel Replacement in Engine Mechanical.
- Remove the front exhaust pipe. Refer to Intermediate Pipe Replacement in Engine Exhaust.
- Remove the exhaust manifold rear pipe. Refer to Exhaust Manifold Replacement in Engine Exhaust.
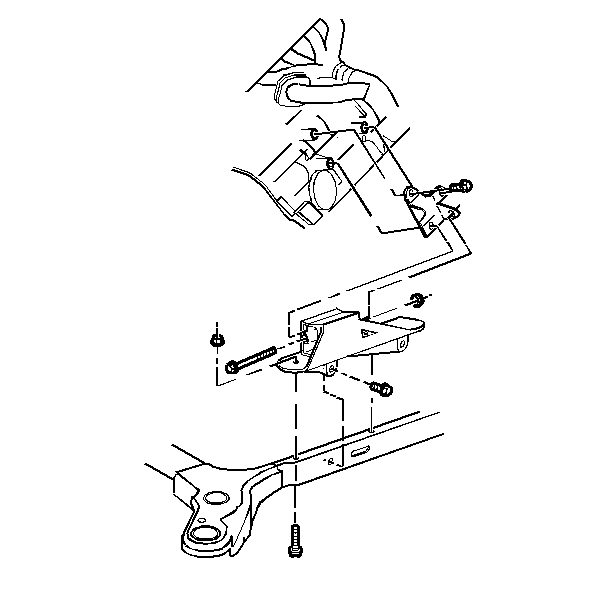
- Remove the steering rack to right transmission mount bolts.
- Remove the bolt from the right transmission mount.
- Remove the frame to right transmission mount bolt and remove the mount.
- Remove the power steering line retaining clamp from the frame.
- Remove the through bolt from the right side of the steering rack and support the steering rack assembly.
- Remove the support frame.
- Remove the vehicle speed sensor shield.
- Support the transaxle using the J 41160 and a suitable transmission jack.
- Secure the J 41160 to the transaxle.
- Remove the engine lower crankcase to transmission brace.
- Remove the cylinder head to transmission brace.
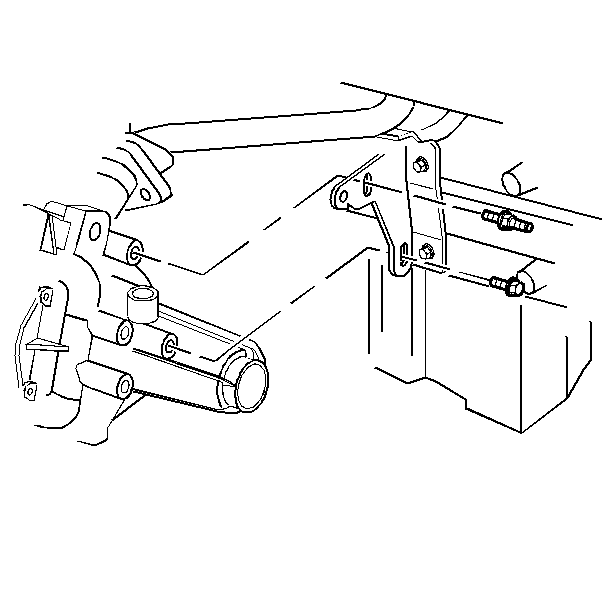
- Remove the transmission mount to bracket retaining nuts.
- Remove the rear transmission mount bracket from the transmission and body.
- Disconnect the electrical connectors from the park/neutral switch.
- Remove the right and left lower transmission to engine bolts.
- Remove the frame bolts and the frame.
- Remove the engine to transmission bolts.
- Lower the transmission.
Caution: Unless directed otherwise, the ignition and start switch must be in the OFF or LOCK position, and all electrical loads must be OFF before servicing any electrical component. Disconnect the negative battery cable to prevent an electrical spark should a tool or equipment come in contact with an exposed electrical terminal. Failure to follow these precautions may result in personal injury and/or damage to the vehicle or its components.
| • | (2) transmission |
| • | The speed sensor |
| • | The power steering gear |
Installation Procedure
- Install the transmission assembly into the vehicle.
- Install the engine-to-transmission bolts.
- Install the frame assembly and the mounting bolts.
- Install the rear transmission mount to the body.
- Install the rear transmission mount bracket to the transmission.
- Install the left lower transmission to engine bolt.
- Install the right lower transmission to engine bolt.
- Install the electrical connector to park/neutral position switch.
- Remove the transmission jack and the J 41160 .
- Install the engine to transmission braces.
- Install the vehicle speed sensor shield.
- Connect the electrical connectors to the speed sensor.
- Install the flywheel to torque converter bolts. Refer to Flywheel to Torque Converter Bolts.
- Install the flywheel cover.
- Install the transmission to oil pan brace.
- Install the left transmission mount to frame bolt.
- Install the through bolt to the right side of the steering rack.
- Install the steering line retaining clamp to the frame.
- Install the right transmission mount.
- Install the rear manifold pipe. Refer to Exhaust Manifold Replacement in Engine Exhaust.
- Install the exhaust system. Refer to Intermediate Pipe Replacement Engine Exhaust.
- Install both drive axles. Refer to Drive Axle in Drive Axle On-Vehicle Service.
- Install both ball joints into the steering knuckles. Refer to Ball Joint in Front Suspension.
- Install both tie rods into the steering knuckles. Refer to Stabilizer Shaft and Link in Front Suspension.
- Install the left and Right splash shield.
- Install both front wheels and tires. Refer to Tire and Wheel Removal and Installation in Tires and Wheels.
- Lower the vehicle.
- Install the right and left upper transmission to engine bolts.
- Remove the J 28467-360 .
- Install the coolant bypass hose at the thermostat housing.
- Install the transmission line bracket.
- Install the upper and lower transmission cooler lines.
- Install the shift control cable and the bracket.
- Install the air cleaner outlet duct.
- Install the vacuum line to brake booster and the transmission vent hose.
- Refill the cooling system. Refer to Cooling System Draining and Filling in engine Cooling.
- Check the fluid level. Fill the fluid to the proper level.
- Connect the negative battery cable.
Notice: Use the correct fastener in the correct location. Replacement fasteners must be the correct part number for that application. Fasteners requiring replacement or fasteners requiring the use of thread locking compound or sealant are identified in the service procedure. Do not use paints, lubricants, or corrosion inhibitors on fasteners or fastener joint surfaces unless specified. These coatings affect fastener torque and joint clamping force and may damage the fastener. Use the correct tightening sequence and specifications when installing fasteners in order to avoid damage to parts and systems.
Tighten
Tighten the bolts to 75 N·m (55 Ib ft).
Tighten
Tighten the bolts to 100 N·m (74 Ib ft).
Notice: Use the correct fastener in the correct location. Replacement fasteners must be the correct part number for that application. Fasteners requiring replacement or fasteners requiring the use of thread locking compound or sealant are identified in the service procedure. Do not use paints, lubricants, or corrosion inhibitors on fasteners or fastener joint surfaces unless specified. These coatings affect fastener torque and joint clamping force and may damage the fastener. Use the correct tightening sequence and specifications when installing fasteners in order to avoid damage to parts and systems.