- Lubricate the inner gear teeth and bearing, planetary gears, and armature shaft gear teeth lightly with lubricant.
- Install the inner gear and drive over the armature shaft with the pinion away from the armature.
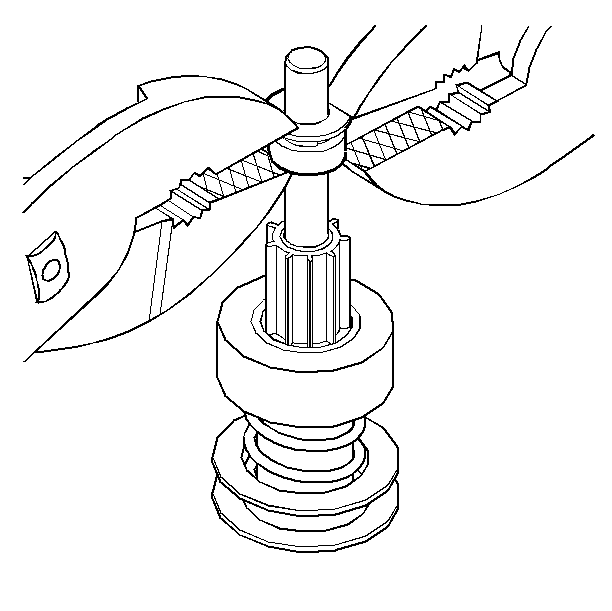
- Install the pinion stop collar onto the armature shaft.
- Install the new pinion stop retainer ring into the groove on the shaft. Do not reuse the old ring.
- Thrust the collar to the end of the shaft with the small flange toward the retainer ring. Use pliers as shown to snap pinion stop collar over the retainer ring.
- Inspect the drive end housing bearing, and armature commutator end bearing. When dry, the armature commutator end bearing may be lightly lubricated with lubricant. The bearing in the drive end housing is a roller type bearing and is permanently lubricated. Do not add lubricant. If dry, replace the drive end housing bearing using a small bearing puller (Snap-On to CG40CB or equivalent) recessed 0.35 mm (0.01 in) into casting. Replace the bearings when damaged.
- Install the drive and shaft assembly into the drive end housing. Use a screwdriver to gently guide the shift lever over the shift collar pins on the drive assembly.
- Install the shield, field frame and armature to the drive end housing.
- Inspect the brushes. When damaged or excessively worn, replace the brush holder assembly.
- Install the brush holder assembly onto the armature.
- Install the commutator end frame to the brush assembly using screws.
- Install the through bolts.
- Measure the pinion clearance. Refer to "Checking Pinion Clearance" in this section.
- Install the solenoid.
- Install the field lead to the solenoid terminal.

Caution: Magnets in frame have strong attraction to metal parts. Keep fingers clear of pinch points in order to avoid personal injury.
Notice: Before attaching field lead, be sure solenoid terminal is secure by tightening nut next to cap. If this nut is not tight, the cap may be damaged during installation of the field lead and cause the starter to fail later.
Tighten
Tighten the screws to 6.5 N·m (60 lb in).
Notice: Use the correct fastener in the correct location. Replacement fasteners must be the correct part number for that application. Fasteners requiring replacement or fasteners requiring the use of thread locking compound or sealant are identified in the service procedure. Do not use paints, lubricants, or corrosion inhibitors on fasteners or fastener joint surfaces unless specified. These coatings affect fastener torque and joint clamping force and may damage the fastener. Use the correct tightening sequence and specifications when installing fasteners in order to avoid damage to parts and systems.
Tighten
Tighten the through bolts to 8.5 N·m (75 lb in).
Tighten the nut on the solenoid field terminal to 8 N·m (71 lb in).
Tighten
Tighten the attaching nut to 8 N·m (71 lb in).
