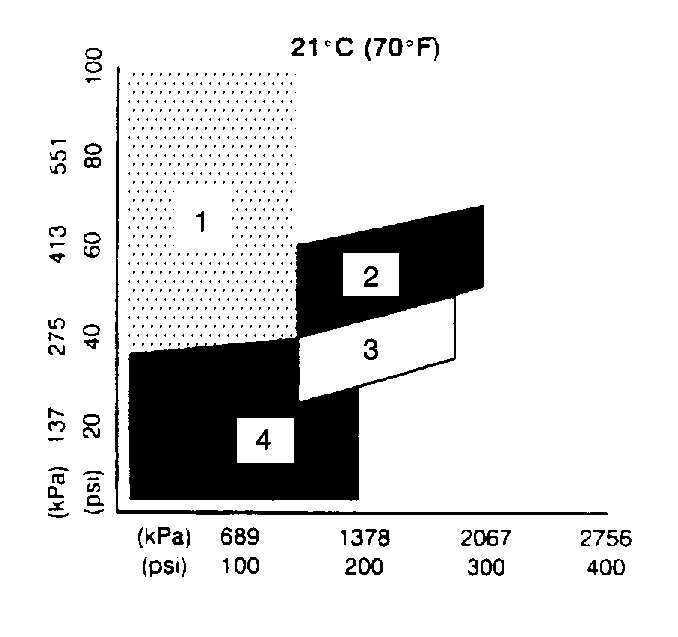
V5/TXV A/C System Pressure/Temperature 21°C(70°F)
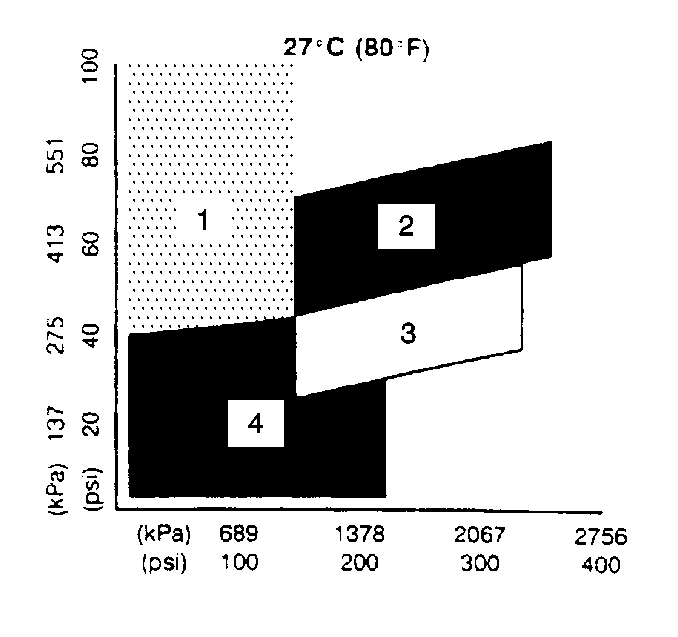
V5/TXV A/C System Pressure/Temperature 27°C(80°F)
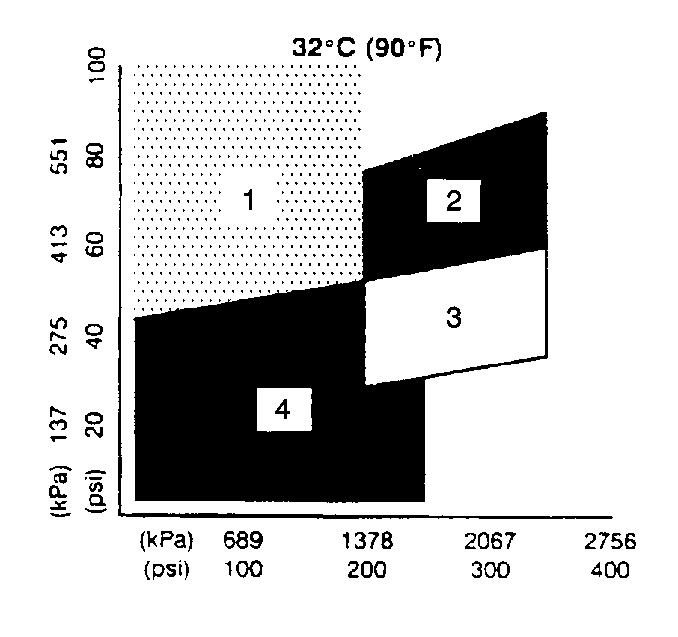
V5/TXV A/C System Pressure/Temperature 32°C(90°F)
V5/TXV A/C System Pressure/Temperature 38°C(100°F)

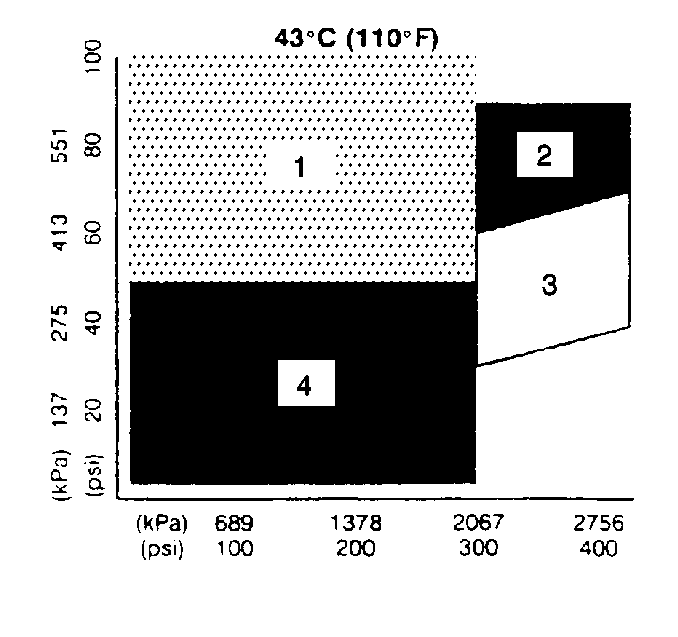
V5/TXV A/C System Pressure/Temperature 43°C(110°F)
Step | Action | Value(s) | Yes | No | ||||||||||||||||||
|---|---|---|---|---|---|---|---|---|---|---|---|---|---|---|---|---|---|---|---|---|---|---|
1 | Perform the following preliminary tests to the A/C system:
At idle the cooling fan must be ON at any A/C mode, except for vehicles with 3.1L/V6 engines. Is the discharge temperature normal? | -- | System OK | Go to Step 2 | ||||||||||||||||||
2 |
Is the high side pressure greater than the specified value? | 413 kPa (60 psi) | Go to Step 6 | Go to Step 3 | ||||||||||||||||||
3 |
Did you perform the system leak test? | -- | Go to Step 4 | -- | ||||||||||||||||||
4 |
Is the repair complete? | -- | Go to Step 5 | -- | ||||||||||||||||||
5 | Evacuate and charge the system to system specifications. Did you charge the system? | -- | Go to Step 6 | -- | ||||||||||||||||||
6 |
Does the clutch engage? | -- | Go to Step 10 | Go to Step 7 | ||||||||||||||||||
7 |
Does the clutch engage? | -- | Go to Step 8 | Go to Step 9 | ||||||||||||||||||
8 | Repair the electrical circuit to the compressor clutch. Refer to HVAC Compressor Control Schematics for further diagnostics. Is the repair complete? | -- | Go to Step 10 | -- | ||||||||||||||||||
9 | Replace the clutch coil. Refer to Air Conditioning Clutch Coil Removal . Is the repair complete? | -- | Go to Step 10 | -- | ||||||||||||||||||
10 | Listen carefully for a loud noise, such as a knocking noise from the compressor or a belt-slipping condition. Do you hear an unusual noise? | -- | Go to Step 11 | Go to Step 19 | ||||||||||||||||||
11 | Cycle the compressor ON and OFF in order to verify the source of the noise. Is belt slippage the probable source of the noise? | -- | Go to Step 12 | Go to Step 13 | ||||||||||||||||||
12 | Correct the condition. Refer to Drive Belt Tensioner Diagnosis (2.4L) or Drive Belt Tensioner Diagnosis (3.1L) in Engine Mechanical. Is the noise corrected? | -- | Go to Step 19 | Go to Step 13 | ||||||||||||||||||
13 | The noise probably occurs in the compressor. Does the noise last for longer than 30 seconds? | -- | Go to Step 15 | Go to Step 14 | ||||||||||||||||||
14 |
Important: You may observe a liquid slugging condition after an extended system shutdown. This condition occurs at warmer ambient temperatures, followed by an overnight ambient drop. This condition is normal. Is the noise repeatable? | -- | Go to Step 15 | Go to Step 19 | ||||||||||||||||||
15 | The noise condition may be caused by a low charge or by a stuck closed TXV. Test the system performance in order to confirm this diagnosis. Did you test the system performance? | -- | Go to Step 16 | Go to Step 19 | ||||||||||||||||||
16 | The pressures are normal. Inspect the compressor for loose bolts or for hard contact of the A/C plumbing. Repair as needed. Is the system OK? | -- | Go to Step 17 | -- | ||||||||||||||||||
17 | Recover the refrigerant and replace the compressor. Did you replace the compressor? | -- | Go to Step 18 | -- | ||||||||||||||||||
18 | Recharge the system. Did you recharge the system? | -- | Go to Step 19 | -- | ||||||||||||||||||
19 |
Important: This test was designed for typical garage conditions:
Use the following steps in order to prepare the vehicle for the procedure:
Important: The V6 engine cooling fan only operates when the high side pressure exceeds 1 309 kPa (190 psi) or 106°C (223°F) coolant temperature. Does the fan operate correctly during all A/C modes? | -- | Go to Step 21 | Go to Step 20 | ||||||||||||||||||
20 | Refer to HVAC Blower Controls System Check for cooling fan diagnostics and correct the fan operation. Is the repair complete? | -- | Go to Step 19 | -- | ||||||||||||||||||
21 |
Have you recorded the temperature and the pressures? | -- | Go to Step 22 | -- | ||||||||||||||||||
22 | Determine if the following conditions exist:
Do the above conditions exist? | 2 928 kPa (425 psi) | Go to Step 23 | Go to Step 24 | ||||||||||||||||||
23 | The compressor may re-engage later and then cycle OFF again. A high charge may cause this condition. If the charge is high, complete the recovery according to the equipment manufacturer's instructions. Evacuate and charge to system specifications. Is the repair complete? | -- | System OK | -- | ||||||||||||||||||
24 | Determine if the temperature drops abruptly in one of the following areas:
Does the temperature drop in one of the above areas? | -- | Go to Step 25 | Go to Step 26 | ||||||||||||||||||
25 | The high side should be warm or hot all the way to the TXV. This heat results from the compressor discharge. A high side restriction may be the cause of the condition. Replace the component where the restriction is occurring. Is the repair complete? | -- | System OK | -- | ||||||||||||||||||
26 | Determine if the following conditions exist:
Does the system operate correctly except for the above conditions? | -- | Go to Step 42 | -- | ||||||||||||||||||
27 |
Do the high side pressure and the low side pressure intersect in area 1? | -- | Go to Step 36 | Go to Step 28 | ||||||||||||||||||
28 | Do the high side pressure and the low side pressure intersect in area 2? | -- | Go to Step 29 | Go to Step 30 | ||||||||||||||||||
29 | The high side pressure and the low side pressure equalize quickly upon turning the A/C OFF. This condition may also be accompanied by a slugging noise during vehicle start-up.
Is the repair complete? | -- | System OK | -- | ||||||||||||||||||
30 | Do the high side pressure and the low side pressure intersect in area 3? | -- | Go to Step 31 | Go to Step 32 | ||||||||||||||||||
31 |
Important: You may discover that the outlet temperature is approximately 11°C (20°F) less than the outside air temperature. This condition is normal. The pressures are normal. Did you perform this test as part of a noise consideration to confirm a possible low charge or a stuck closed TXV? | -- | Go to Step 16 | System OK | ||||||||||||||||||
32 | Do the high side pressure and the low side pressure intersect in area 4? | -- | Go to Step 33 | -- | ||||||||||||||||||
33 |
Important:
Evacuate the system and weigh the charge. Is the weight of the charge less than the specified value, and did the low side gauge remain steady? | 0.8 kg (1.75 lb) | Go to Step 34 | Go to Step 35 | ||||||||||||||||||
34 | Recharge the system to specifications. Did you recharge the system? | -- | System OK | -- | ||||||||||||||||||
35 | The charge removed is within specifications and you noticed a rapid fluctuation of the low side gauge. Replace the TXV. Is the repair complete? | -- | System OK | -- | ||||||||||||||||||
36 | A destroked compressor or a no-pump compressor may be the cause of the condition. You may have already tested for this condition and made tentative repairs. Have you already performed a control valve diagnosis? | -- | Go to Step 47 | Go to Step 37 | ||||||||||||||||||
37 |
Is the difference between the high side pressure and the low side pressure within the specified value? | 207 kPa (30 psi) | Go to Step 38 | Go to Step 19 | ||||||||||||||||||
38 | Determine whether the compressor is broken internally:
Is the compressor broken? | -- | Go to Step 39 | Go to Step 42 | ||||||||||||||||||
39 | Replace the compressor. Is the repair complete? | -- | Go to Step 40 | -- | ||||||||||||||||||
40 | Recover the refrigerant. Evacuate and charge the system according to the equipment manufacturer's instructions. Did you recharge the system? | -- | Go to Step 41 | -- | ||||||||||||||||||
41 | Perform the leak test. Refer to Leak Testing . Did you perform the leak test? | -- | Go to Step 19 | -- | ||||||||||||||||||
42 |
Important: Follow this test procedure exactly. This procedure creates a low cooling load in order to cause the V5 compressor to operate at less than full stroke. This is absolutely necessary for accurate test results.
Is the low side pressure within the range specified? | 161-238 kPa (23-35 psi) | Go to Step 47 | Go to Step 43 | ||||||||||||||||||
43 | Recover the refrigerant according to the equipment manufacturer's instructions. Did you recover the refrigerant? | -- | Go to Step 44 | -- | ||||||||||||||||||
44 | Replace the control valve. Did you replace the control valve? | -- | Go to Step 45 | -- | ||||||||||||||||||
45 | Evacuate and charge the system according to the manufacturer's instructions. Did you charge the system? | -- | Go to Step 46 | -- | ||||||||||||||||||
46 | Perform the leak test. Refer to Leak Testing . Did you perform the leak test? | -- | Go to Step 47 | -- | ||||||||||||||||||
47 | The system should now function normally. Test the system performance again in order to confirm this diagnosis. Did you test the system performance a second time? | -- | Go to Step 48 | Go to Step 19 | ||||||||||||||||||
48 | Do the high side pressure and the low side pressure again intersect in area 1? | -- | Go to Step 49 | System OK | ||||||||||||||||||
49 | Replace the compressor. Is the repair complete? | -- | System OK | -- |
