Tools Required
Removal Procedure
- Drain the cooling system. Refer to
Cooling System Draining and Filling
in Engine Cooling.
- Remove the valve rocker arm cover from the cylinder head. Refer
to
Valve Rocker Arm Cover Replacement
.
- Remove both heater hoses from the heater core. Refer to
Heater Hoses Replacement
in Heating Ventilation and Air Conditioning.
- Remove the spark plugs from the cylinder head. Refer to
Spark Plug Replacement
in Engine Controls 2.2L (L43).
- Remove the required valve rocker arm (s). Refer to
Valve Rocker Arm and Push Rod Replacement
.

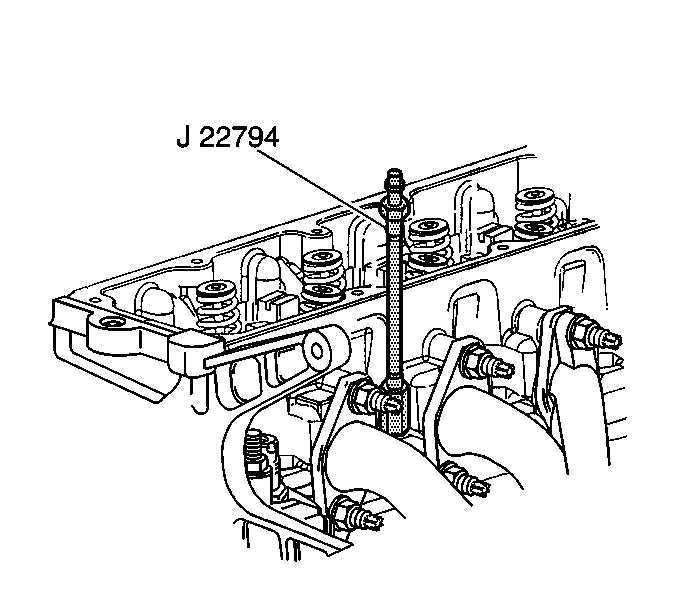
- Install the J 22794
to the spark plug hole in the cylinder head.
- Apply compressed air in order to hold the valve in place.
- Connect a shop air supply hose and apply compressed air in order
to hold the valves in place.

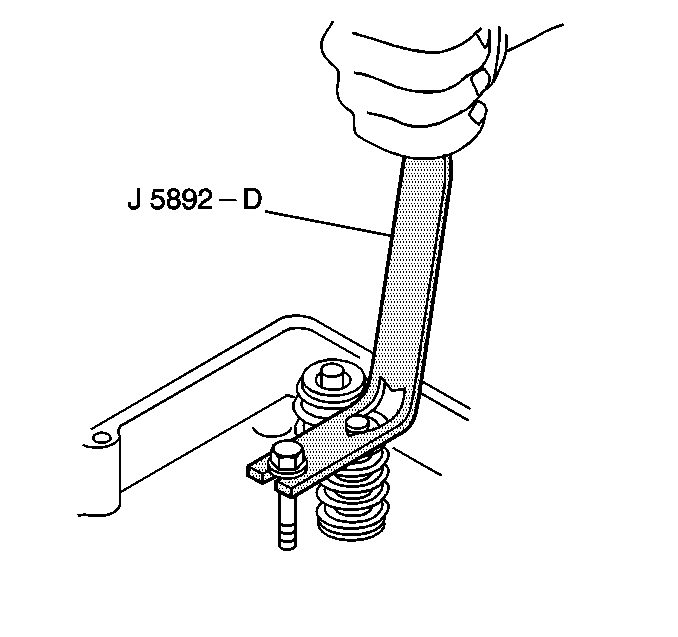
- Install an 8 mm x 65 mm
bolt with a hardened washer into the rocker arm bolt hole.
Caution: Compressed valve springs have high tension against the valve spring
compressor. Valve springs that are not properly compressed by or released
from the valve spring compressor can be ejected from the valve spring compressor
with intense force. Use care when compressing or releasing the valve spring
with the valve spring compressor and when removing or installing the valve
stem keys. Failing to use care may cause personal injury.
- Use the J 5892-D
in order to compress the valve spring.
| 10.1. | Hook the slotted end of J 5892-D
under the washer on the bolt. |
| 10.2. | Apply steady pressure on the valve spring cap until the valve
keys are accessible |
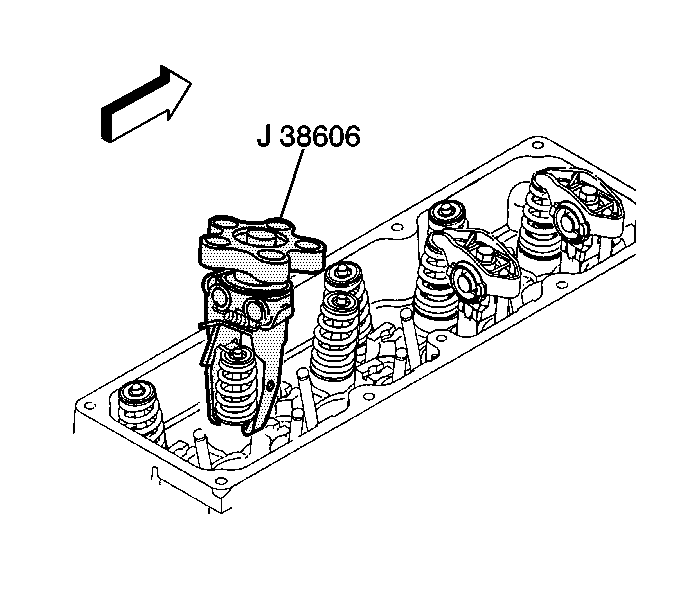
Notice: Completely engage the J 38606 jaws on the valve spring.
The J 38606 may slip off and scratch the valve spring. Replace the valve
spring if the valve spring becomes scratch.

- Use J 38606
when there is not enough clearance
to use J 5892-D
.

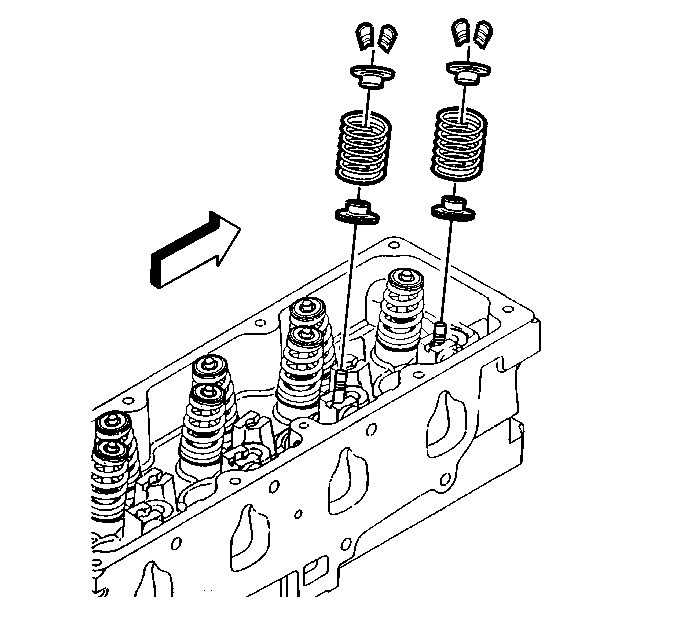
- Remove the valve keys.
- Carefully release the spring tension.
- Remove the J 5892-D
or the J 38606
.
- Remove the valve spring cap.
- Remove the valve spring.
- Remove the valve stem oil seal.
Installation Procedure

Important: The LN2 Engine uses a unique valve spring seat and seal combination
unit. Under no circumstances should this seal and seat unit be replaced with
a different type of seal. Use care to ensure that the valve stem seal and
spring seat are not damaged during installation. Do not use excessive force
or a hammer to install the seal on the guide. The seal will go on if straight
and properly lubricated using hand pressure only.
- Lubricate the outside of the valve guide and the valve seal with clean
engine oil.
- Using the J 38820
install
the valve spring seat and seal unit onto the guide. Push and twist the
valve seal into position on the valve guide until the spring seat flange
is flush with the cylinder head surface.
- Set the valve spring in place.
- Set the valve spring cap in place.
Caution: Compressed valve springs have high tension against the valve spring
compressor. Valve springs that are not properly compressed by or released
from the valve spring compressor can be ejected from the valve spring compressor
with intense force. Use care when compressing or releasing the valve spring
with the valve spring compressor and when removing or installing the valve
stem keys. Failing to use care may cause personal injury.

- Compress
the valve spring with the J 5892-D
.
Notice: Completely engage the J 38606 jaws on the valve spring.
The J 38606 may slip off and scratch the valve spring. Replace the valve
spring if the valve spring becomes scratch.

- Use the J 38606
if the clearance does not permit the
use of the J 5892-D
.
- Install the valve keys.
Use grease in order to hold the valve keys in place.
- Carefully release the valve spring pressure making sure the valve
stem keys stay in place.
Notice: The valve stem keys must correctly seat in the valve spring cap. Engine
damage may occur by not installing properly.
- Remove the J 5892-D
or
the J 38606
.
| 9.1. | Look to ensure that the valve stem keys seat properly in the groove
of the valve stem. |
| 9.2. | Tap the end of the valve stem with a soft-faced hammer in order
to seat the valve keys if necessary. |
- Remove the J 22794
from the
cylinder head.
- Remove the 8 mm x 65 mm bolt and washer.
- Install the valve rocker arms to the cylinder head. Refer to
Valve Rocker Arm and Push Rod Replacement
.
- Install the spark plugs to the cylinder head. Refer to
Spark Plug Replacement
in Engine Controls 2.2L (L43).
- Install both heater hoses on to the heater core. Refer to
Heater Hoses Replacement
in Heating Ventilation and Air Conditioning.
- Install the valve rocker arm cover. Refer to
Valve Rocker Arm Cover Replacement
.
- Fill the cooling system. Refer to
Cooling System Draining and Filling
in Engine Cooling.


