Notice: Never operate the starter motor for more than 30 seconds at a time.
Allow it to cool for at least two minutes. Overheating, caused by too much
cranking, will damage the starter motor.
The following procedure is to corrct a noise condition.
Refer to
Starter Motor Noise Diagnosis
in
order to diagnose this condition. Shims are available to adjust the starter
drive pinion-to-flywheel clearance.
- Remove the flywheel housing cover. Refer to
Engine Flywheel Replacement
in Engine Mechanical.
- Inspect the flywheel for the following signs of unusual wear:
- Repair or replace as necessary, then retest before continuing
with this procedure.
- Start the engine.
- Gently touch the outside diameter of the rotating flywheel ring
gear with a piece of chalk.
This will show the high point of tooth runout, after the engine is stopped.
- Turn OFF the engine.
- Rotate the flywheel so that the marked teeth are in the area of
the starter pinion gear.
- Disconnect the battery negative cable. Refer to
Caution: Before servicing any electrical component, the ignition and start switch must be in the OFF or LOCK position and all electrical loads
must be OFF, unless instructed otherwise in these procedures. If a tool or equipment could easily come in contact with a live exposed electrical terminal, also disconnect the negative battery cable. Failure to follow these precautions may cause personal injury
and/or damage to the vehicle or its components.
in Cautions and
Notices.

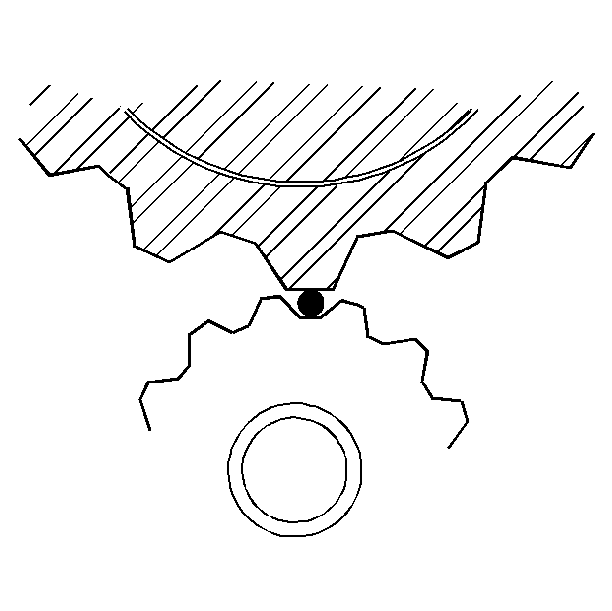
- Measure the clearance
between the top of the ring gear tooth and the bottom of the pinion tooth.
| • | Use the width of the wire gauge. |
| • | Normal clearance is from 0.5-1.5 mm (0.01-0.06 in). |
| • | Starter shims are available in sizes 1.0 mm (0.04 in)
and 0.33 mm (0.013 in). |

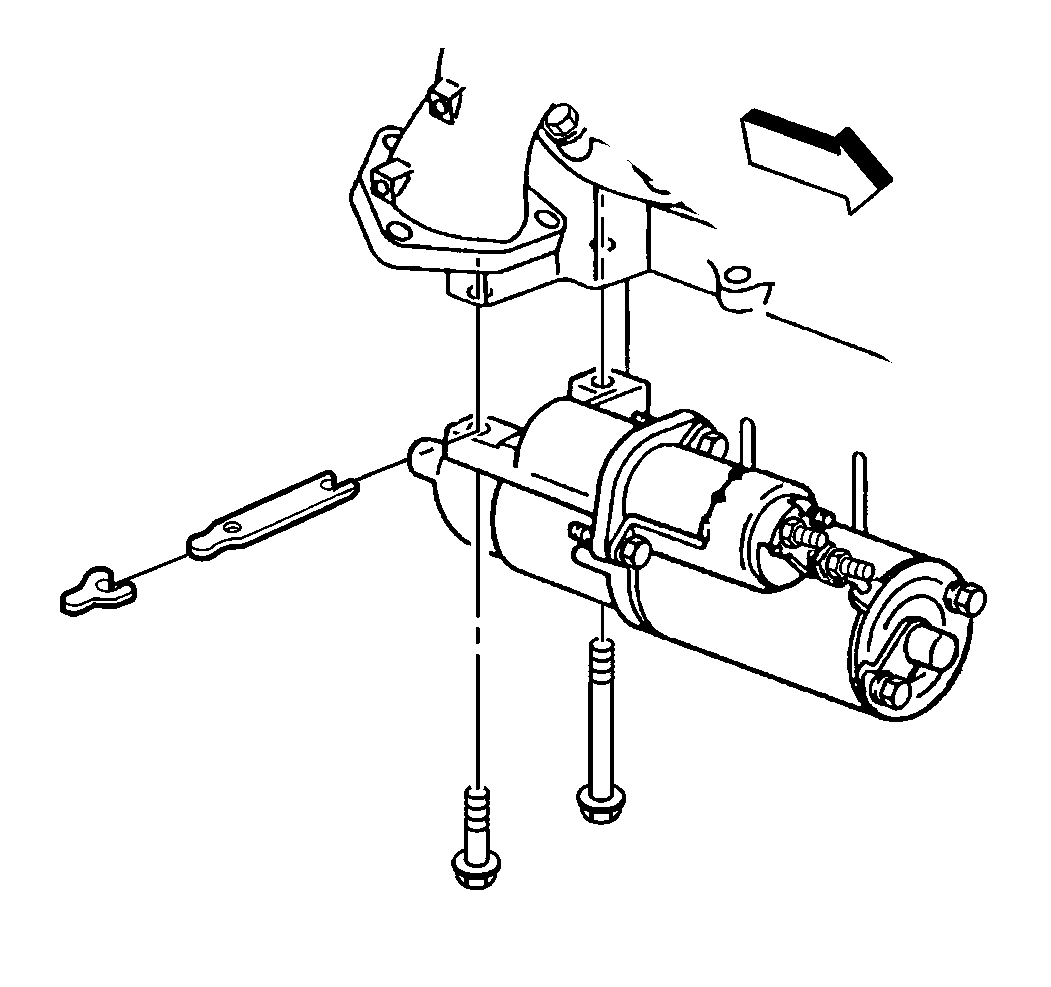
- The starter must be shimmed
away from the flywheel if the following is true:
| • | The pinion clearance is less than 0.5 mm (0.02 in) |
| • | The starter whines after the engine fires. |
| - | Add 1.0 mm (0.4 in) shims, one at a time. |
| - | Loosen both starter mounting bolts enough to add the shims. |
| - | Place the shims between the starter mounting pads and the engine
block. |
| - | Do not use more than two shims total. |
| - | Tighten the bolts to specifications, then retest. |
- The starter must be shimmed toward the flywheel if the following
is true:
| • | The pinion clearance is more than 1.5 mm (0.06 in). |
| • | The starter whines only during cranking. |
| - | Add 0.33 mm (0.013 in) shims between the outboard
starter mounting pad and the engine. |
| - | Loosen the inboard bolt. |
| - | Remove the outboard bolt. |
| - | Install the outboard bolt. |
| - | Tighten both bolts to specifications, then retest. |
| - | Do not add more than four shims total. |
Notice: Use the correct fastener in the correct location. Replacement fasteners
must be the correct part number for that application. Fasteners requiring
replacement or fasteners requiring the use of thread locking compound or sealant
are identified in the service procedure. Do not use paints, lubricants, or
corrosion inhibitors on fasteners or fastener joint surfaces unless specified.
These coatings affect fastener torque and joint clamping force and may damage
the fastener. Use the correct tightening sequence and specifications when
installing fasteners in order to avoid damage to parts and systems.
- Ensure that the
starter mounting bolts are tighten to 43 N·m (31 lb ft).


