SERPENTINE DRIVE BELT ADJ. (SERVICE PROCEDURE)

SUBJECT: SERPENTINE DRIVE BELT ADJUSTMENT
MODELS: 1990 C6H, C7H AND 91 C6H, C7H TOPKICK/KODIAK EQUIPPED WITH 3116 CATERPILLAR ENGINES (RPO LXO, VIN CODE J 8th PLACE)
THIS BULLETIN CANCELS AND REPLACES GMC TRUCK SERVICE BULLETIN 91-6A-93, DATED MAY 1991 TO INCLUDE THE NECESSARY ILLUSTRATIONS. ALL COPIES OF 91-6A-93 SHOULD BE DISCARDED.
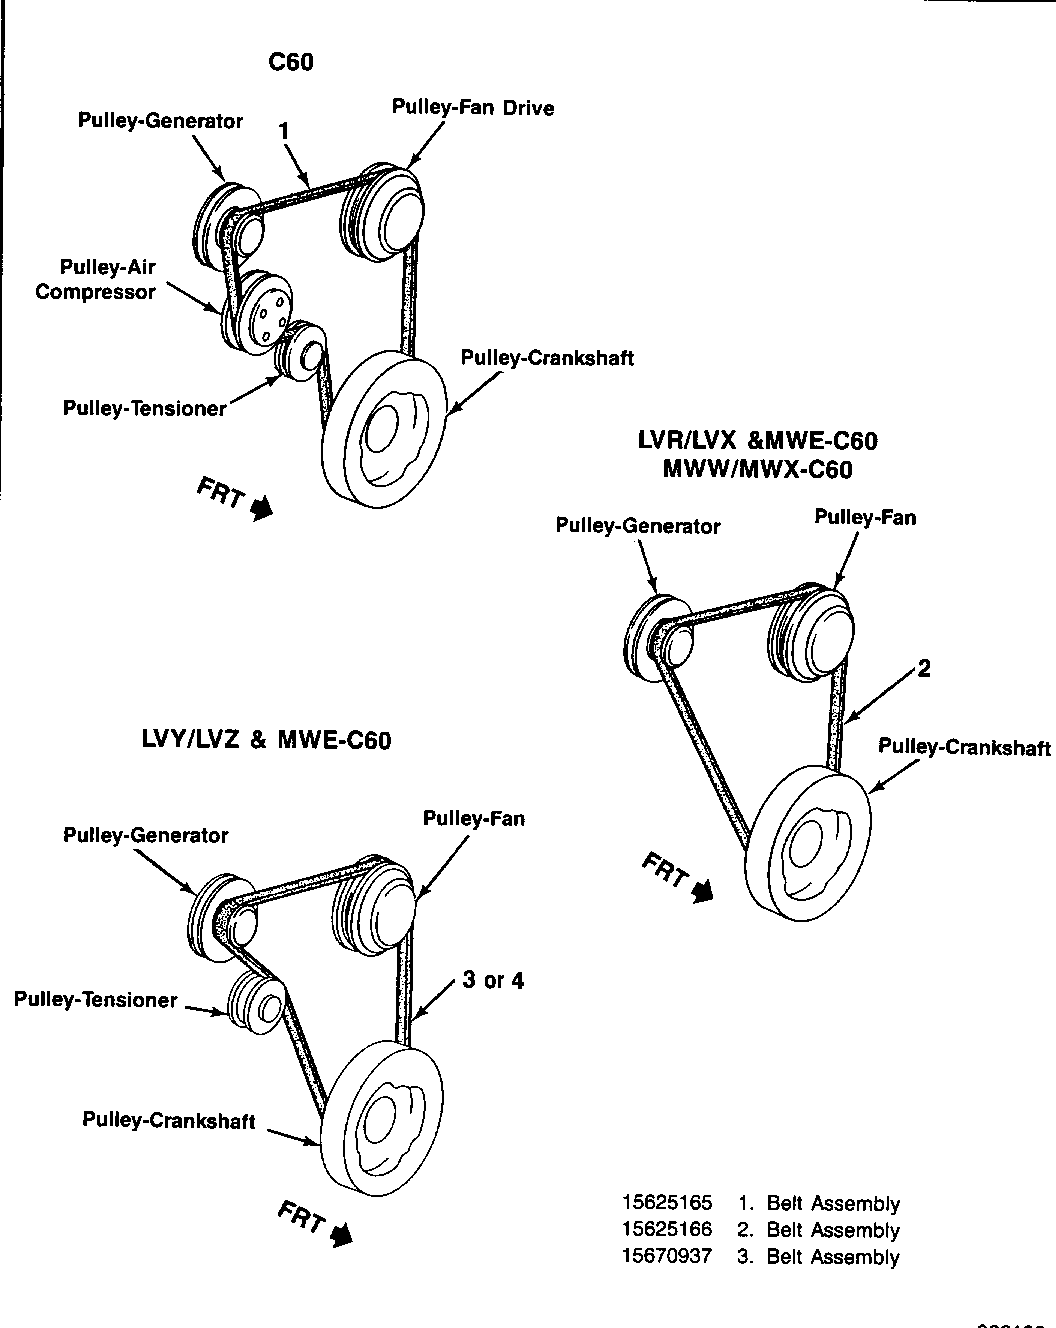
With the introduction of the 3116 Diesel Engine in the TopKick/Kodiak a new serpentine drive belt system was used. Depending on application, the drive belt system will have an automatic tensioner or a manual belt adjustment system without an automatic belt tensioner.
The following information is for your use in repairing or maintaining vehicles built with the serpentine drive belt system. The serpentine drive belt system is designed to minimize periodic maintenance. However, it is good practice to retension the belt used on vehicles without automatic ten- sioners after initial break-in.
[!] Important
When the brackets affecting belt linearity are installed on the engine, a very specific installation and torque sequence must be followed. Failure to follow the specific installation and torque sequence may cause improper belt position and a subsequent lack of belt retention condition.
When a vehicle exhibits irregular belt wear, noise and/or a belt jumping condition, the applicable installation and torque sequence listed below should be performed. Also, anytime any of the brackets included in the service procedure listed below are removed or replaced, the entire service procedure should be performed to ensure proper belt position and retention. All of the steps in the repair procedure must be followed exactly to ensure proper belt position.
NOTE: The information included in this service bulletin is intended to supersede the information in the 1991 TopKick/Kodiak Service Manual X9133. Please attach a copy of this bulletin to section 6B1-19 of the 1991 TopKick/Kodiak service manual
VEHICLES INVOLVED:
The following service procedures (1-3) apply to some 1990 and 1991 vehicles built with Caterpillar 3116 engines that were produced prior to January 1, 1991. Engines produced after January 1, 1991 are subject to new emissions standards. The new emissions standards impact heat rejection on some of the models discussed in this bulletin. Therefore, some of the belt configurations will be changed for vehicles equipped with engines produced after January 1, 1991. The engine serial number prefix can be used to differentiate between an "old" emission vehicle and a "new" emission vehicle. i.e., old (prior to Jan. 1, 1991) engine number prefix = 7SF_______________ new (Jan. 1, 1991 and after) engine number prefix = 2BK__________________ Please refer to the section at the end of this bulle- tin for information regarding which service procedure to use for vehicles built with new (1991) emissions.
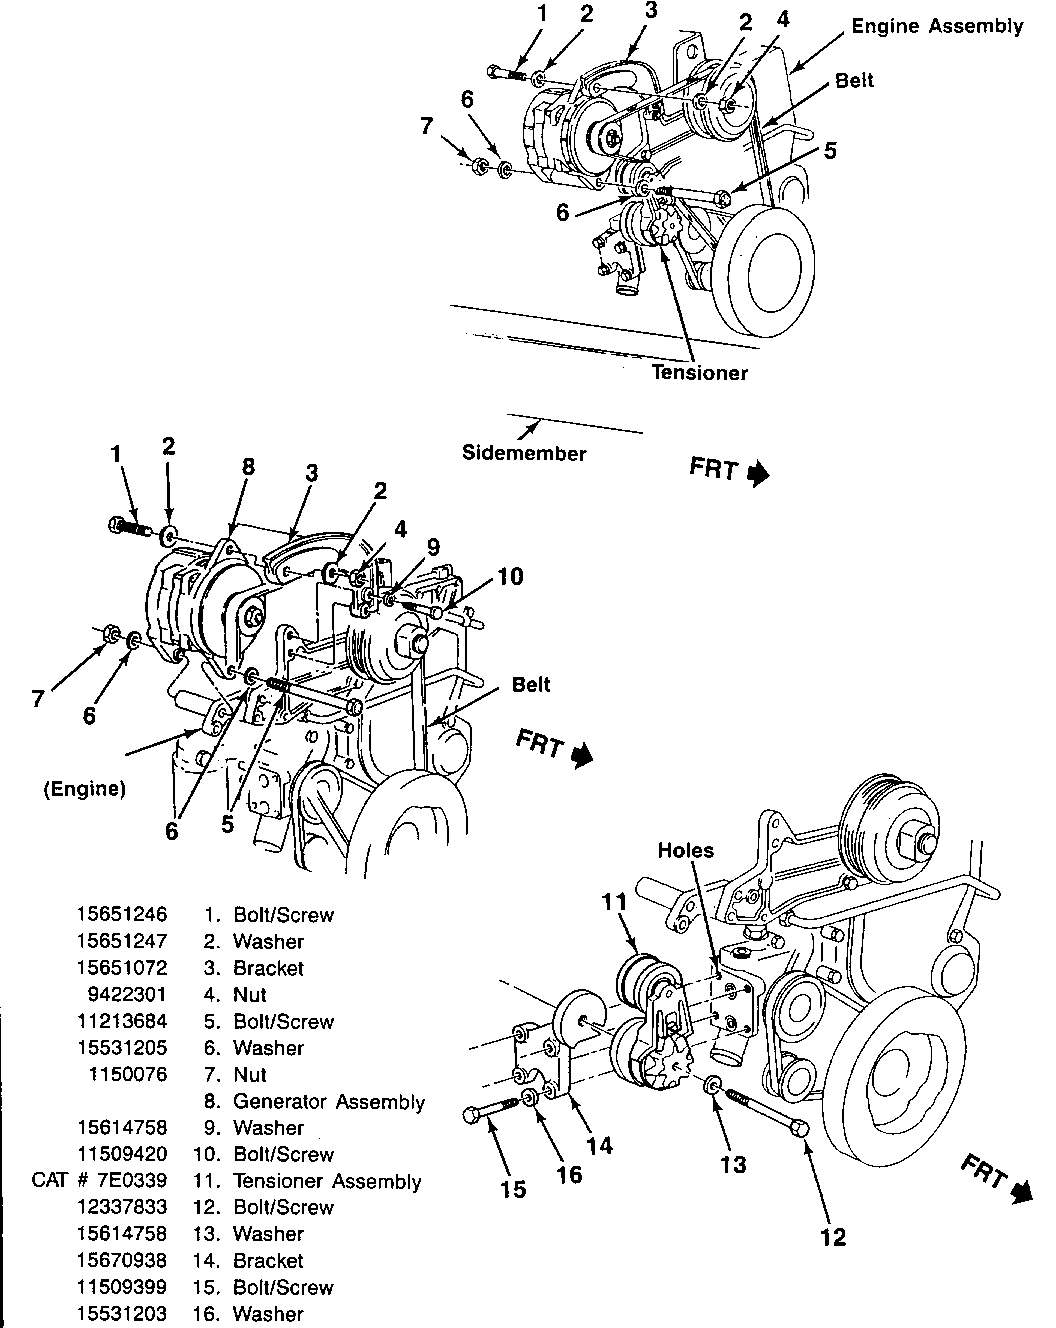
SERVICE PROCEDURE 1 (Figure 1):
Use this service procedure on C6H, C7H with 215 Hp or 250 Hp 3116 Diesel Engine (RPO LVY or LVZ) with Automatic Transmission (RPO MWE) without Air Conditioning (RPO C60).
1. Relieve the belt tension to the position of the most slack in the belt.
o Remove the belt.
3. Remove the generator. 4. Loosen the bolts holding the tensioner bracket to the water pump and the fasteners holding the upper generator bracket to the front engine plate.
[!] Important
Steps 4-6 need to be completed to ensure proper no-load alignment of the respective brackets.
5. Position the tensioner bracket so that the tensioner base is parallel to the front face of the engine. Torque the tensioner bracket bolts to 27-35 N-m (20-26 lb. ft.). 6. Torque the upper generator bracket bolts to 65-80 N-m (48-59 lb. ft.). 7. Position the generator and install the bottom generator fastener bolt - finger tight. 8. Install the top generator fastener and torque to 81-95 N-m (60-70 lb. ft.). 9. Torque the bottom generator fastener bolt to 60-81 N-m (44-60 lb. ft.). 10. Install the top generator mounting nut and torque to 67-88 N-m (49-65 lb. ft.). 11. Place belt around crankshaft, fan and generator pulleys. 12. Rotate tensioner to the load position. 13. Slide bet over tensioner pulley.
[!] Important
Do not force a belt into a pulley groove by prying with a screwdriver, crowbar, or other wedge type tool. Prying a belt into position can damage the belt and drive components.
14. Release tensioner.
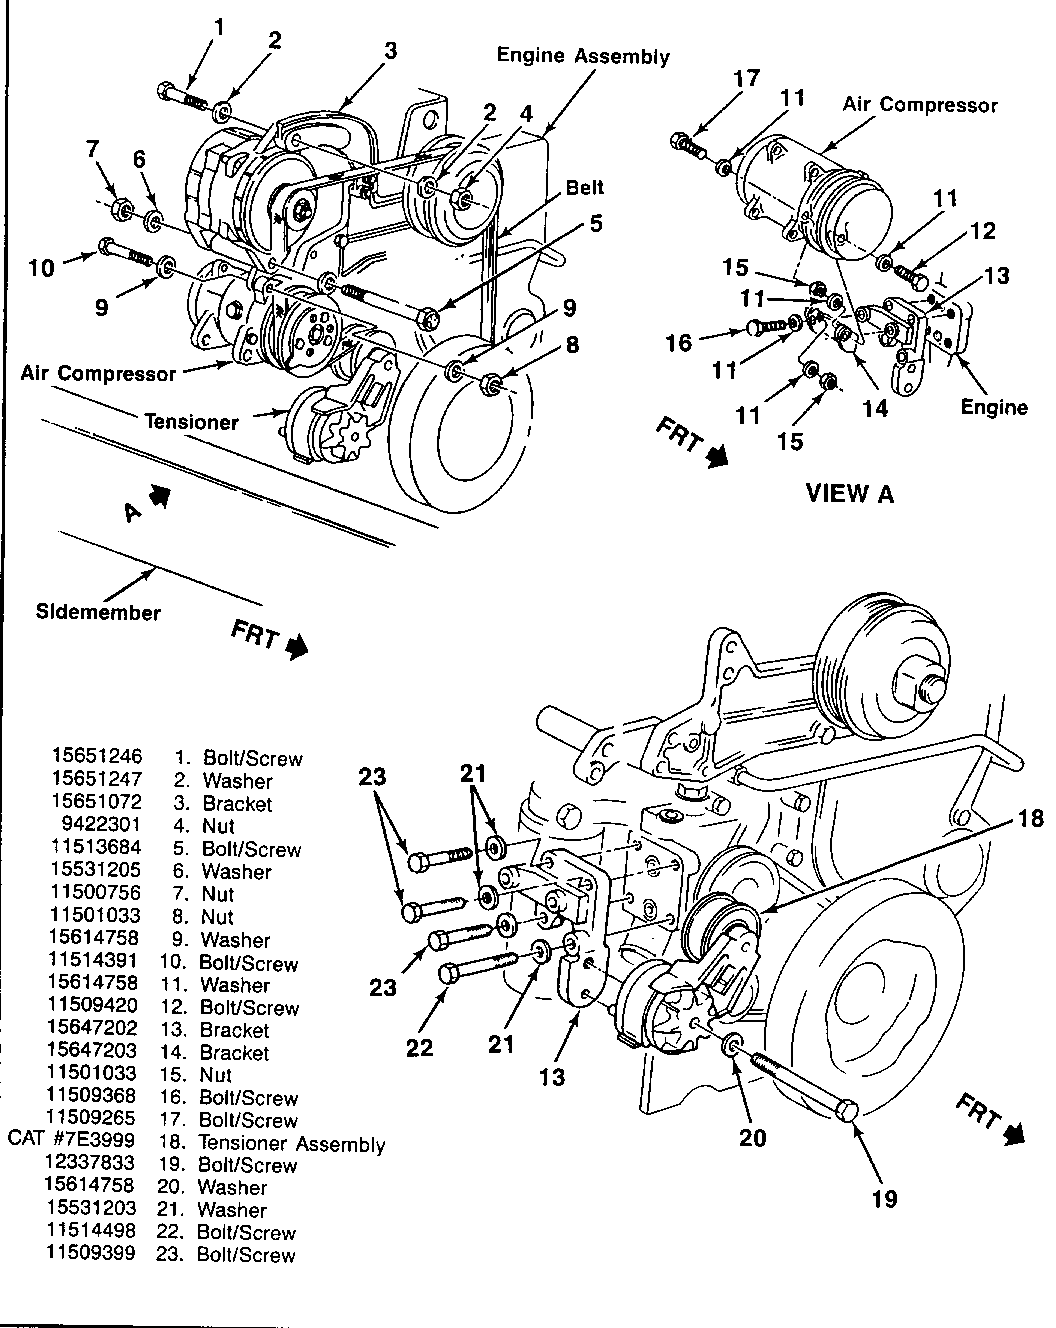
SERVICE PROCEDURE 2 (Figure 2):
Use this service procedure on C6H, C7H with 3116 Diesel Engine (RPO LXO) with Air Conditioning (RPO C60).
1. Relieve the belt tension to the position of the most slack in the belt. 2. Remove the belt. 3. Remove the generator. 4. Remove the air conditioning compressor fastener bolts and set the compressor aside. Do not disconnect the air conditioning compressor hoses. 5. Remove the air conditioning compressor lower bracket. 6. Loosen the bolts holding the tensioner bracket to the water pump and the fasteners holding the upper generator bracket to the front engine plate.
[!] Important
Steps 4-8 need to be completed to ensure proper no-load alignment of the respective brackets.
7. Position the tensioner bracket so that the tensioner base is parallel to the front face of the engine. Torque the tensioner bracket bolts to 27-35 N-m (20-26 lb. ft.). 8. Torque the upper generator bracket bolts to 65-80 N-m (48-59 lb. ft.). 9. Position the generator and install the bottom generator fastener bolt - finger tight. 10. Install the top generator fastener and torque to 81-95 N-m (60-70 lb. ft.). 11. Install the nut on the top generator fastener and torque to 67-88 N-m (49-65 lb. ft.). 12. Position the lower air conditioning compressor bracket and install the fasteners - finger tight. 13. Position the air conditioning compressor and install the upper compressor fastener - finger tight. 14. Install both lower air conditioning compressor fasteners - finger tight. 15. Torque the upper air conditioning compressor fastener to 40-51 N-m (30-38 lb. ft.) (nut torque). 16. Torque the lower front air conditioning compressor fastener to 45-60 N-m (33-44 lb. ft.). 17. Torque the lower rear air conditioning compressor fastener to 45-60 N-m (33-44 lb. ft.). 18. Torque the lower air conditioning compressor bracket to 65-80 N-m (48-59 lb. ft.). 19. Place belt around crankshaft, fan and generator pulleys. 20. Rotate tensioner to the load position. 21. Slide belt over tensioner pulley.
[!] Important
Do not force a belt into a pulley groove by prying with a screwdriver, crowbar, or other wedge type tool. Prying a belt into position can damage the belt and drive components.
22. Release tensioner.
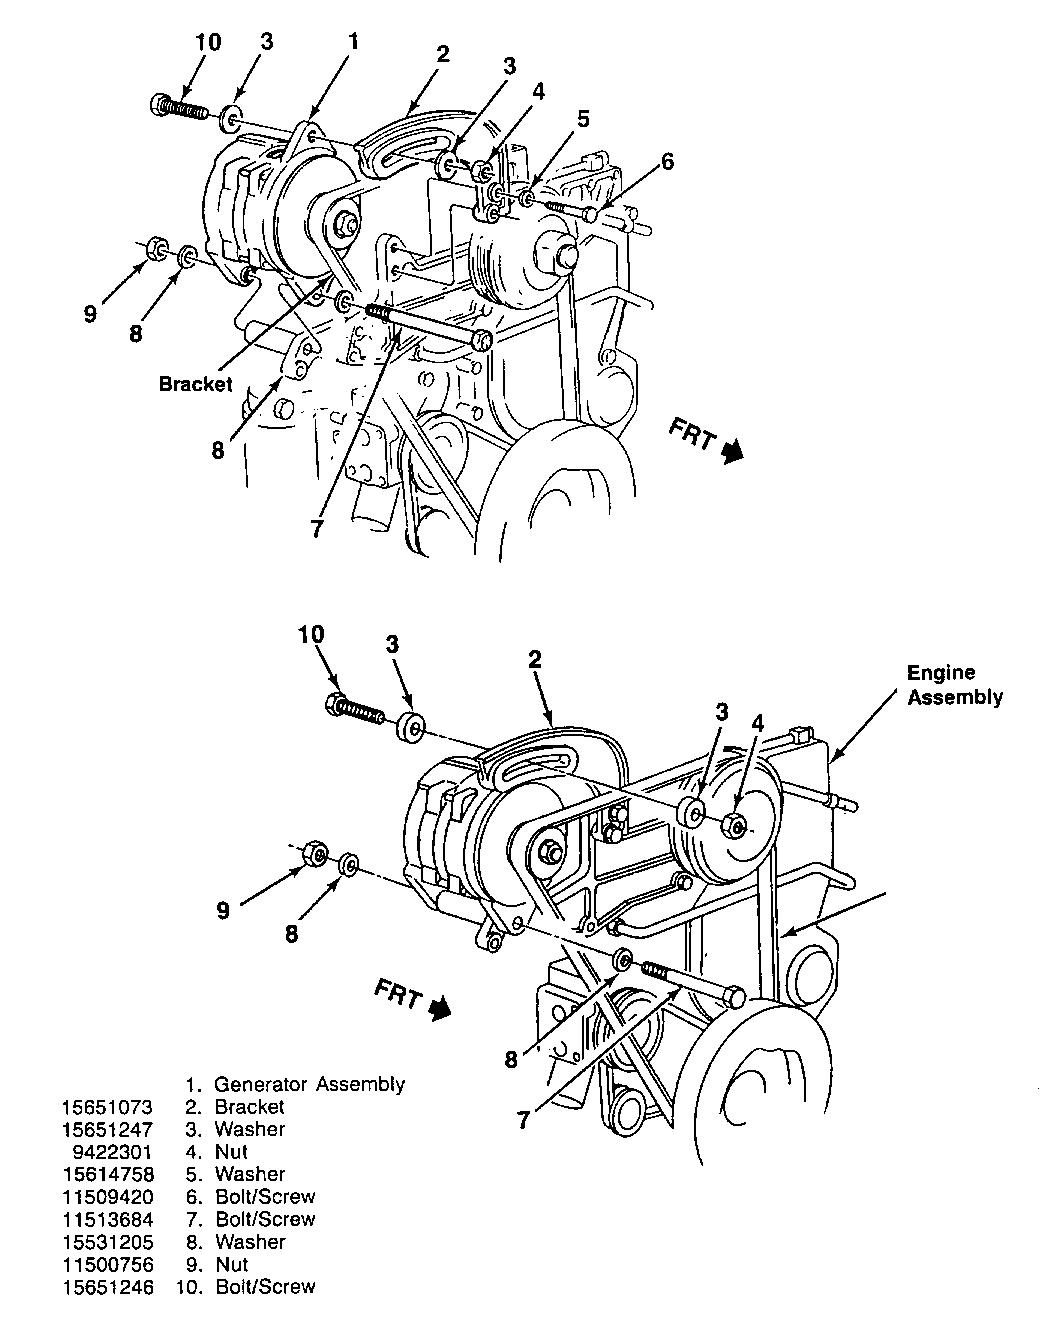
SERVICE PROCEDURE 3 (Figure 3):
Use this service procedure on C6H, C7H with 3116 Diesel Engine - All Horsepower's (RPO LXO) with Manual Transmission (RPO MWN or MWW) without Air Conditioning (RPO C60). or C6H, C7H with 3116 Diesel Engine, 165 Hp or 185 Hp (RPO LVW or LVX) with automatic Transmission (RPO MWE) without air conditioning (RPO C60).
1. Remove the top generator adjusting bolt. 2. Loosen the bottom generator fastener. 3. Rotate the top of the generator towards the engine. 4. Remove the belt from the generator pulley. 5. Remove the generator. 6. Loosen the fasteners holding the upper generator bracket to the front engine plate.
[!] Important
Steps 5-7 need to be completed to ensure proper no-load alignment of the bracket.
7. Torque the upper generator bracket bolts to 65-80 N-m (48-59 lb. ft.). 8. Position the generator and install the bottom generator fastener bolt - finger tight. 9. Install the top generator fastener and torque to 81-95 N-m (60-70 lb. ft.). 10. Install the top generator adjusting nut - finger tight. 11. Rotate the generator to the innermost position of the generator adjusting slot. 12. Place belt around crankshaft, fan and generator pulleys. 13. Tension the generator belt by placing an 18 inch (handle) torque wrench on the top generator bolt and torquing to 75-80 N-m (55-59 lb. ft.) (new belt) or 60-65 N-m (44-48 lb. ft.) (used belt).
[!] Important
Increase torque 7 N-m (5 lb. ft.) with a 24 inch torque wrench and decrease torque 7 N-m (5 lbs. ft.) with a 12 inch torque wrench.
14. Torque the top generator adjusting nut to 67-88 N-m (49-65 lb. ft.) while holding the generator in place with the proper torque on the top gen- erator bolt. 15. Torque the bottom generator bolt to 60-81 N-m (44-60 lb. ft.). 16. Check belt tension. Reference for configurations without a belt ten- sioner:
New belt tension: 175 lbs + or - 10 lbs. before rotation of pulleys
Used belt tension: 145 lbs + or - 10 lbs. before initial rotation of pulleys.
Minimum belt tension: 105 lbs. after rotation of pulleys.
Definition of a used belt: New belt that has been tensioned one time and has been rotated one revolution.
1991 EMISSIONS (Engines built after Dec. 31, 1990) INFORMATION: ----------------------------------------------------------------- Use Service Procedure 1 for the following vehicles equipped with 1991 emissions (Engines built after Dec. 31, 1990):
- C6H, C7H with 185 Hp, 215 Hp, or 250 Hp 3116 Diesel Engine (RPO LVX, LVY, or LVZ) with Automatic Transmission (RPO MWE) without Air Conditioning (RPO C60). or
- C6H, C7H with 250 Hp Diesel Engine (RPO LVZ) with Heavy Duty Radiator (RPO V01) or Power Take Off (RPO V66).
Use Service Procedure 2 for the following vehicles equipped with 1991 emissions (Engines built after Dec. 31, 1990):
- C6H, C7H with 3116 Diesel Engine (RPO LXO) with Air Conditioning (RPO C60).
Use Service Procedure 3 for the following vehicles equipped with 1991 emissions (Engines built after Dec. 31, 1990):
- C6H, C7H with 170 Hp, 185 Hp, or 215 Hp 3116 Diesel Engine (RPO LVR, LVX, or LVY) without Automatic Transmission (RPO MWE) without Air Conditioning (RPO C60). or
- C6H, C7H with 250 Hp 3116 Diesel Engine (RPO LVZ) without Automatic Transmission (RPO MWE) without Air Conditioning (RPO C60) without Heavy Duty Radiator (RPO V01) without Provisions for Power Take Off (RPO V66). or
- C6H, C7H with 170 Hp 3116 Diesel Engine (RPO LVR) with Automatic Transmission (RPO MWE) without Air Conditioning (RPO C60).
WARRANTY INFORMATION
For vehicles repaired under warranty use:
Service Labor Labor Time Procedure Operation ---------- ---------- ----------- 1 T7131 0.5 hr. 2 T7131 1.0 hr. 3 T7131 0.6 hr.
NOTE: Labor Operation is coded to base vehicle coverage in the warranty system.


General Motors bulletins are intended for use by professional technicians, not a "do-it-yourselfer". They are written to inform those technicians of conditions that may occur on some vehicles, or to provide information that could assist in the proper service of a vehicle. Properly trained technicians have the equipment, tools, safety instructions and know-how to do a job properly and safely. If a condition is described, do not assume that the bulletin applies to your vehicle, or that your vehicle will have that condition. See a General Motors dealer servicing your brand of General Motors vehicle for information on whether your vehicle may benefit from the information.
