Special Tools
Removal Procedure

- Disconnect the negative battery cable. Refer to
Battery Negative Cable Disconnection and Connection.
- Remove the air cleaner assembly. Refer to
Air Cleaner Assembly Replacement.
- Remove the hood. Refer to
Hood Replacement.
- Remove the intake manifold cover. Refer to
Intake Manifold Cover Replacement.
- Remove the engine mount snubber and drive belt. Refer to
Drive Belt Replacement.
- Drain the cooling system. Refer to
Cooling System Draining and Filling.
- Drain the engine oil. Refer to
Engine Oil and Oil Filter Replacement.
- Remove the starter motor. Refer to
Starter Motor Replacement.
- Remove the oil pressure sensor heat shield nuts and shield.

- Disconnect the engine wiring harness electrical connector (1) from the
oil pressure sensor.
- Disconnect the engine wiring harness electrical connector (2) from the knock sensor.

- Remove the engine wiring harness ground bolt (1).
- Separate the engine wiring harness ground terminal (2) from the engine boss.

- Remove the engine wiring harness clip (1) from the air conditioning (A/C)
compressor bracket.
- Remove the engine wiring harness clip bolt (3).
- Separate the engine wiring harness clip (2) from the engine boss.

- Disconnect the engine wiring harness electrical connector from the A/C compressor.
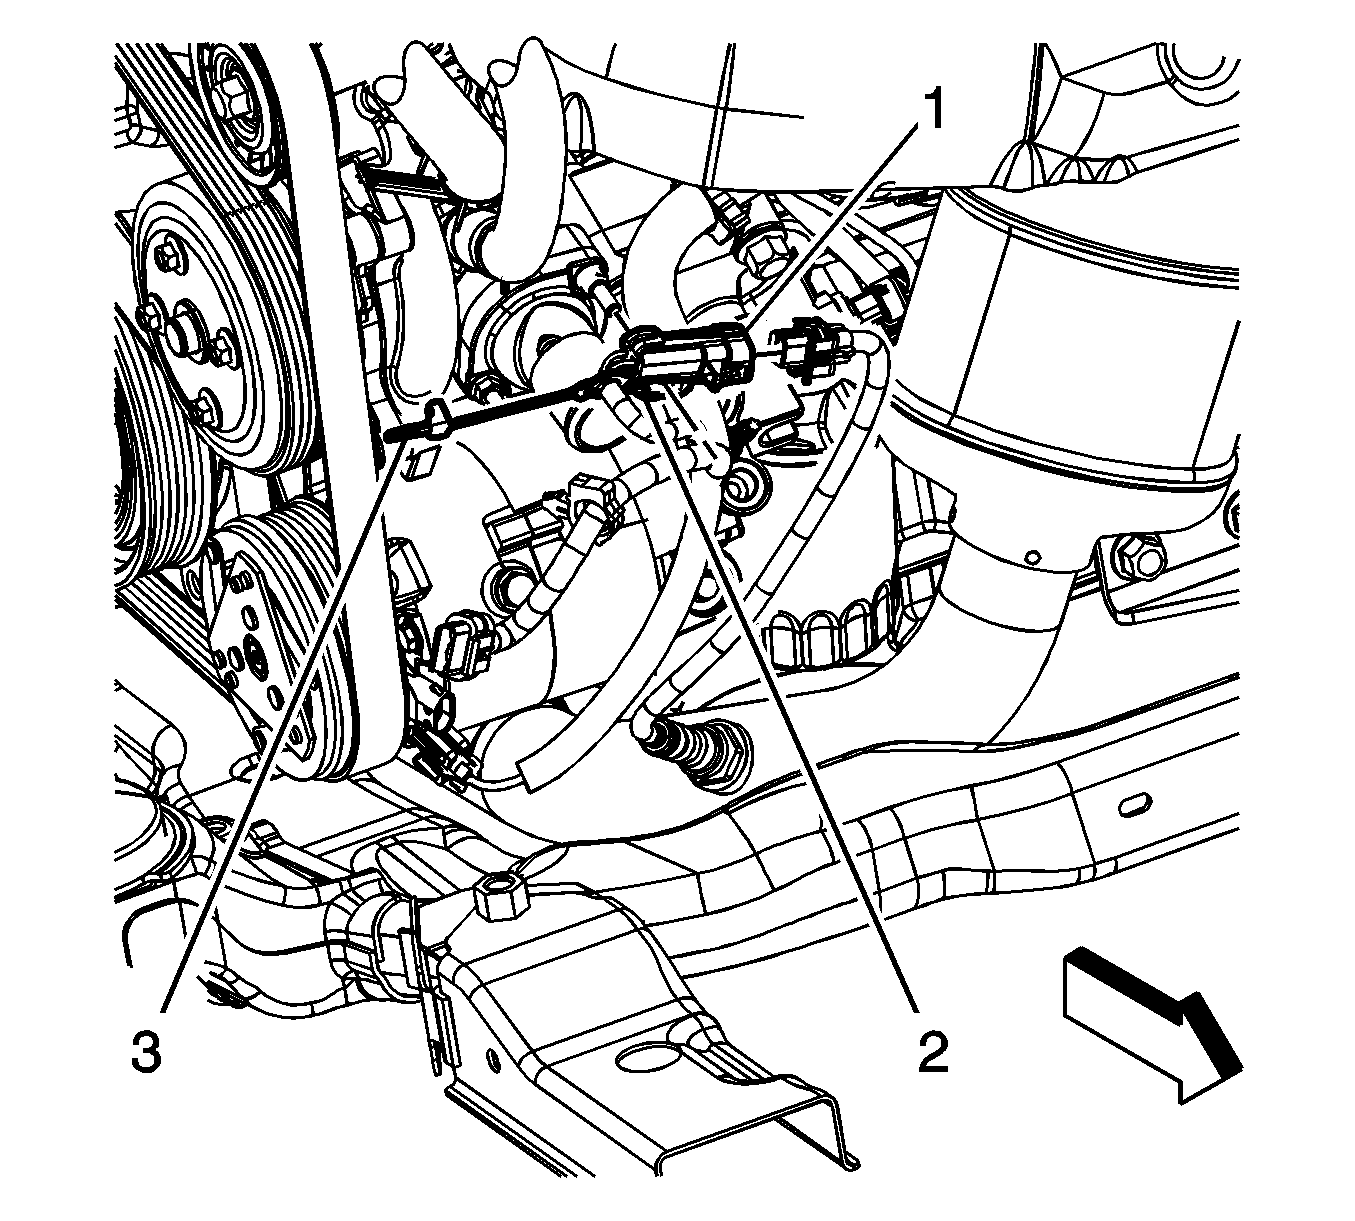
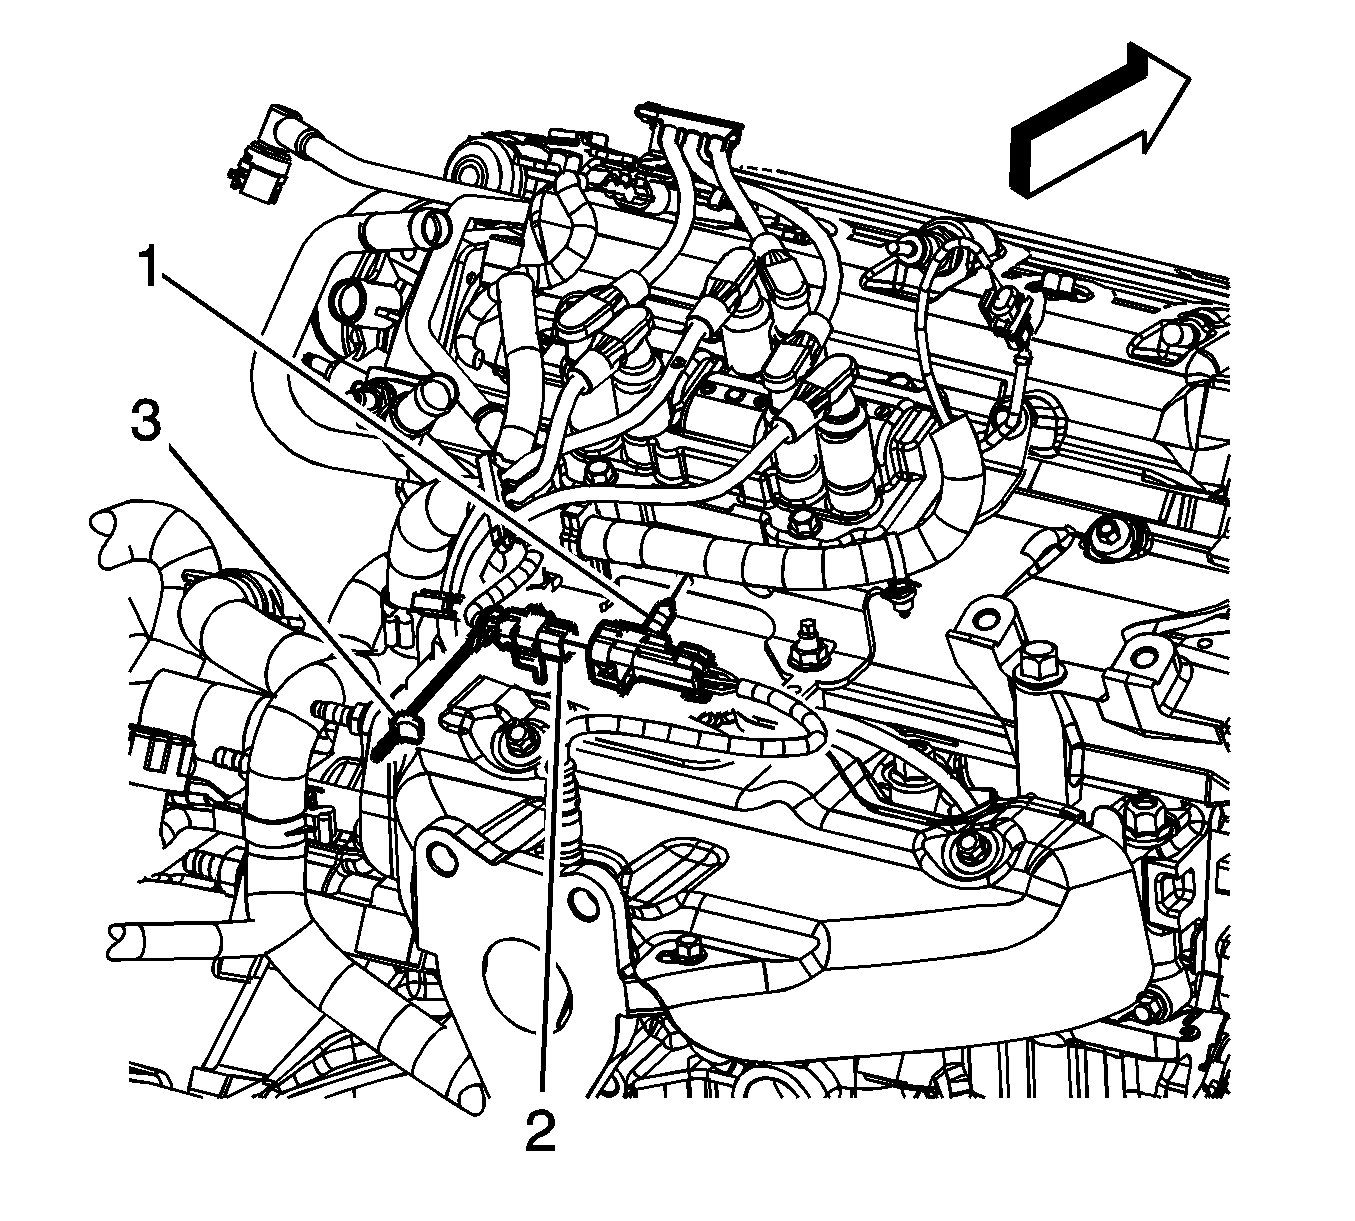
- Remove the connector position assurance (CPA) retainer (3).
- Disconnect the lower front heated oxygen sensor (HO2S) electrical connector from the engine wiring harness electrical connector (1).
- Remove the engine wiring harness electrical connector clip (2) from the thermostat housing stud.
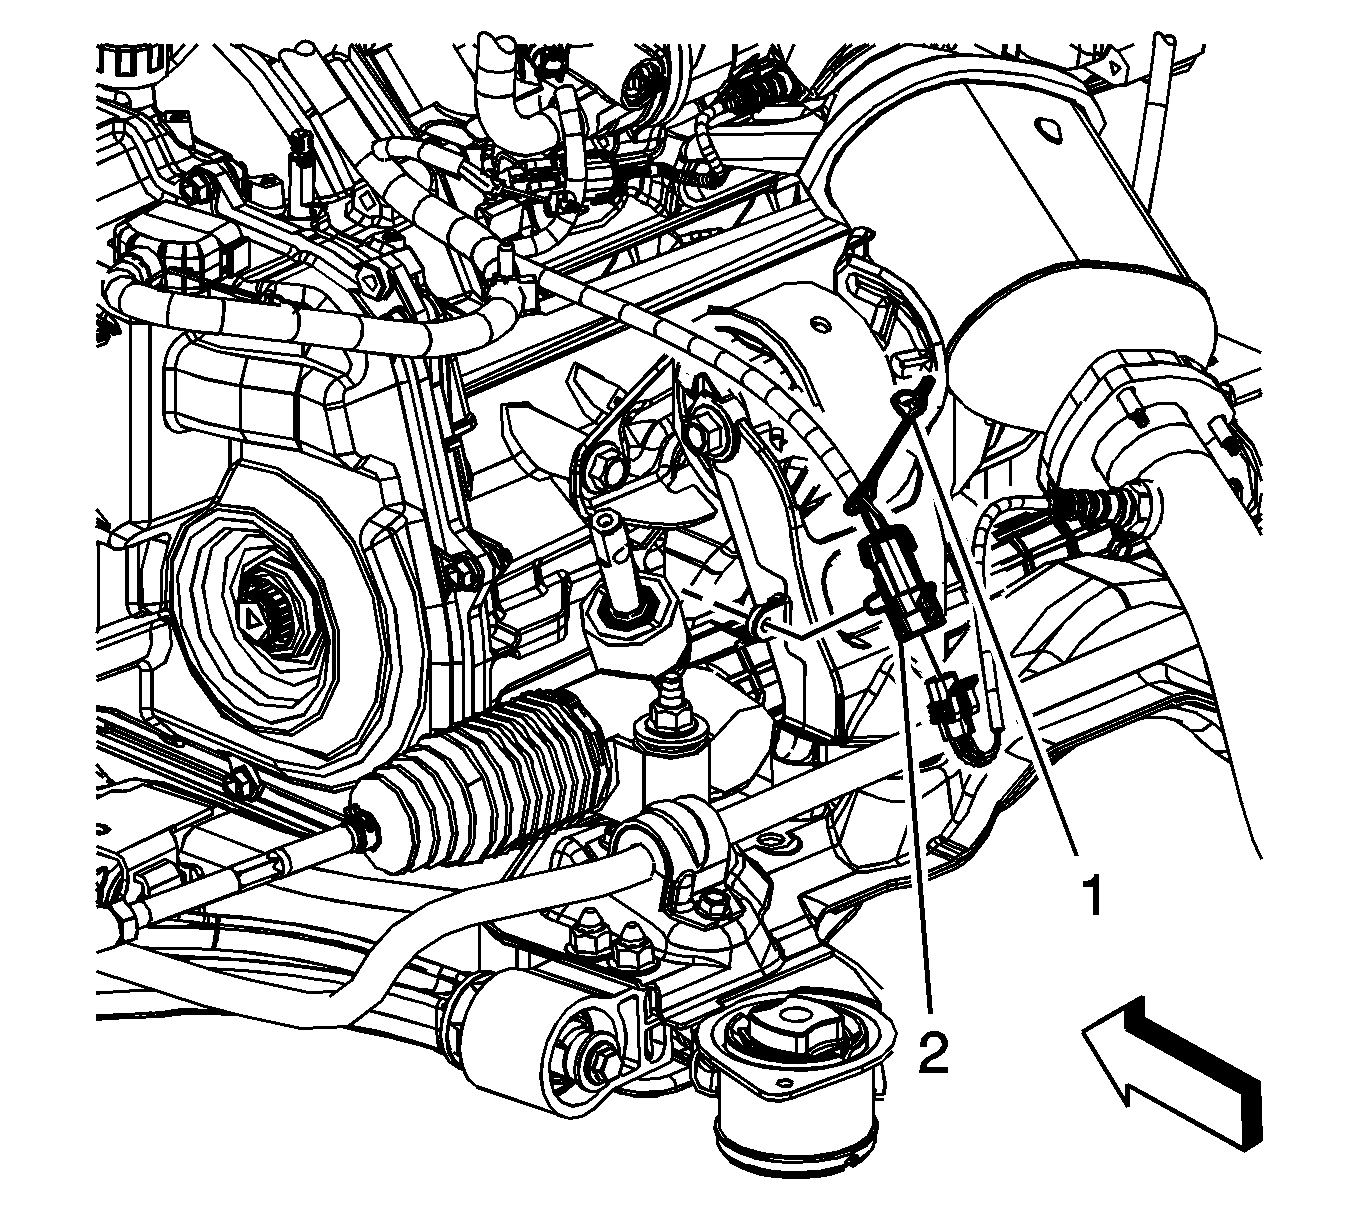
- Remove the lower rear CPA retainer (1).
- Disconnect the lower rear HO2S electrical connector from the engine wiring harness electrical connector (2).
- Remove the engine wiring harness electrical connector (2) rosebud from the transaxle mount.

- Disconnect the engine wiring harness electrical connector (1) from the knock sensor.
- Disconnect the engine wiring harness electrical connector (2) from the crankshaft position (CKP) sensor.

- Remove the engine wiring harness clip (1) from the engine stud.
- Lower the vehicle.

- Using the
J 25034-C
, remove the power steering pump pulley.
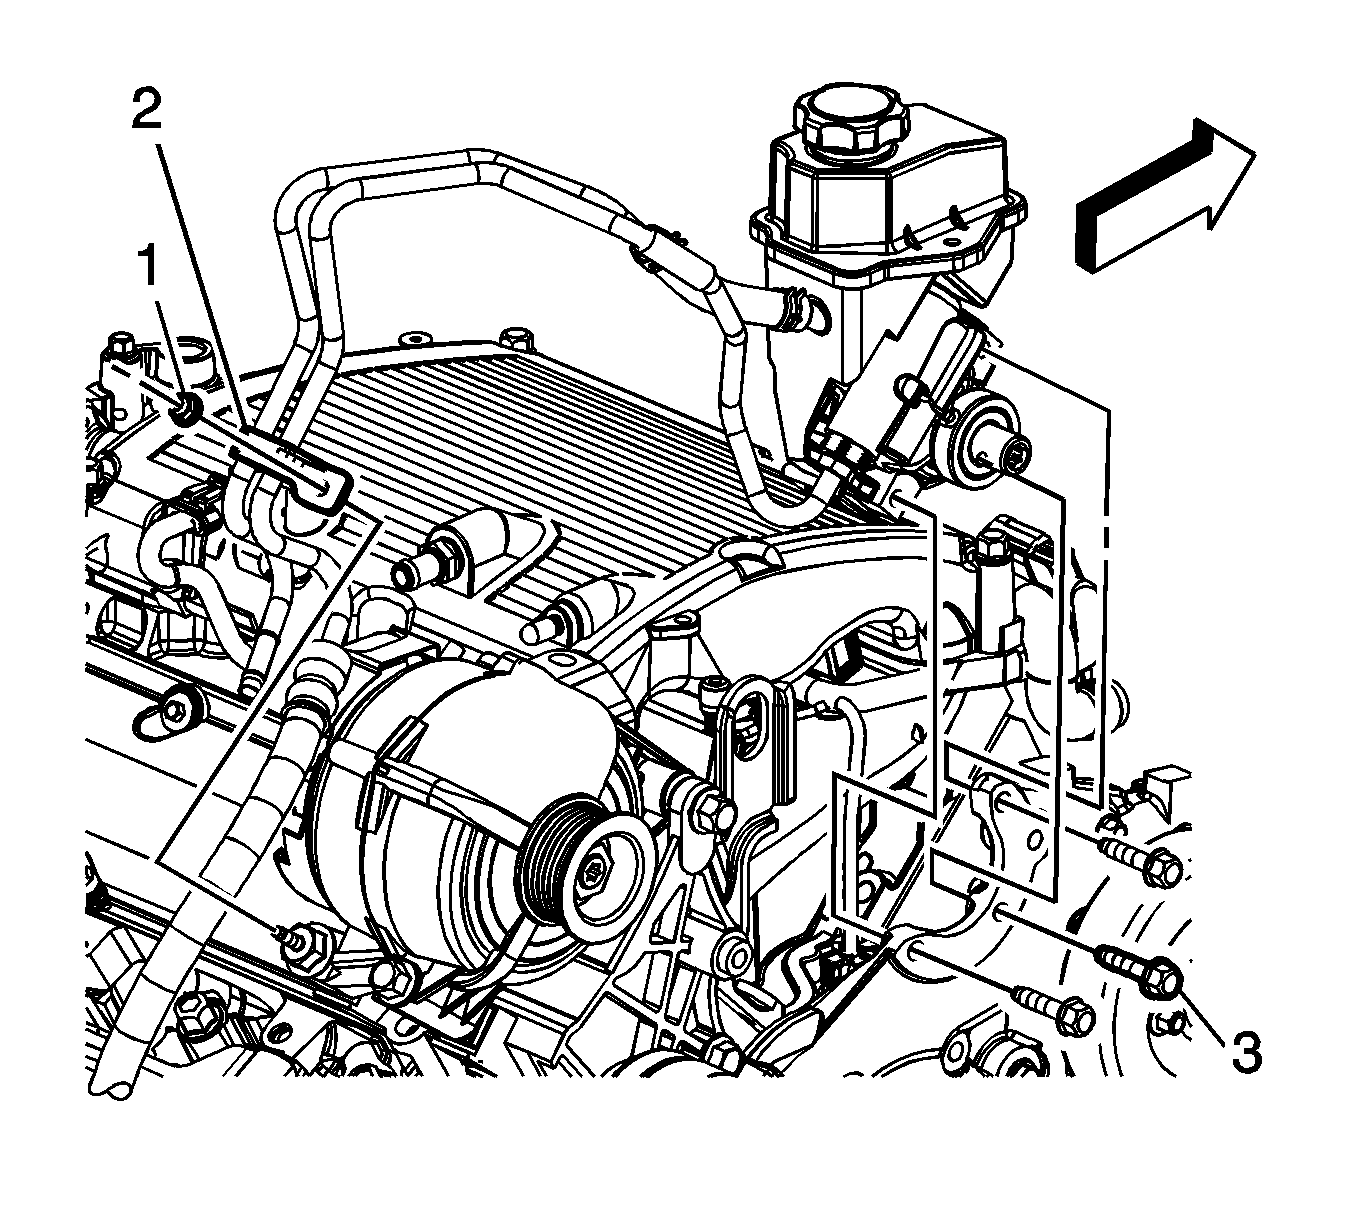
- Remove the power steering pump bolts (3).
- Remove the power steering line clip bolt (1) from the generator stud.
- Remover the power steering line clip (2) from the stud.
- Reposition and secure the power steering pump assembly out of the way.
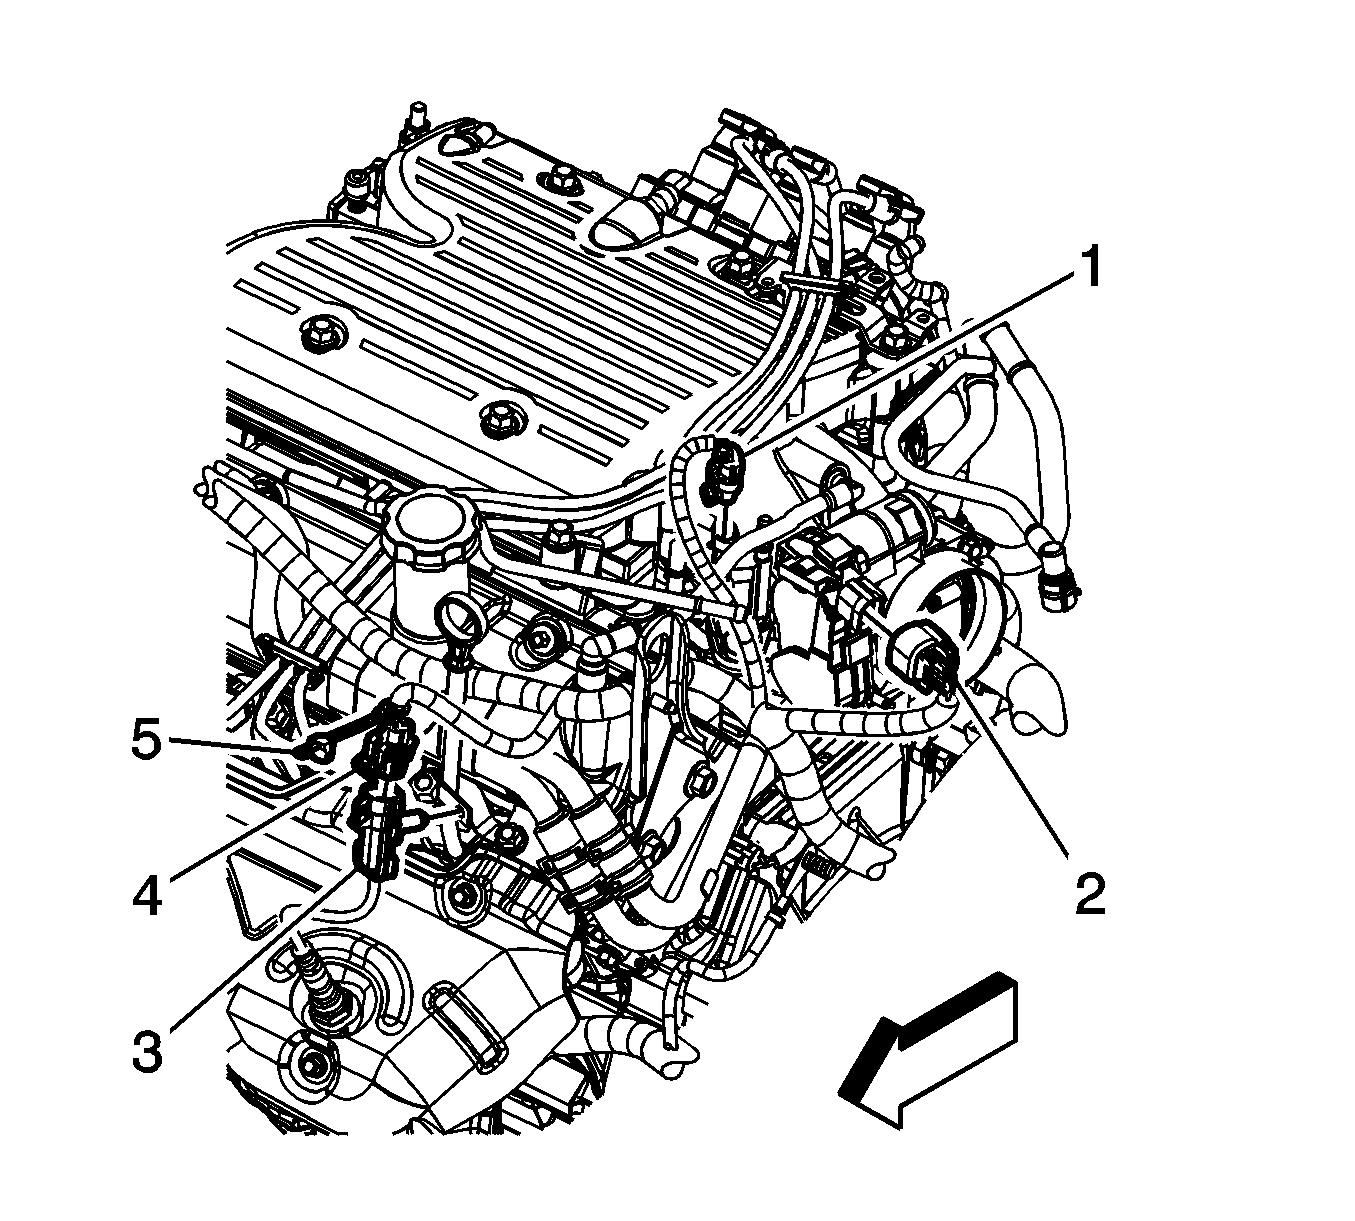
- Disconnect the engine wiring harness electrical connector (1) from the evaporative emission (EVAP)
canister purge solenoid.
- Disconnect the engine wiring harness electrical connector (2) from the electronic throttle control (ETC).
- Remove the CPA retainer (5).
- Disconnect the engine wiring harness electrical connector (4) from the HO2S.

- Disconnect the engine wiring harness clips (1, 2) from the heater inlet
and outlet pipe brackets.
- Disconnect the engine wiring harness clip (3) from the engine lift bracket.

- Disconnect the engine wiring harness electrical connector (1) from the manifold absolute pressure (MAP)
sensor.
- Disconnect the engine wiring harness electrical connector (2) from the ignition control module.
- Remove the CPA retainer (3).
- Disconnect the engine wiring harness electrical connector (2) from the rear upper HO2S.

- Remove the engine wiring harness clips (1, 2) from the ignition control
module bracket.
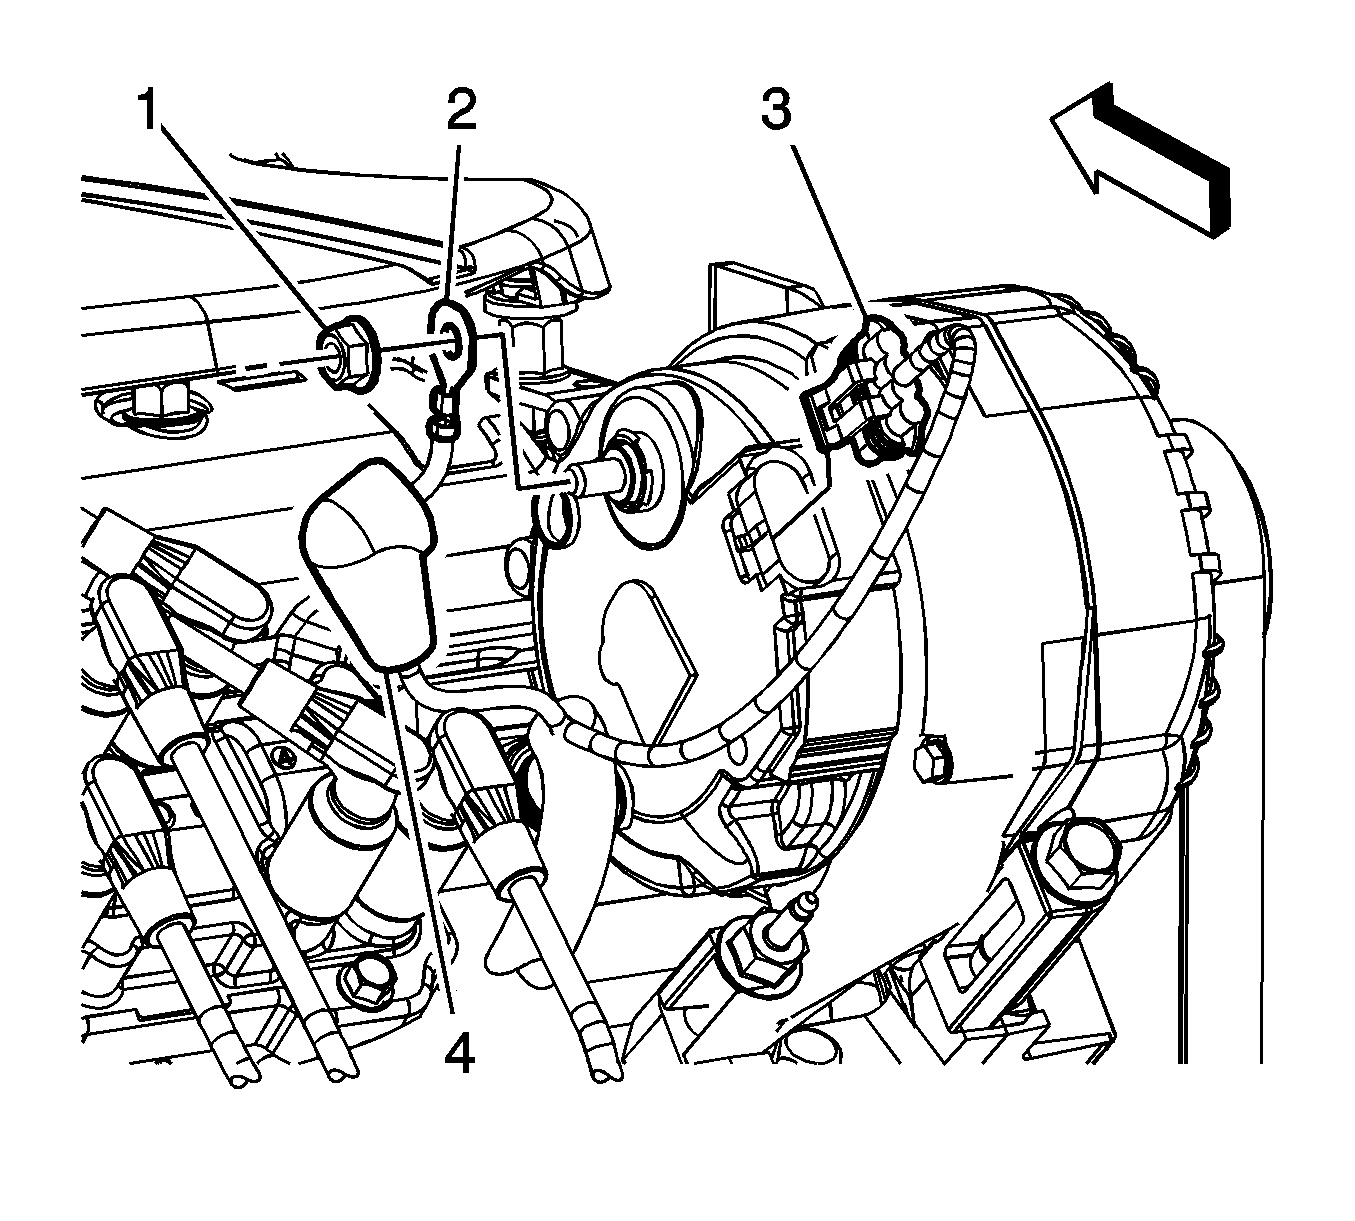
- Reposition the engine wiring harness terminal boot (4).
- Remove the engine wiring harness to generator stud nut (1).
- Remove the engine wiring harness terminal (2) from the generator.
- Disconnect the engine wiring harness electrical connector (3) from the generator.
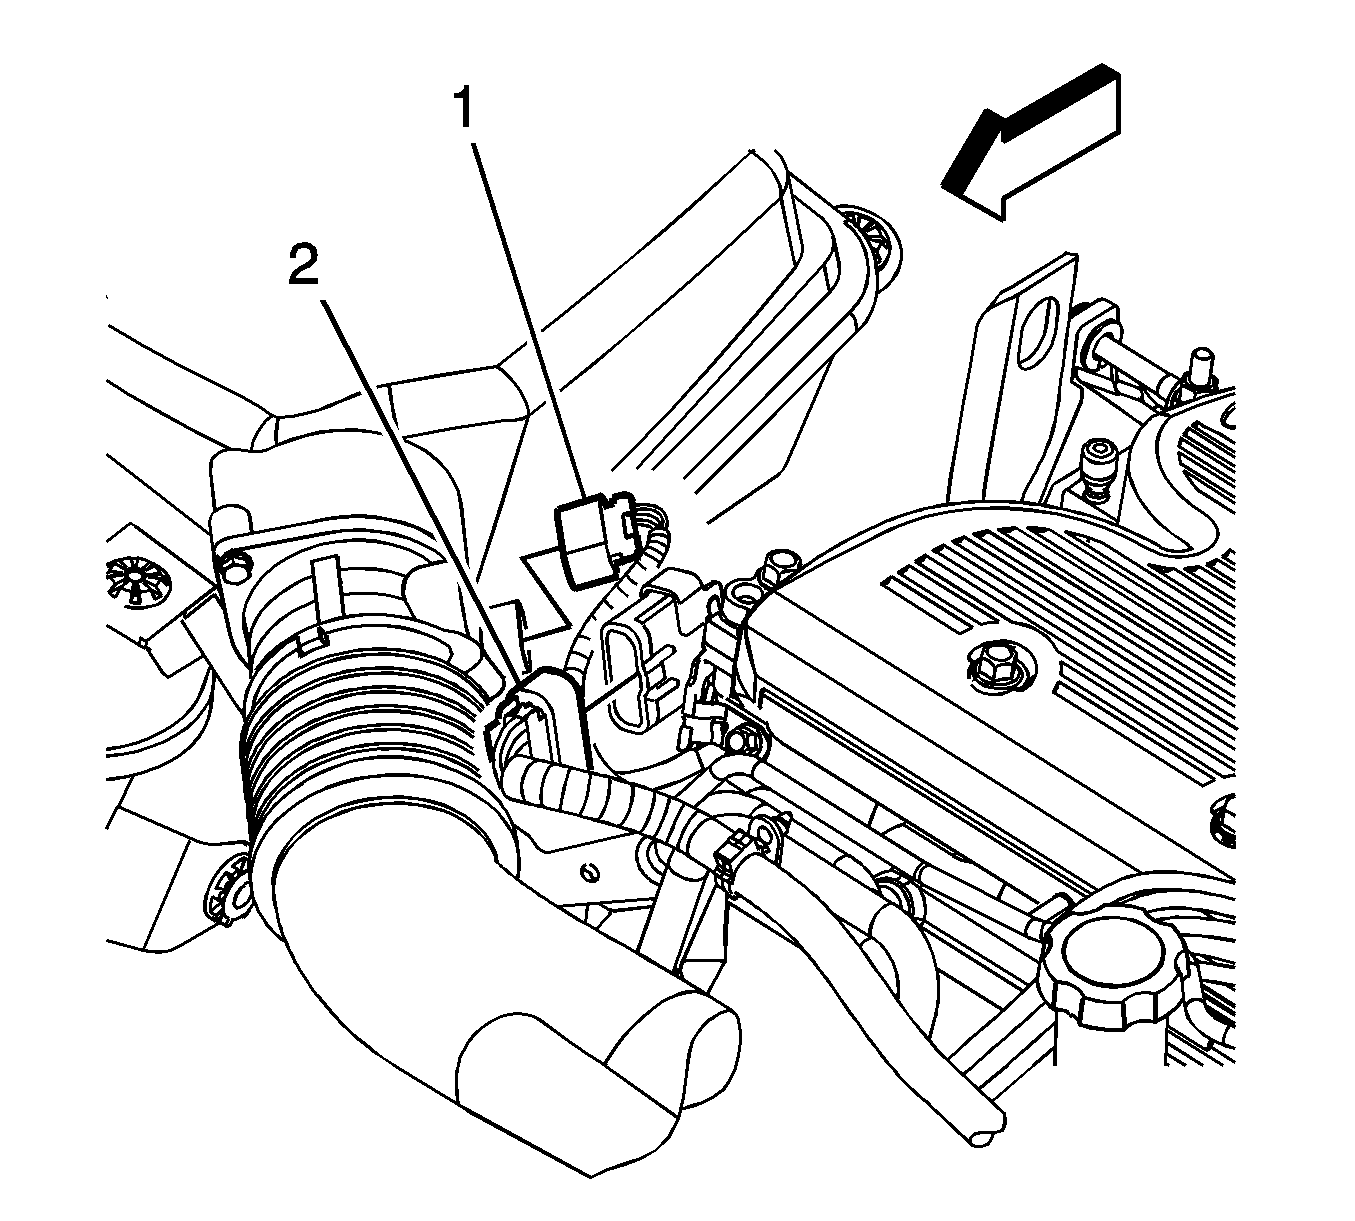
- Disconnect the engine wiring harness electrical connector (2) from the
fuel injector inline electrical connector.

- Remove the engine wiring harness bolt (1).
- Disconnect the engine wiring harness electrical connector (2) from the camshaft phasor.
- Remove the engine wiring harness clip (3) from the engine.

- Disconnect the engine wiring harness electrical connector (1) from the
body wiring harness electrical connector (2).

- Disconnect the engine wiring harness electrical connector (3) from the body wiring harness electrical
connector (2).

- Disconnect the body harness electrical connector from the powertrain control module (PCM).
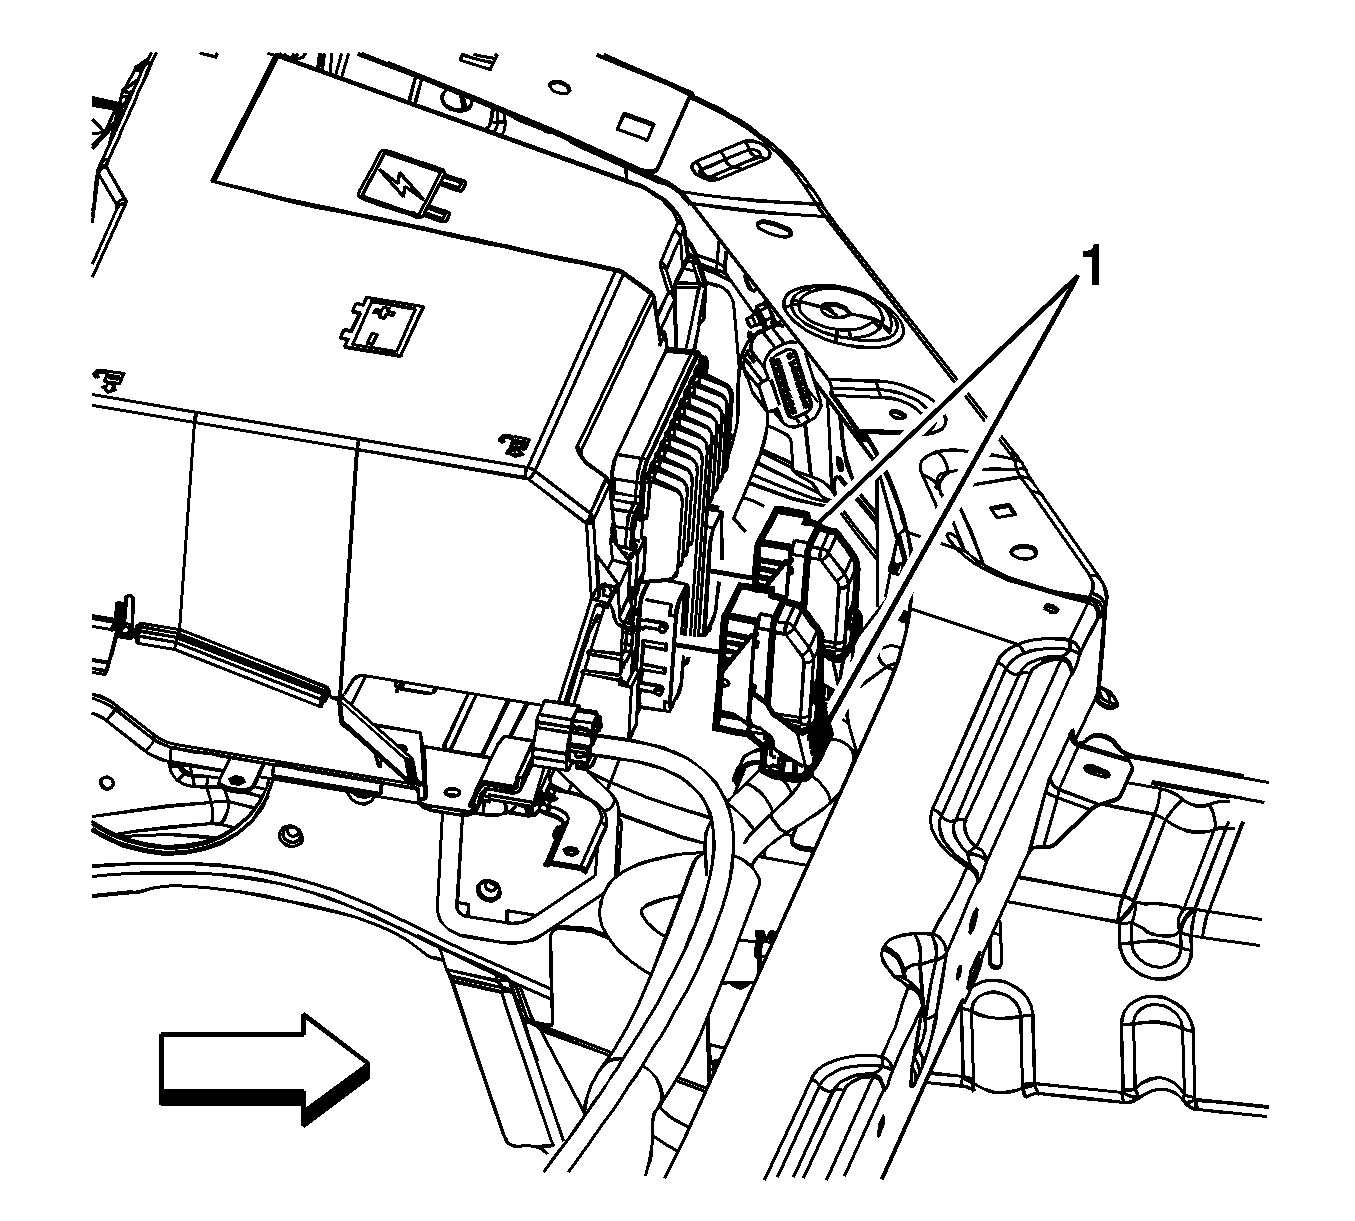
- Disconnect the engine wiring harness electrical connector (1) from the PCM.

- Disconnect the engine wiring harness electrical connector from the transmission control module (TCM).

- Disconnect the engine wiring harness electrical connector from the vehicle speed sensor.

- Remove the engine wiring harness clip from the vehicle speed sensor bracket.

- Disconnect the engine wiring harness electrical connector (1) from the neutral safety backup switch.

- Disconnect the engine wiring harness electrical connector (1) from the transaxle.

- Remove the engine wiring harness clip bolt (4).
- Remove the engine wiring harness clip nut (5).
- Remove the engine wiring harness clip (6) from the transaxle stud.

- Remove the engine wiring harness ground nut (3).
- Remove the engine wiring harness ground terminal (2) and the battery cable ground terminal (1) from the transaxle stud.
- Gather all branches of the engine wiring harness and reposition the harness out of the way.
- Remove the catalytic converter. Refer to
Catalytic Converter Replacement - Left Side and/or
Catalytic Converter Replacement - Right Side.
- Remove the engine mount. Refer to
Engine Mount Replacement.

- Remove the torque converter cover bolts and cover.

- Remove the flexplate to torque converter bolts.

- Unbolt and reposition the A/C compressor off to the side. DO NOT discharge the A/C system.

- Remove the transaxle brace bolts and brace.
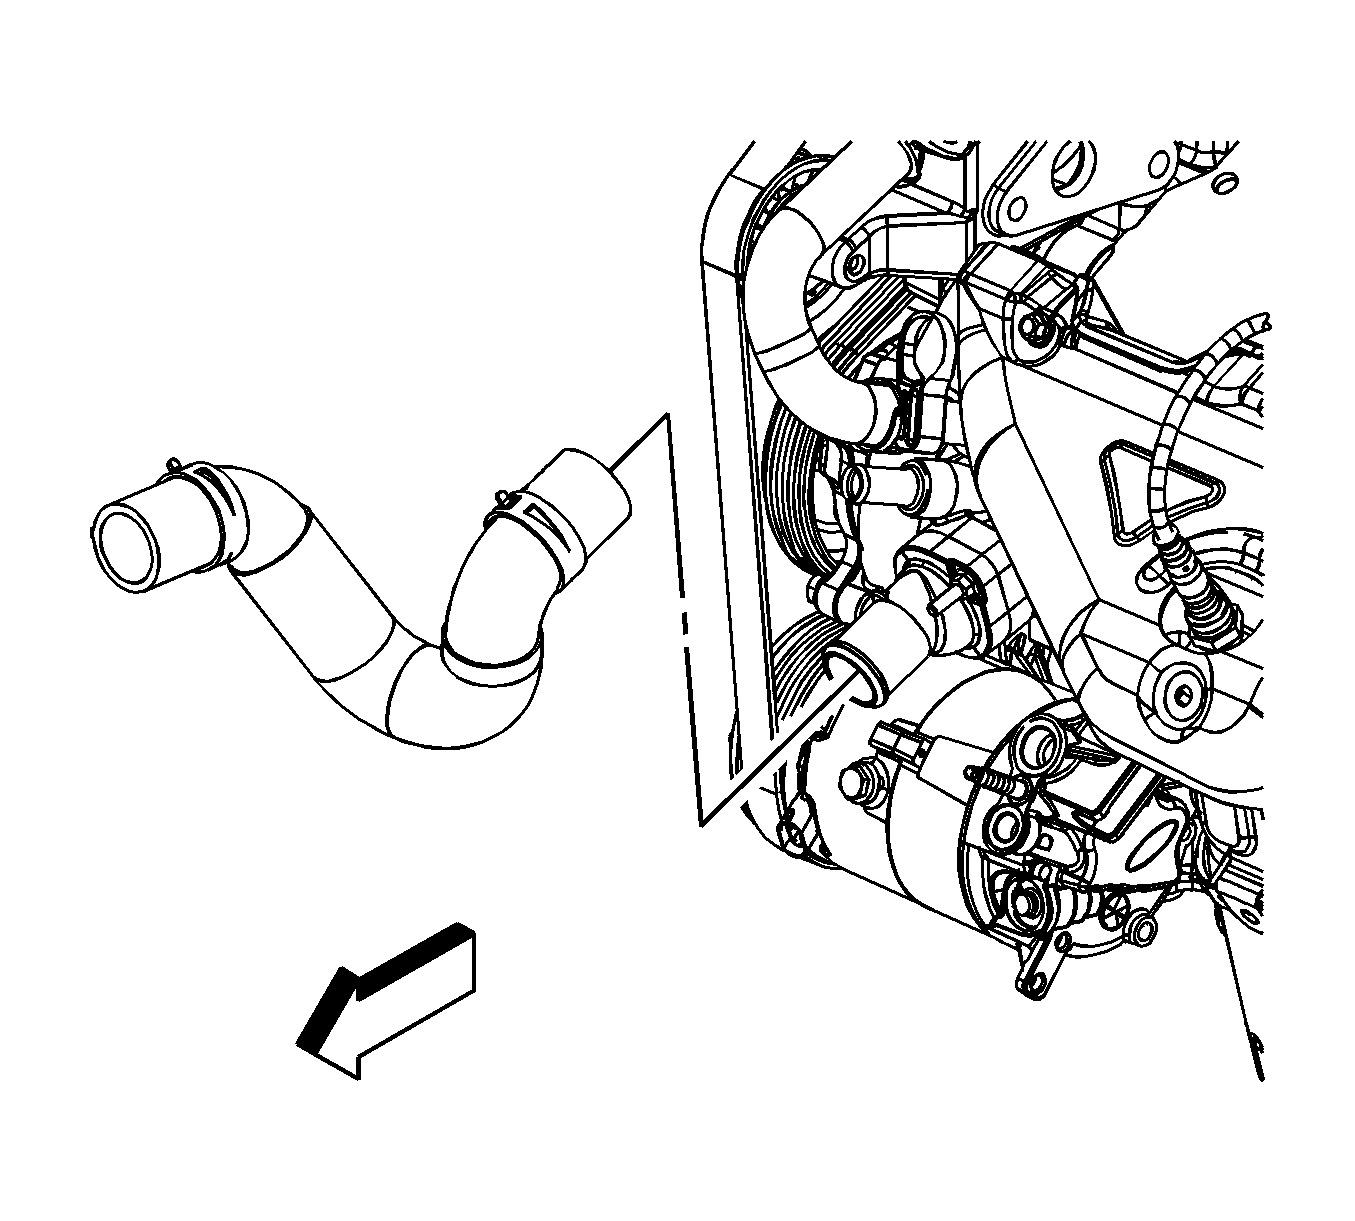
- Reposition the radiator outlet hose clamp at the thermostat housing.
- Remove the radiator outlet hose from the thermostat housing.
- Lower the vehicle and support the transaxle.

- Reposition the radiator surge tank hose clamp (1) at the surge tank pipe.
- Remove the radiator surge tank hose from the surge tank pipe.

- Reposition the brake booster vacuum hose clamp (2) at the intake manifold.
- Remove the brake booster vacuum hose (1) from the intake manifold.

- Reposition the heater inlet (1) and outlet (2) hose clamps at the
engine.
- Remove the heater outlet and inlet hoses from the engine.
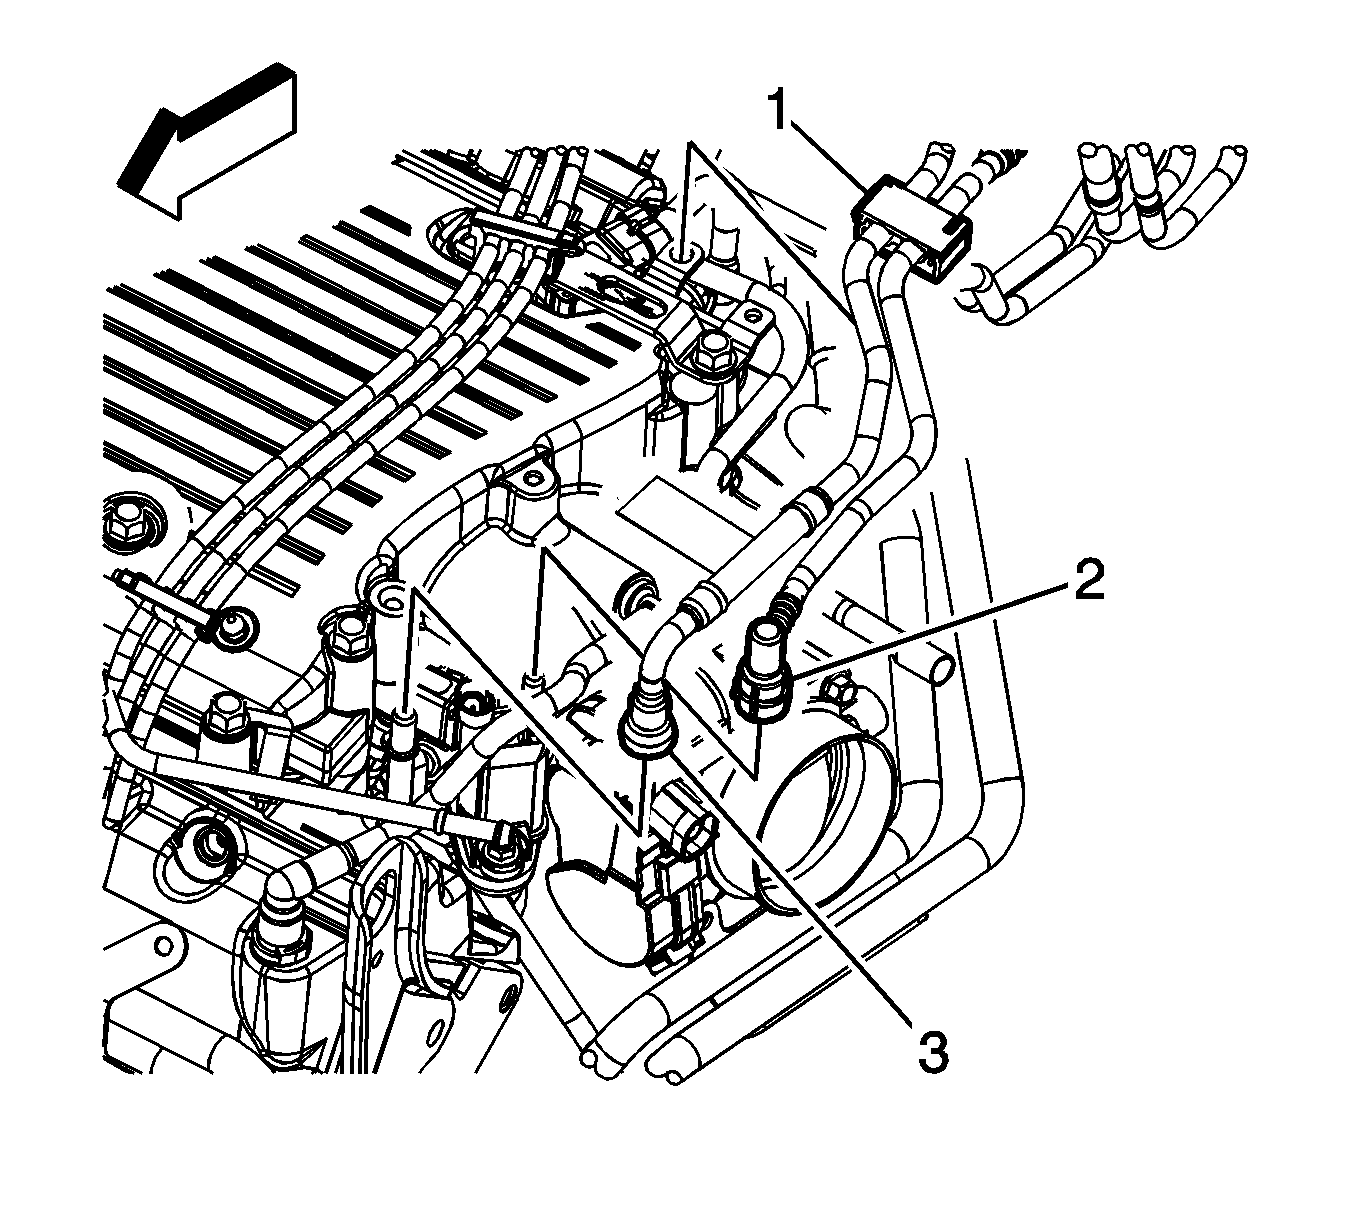
- Disengage the fuel/EVAP line clip (1) from the MAP sensor bracket.
- Disconnect the fuel feed line quick connect fitting (3) from the fuel rail. Refer to
Metal Collar Quick Connect Fitting Service.
- Disconnect the EVAP purge line quick connect fitting (2) from the canister purge solenoid. Refer to
Plastic Collar Quick Connect Fitting Service.

- Reposition the radiator inlet hose clamp at the engine.
- Remove the radiator inlet hose from the engine.
- Install a engine lifting device to the engine.

- Remove the transaxle-to-engine bolts/studs.
- Separate the engine from the transaxle and remove the engine from the vehicle.
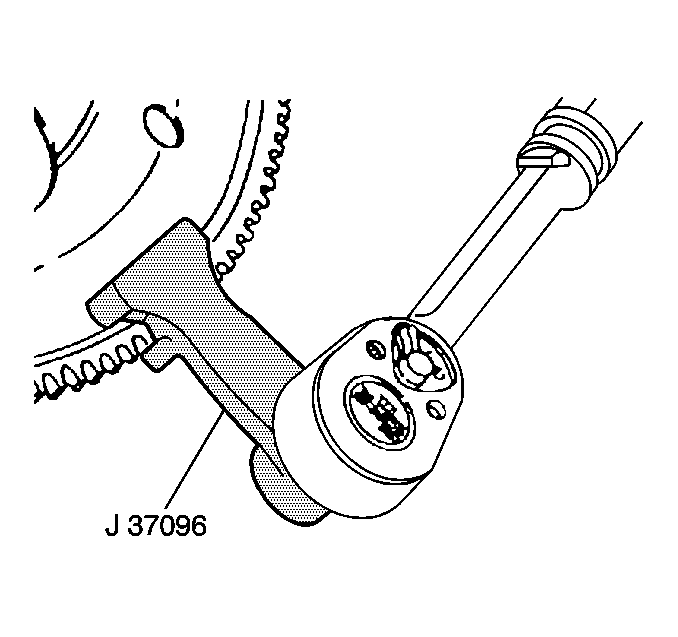
- Using the
J 37096
, secure the flexplate in order to prevent the flexplate from rotating.
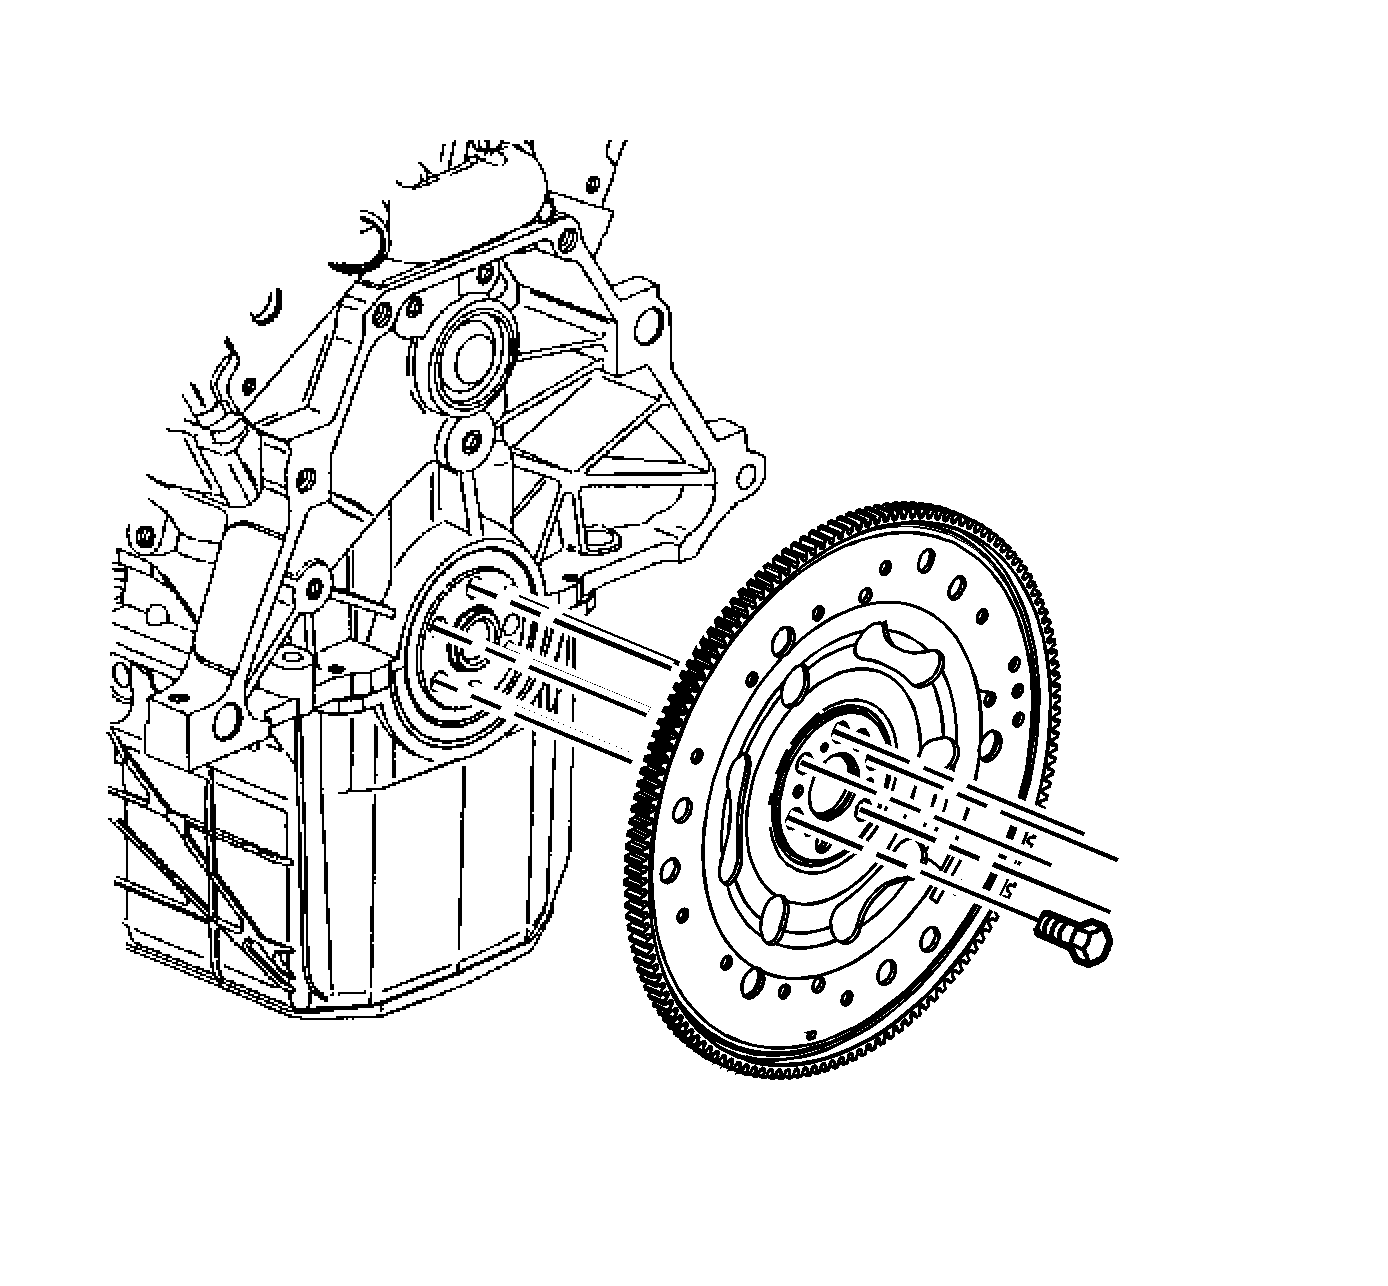
- Loosen the flexplate bolts.
- Remove 5 of the 6 flexplate bolts leaving one bolt at the top of the crankshaft.
- Grip the flexplate and remove the remaining bolt. Do not drop the flexplate when removing the final bolt.
- Remove the flexplate.
- Install the engine to the engine stand.
Installation Procedure

- Install a engine lifting device to the engine.
- Remove the engine from the engine stand.
- Position the flexplate to the crankshaft.
- Install the flywheel bolts finger tight.
- Install the
J 37096
to the flexplate in order to prevent the flexplate from rotating.
Caution: Refer to Fastener Caution in the Preface section.
- Tighten the flexplate bolts to
70 N·m (52 lb ft).

- Remove the
J 37096
.

- Install the engine to the vehicle and install the engine to the transaxle.
- Install the transaxle-to-engine bolts/studs and tighten to
75 N·m (55 lb ft).

- Install the radiator inlet hose to the engine.
- Position the radiator inlet hose clamp at the engine.

- Connect the EVAP purge line quick connect fitting (2) to the canister purge solenoid. Refer to
Plastic Collar Quick Connect Fitting Service.
- Connect the fuel feed line quick connect fitting (3) to the fuel rail. Refer to
Metal Collar Quick Connect Fitting Service.
- Engage the fuel/EVAP line clip (1) to the MAP sensor bracket.

- Install the heater outlet and inlet hoses to the engine.
- Position the heater inlet(1) and outlet (2) hose clamps at the engine.

- Install the brake booster vacuum hose (1) to the intake manifold.
- Position the brake booster vacuum hose clamp (2) at the intake manifold.

- Install the radiator surge tank hose to the surge tank pipe.
- Position the radiator surge tank hose clamp (1) at the surge tank pipe.
- Remove the support from the transaxle and raise the vehicle.

- Install the radiator outlet hose to the thermostat housing.
- Position the radiator outlet hose clamp at the thermostat housing.

- Install the transaxle brace and bolts and tighten the bolts to
50 N·m (37 lb ft).

- Position and install the A/C compressor onto the stud.
- Tighten the A/C compressor nut first, then the rear bolt, then the front bolt to
50 N·m (37 lb ft).

- Install the flexplate to torque converter bolts and tighten to
62 N·m (46 lb ft.

- Install the torque converter cover and bolts and tighten to
10 N·m (89 lb in).
- Install the catalytic converter. Refer to
Catalytic Converter Replacement - Left Side and/or
Catalytic Converter Replacement - Right Side.
- Install the engine mount. Refer to
Engine Mount Replacement.

- Position the branches of the engine wiring harness over the engine.
- Install the battery cable ground terminal (1) and the engine wiring harness ground terminal (2) to the transaxle stud.
- Install the engine wiring harness ground nut (3) and tighten to
25 N·m (18 lb ft.

- Install the engine wiring harness clip (6) to the transaxle stud.
- Install the engine wiring harness clip nut (5) and tighten to
25 N·m (18 lb ft).
- Install the engine wiring harness clip bolt (4) and tighten to
25 N·m (18 lb ft).

- Connect the engine wiring harness electrical connector (1) to the transaxle.

- Connect the engine wiring harness electrical connector (1) to the neutral safety backup switch.

- Install the engine wiring harness clip to the vehicle speed sensor bracket.

- Connect the engine wiring harness electrical connector to the vehicle speed sensor.

- Connect the engine wiring harness electrical connector to the TCM.

- Connect the engine wiring harness electrical connector (1) to the PCM.

- Connect the body harness electrical connector to the PCM.

- Connect the engine wiring harness electrical connector (3) to the body wiring harness electrical connector (2).

- Connect the engine wiring harness electrical connector (1) to the body
wiring harness electrical connector (2).

- Install the engine wiring harness clip (3) to the engine.
- Connect the engine wiring harness electrical connector (2) to the camshaft phasor.
- Install the engine wiring harness bolt (1) and tighten to
10 N·m (89 lb in).

- Connect the engine wiring harness electrical connector (2) to the fuel
injector inline electrical connector.

- Connect the engine wiring harness electrical connector (3) to the generator.
- Install the engine wiring harness terminal (2) to the generator.
- Install the engine wiring harness to generator stud nut (1) and tighten to
20 N·m (15 lb ft).
- Position the engine wiring harness terminal boot (4).

- Install the engine wiring harness clips (1, 2) to the ignition control
module bracket.

- Connect the engine wiring harness electrical connector (2) to the rear upper HO2S.
- Install the CPA retainer (3).

- Connect the engine wiring harness electrical connector (2) to the ignition control module.
- Connect the engine wiring harness electrical connector (1) to the MAP sensor.

- Connect the engine wiring harness clip (3) to the engine lift bracket.
- Connect the engine wiring harness clips (1, 2) to the heater inlet and outlet pipe brackets.

- Connect the engine wiring harness electrical connector (4) to the HO2S.
- Install the CPA retainer (5).
- Connect the engine wiring harness electrical connector (2) to the ETC.
- Connect the engine wiring harness electrical connector (1) to the EVAP canister purge solenoid.

- Unsecure and position the power steering pump.
- Install the power steering line clip (2) to the stud.
- Install the power steering line clip nut (1) to the generator stud and tighten the nut to
5 N·m (44 lb in).
- Install the power steering pump bolts (3) and tighten to
25 N·m (18 lb ft).

- Using the
J 25033-C
, install the power steering pump pulley (1).

- Connect the engine wiring harness electrical connector (2) to the CKP sensor.
- Connect the engine wiring harness electrical connector (1) to the knock sensor.

- Install the engine wiring harness electrical connector (2) rosebud to the transaxle mount.
- Connect the lower rear HO2S electrical connector to the engine wiring harness electrical connector (2).
- Install the lower rear CPA retainer (1).

- Install the engine wiring harness electrical connector clip (2) to the thermostat housing stud.
- Connect the lower front HO2S electrical connector to the engine wiring harness electrical connector (1).
- Install the CPA retainer (3).

- Connect the engine wiring harness electrical connector to the A/C compressor.

- Install the engine wiring harness clip (2) to the engine boss.
- Install the engine wiring harness clip bolt (3) and tighten to
25 N·m (18 lb ft).
- Install the engine wiring harness clip (1) to the A/C compressor bracket.

- Install the engine wiring harness ground terminal (2) to the engine boss.
- Install the engine wiring harness ground bolt (1) and tighten to
25 N·m (18 lb ft).

- Connect the engine wiring harness electrical connector (2) to the knock
sensor.
- Connect the engine wiring harness electrical connector (1) to the oil pressure sensor.

- Install the oil pressure sensor heat shield and nuts and tighten to
10 N·m (89 lb in).
- Install the starter motor. Refer to
Starter Motor Replacement.
- Install the drive belt and the engine mount snubber. Refer to
Drive Belt Replacement.
- Install the intake manifold cover. Refer to
Intake Manifold Cover Replacement.
- Install the air cleaner assembly. Refer to
Air Cleaner Assembly Replacement.
- Install the hood. Refer to
Hood Replacement.
- Fill the cooling system. Refer to
Cooling System Draining and Filling.
- Connect the negative battery cable. Refer to
Battery Negative Cable Disconnection and Connection.
- Prelube the engine. Refer to
Engine Prelubing.
- Perform the CKP system variation learn procedure. Refer to
Crankshaft Position System Variation Learn.
Note: After an overhaul the engine should be tested. Use the following procedure after the engine is installed in the vehicle.
| 95.1. | Disable the ignition system. |
| 95.2. | Crank the engine several times. Listen for any unusual noises or evidence that parts are binding. |
| 95.3. | Enable the ignition system. |
| 95.4. | Start the engine and listen for unusual noises. |
| 95.5. | Check the vehicle oil pressure gage or light and confirm that the engine has acceptable oil pressure. |
| 95.6. | Run the engine speed at about 1,000 RPM until the engine has reached normal operating temperature. |
| 95.7. | Listen for sticking lifters or other unusual noises. |
| 95.8. | Inspect for fuel, oil, and/or coolant leaks while the engine is running. |
| 95.9. | Perform a final inspection for the proper oil and coolant levels. |
- Close the hood.


