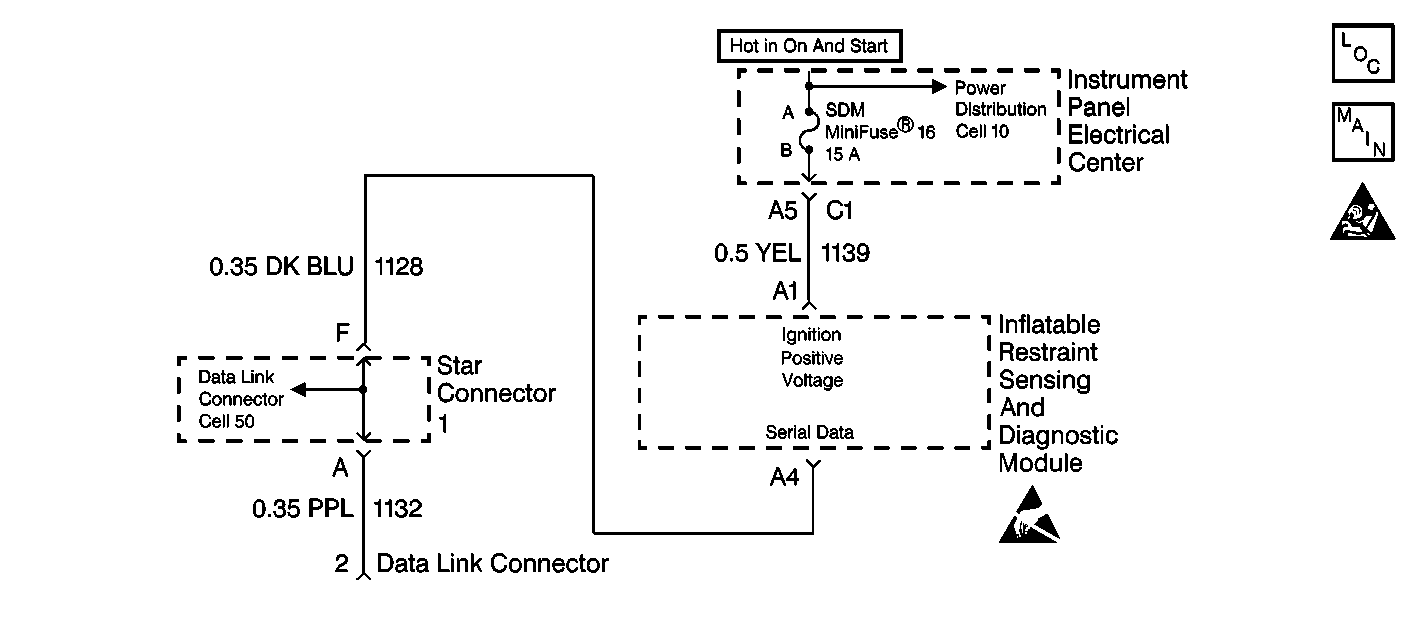
Circuit Description
The data link connector (DLC) is the provision for communicating with the inflatable restraint sensing and diagnostic module (SDM) and other Class 2 modules that are on the same data line. The DLC is located under the LH side of the instrument panel. The DLC supplies B+ and ground to the scan tool. The scan tool communicates with the SDM and other Class 2 modules that are on the data line.The scan tool is connected to the DLC in order to perform the following functions:
| • | Read the data list |
| • | Read diagnostic trouble codes (DTCs) |
| • | Clear DTCs |
Diagnostic Aids
The loss of serial data communication between the SDM and the instrument cluster will cause the AIR BAG warning lamp to stay ON. Refer to Diagnostic System Check - Data Link Communications in Data Link Communications.
Test Description
-
This test checks for proper operation of the scan tool.
-
This test checks for scan tool communication with the PCM.
-
This test checks for a blown SDM Fuse.
-
This test determines whether there is a short to ground in CKT 1139 or if the SDM is malfunctioning.
-
This test checks for an open or high resistance condition in CKT 1139.
-
This test determines whether there is an open or high resistance in CKT 1128 or if the SDM is malfunctioning.
Step | Action | Value(s) | Yes | No |
|---|---|---|---|---|
1 | Was the SIR Diagnostic System Check performed? | -- | ||
Does the scan tool power-up? | -- | Go to Scan Tool Inoperative in Data Link Communications | ||
Attempt to establish communication with the powertrain control module (PCM). Can the scan tool communicate with the PCM? | -- | Go to Scan Tool Does Not Communicate with Components in Data Link Communications | ||
Is the SDM Fuse good? | -- | |||
5 |
Is the SDM Fuse good? | -- | ||
Is the resistance reading less than the specified value? | OL | |||
7 |
Is the repair complete? | -- | -- | |
8 |
Is the repair complete? | -- | -- | |
Is the resistance reading within the specified value? | 0-2 ohms | |||
10 |
Is the repair complete? | -- | -- | |
Is the resistance reading within the specified value? | 0-5 ohms | |||
12 |
Is the repair complete? | -- | -- | |
13 | Replace the inflatable restraint sensing and diagnostic module (SDM). Refer to Inflatable Restraint Sensing and Diagnostic Module Replacement . Is the repair complete? | -- | -- | |
14 | Reconnect all the SIR system components, make sure all the components are properly mounted. Have all the SIR components been reconnected and properly mounted? | -- | -- |
