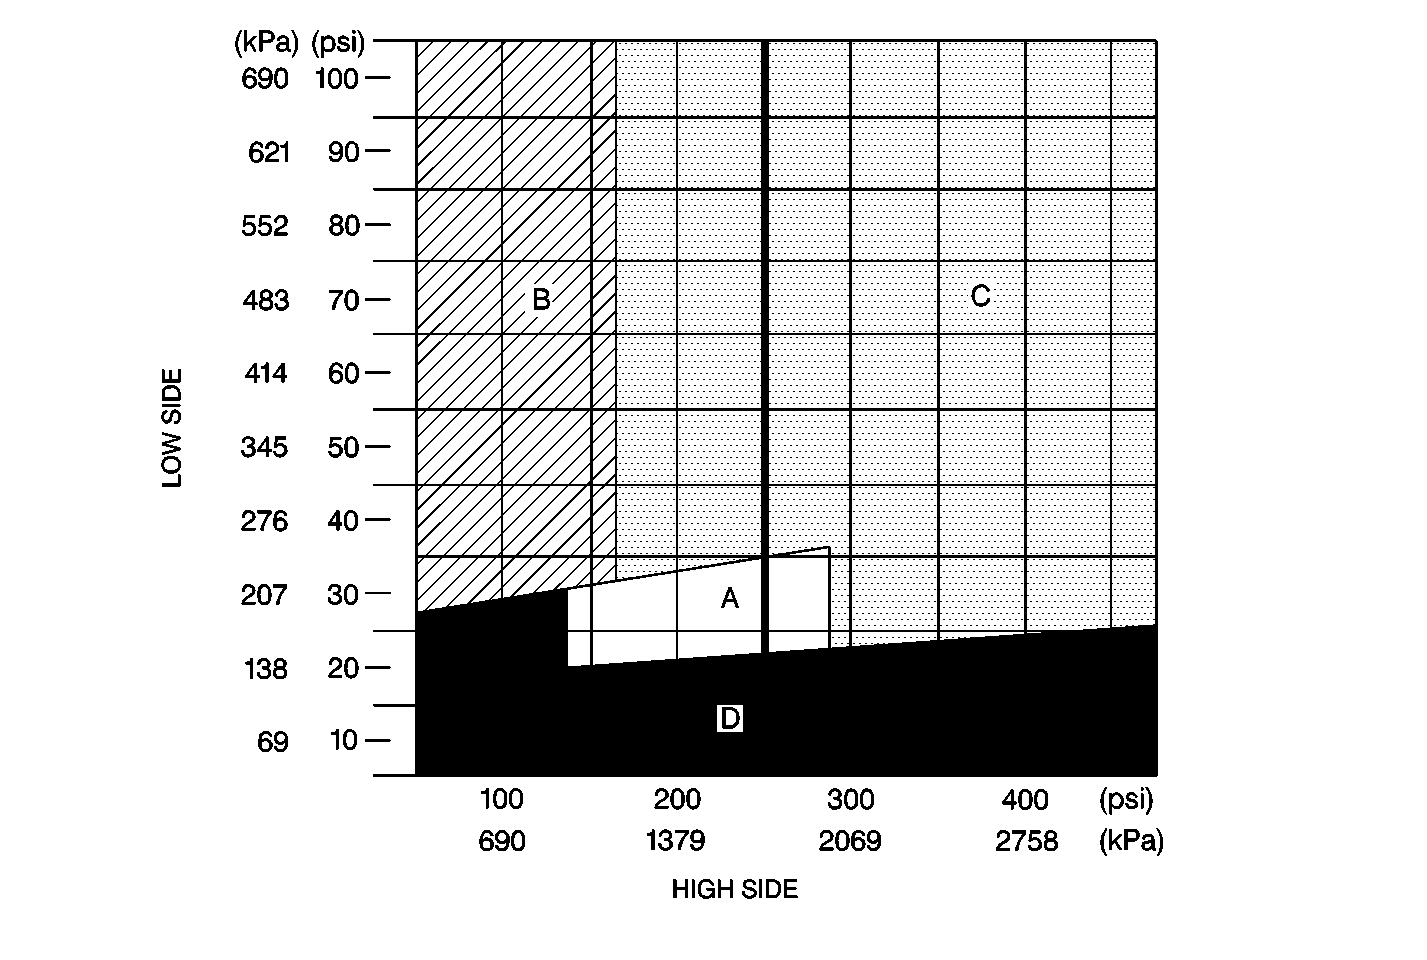
Step
| Action
| Value(s)
| Yes
| No
|
1
| Were you sent here from the Cooling Insufficient, A/C System
diagnostic table?
| --
|
Go to Step 2
| Go to
Cooling Insufficient - Air Conditioning (A/C) System
|
2
| During continued operation of the A/C system, does the compressor clutch
disengage and re-engage with no abnormal change to the low and high side
pressure readings?
| --
|
Go to Step 3
|
Go to Step 4
|
3
|
- Check for an intermittent in the clutch coil and/or the clutch
coil circuit. Refer to
HVAC Compressor Clutch Does Not Engage
.
- If replacement of the clutch coil is necessary, recover the refrigerant
Refer to Refrigerant Recovery and Recharging
.
- Replace the clutch coil and/or repair the clutch coil circuit.
For clutch coil replacement, refer to Compressor Clutch Coil Removal (V7 - Direct Mount)
.
Is the repair complete?
| --
|
Go to Step 12
| --
|
4
| Did the customer concern mention that the A/C system output temperatures
are good at first, but then turn warm during extended drives?
| --
|
Go to Step 5
|
Go to Step
7
|
5
| The
engine still running with a speed of 1000 RPM.
During extended operation of the A/C system, does the low side (and
possibly the high side) pressure increase significantly (possibly accompanied
by heavy frost on the liquid line between the orifice and the evaporator)?
| --
| Go to
Cooling Insufficient - Air Conditioning (A/C) System - Pressure Zone B
|
Go to Step 6
|
6
| Take the vehicle on a test drive under the same conditions as the customer,
to verify the concern.
Has the concern been verified?
| --
| Go to
Cooling Insufficient - Air Conditioning (A/C) System - Pressure Zone B
|
Go to Step 11
|
7
| Compare the low and high side pressures to those listed
in the A/C System Performance Table. Refer to System Performance Test
.
Is the high side pressure slightly above normal pressure?
| --
|
Go to Step 8
|
Go to Step
9
|
8
|
- The refrigerant system oil charge level may be too high.
- Evacuate the refrigerant system Refer to Refrigerant Recovery and Recharging
.
- Check the amount of refrigerant oil removed from the system.
- Charge the refrigerant system to specifications Refer toRefrigerant Recovery and Recharging
,
using care to maintain the proper oil level.
- Leak test the refrigerant system. Refer to Leak Testing
.
Are the operations completed?
| --
|
Go to Step 10
| --
|
9
|
- The refrigerant system may contain too much moisture.
- Evacuate the refrigerant system.
- Charge the refrigerant system to specifications Refer to Refrigerant Recovery and Recharging
.
- Leak test the refrigerant system.
Refer to Leak Testing
.
- If no leaks are found, replace the accumulator. Refer to Accumulator Replacement
.
Are the operations completed?
| --
|
Go to Step 10
| --
|
10
| Compare the outlet temperature to those listed in the A/C System Performance
Table. Refer to System Performance Test
.
Is the outlet temperature within specifications?
| --
| Go to
HVAC System Check
| Go to
Air Temperature Control Inoperative
|
11
|
- Start the engine and allow the engine to idle.
- An accurate thermometer still installed to the I/P center air
outlet.
- Set the HVAC control head to the following positions:
| • | Temperature control to full cold |
| • | Mode control button to UPPER (I/P outlets) |
| • | Blower speed to maximum high |
- Elevate and maintain the engine speed at 1000 RPM.
- Allow the low and high side pressure readings to stabilize, if
necessary.
(Stabilization usually requires 2-3 minutes.)
- Record the low and high side pressure readings and the delivered
air output temperature.
- Compare the low and high side pressures and the output temperatures
to those listed in the A/C System Performance Table.
Refer to System Performance Test
.
Are both the low and high side pressures as well as the output temperatures
within specifications?
| --
| System OK
| --
|
12
|
- Evacuate and charge the refrigerant system Refer to Refrigerant Recovery and Recharging
.
- Leak test the refrigerant system.
Refer to Leak Testing
.
Are the operations completed?
| --
|
Go to Step 13
| --
|
13
|
- Start the engine and allow the engine to idle.
- An accurate thermometer still installed to the I/P center air
outlet.
- Set the HVAC control head to the following positions:
| • | Temperature control to full cold |
| • | Mode control button to UPPER (I/P outlets) |
| • | Blower speed to maximum high |
- Elevate and maintain the engine speed at 1000 RPM.
- Allow the low and high side pressure readings to stabilize, if
necessary.
(Stabilization usually requires 2-3 minutes.)
- Record the low and high side pressure readings and the delivered
air output temperature.
- Compare the low and high side pressures and the output temperatures
to those listed in the A/C System Performance Table.
Refer to System Performance Test
.
Are both the low and high side pressures as well as the output temperatures
within specifications?
| --
| Go to
HVAC System Check
| --
|

