Fuel Hose and Pipes Engine Compartment Pipes
Removal Procedure
Tools Required
J 37088-A Tool Set,
Fuel Line Quick-Connect Separator
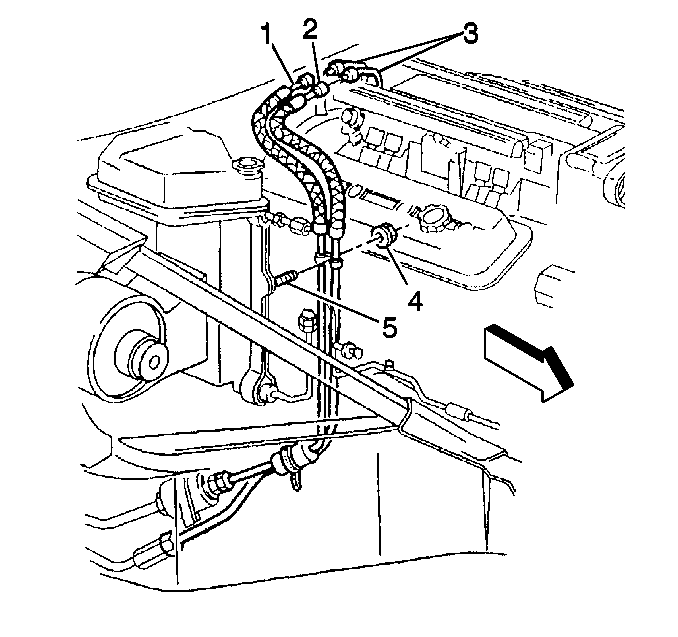
Notice: Do Not repair sections of the engine compartment connecting fuel feed
and return pipe assemblies. Replace the fuel feed and return pipe assemblies
if damaged.
- Disconnect the negative battery cable.
- Relieve the fuel system pressure. Refer to the Fuel Pressure Relief
Procedure.
- Disconnect the quick-connect fittings (1 and 2) at the fuel rail
(3). Refer to Servicing Quick-Connect Fittings.
- Cap the fuel rail pipes (3) in order to prevent possible fuel
system contamination.
- Remove the nut (4) attaching the fuel pipes to the A/C evaporator
and blower module assembly stud (5).
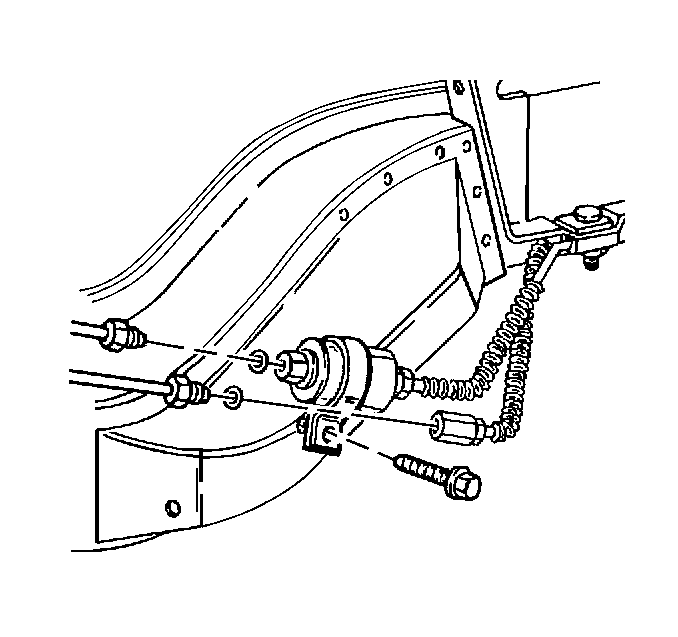
- Raise the vehicle.
- Remove the underbody braces (convertible only).
- Remove the fuel filter bracket attaching screw.
- Remove the first fuel pipe lower mount clip.
- Disconnect the fuel return pipe near the fuel filter.
- Disconnect the fuel feed pipe at the fuel filter inlet.
- Lower the vehicle.
- Remove the engine compartment fuel feed and return pipes with
the fuel filter.
- Remove the fuel filter from the fuel feed pipe.
- Inspect the O-rings for cuts, distortion, or any signs of damage.
Replace the O-rings as required.
- Inspect the connecting hoses for cuts, swelling, cracks, and distortion.
Replace the connecting hoses as required.
- Inspect the fuel pipes for bends, kinks, chafing, and cracks.
Replace the fuel pipes as required.
Installation Procedure

- Install the fuel filter to the fuel feed pipe.
- Install the engine compartment fuel feed and return pipes.
- Raise the vehicle.
- Connect the fuel feed pipe at the fuel filter inlet.
- Connect the fuel return pipe near the fuel filter.
Tighten
Tighten the fuel pipe fittings to 27 N·m (20 lb ft).
- Install the fuel pipe lower mount clip.
- Install the fuel filter bracket attaching screw.
Tighten
Tighten the fuel filter bracket attaching screw to 6 N·m
(53 lb in).
- Install the underbody braces (convertible only).
Tighten
| • | Tighten the underbody brace nuts to 27 N·m (20 lb ft). |
| • | Tighten the underbody brace bolts to 62.5 N·m (46 lb ft). |
- Lower the vehicle.

- Remove the caps from the fuel rail pipes (3).
- Install the quick-connect fittings (1 and 2). Refer to Servicing
Quick-Connect Fittings.
- Install the fuel pipe clip nut (4) at the A/C evaporator and blower
module stud (5).
- Tighten the fuel filler cap.
- Connect the negative battery cable.
- Inspect for leaks.
| 15.1. | Turn the ignition switch ON for 2 seconds. |
| 15.2. | Turn the ignition switch OFF for 10 seconds. |
| 15.3. | Turn the ignition switch ON. |
| 15.4. | Check for fuel leaks. |
Fuel Hose and Pipes Chassis Fuel Pipes
Removal Procedure
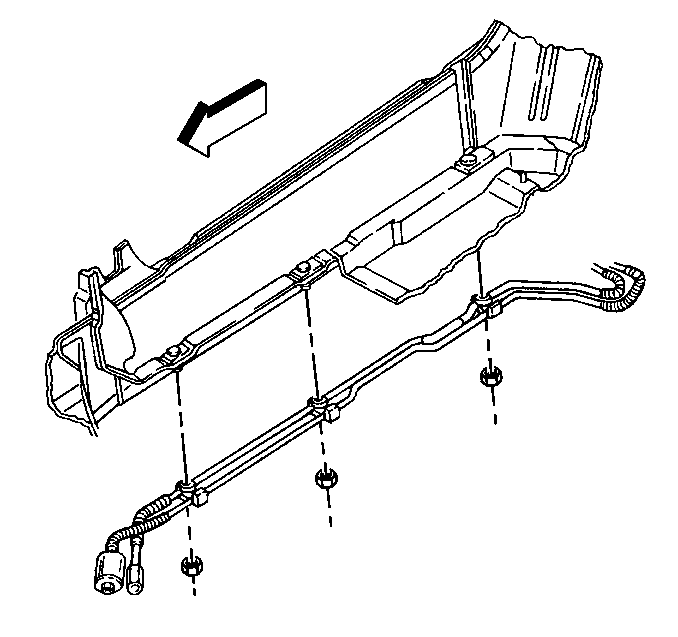
Notice:
| • | Do Not attempt to repair the fuel feed or return pipes. |
| • | Replace the fuel feed and return pipes with original equipment
or parts that meet the GM specifications for those parts. The replacement
pipe must have the same type of fittings as the original pipe in order to
ensure the integrity of the connection. |
| • | Do not use copper or aluminum tubing to replace steel tubing.
Only tubing meeting the 124M specification or its equivalent is capable of
meeting all pressure and vibration characteristics necessary to ensure the
durability standard required. |
| • | When replacing , Replace the fuel feed or fuel return connecting
hoses with original equipment or parts meeting GM specifications. Use only
the reinforced fuel-resistant hose identified with the word Fluoroelastomer
or GM 6163M on the hose. The inside hose diameter must match the outside
pipe diameter. |
- Disconnect the negative battery cable.
- Relieve the fuel system pressure. Refer to the Fuel Pressure Relief
Procedure.
- Remove the fuel tank. Refer to Fuel Tank Replacement.
- Remove the differential carrier and cover.
- Remove the hardware retaining the pipe to be replaced. Note the
location of the attaching hardware for installation.
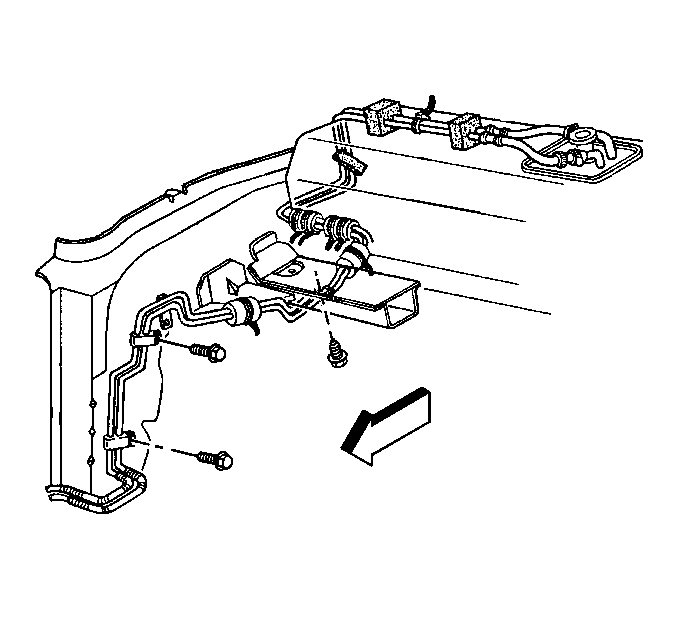
- Remove the connecting hose and clamps, the fuel pipe fitting, and the fuel
feed or return pipe.
- Inspect the O-rings for cuts, distortion, or any signs of damage.
Replace the O-rings as required.
- Inspect the connecting hoses for cuts, swelling, cracks, and distortion.
Replace the hoses as required.
- Inspect the pipes for bends, kinks, chafing, and cracks. Replace
the pipes as required.
Installation Procedure

Notice:
| • | Secure the fuel pipes to the frame in order to prevent chafing.
Maintain a minimum of 13 mm (½ inch) clearance around
a pipe in order to prevent contact and chafing. Maintain a minimum of 19 mm
(¾ inch) around any moving part. |
| • | Do not allow the fuel pipes to come into contact with the fuel
tank or underbody. |
Important:
| • | Follow the same routing as the original pipe(s). |
| • | Secure the hoses and pipes in order to prevent chafing. |
- Install the fuel feed or fuel return pipe, the fuel pipe fitting, and
the connecting hose and clamps.
Tighten
Tighten the fuel pipe fitting to 27 N·m (20 lb ft).

- Install the hardware retaining the pipe.
- Install the differential carrier and cover.
- Install the fuel tank. Refer to Fuel Tank Replacement.
- Refill the fuel tank.
- Tighten the fuel filler cap.
- Connect the negative battery cable.
- Inspect for leaks.
| 8.1. | Turn the ignition switch ON for 2 seconds. |
| 8.2. | Turn the ignition switch OFF for 10 seconds. |
| 8.3. | Turn the ignition switch ON. |
| 8.4. | Check for fuel leaks. |
Fuel Hose and Pipes EVAP Pipes
Removal Procedure
Notice: Replace the EVAP pipes and hoses with the original equipment or parts
that meet the GM specifications for those parts. The replacement EVAP pipe
must have the same type of fittings as the original pipe in order to ensure
the integrity of the connection. When replacing EVAP hoses, use only reinforced
fuel-resistant hose identified with the word Fluoroelastomer or GM 6163-M
on the hose. The inside hose diameter must match the outside pipe diameter.
Do not use rubber hose within 100 mm (4 in) of any part of the
exhaust system or within 254 mm (10 in) of the catalytic converter.
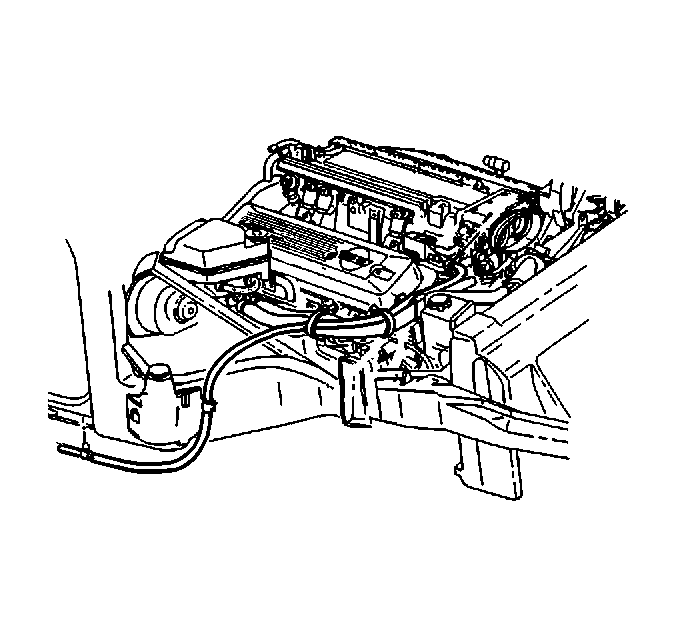
- Remove the splash shield to access the EVAP canister.
- Remove the hardware retaining the section of pipe
to be replaced.
- Remove the pipe or hose.
- Inspect the hoses for cuts, swelling, cracks, and distortion.
Replace the hoses as required.
- Inspect the pipes for bends, kinks, and cracks. Repair or replace
the sections of pipes as required.
| • | In the repairable areas, cut a piece of hose 100 mm (4 in)
longer than the portion of the pipe removed. |
| • | If you remove more than a 152 mm (6 in) length of
pipe, use a combination of steel pipe and hose. |
| • | The total hose length, including the 100 mm (4 in)
of additional length, should not be more than 254 mm (10 in)
in length. |
Installation Procedure

Important:
| • | Follow the same routing as the original hoses and pipes. |
| • | Secure the hoses and pipes in order to prevent chafing. |
- Install the section of pipe and/or hoses.
- Install the hardware retaining the section of pipe and/or hoses.
- Install the splash shield if it was necessary to access the EVAP
canister.


