CAMPAIGN:OVERDRIVE SWITCH REPLACE INOP WIRED SWITCH

1986 Corvette Models equipped with MK2 Manual Transmission
DEFECT INVOLVED:
General Motors has determined some early 1986 Chevrolet corvette Models equipped with MK2 manual transmission may have been assembled with an imprbperly wired overdrive switch.
This condition results in the vehicles defaulting to non-overdrive mode upon restart. All other functions relating to the overdrive feature, including driver initiated overdrive activation, perform as intended.
To prevent this condition from occurring, a new overdrive switch will be installed.
VEHICLES INVOLVED:
Involved are certain early 1986 Chevrolet Corvette Models equipped with RPO MK2 manual transmission within the following vehicle parameters:
PLANT FROM THROUGH ----- ---- ------- Bowling Green G5100002 G5106310
All affected vehicles have been identified by the VIN listing provided to involved Dealers with this bulletin. Any Dealer not receiving a listing was not shipped any of the affected vehicles.
DEALER CAMPAIGN RESPONSIBILITY:
Dealers are to service all vehicles subject to this campaign at no charge to owners, regardless of mileage, age of vehicle, or ownership, from this time forward.
Whenever a vehicle subject to this campaign is taken into your new or used vehicle inventory, or it is in your Dealership for service in the future, you should take the steps necessary to be sure the campaign correction has been made before reselling or releasing the vehicle.
Owners of vehicles recently sold from your new vehicle inventory are to be contacted by the Dealer, and arrangements made to make the required modification according to instructions contained in this bulletin.
CAMPAIGN PROCEDURE:
Refer to Section 4 of the Service Policies and Procedures Manual for the detailed procedure on handling Product Campaigns.' Dealers are requested to complete the campaign on all transfers as soon as possible.
OWNER NOTIFICATION:
All owners of record at the time of campaign release are shown on the attached computer listing and have been notified by first class mail from General Motors. The listings provided are for campaign activity only and should not be used for any other purpose.
PARTS INFORMATION:
Parts required to complete this modification should be ordered through regular channels.
PART QUANTITY NUMBER PER VEHICLE DESCRIPTION ------ ----------- ----------- 14087693 1 Overdrive Switch
PARTS SHOULD BE ORDERED ONLY WHEN DEALERS HAVE INVOLVED VEHICLES CURRENTLY ASSIGNED PER ATTACHED VEHICLE IDENTIFICATION NUMBER COMPUTER LISTINGS.
PARTS AND LABOUR CLAIM INFORMATION:
Credit for the campaign work performed will be paid upon receipt of a properly completed campaign claim card or RAPID terminal transmission in accordance with the following:
Repair Code Operation Time Allowance ----------- --------- --------------- 2A Replace Manual Trans. .8 Overdirve Switch
Time allowance includes 0.1 hour for Dealer administrative detail associated with this campaign. Parts credit will be based on Dealer net plus 30% to cover parts handling.
SERVICE PROCEDURE:
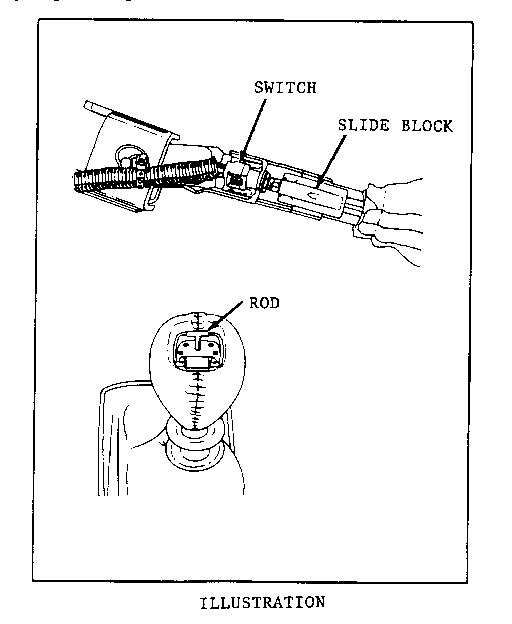
OVERDRIVE SWITCH
Removal
1. Disconnect negative cable at battery.
2. Remove the screws retaining trim plate for the instrument cluster. Remove the knob for the headlamp switch, lever for tilt steering column and then the trim plate.
3. Remove the screws retaining I.P. accessory trim plate and then remove the trim plate.
4. Remove the screws retaining console trim plate. Pull trim plate back and disconnect electrical lead for cigarette lighter. Remove screws retaining shift boot to trim plate, then remove trim plate.
5. Remove the O/D switch button from the shifter knob. Use care when prying button from the knob to prevent damaging the knob or button.
6. Remove the rod for the O/D switch from the shifter. Count the number of turns required to remove the rod.
7. Loosen the nut retaining the switch to the shifter and remove the switch and slide block from the shifter.
Care must be taken to prevent the loss of the return spring located in the slide block.
8. Disconnect the electrical lead for the switch.
9. Remove the pin retaining the switch to the slide block.
Installation
1. Position the switch to the slide block and install retaining pin.
2. Compress the return spring in the slide block using a small screwdriver, then position the switch and block on the shifter.
3. Tighten the switch retaining nut.
4. Install the O/D switch rod in the shifter. Screw the rod into the slide block the same amount of turns it took to remove. Install the switch button. The button should be flush with the top of the shift knob. I fit is not, remove the button and turn the rod in or out to make it flush.
5. Connect electrical lead for the switch.
6. Position the console trim plate to the shifter boot and install retaining screws.
7. Connect the electrical lead for the cigarette lighter.
8. Position the console trim plate and install the retaining screws.
9. Position the I.P. accessory trim plate and install the retaining screws.
10. Position the instrument cluster trim plate and install the retaining screws. Install the knob for the headlamp switch and the lever for the tilt steering column.
11. Connect negative cable at battery.
12. Install Campaign completion label.
INSTALLATION OF CAMPAIGN IDENTIFICATION LABEL
Clean surface of radiator upper mounting panel and apply a Campaign Identification Label. Make sure the correct campaign number is inserted on the label. This will indicate that the campaign has been completed.
General Motors bulletins are intended for use by professional technicians, not a "do-it-yourselfer". They are written to inform those technicians of conditions that may occur on some vehicles, or to provide information that could assist in the proper service of a vehicle. Properly trained technicians have the equipment, tools, safety instructions and know-how to do a job properly and safely. If a condition is described, do not assume that the bulletin applies to your vehicle, or that your vehicle will have that condition. See a General Motors dealer servicing your brand of General Motors vehicle for information on whether your vehicle may benefit from the information.
