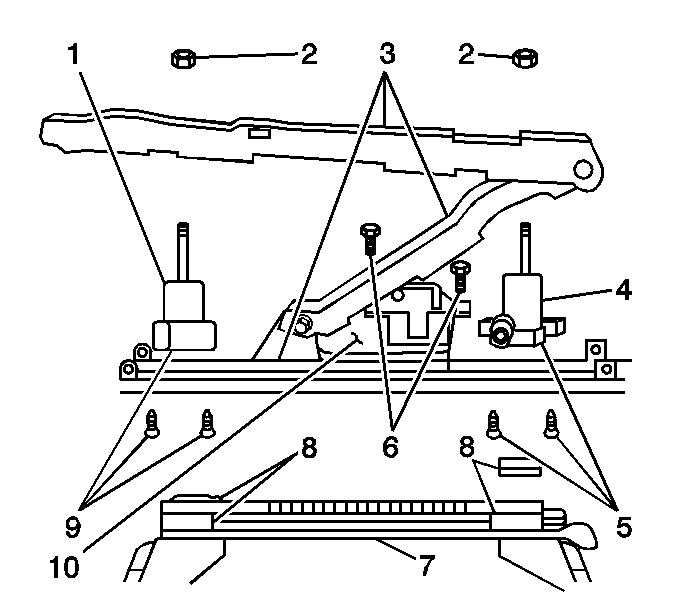
Removal Procedure
- Remove the front seat adjusters as an assembly from the seat cushion frame. Refer to Front Seat Adjuster Replacement .
- Place a protective barrier inside the vehicle.
- Squeeze the oblong connector for the vertical drive cables.
- Disconnect the drive cable from the actuator (1,4).
- To remove the vertical actuators bolts (5,9), perform the following steps:
- If the actuator (4) is located next to the motor you will have to remove the motor support bracket assembly. Refer to Front Seat Adjuster Motor Replacement .
- Remove the actuator jack nuts (2) from the top of the upper channel (3).
- Remove the vertical actuators (1,4) from the upper channel (3).
Important: Place the front seat in the highest vertical position. Remove the seat adjusters as an assembly, and remove the power seat switch. You will need to reposition the seat adjuster to gain access to the vertical actuator bolts. The vertical actuator bolts are located between the lower seat track and the upper channel on the adjuster.

| 5.1. | Place the adjuster assembly onto the protective barrier inside the vehicle. |
| 5.2. | Connect the power supply to the adjuster assembly. |
| 5.3. | Using the power seat switch, place the seat adjuster in the full forward position. |
Remove the rear actuator bolts (9).
| 5.4. | Using the power seat switch, place the seat adjuster in the full rearward position. |
Remove the front actuator bolts (5).
Installation Procedure
- Install the vertical actuator (1,4) to the upper channel (3).
- Install the vertical actuator jack nut (2) to the upper channel (3).
- Install the motor support bracket, if previously removed. Refer to Front Seat Adjuster Motor Replacement
- To install the vertical actuators bolts (5,9), perform the following steps:
- Connect the drive cable to the actuator (1,4).
- Push the connector for the drive cables into the actuators until you hear an audible click.
- Remove the protective barrier from inside the vehicle.
- Install the front seat adjusters as an assembly to the seat cushion frame. Refer to Front Seat Adjuster Replacement .
- Verify that the adjusters are in phase. Refer to Seat Adjuster Phase Adjustment .

Notice: Use the correct fastener in the correct location. Replacement fasteners must be the correct part number for that application. Fasteners requiring replacement or fasteners requiring the use of thread locking compound or sealant are identified in the service procedure. Do not use paints, lubricants, or corrosion inhibitors on fasteners or fastener joint surfaces unless specified. These coatings affect fastener torque and joint clamping force and may damage the fastener. Use the correct tightening sequence and specifications when installing fasteners in order to avoid damage to parts and systems.
Tighten
Tighten the nut to 11 N·m (97 lb in).
| 4.1. | Using the power seat switch place the seat adjuster in the full forward position. |
Install the rear actuator bolts (9).
Tighten
Tighten the bolts to 4 N·m (35 lb in).
| 4.2. | Using the power seat switch place the seat adjuster in the full rearward position. |
Install the front actuator bolts (5).
Tighten
Tighten the bolts to 4 N·m (35 lb in).
| 4.3. | Disconnect the electrical connector for the power seat wire harness. |
| 4.4. | Remove the adjuster assembly from the vehicle. |
