BURNED 2-4 BAND/3-4 CLUTCH SHIFT SLIPPING THM 700-R4

The following diagnosis procedure is for a burned 2-4 band and/or a burned 3-4 clutch. The probable customer comment for these conditions would be: 1) slipping 1-2 shift or no 1-2 shift and/or 2) slipping 2-3 shift or no 2-3 shift. This procedure is a general guide and you will need to refer to your service manual for additional information if questions arise.
SERVICE PROCEDURE
1. Verfiy the condition as follows:
a) Check and correct the oil level.
b) Check the T.V. cable for sticking or binding. Adjust the T.V. cable.
c) Road test the vehicle at normal operating temperature and check oil pressure.
2. For conditions of high or low oil pressure, refer to the service manual for proper diagnosis.
3. As a diagnosis aid, you can check the oil pressure differential between line pressure and the second, third or fourth clutch. If the pressure differential between line and any of these clutch circuits is more than 10 psi (assuming your oil pressure gages are accurate) there is a possible oil leak in that clutch oil circuit.
I. DIAGNOSIS PROCEDURE FOR A SLIPPING 1-2 OR NO 1-2 SHIFT
Step 1
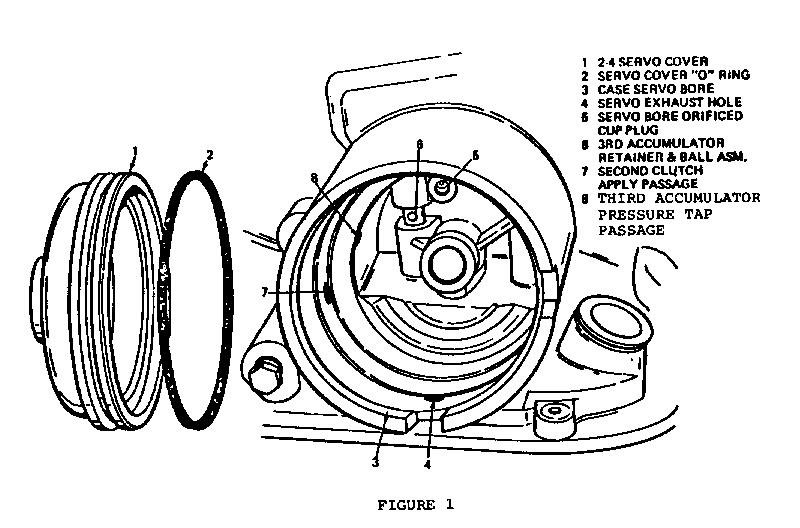
After verifying the condition, remove and disassemble the 2-4 servo cover and piston assembly. Check the following:
a) Proper servo pin length.
b) Damaged or worn seals. Replace if necessary.
c) Porosity, nicks, burrs, sharp edges, or ring groove damage in the pistons, cover, servo pin, or servo bore.
d) Blocked servo exhaust hole. See Figure 1.
e) Blocked or missing orifice cup plug in the case servo bore.
Step 2
Reassemble and install the 2-4 servo piston and cover.
Step 3
Remove and inspect the governor assembly and cover.
a) Governor assembly - damaged gear teeth, scored sleeve, stuck or sticking valve, missing springs, and sticking or damaged weights.
b) Case governor bore - scoring, damage, or governor support pin off location, loose or missing.
Step 4
Install the governor assembly and cover.
Step 5
Road test the vehicle. If the vehicle operates satisfactory - stop here, if not, continue.
Step 6
Remove the oil pan and oil filter.
a) Remove the 1-2 accumulator cover and pin assembly, 1-2 accumulator spring and the 1-2 accumulator piston. Inspect for porosity, nicks, damaged ring grooves, cut seals or broken spring.
b) Remove the solenoid and "O" ring assembly.
c) Remove the T.V. lever and bracket assembly. Inspect both the T.V. cable and the T.V. lever and bracket assembly for sticking or binding.
d) Remove the valve body assembly and check the following valves for freeness: T.V. limit valve, accumulator valve, line bias valve, throttle valve, 3-4 relay valve, 1-2 shift valve, 1-2 T.V. valve, modulated T.V. up valve, modulated T.V. down valve. Disassemble and clean the valve body assembly or replace as necessary.
e) Remove the oil passage cover plate, the spacer plate and gaskets and the checkballs.
f) Inspect both the case and the valve body faces for nicks, damage or out of flat faces.
g) Be certain the band anchor plug is installed.
h) Check the oil filter for small cracks, plugged screen, flash plugging filter neck or cut "O" ring.
i) Check for plugged governor filters.
j) Reassemble the transmission. Be certain all check-balls are properly installed and bolt torques are correct.
Step 7
Road test the vehicle. If the condition is corrected, stop here, if not, continue.
Step 8
Following the service manual procedure, remove the transmission from the vehicle, disassemble and inspect. Pay careful attention to the following items:
a) Inspect the oil pump assembly for stuck or sticking pressure regulator valve, loose, mislocated or missing stator shaft sleeve and scored or damaged bearing journals.
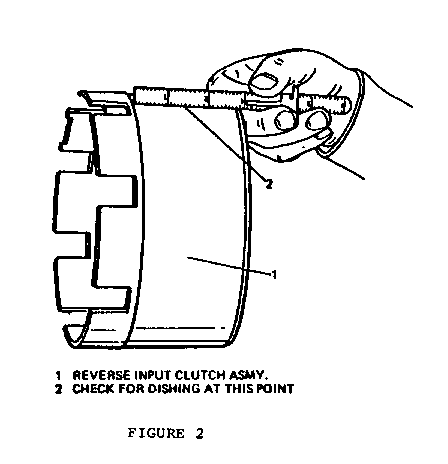
b) Inspect the reverse input housing for scored or damaged bushings. Also, check the clutch housing outer diameter for scoring, damage or dishing. See Figure 2.
c) Inspect the turbine shaft seal rings for cuts, nicks or damage. Make sure the rings are free in the ring grooves.
d) Check the lip seals on the forward, overrun and 3-4 clutch pistons for cuts or damage.
e) Check the forward clutch "O" ring seal on the input housing hub for cuts, nicks or damage.
f) Check the forward, overrun and 3-4 clutch piston for porosity or damage.
g) Inspect the forward, overrun and 3-4 clutch check-balls for sticking or leaking conditions.
h) Inspect the reaction sun gear shell and reaction sun gear for damaged tangs, stripped splines, broken hub, or scored bushings.
i) Inspect the reaction carrier for damaged pinion teeth.
j) Inspect the 2-4 band assembly for wear or damage.
Step 9
Reassemble the transmission refer to your service manual Replace any worn or damaged parts as necessary. Recheck the 2-4 servo pin length and be certain clutch pack and transmission end plays are correct.
Step 10
Install the transmission into the vehicle and road test.
II. FOR A CONDITION OF SLIPPING 2-3 OR NO 2-3 SHIFT OR A COMBINATION OF THAT AND THE CONDITION DIAGNOSED IN SECTION I, FOLLOW THE DIAGNOSIS PROCEDURE IN SECTION I EXCEPT AS FOLLOWS:
Step 1
During Step 6, also check the following:
a) Check the valve body assembly to be certain the following valves are free: 3-2 control valve, 3-4 relay valve, 2-3 shift valve and 2-3 T.V. valve.
b) Check the 3-4 accumulator piston and case bore for porosity, nicks, burrs, damaged ring grooves or cut seal.
Step 2
During Step 8, also check the following:
a) Be certain the three sealing balls are in the turbine shaft and they are not loose.
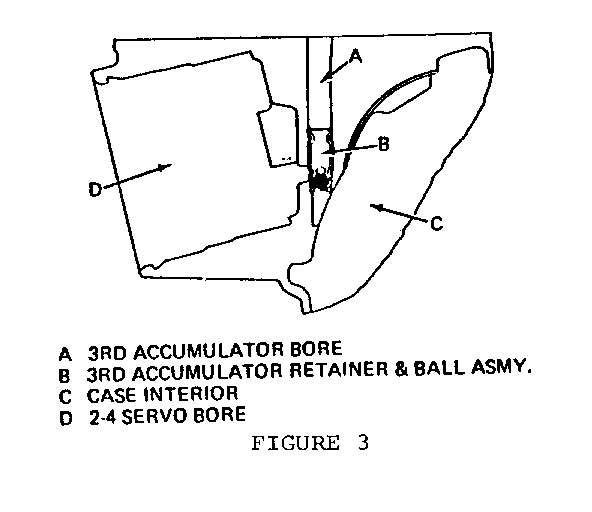
b) If after checking all other possibilities, you find no apparent cause for the condition you are diagnosing, replace both the input housing and shaft assembly and the third accumulator retainer and ball assembly (P/N 8634400). See Figure 3.
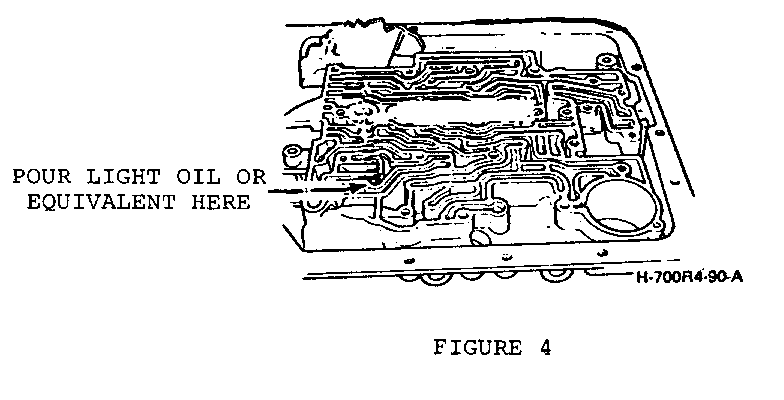
After installing the third accumulator retainer and ball assembly, leak check it as follows:
Install the 2-4 servo piston assembly and cover.
Pour solvent (i.e. light oil or equivalent) into the third accumulator bore at the case oil passages. See Figure 4. Watch inside the case for leakage.
Step 3
Reassemble the transmission. Replace any work or damaged parts as necessary. Recheck the 2-4 servo pin length and be certain the clutch pack and transmission end plays are correct.
Step 4
Install the transmission into the vehicle and road test. Refer to your service manual for installation procedures.


General Motors bulletins are intended for use by professional technicians, not a "do-it-yourselfer". They are written to inform those technicians of conditions that may occur on some vehicles, or to provide information that could assist in the proper service of a vehicle. Properly trained technicians have the equipment, tools, safety instructions and know-how to do a job properly and safely. If a condition is described, do not assume that the bulletin applies to your vehicle, or that your vehicle will have that condition. See a General Motors dealer servicing your brand of General Motors vehicle for information on whether your vehicle may benefit from the information.
