Removal Procedure
- Raise and support the vehicle. Refer to Lifting and Jacking the Vehicle in General Information.
- Place a drain pan under the transmission oil pan.
- Remove all of the oil pan bolts except for the rear bolts.
- Loosen the rear oil pan bolts approximately 4 turns.
- Lightly pry down the front of the oil pan and allow the oil to drain.
- Remove the remaining oil pan bolts.
- Remove the oil pan.
- Remove the oil filter.
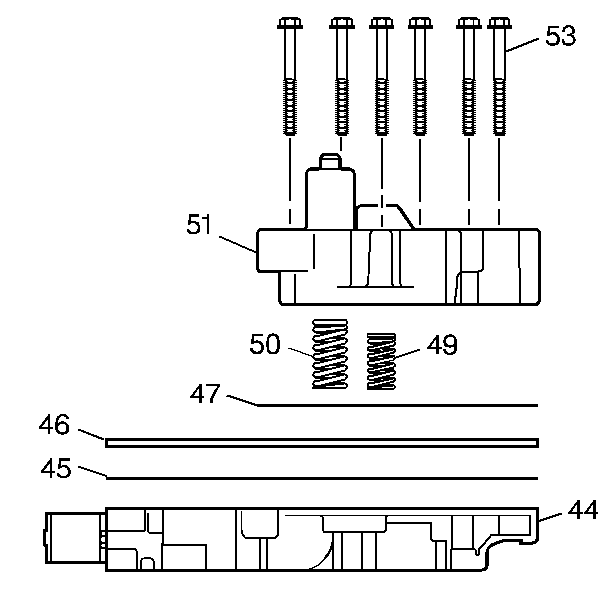
- Remove the 3rd and 4th clutch accumulator housing bolts (53).
- Remove the 3rd and 4th clutch accumulator housing (51).
- Remove the accumulator housing gasket (47). The accumulator housing gasket may be stuck to the spacer plate (46).
- Remove the 3rd clutch accumulator piston spring (50).
- Remove the 4th clutch accumulator piston spring (49).
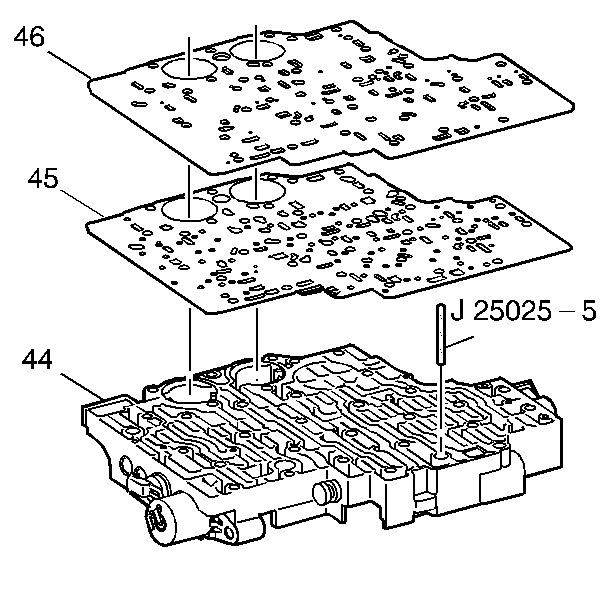
- Remove the control valve body spacer plate (46).
- Remove the control valve assembly to spacer plate gasket (45) from the spacer plate (46).

Installation Procedure
Tools Required
J 25025 Guide Pin
- Install the J 25025 into the control valve body bolt hole where the manual shaft detent roller and spring assembly is mounted.
- Install the control valve body gasket (45).
- Install the control valve body spacer plate (46).
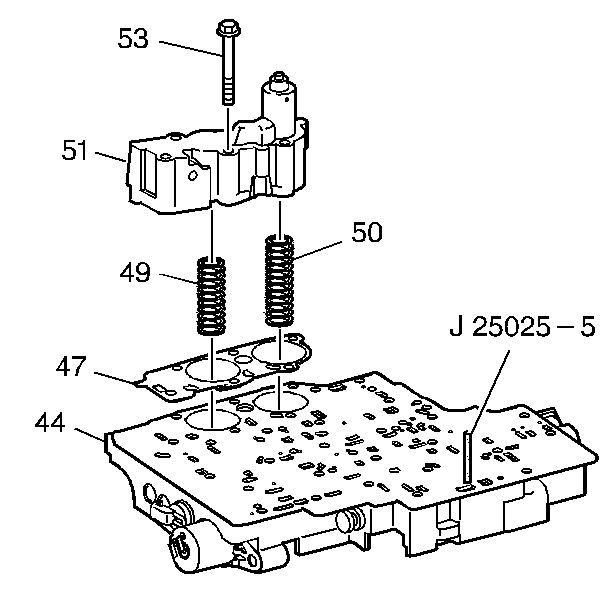
- Install the third and fourth clutch accumulator housing gasket (47).
- Install the third clutch accumulator piston spring (50). This spring is the longer of the two springs.
- Install the fourth clutch accumulator piston spring (49).
- Install the third and fourth clutch accumulator housing assembly (51) onto the control valve body assembly (44).
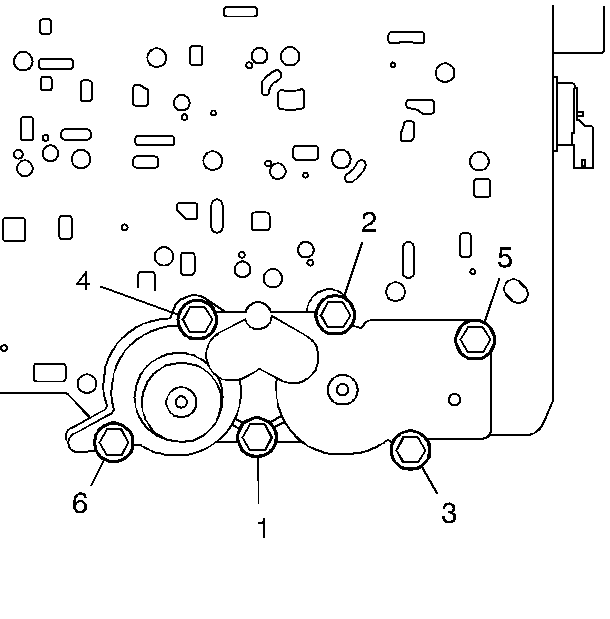
- Install the six accumulator housing bolts (53). Start the bolts finger tight and work towards the opposite end.
- Tighten the accumulator housing bolts sequentially.
- Remove the J 25025 .
- Install the oil filter.
- Install the oil pan gasket to the oil pan.
- Install the oil pan using all seventeen bolts.
- Install Dexron® III Automatic Transmission Fluid. Refer to Approximate Fluid Capacities in maintenance and Lubrication.
- Lower the vehicle.


Notice: Use the correct fastener in the correct location. Replacement fasteners must be the correct part number for that application. Fasteners requiring replacement or fasteners requiring the use of thread locking compound or sealant are identified in the service procedure. Do not use paints, lubricants, or corrosion inhibitors on fasteners or fastener joint surfaces unless specified. These coatings affect fastener torque and joint clamping force and may damage the fastener. Use the correct tightening sequence and specifications when installing fasteners in order to avoid damage to parts and systems.
Tighten
Tighten the accumulator housing bolts sequentially to 11 N·m
(97 lb in).
Notice: Use the correct fastener in the correct location. Replacement fasteners must be the correct part number for that application. Fasteners requiring replacement or fasteners requiring the use of thread locking compound or sealant are identified in the service procedure. Do not use paints, lubricants, or corrosion inhibitors on fasteners or fastener joint surfaces unless specified. These coatings affect fastener torque and joint clamping force and may damage the fastener. Use the correct tightening sequence and specifications when installing fasteners in order to avoid damage to parts and systems.
Tighten
Tighten the oil pan bolts to 24 N·m (18 lb ft).
