FRONT AXLE ENGAGEMENT OR OPERATION

Model and Year 1988 K TRUCK
If the front axle does not engage or disengages while the vehicle is operated in 4 high or 4 low and diagnosis indicates that replacement of the front axle actuator is necessary, use the following parts and instructions:
From start of production through the following VIN breakpoints.
Pontiac Production - JE169688
Fort Wayne Production - JZ224228
Oshawa Production - J1231643
Repair by replacing both the thermal actuator and the fork dampener assembly.
Use: Actuator Assembly P/N 26013495 Fork Damper Assembly P/N 26013507
Production began using the fork damper assembly with the vehicle identification number breakpoints listed above. After these VIN's repair with actuator assembly only.
Actuator Assembly P/N 26013495
The fork damper assembly reduces back pressure and the new actuator is a new part. Used together, these parts increase actuator life.
SERVICE PROCEDURE
Thermal Actuator Replacement
Remove and disconnect
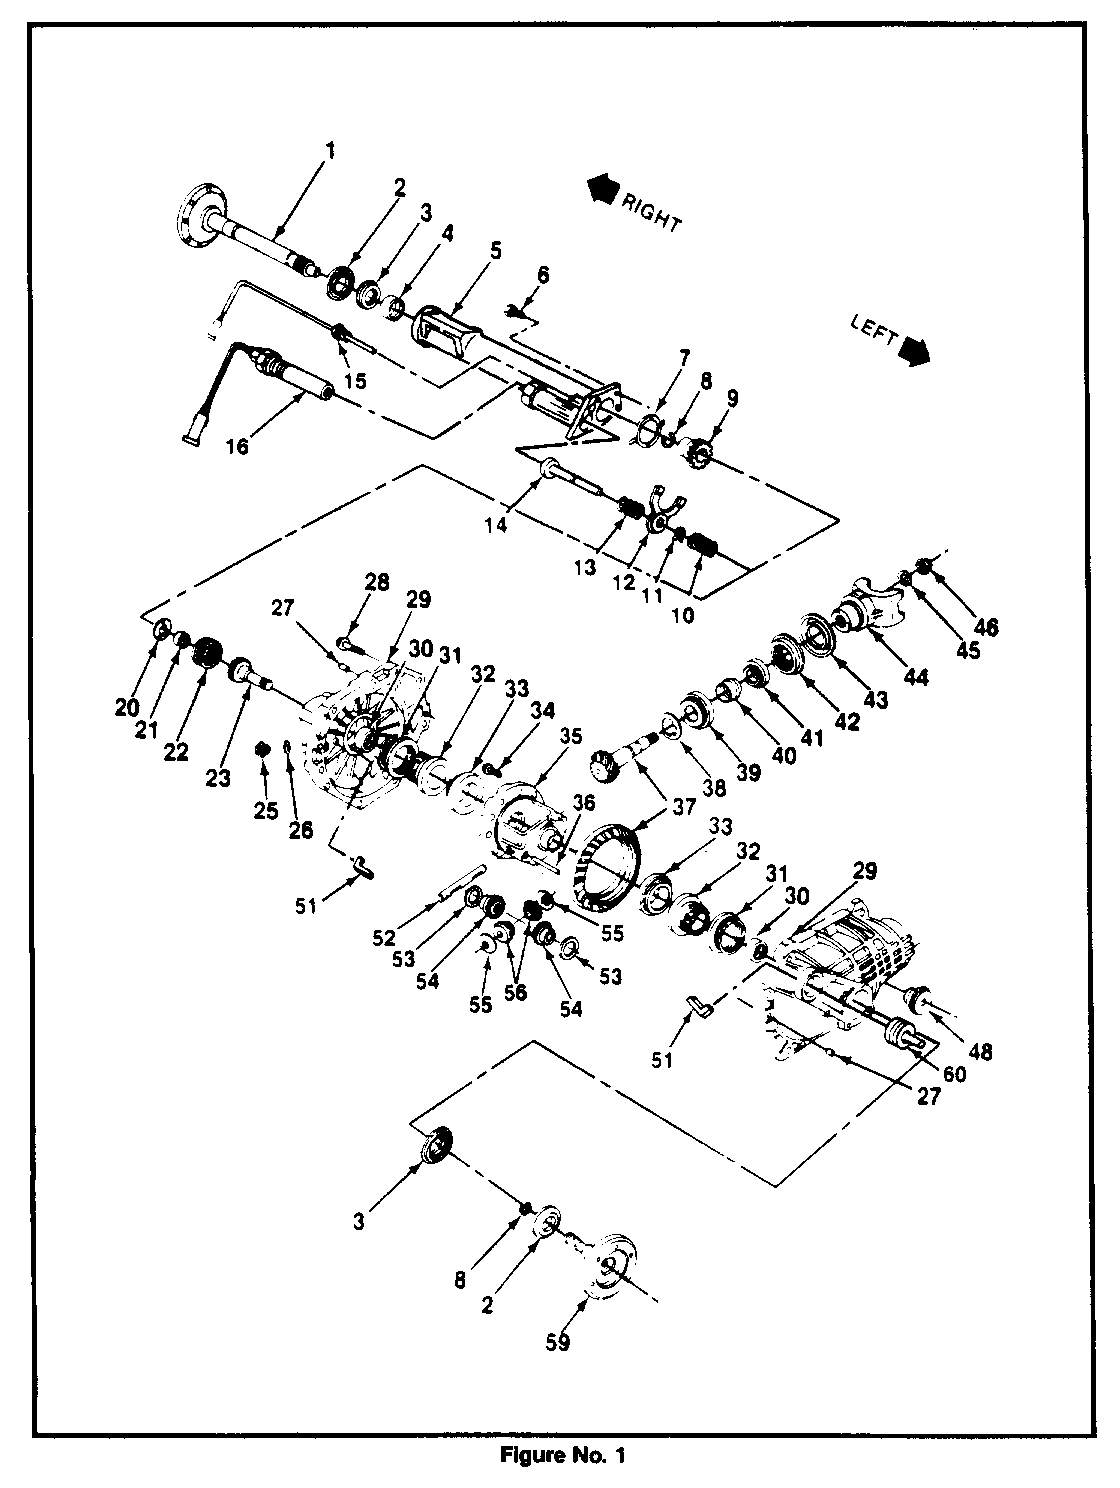
1. Disconnect electrical wire from black junction located on axle tube.
2. Unscrew actuator (Figure 1, item 16).
Install and connect
1. Install replacement actuator (Figure 1, item 16). Tighten to 22 Nm (16 ft lbs).
2. Connect wire to black junction on axle tube.
Fork Damper Assembly Replacement
Raise truck and support using suitable safety stands.
Remove or disconnect
1. Actuator connector. 2. Indicator light connector. 3. Drive axle to tube bolts. 4. Axle mounting nuts. 5. Nut from the idler arm. 6. Nut from pitman arm.
Push the relay rod up and toward the front of the truck. Turn wheel out to loosen the drive shaft from the axle tube. Move axle shaft away from the axle tube and secure out of the way.
7. Stabilizer shaft link, if present. 8. Skid plate, if present. 9. Drain plug from the carrier and drain the axle lubricant. 10. Axle tube to carrier bolts. 11. Axle tube from carrier. Take care to keep the open end of the tube up. 12. Shift lever and fork. (Spring #13 in Figure 1 and clip #11 will not be in existing tube and are part of new fork damper assembly).
Install or connect
1. Shift lever, fork, spring and clip assembly into carrier case (Assembly part number 26013507). Install spring (#lo in Figure 1) on shift lever. Clean mating surfaces of the axle tube and carrier assembly. Remove all oil and grease. Use carburetor cleaner or equivalent. Apply a bead of sealer (GM P/N 1052942, Loctite 518, or equivalent) to the tube sealing surface. 2. Axle tube to carrier. 3. Axle tube to carrier bolts and tighten to 40 Nm (30 ft lbs). 4. Drive shaft to axle shaft. 5. Drive shaft to axle shaft bolts and tighten to 80 Nm (59 ft lbs). 6. Axle mounting nuts with washers. Tighten to 80 Nm (59 ft lbs). 7. Relay rod to idler arm and pitman arm. 8. Idler arm washer and nut. 9. Pitman arm washer and nut. Tighten pitman arm and idler arm nuts to 54 Nm (40 ft lbs). 10. Stabilizer shaft link, if present. 11. Actuator connector. 12. Indicator connector. 13. Drain plug and the washer. Tighten plug to 32 Nm (24 ft lbs). 14. New lubricant. Refer to "Specifications" 1988 C/K Pick-Up Truck Service Manual ST375-88. 15. Filler plug. Tighten plug to 32 Nm (24 ft lbs). 16. Skid plate, if present. 17. Skid plate torx head screws. Tighten screws to 34 Nm (25 ft lbs).
Lower truck.
For warranty replacement of the thermal actuator only use:
Labor Op: F0025 Time: 0.3 Hrs
For warranty replacement of the thermal actuator and shift lever assembly use:
Labor Op: T7525 Time: 1.1 Hrs.
1. Shaft 37. Ring and Pinion 2. Deflector Gears 3. Seal 38. Shim 4. Bearing 39. Bearing 5. Tube 40. Spacer 6. Bolt 41. Bearing 7. Thrust Washer 42. Seal 8. Retaining Ring 43. Deflector 9. Carrier Connector 44. Flange 10. Spring 45. Washer 11. Clip 46. Nut 12. Shift Fork 48. Bushing 13. DamperSpring 51. Lock 14. Shift Shaft 52. Shatt 15. Indicator Switch 53. Thrust Washer 16. Solenoid 20. Shim 54. Side Gear 21. Differential Pilot 55. Thrust Washer Bearing 56. Differential Pinion 22. Sleeve Gear 23. Output Shaft 58. Bolt 25. Plug 59. Shaft 26. Washer 60. Vent Plug 27. Pin 28. Bolt 29. Carrier Case 30. Bearing 31. Insert 32. Sleeve 33. Side Bearing 34. Bolt 35. Differential Case 36. Pin
General Motors bulletins are intended for use by professional technicians, not a "do-it-yourselfer". They are written to inform those technicians of conditions that may occur on some vehicles, or to provide information that could assist in the proper service of a vehicle. Properly trained technicians have the equipment, tools, safety instructions and know-how to do a job properly and safely. If a condition is described, do not assume that the bulletin applies to your vehicle, or that your vehicle will have that condition. See a General Motors dealer servicing your brand of General Motors vehicle for information on whether your vehicle may benefit from the information.
