Door Window Replacement Standard
Removal Procedure
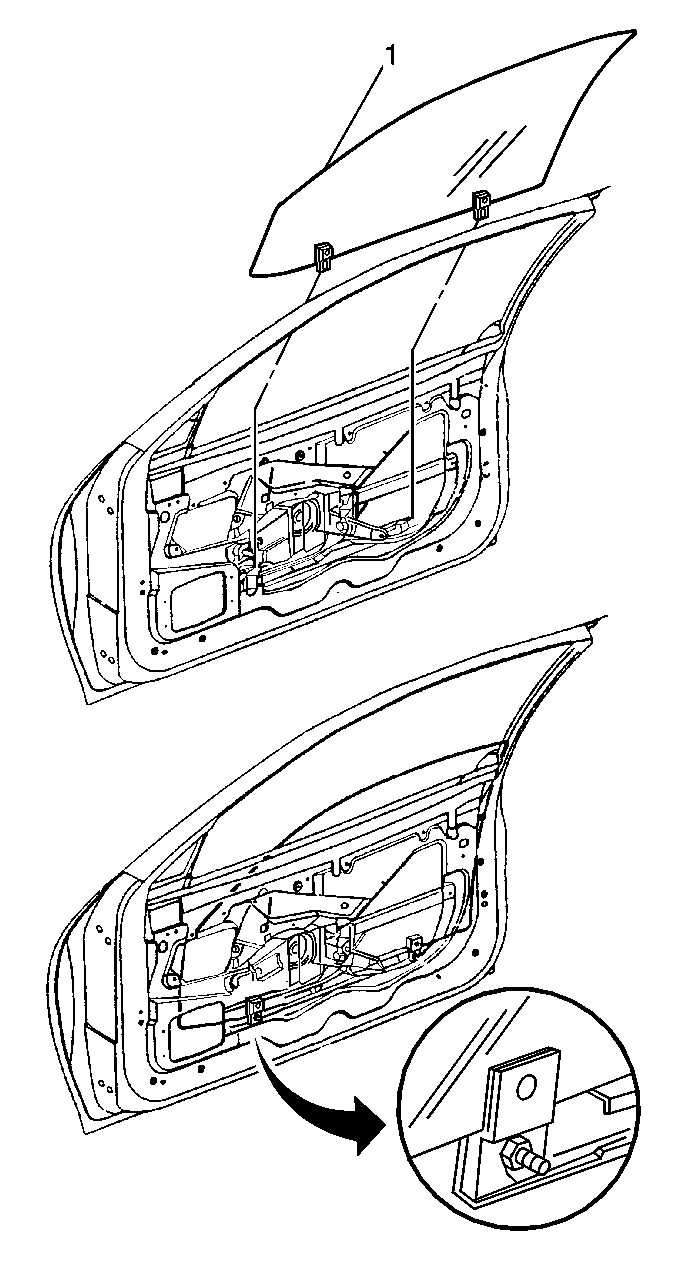
- Move the window assembly to the DOWN position in order to align the window with the access holes.
- Remove the door trim panel. Refer to Door Trim Panel Replacement .
- Remove the water deflector in order to access the window assembly nuts. Refer to Door Water Deflector Replacement .
- Remove the window assembly nuts.
- Remove the energy absorber. Refer to Energy Absorber Pad Replacement .
- Lift the front and the rear of the door window assembly (1).
- Remove the door window assembly (1) from the outside of the door.
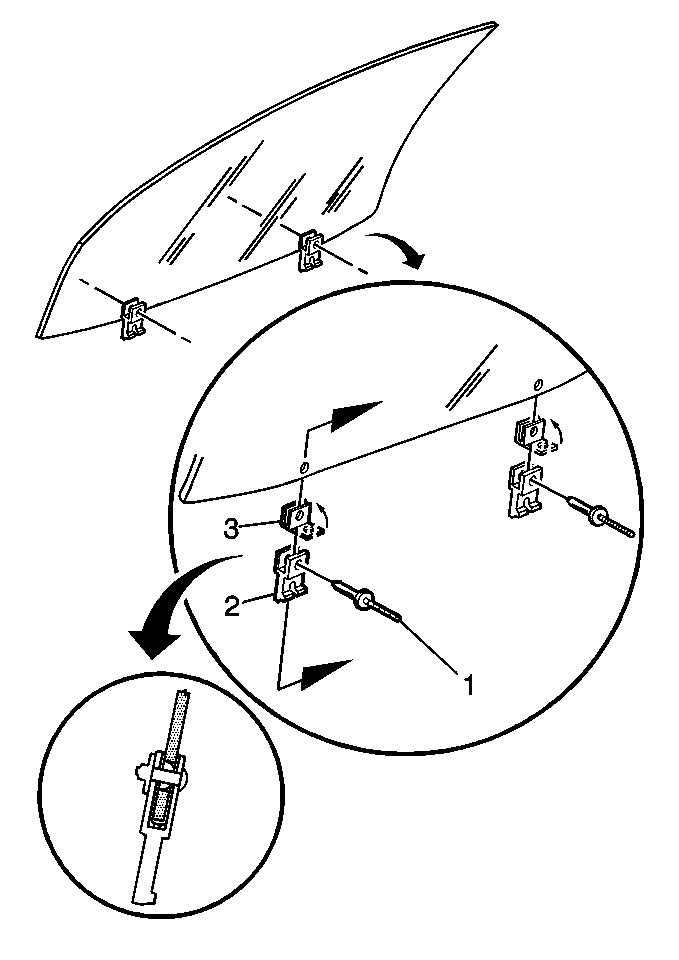
- Remove the sash rivet (1) from the door window assembly.
- Remove the sash (2) from the door window assembly.


Installation Procedure
- Install the sash (2) to the door window assembly.
- Install the sash rivet (1) to the door window assembly.
- Install the door window assembly (1) to the outside of the door.
- Insert the front and the rear of the door window assembly (1).
- Install the window assembly nuts.
- Install the energy absorber. Refer to Energy Absorber Pad Replacement .
- Install the water deflector. Refer to Door Water Deflector Replacement .
- Install the door trim panel. Refer to Door Trim Panel Replacement .


Notice: Use the correct fastener in the correct location. Replacement fasteners must be the correct part number for that application. Fasteners requiring replacement or fasteners requiring the use of thread locking compound or sealant are identified in the service procedure. Do not use paints, lubricants, or corrosion inhibitors on fasteners or fastener joint surfaces unless specified. These coatings affect fastener torque and joint clamping force and may damage the fastener. Use the correct tightening sequence and specifications when installing fasteners in order to avoid damage to parts and systems.
Tighten
Tighten the nuts to 10 N·m (89 lb in).
Door Window Replacement Convertible
Removal Procedure
- Remove the door trim panel. Refer to Door Trim Panel Replacement .
- Remove the trim panel. Refer to Upper Extension Trim Panel Replacement .
- Remove the water deflector. Refer to Door Water Deflector Replacement .
- Remove the water deflector. Refer to Door Water Deflector Replacement .
- Remove the door belt outer molding.
- Remove the window front channel assembly. Refer to Door Window Channel Replacement .
- Loosen the following components in order to release the tension from the front door glass stabilizer:
- Position the window glass (13) in order to access the nutwashers.
- Loosen the nutwashers in order to remove the glass (13) from the regulator assembly studs.
- Lift the window glass (13) from the door.
- Place the window glass (13) on a protected surface.
Peel the deflector away from the door inner panel as necessary.

Caution: Disconnect the power window switch when working inside the driver's door. When operated, the Express Down Feature allows the door window to drop very quickly, without stopping, which could cause personal injury.
| • | The nut |
| • | The setscrew |
Disassembly Procedure
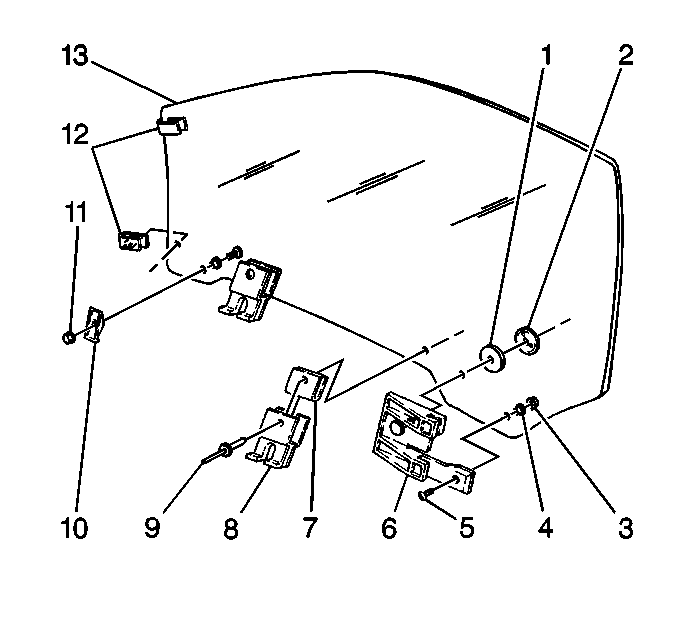
- Remove the glass front guides (12).
- Remove the screw (5).
- Remove the nut (3).
- Remove the door window upstop (10).
- Remove the bushing (4).
- Punch out the center pin in order to remove the rivet (9).
- Remove the front door window sash (8).
- Remove the spacer (7).
- Remove the rivet (9).
- Remove the retainer (2).
- Remove the washer (1).
- Remove the door glass rear guide assembly (6).

Caution: Eye protection must be worn when drilling rivets to reduce the chance of personal injury.
Drill out the rivet.
Assembly Procedure
- Install the door glass rear guide assembly (6)
- Install the washer (1)
- Install the retainer (2)
- Use the rivet (9) in order to install the spacer (7) and the front door window sash (8).
- Install the bushing (4).
- Install the door window upstop (10).
- Install the screw (5).
- Install the nut (3).
- Install the door glass front guides (12).

Notice: Use the correct fastener in the correct location. Replacement fasteners must be the correct part number for that application. Fasteners requiring replacement or fasteners requiring the use of thread locking compound or sealant are identified in the service procedure. Do not use paints, lubricants, or corrosion inhibitors on fasteners or fastener joint surfaces unless specified. These coatings affect fastener torque and joint clamping force and may damage the fastener. Use the correct tightening sequence and specifications when installing fasteners in order to avoid damage to parts and systems.
Tighten
Tighten the retainer (2) to 6 N·m (53 lb in).
Tighten
Tighten the nut (3) to 6 N·m (53 lb in).
Installation Procedure
- Install the door window glass (13).
- Install the nutwashers that attach the door window glass (13) to the window regulator assembly.
- Install the window front channel. Refer to Door Window Channel Replacement .
- Install the door belt outer molding.
- Adjust the door window glass (13) as necessary. Adjust the door glass stabilizers.
- Install the water deflector. Refer to Door Water Deflector Replacement .
- Install the trim panel. Refer to Upper Extension Trim Panel Replacement .
- Install the door trim panel. Refer to Door Trim Panel Replacement .

Position the glass on the door window regulator assembly studs.
Notice: Use the correct fastener in the correct location. Replacement fasteners must be the correct part number for that application. Fasteners requiring replacement or fasteners requiring the use of thread locking compound or sealant are identified in the service procedure. Do not use paints, lubricants, or corrosion inhibitors on fasteners or fastener joint surfaces unless specified. These coatings affect fastener torque and joint clamping force and may damage the fastener. Use the correct tightening sequence and specifications when installing fasteners in order to avoid damage to parts and systems.
Tighten
Tighten the nut to 6 N·m (53 lb in).
