For 1990-2009 cars only
Removal Procedure
Important: Always maintain cleanliness when servicing fuel system components.
- Relieve the fuel system pressure. Refer to the Fuel Pressure Relief .
- Drain the fuel tank. Refer to Fuel Tank Draining .
- Remove the fuel tank. Refer to Fuel Tank Replacement .
- Remove the fuel sender assembly. Refer to Fuel Sender Assembly Replacement .
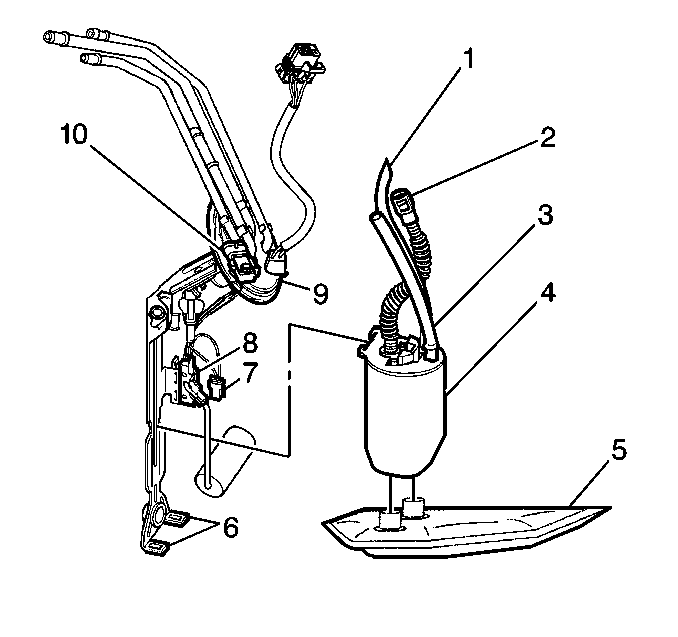
- Note the position of the fuel strainer (5) on the fuel pump.
- Support the fuel sender assembly with one hand and grasp the strainer (5) with the other hand.
- Rotate the strainer in one direction and pull the strainer off the pump. Discard the strainer after inspection.
- Inspect the strainer. Replace a contaminated strainer and clean the fuel tank.
- Inspect the fuel pump inlet for dirt and debris. If found, replace the fuel pump and reservoir.
- If the fuel pump and reservoir is being replaced, proceed to step 12.
- Disconnect the vent hose (1) and the fuel return hose (3) from under the cover (9).
- Disconnect the quick-connect fitting on the fuel pump flex pipe (2).
- Disconnect the electrical connector (7) from the fuel pump.
- Pry the locking tabs (6) on the bottom of the fuel sender, lift the reservoir to clear the locking tabs and pull the reservoir downward to clear the guides on the fuel sender.
Installation Procedure
- Align the tabs on the reservoir with the guide on the fuel sender, push the reservoir upward to the stop on the top of the reservoir and snap the locking tabs (6) over the ramps on the bottom of the reservoir.
- Connect the fuel vent hose (1) and the fuel return hose (3).
- Connect the quick-connect fitting on the fuel pump flex pipe (2).
- Connect the fuel pump electrical connector (7).
- Install the new fuel pump strainer in the same position as noted during disassembly. Push on the outer edge of the strainer ferrule until the strainer is fully seated.
- Reinstall the fuel sender assembly. Refer to Fuel Sender Assembly Replacement .
- Reinstall the fuel tank. Refer to Fuel Tank Replacement .
- Add fuel and reinstall the fuel fill cap.
- Reconnect the negative battery cable.
- Inspect for leaks.
Important: Always install a new pump strainer when replacing the fuel pump.
Caution: Unless directed otherwise, the ignition and start switch must be in the OFF or LOCK position, and all electrical loads must be OFF before servicing any electrical component. Disconnect the negative battery cable to prevent an electrical spark should a tool or equipment come in contact with an exposed electrical terminal. Failure to follow these precautions may result in personal injury and/or damage to the vehicle or its components.
| 10.1. | Turn the ignition switch ON for 2 seconds. |
| 10.2. | Turn the ignition switch OFF for 10 seconds. |
| 10.3. | Turn the ignition switch ON. |
| 10.4. | Check for fuel leaks. |
