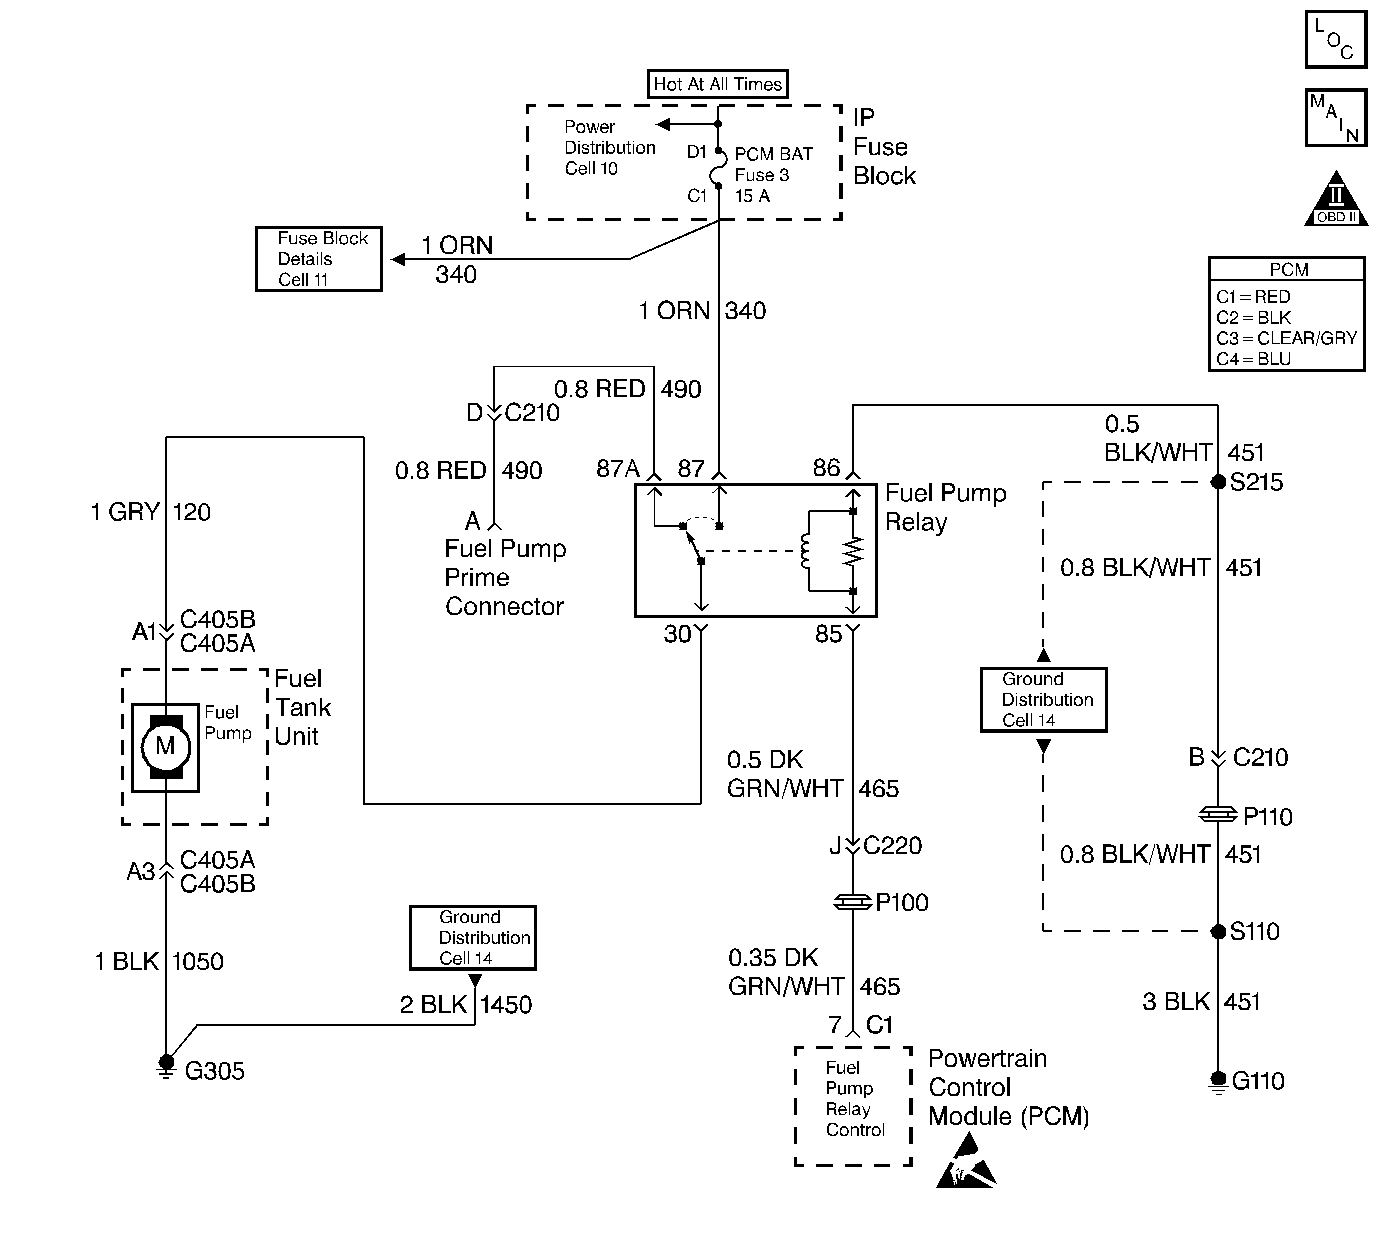
Circuit Description
When the ignition switch is turned ON, the PCM will activate the in-tank fuel pump. The fuel pump will remain ON as long as the PCM is receiving reference pulses from the distributor ignition system. If there are no reference pulses, the PCM will turn the fuel pump OFF after about 2-3 seconds. The pump will deliver fuel to the fuel rail and injectors, then to the pressure regulator, where the system pressure is controlled at 284-325 kPa (41-47 psi). Excess fuel is returned to the fuel tank. When the engine is stopped, the fuel pump can be turned ON with a scan tool.
Improper fuel system pressure will result in one or many of the following symptoms:
| • | Cranks but will not run. |
| • | Cuts out, may feel like an ignition problem. |
| • | Poor fuel economy. |
| • | Loss of power. |
| • | Hesitation. |
| • | DTCs. |
Diagnostic Aids
The following conditions may have caused the fuel pump fuse to open:
| • | The fuse was faulty |
| • | There is an intermittent short in the fuel pump power feed circuit. |
| • | The fuel pump has an intermittent internal problem. Refer to Symptoms . |
Test Description
Number(s) below refer to step numbers on the diagnostic table.
Step | Action | Value(s) | Yes | No |
|---|---|---|---|---|
1 | Was the Powertrain On-Board Diagnostic (OBD) System Check performed? | -- | ||
2 | Check the fuel pump fuse. Is the fuse open? | -- | ||
3 |
Does the test light illuminate? | -- | ||
4 | Probe the ground circuit in the fuel pump relay harness connector with test light J 34142-B connected to B+. Does the test light illuminate? | -- | ||
5 |
Does the test light illuminate? | -- | ||
6 | Using a fused jumper wire, jumper the battery feed circuit to the fuel pump circuit in the fuel pump relay harness connector. Does the fuel pump run? | -- | ||
7 |
Does the test light illuminate? | -- | ||
8 |
Does the test light illuminate? | -- | ||
9 |
Does the test light illuminate? | -- | ||
10 |
Is the fuse open? | -- | Go to Diagnostic Aids | |
11 |
Does the DVM display the specified value (or lower)? | 5 ohms | ||
Repair the open relay battery feed circuit. Is the action complete? | -- | -- | ||
13 | Repair the open relay ground circuit. Is the action complete? | -- | -- | |
14 | Repair the open fuel pump feed circuit. Is the action complete? | -- | -- | |
15 | Repair the open fuel pump ground circuit. Is the action complete? | -- | -- | |
16 | Repair the short to ground in the fuel pump feed circuit. Is the action complete? | -- | -- | |
17 | Repair the fuel pump relay control circuit. Is the action complete? | -- | -- | |
18 | Check for poor connections at the relay. Was a problem found and corrected? | -- | ||
19 | Replace the relay. Is the action complete? | -- | -- | |
20 | Check the fuel pump harness for damage. Was a problem found and corrected? | -- | ||
21 | Replace the fuel pump. Refer to Engine Fuel. Is the action complete? | -- | -- | |
22 | Check for poor connections at the PCM. Was a problem found and corrected? | -- | ||
23 |
Important:: Replacement PCM must be programmed. Refer to Powertrain Control Module Replacement/Programming . Replace the PCM. Is the action complete? | -- | -- | |
24 |
Does the engine start and continue to run? | -- | ||
25 |
Are any DTCs displayed? | -- | Go to the applicable DTC table | |
26 | Using the scan tool, select Capture Info, Review Info. Are any DTCs displayed that have not been diagnosed? | -- | Go to the applicable DTC table | System OK |
