DOOR WIND NOISE & WATER LEAKS CAUSE AND CORRECTION

The following information is being provided to assist dealer personnel in diagnosing and correcting a windnoise or water-leak in the front door area on 1982 Camaro series.
The vehicle may have to be water tested to pinpoint the specific area of water entry or road tested to locate the windnoise. Refer to Section 1 of the Body Service Section of the 1982 Camaro Shop Manual for water testing procedures. Useful tools in detecting the source of a windnoise are a powder gun, ultrasonic leak detector or a stethoscope.
Listed below are some specific areas that should be checked for wind and/or water leaks and procedures to correct them:
(1) Misaligned door window filler panels which catch and fold the lip of the side roof rail weatherstrip over and trap it between the sealing surface of the filler and the weatherstrip or do not effect a seal to the weatherstrip.
This condition is usually caused by a misaligned filler that is positioned too far outboard and/or high. To correct this condition, perform the following operations:
a. With window in full-down position, remove door trim pad.
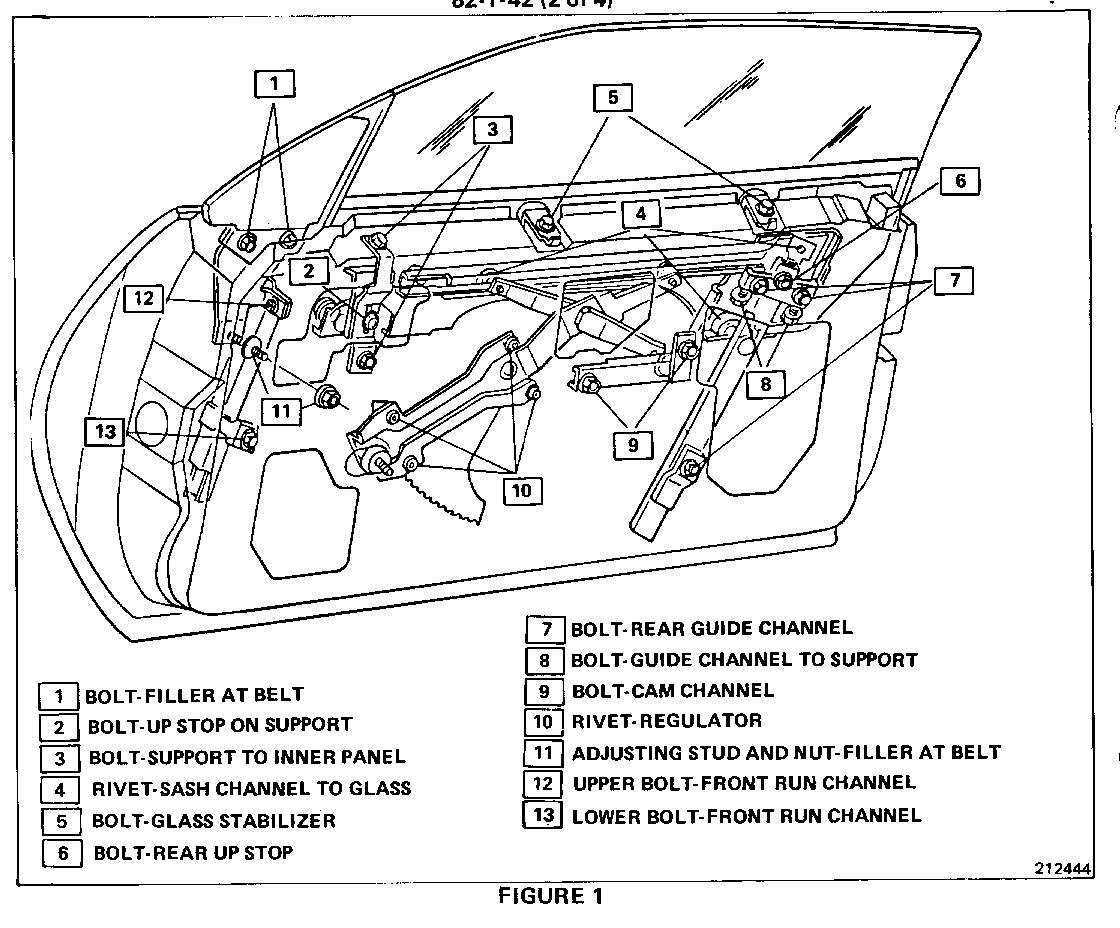
b. Disengage end detail of door weatherstrip by removing two (2) attaching screws at front of door. Then peel back upper front corner of inner panel water deflector to gain access to filler attachments (Figure 1).
c. Loosen filler to door inner panel reinforcement bolts at belt (1, Figure 1), lower front run channel bolt (13, Figure 1) and filler to inner panel adjusting stud nut (11, Figure 1).
d. Turn filler adjusting stud (11, Figure 1) counter-clockwise, as required, to move upper/forward edge of filler inboard to clear lip of weatherstrip and to effect a seal to the side roof rail weatherstrip. Conversely, turn adjusting stud clockwise to move the filler outboard.
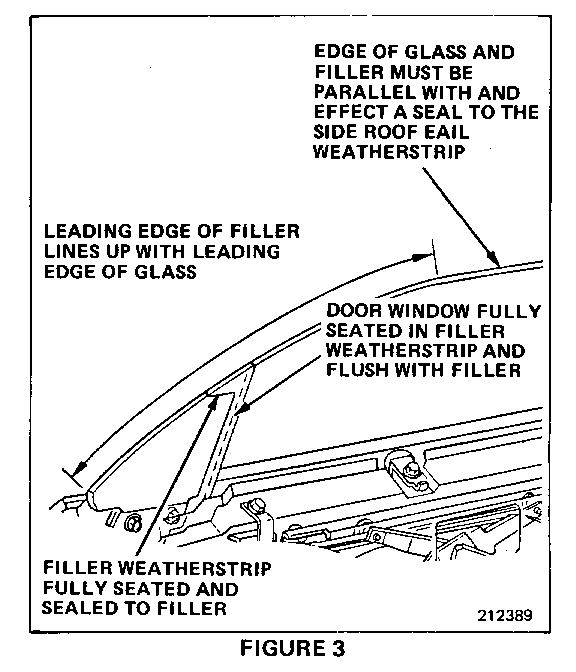
e. Shift the filler, as required, to align the leading edge of the filler with the leading edge of glass and to effect a seal with the side roof rail weatherstrip (Figure 3).
f. Tighten all filler attachments and raise door window. Check filler alignment by opening and closing the door. A properly aligned filler should be in line with the leading edge of the glass, clear the lip of the weatherstrip when the door is closed and effect a seal to the side roof rail weatherstrip.
(2) Improperly sealed/misposition door window filler weather-strip (at rear of filler) that is not effecting a seal to the filler or to the side roof rail weatherstrip.
This condition can be corrected by performing the following:
a. Lower door window to a full-down position.
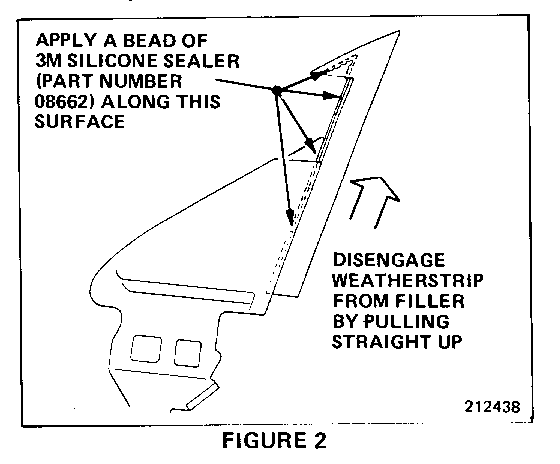
b. Grasp sealing strip and disengage from filler by sliding straight upward (Figure 2). This operation can be performed without removing the door trim assembly.
C. Remove all traces of sealer on filler and sealing strip. If necessary, reshape the forward portion of sealing strip, by bending metal insert downward and rearward to allow the strip to properly seat with the filler (Figure 3).
d. Apply a bead of 3M super silicone sealer (P/N 08662) or equivalent onto the edge of the sealing strip (Figure 2) and install sealing strip. Slick down the weatherstrip and remove all excess sealer that oozes out.
(3) Misaligned door glass; too high/low or too far rearward not effecting a seal to the filler or side roof rail weatherstrip.
A properly aligned door glass should be parallel with and effect a seal to the side roof rail weatherstrip, far enough forward to fully engage and effect a seal to the filler weatherstrip and be in line with the leading edge of the filler (Figure 3).
Compressions along the upper edge of the glass can be checked by closing the door onto a paper strip (dollar bill size) that has been inserted between the glass and the weatherstrip and then pulling the paper strip out of contact.
To correct this condition, perform the following operations:
a. Lower glass, remove door trim assembly and peel back inner panel water deflector to gain-access to upper hardware attachments (Figure 1).
b. Loosen front and rear up-travel stops (2 and 6, Figure 1). Raise or lower glass until the upper forward corner of the glass is in line with the leading edge of the window filler (Figure 3). If the upper edge of the glass is not parallel with the side roof rail weatherstrip, adjust the inner panel cam (9, Figure 1), as required, to parallel the glass with the weatherstrip. Open and close the door to make certain that the upper edge of the glass clears the lip of the side roof rail weatherstrip. Then firmly slide the up-travel stop downward to set the stops and tighten the attachments. Cycle the glass to make certain the glass maintains the desired up-travel position. Adjust as required.
c. With the glass in an up-position, peel back the lip of the weatherstrip at the rear edge of the filler to make certain the door glass is properly engaging the run channel in the sealing strip (Figure 3). If the glass is too far rearward, loosen the rear guide channel to inner panel attachments (7, Figure 1) and move the glass forward to effect a seal to the filler sealing strip.
d. Using a strip of paper, check the seal along upper edge of glass to the side roof rail weatherstrip. If additional weatherstrip compression is required, lower glass to a partial down position and loosen rear guide channel support attaching bolts (8, Figure 1). Then, move lower guide outboard to adjust upper edge of glass inboard. Tighten all attachments. Recheck weatherstrip compression and window operation by cycling glass and opening and closing door.
(4) Door glass rolls up outboard of channel in filler weatherstrip.
This condition is usually due to a misaligned door window and/or filler assembly. To correct this condition, perform the following operations:
a. Lower door glass, remove door trim assembly and peel back inner panel water deflector to gain access to hardware attachments (Figure 1).
b. With the glass in an up-position, peel back the lip of the weatherstrip at the rear edge of the filler to make certain the front edge of the door glass is properly engaging the run channel in the sealing strip (Figure 3). If the glass is too far rearward, loosen the rear guide channel to inner panel upper bolts (7, Figure 1) and move the glass forward to fully engage the run channel.
c. Loosen and permanently move the front glass stabilizer strip (5, Figure 1) out of contact with the glass.
d. Cycle glass up and down. If the glass remains in the run channel for its full up-travel, replace all previously removed parts, except for front stabilizer strip. Leave the front stabilizer strip out of contact with the glass. If the glass still rolls up outboard of the filler weatherstrip, check the in and out alignment of the filler assembly and/or door window assembly and adjust as required. To align the door window and filler assembly, refer to Condition 1 and 3.
(5) Missed or skipped sealer application at base of windshield pillar beneath the end detail of the side roof rail weatherstrip.
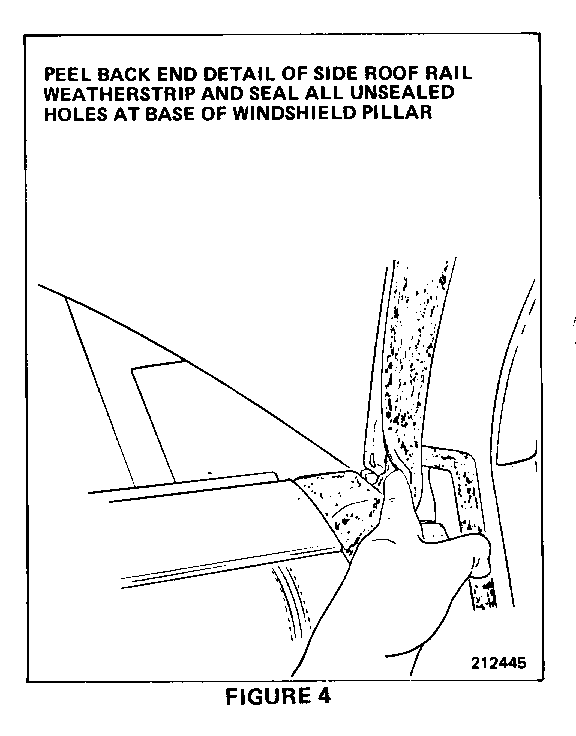
This condition can be corrected by disengaging and peeling back the end detail of the side roof rail weatherstrip and sealing all unsealed holes (Figure 4) with 3M Heavy Drip Chek Sealer (P/N 08531).
(6) Improperly cemented/sealed and retained end detail of side roof rail weatherstrip at base of windshield pillar.
To correct this condition, disengage the plastic nail from the end detail of the side roof rail weatherstrip. Using a flat-bladed tool, carefully peel back approximately 10" of weatherstrip from the pillar and retainer. Apply 3M weatherstrip adhesive (P/N 08011) and cement the weatherstrip to the retainer and windshield pillar. Make certain that the plasticc nail securely attaches the weatherstrip.
(7) Wrinkled/distorted end detail of door weatherstrip at nose area of filler that is not effecting a seal to side roof rail weatherstrip.
This condition is usually due to an improperly installed weatherstrip (rolled under) around the nose area of the filler. To correct this condition, remove the weatherstrip attaching screws and fit the weatherstrip around the nose area of the filler. If necessary, relocate weatherstrip attaching screw holes and install screws.
(8) Improperly sealed windshield at the lower outer corners. This condition can usually be found by using an air hose and water and corrected using a suitable windshield resealant.
Use applicable labor operation.


General Motors bulletins are intended for use by professional technicians, not a "do-it-yourselfer". They are written to inform those technicians of conditions that may occur on some vehicles, or to provide information that could assist in the proper service of a vehicle. Properly trained technicians have the equipment, tools, safety instructions and know-how to do a job properly and safely. If a condition is described, do not assume that the bulletin applies to your vehicle, or that your vehicle will have that condition. See a General Motors dealer servicing your brand of General Motors vehicle for information on whether your vehicle may benefit from the information.
