CAMPAIGN: WATER INGESTION THRU AIR INDUCTION SYSTEM

General Motors has determined that some early production 1982 Chevrolet Camaro Z-28 models equipped with 5.0 liter "Cross- Fire Injection" V8 engines (RPO LU5) may experience water entry through the air cleaner into the combustion chambers. This could occur when the vehicle is subjected to large volumes of water directed at the hood air inlet duct when the engine is off. The condition might result in an engine no-start, and if not corrected, engine damage could occur.
To prevent the possibility of this condition occurring, it will be necessary to make adjustments to the hood door assembly and install a special air cleaner service kit.
VEHICLES INVOLVED
Involved are certain 1982 Camaro Z28 models equipped with RPO LU5 (5.0L 305) "Cross-Fire Injection" V8 engines within the following vehicle identification number breakpoints:
Plant From Through ------- -------- -------- Norwood CN105352 CN120934 Van Nuys CL100887 CL146959
Involved vehicles have been identified by Vehicle Identification Number Computer Listings. Computer listings contain the complete Vehicle Identification Number, Owner Name and Address Data, and are furnished to the involved Dealers with the campaign bulletin. Owner name and address data furnished will enable dealers to follow-up with owners involved in this campaign.
These listings may contain owner names and addresses obtained from State Motor Vehicle Registration Records. The use of such motor vehicle registration data for any other purpose is a violation of law in several states. Accordingly, you are urged to limit the use of this listing for the follow-up necessary to complete this campaign.
Any dealer not receiving a computer listing with the campaign bulletin was not shipped any involved vehicles.
OWNER NOTIFICATION
Owners will be notified of this campaign on their vehicles by Chevrolet Motor Division (see copy of Owner Letter included with this bulletin).
DEALER CAMPAIGN RESPONSIBILITY
This recall campaign is to be performed at no charge to owners on all affected vehicles regardless of time, mileage, or ownership. Dealers are to inspect and correct all affected vehicles in new and used vehicle stock prior to their sale.
Whenever a vehicle subject to this campaign is taken into your new or used vehicle inventory, or it is in your dealership for service in the future you should take the steps necessary to be sure the campaign correction has been made.
The following door inspection and air cleaner modification procedure is recommended:
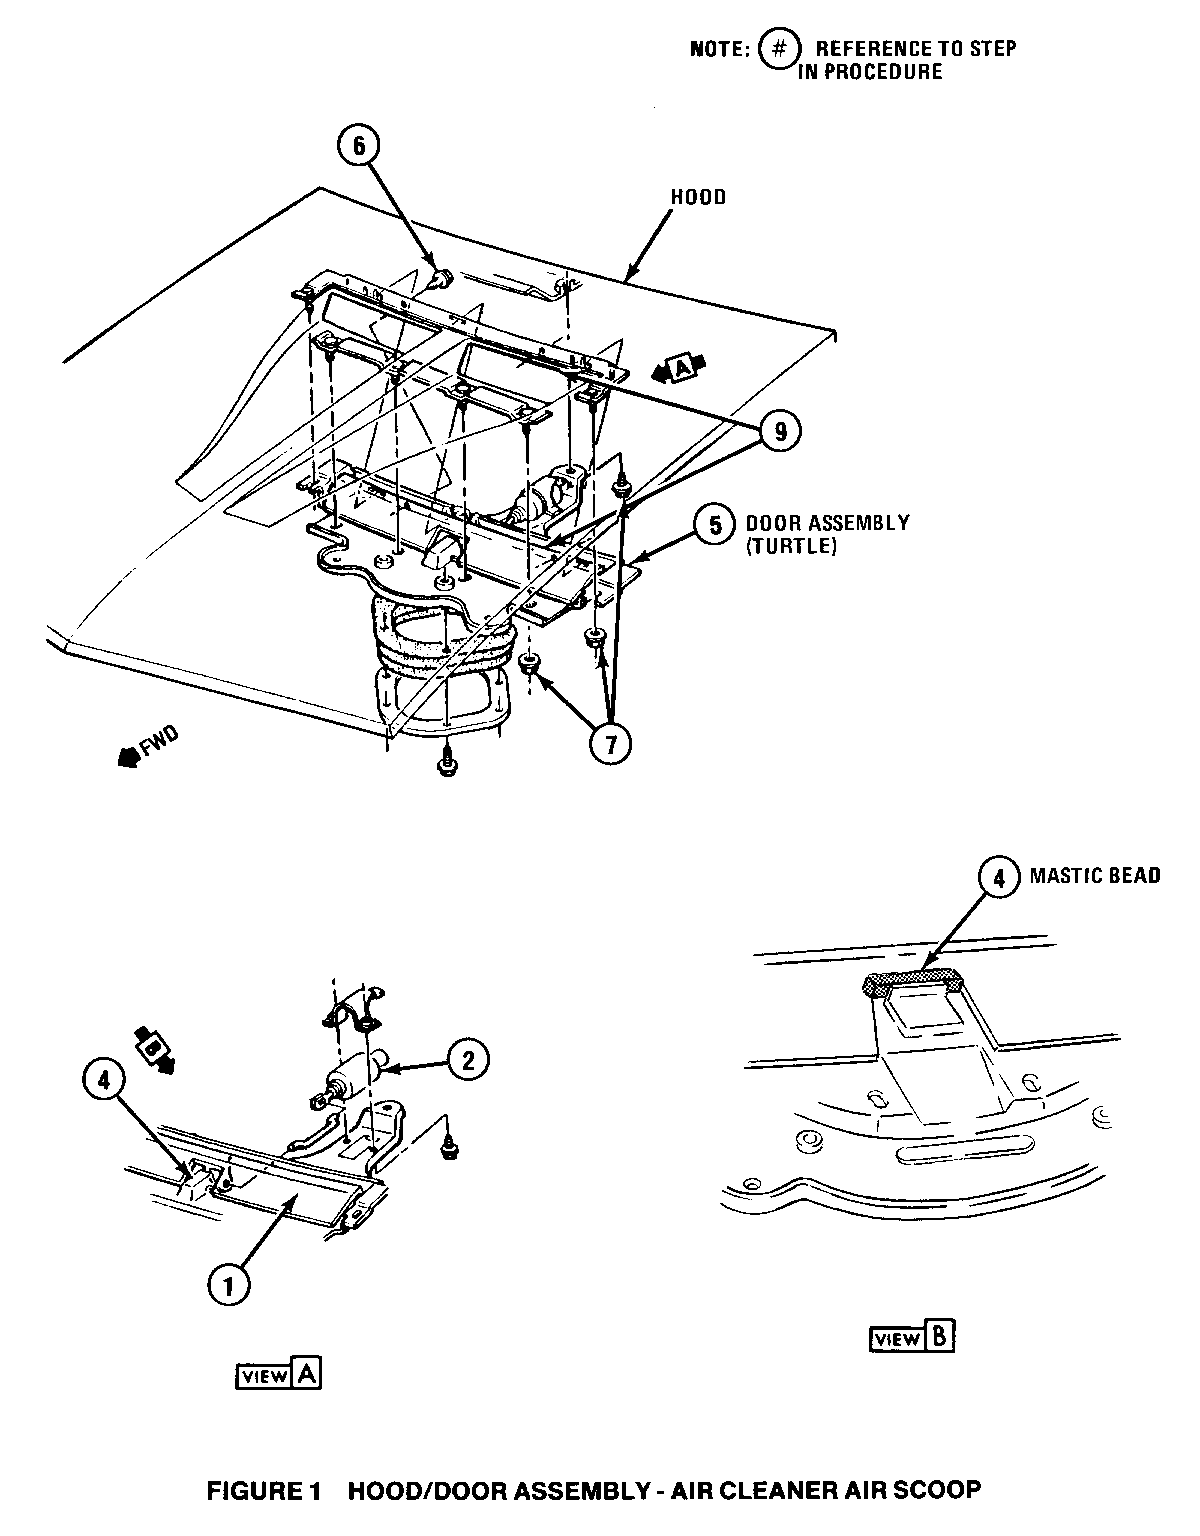
A. PREPARATION Raise hood and remove hood insulation (blanket) using tool (J24595-B trim pad remover) to loosen retainers. Loosen hood mounted air induction door assembly (turtle) by removing six(6) attaching nuts, and three(3) attaching screws. Using screwdriver, push two(2) hood retainer metal tabs forward at outboard slots in door assembly's rear vertical wall to disengage door assembly from hood.
B. INSPECTION OF DOOR ASSEMBLY (Figures 1 and 2)
1. Insure doors of assembly as shown in Figure 1, View A are not warped and that a rubber seal is affixed to the underside of doors. Replace door assembly if necessary.
2. Remove (cut) rubber boot from solenoid's shaft and insure solenoid is seated properly (depression provided), and secured in place by its mounting bracket as shown in Figure 1, View A.
3. Insure doors seal against front vertical wall of door assembly while in closed position by lifting front edge of door upward, releasing, and allowing solenoid's spring to pull door back to closed position.
4. Insure strip of mastic material is applied between doors (cut-out area) as shown in Figure 1, View B. In door closed position, material must contact door's front and side trim edges and be flush with top of door. If necessary, add an approximate 30 mm long strip of mastic from service kit to this door cut-out area.
5. Properly align door assembly to hood by installing assembly on six(6) hood retainer-oriented mounting studs and insuring the two(2) metal tabs in hood retainer engage the outboard slots in assembly's rear vertical wall.
6. While pushing aligned door assembly upward against hood, install two(2) rear attaching screws per Figure 1 and torque to specification (1.2 to 1.6 N.m).
7. Complete mounting of assembly to hood by installing and fully driving six(6) lower attaching nuts the full length of mounting studs (especially at ends) and one(l) lower attaching screw per Figure 1. Torque specification for nut is 4.5 to 7.0 N.m., while that for screw is 1.2 to 1.6 N.m.
8. Check hood to door clearances at ends of door to be certain door operates freely. If necessary, provide clearance by slightly filing away hood material at point of interference.
9. Insure rear of door seals to hood per Figure 1, and verify door closes and seals against front vertical wall of door assembly.
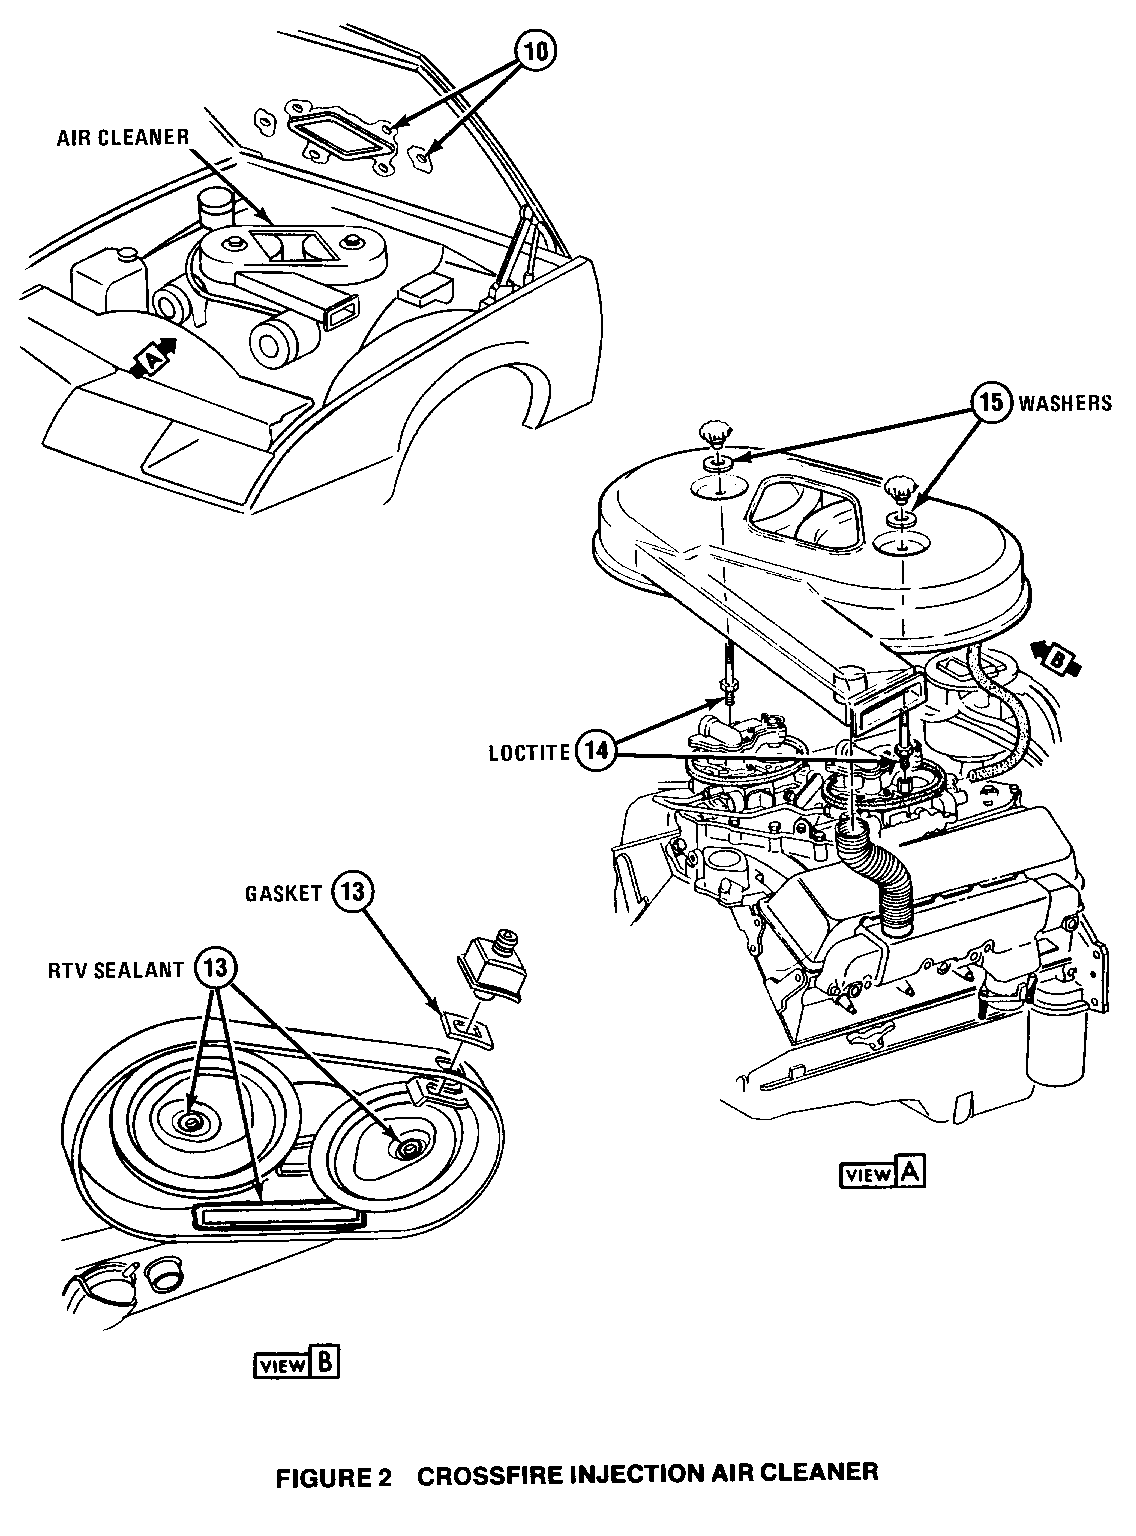
10. Install hood insulation (blanket) to hood. Insure blanket is clear about all six(6) of the door assembly's drain holes, as shown in Figure 2, by first positioning blanket to obtain oval cut-out clearance around door assembly prior to installing any retainer clips into inner hood panel. Enlarge holes in blanket as necessary to provide required clearance.
C. MODIFICATION OF AIR CLEANER (Figure 2)
11. If necessary, remove any air cleaner water protector device that may have been previously installed as a temporary field fix to the water entry condition.
12. Remove entire air cleaner assembly from engine and replace its original base with new air cleaner base from service kit.
13. Apply black RTV sealant to underside surfaces of air cleaner covers as shown in Figure 2, View B making sure to seal both locating dimple and crimp areas. Also seal air cleaner snorkel to cover with neat bead of black RTV as shown in View B. Dissemble breather tube from cover and reassemble, per View B, using new gasket from service kit.
14. On vehicles built prior to VIN Norwood (CN115094), remove the two(2) air cleaner attaching studs from the throttle body injection unit and clean threads of any oil film. Apply Loctite pipe sealant with teflon (service P/N 1052080 or equivalent) to threads per Figure 2, View A, reinstall and torque each stud to specification (4.0 to 5.0 N.m.).
15. Install modified air cleaner assembly to engine. Insure that new sealing washers from service kit are in place under attaching nuts, per View A, and that nuts are torqued to specification (1.0 to 1.3 N.m.).
NOTE: Some units were produced using "O" rings under the nuts. These "O" rings must be removed prior to installing the new sealing washers.
16. Check crankcase for evidence of water by inspecting oil on dipstick. If milky in appearance, change crankcase oil and filter.
17. Close hood.
PARTS INFORMATION
Parts Kit (P/N 25042734) required to complete this modification are to be ordered from your Chevrolet Zone Service Department. Parts will be furnished to the dealer on a no charge basis and are not to be ordered or returned to Warehousing and Distribution Division of General Motors (WDDGM).
Part Number Quantity Description ---------- ------------- --------------- 25042734 1 Per Vehicle *Special Air Cleaner Service Kit
*Kit consist of (1) air cleaner base, (1) breather tube gasket, (2) sealing washers, (1) 30mm mastic strip and (1) instruction sheet.
CLAIM INFORMATION
Submit a Product Claim with the information indicated below:
Failure Labor Labor *Other **Net Code Operation Hours Hours Amount ------- --------- ------ ----- ------ 00 V1230 .6 .1 .00
Description: Install "Special Air Cleaner Service Kit" P/N 25042734 in accordance with the instructions contained in this bulletin.
Failure Labor Labor *Other **Net Code Operation Hours Hours Amount ------ --------- ----- ----- ------ 00 V1231 .9 .1 12.96
Description: Install "Special Air Cleaner Service Kit", P/N 25042734 in accordance with the instructions contained in this bulletin, change crankcase oil and filter.
*Campaign Administrative Allowance.
**Dealers Net Amount includes engine oil, filter and Loctite allowance.
Dealers will automatically receive the correct parts and labor allowance based on the Labor Operation performed. Amounts are entered on Campaign Claims to allow the dealer to develop an accounts receivable amount only.
Refer to the Chevrolet Claims Processing Manual for details on Product Campaign claim submission.
CAMPAIGN IDENTIFICATION LABEL
Each vehicle modified in accordance with the instructions outlined in this Product Campaign Bulletin will require a "Campaign Identification Label". Each label provides a space to include the five digit dealer code of the dealer performing the campaign service. This information may be inserted with a typewriter or ballpoint pen.
Each "Campaign Identification Label" is to be located on the radiator core support in an area which will be visible when the vehicle is brought in for periodic servicing by the owner.
Apply "Campaign Identification Label" only on a clean dry surface.
ADMINISTRATIVE PROCEDURE
REFER TO THE CURRENT CHEVROLET SERVICE POLICIES AND PROCEDURES MANUAL AND CLAIMS PROCESSING MANUAL FOR CAMPAIGN HANDLING AND ADMINISTRATIVE PROCEDURES.
General Motors bulletins are intended for use by professional technicians, not a "do-it-yourselfer". They are written to inform those technicians of conditions that may occur on some vehicles, or to provide information that could assist in the proper service of a vehicle. Properly trained technicians have the equipment, tools, safety instructions and know-how to do a job properly and safely. If a condition is described, do not assume that the bulletin applies to your vehicle, or that your vehicle will have that condition. See a General Motors dealer servicing your brand of General Motors vehicle for information on whether your vehicle may benefit from the information.
