Removal procedure
- Remove the instrument panel (I/P) accessory trim plate. Refer to Instrument Panel Accessory Trim Plate Replacement in Instrument Panel, Gages, and Console.
- Remove the cupholder. Refer to Front Floor Console Cup Holder Replacement in Instrument Panel, Gages, and Console.
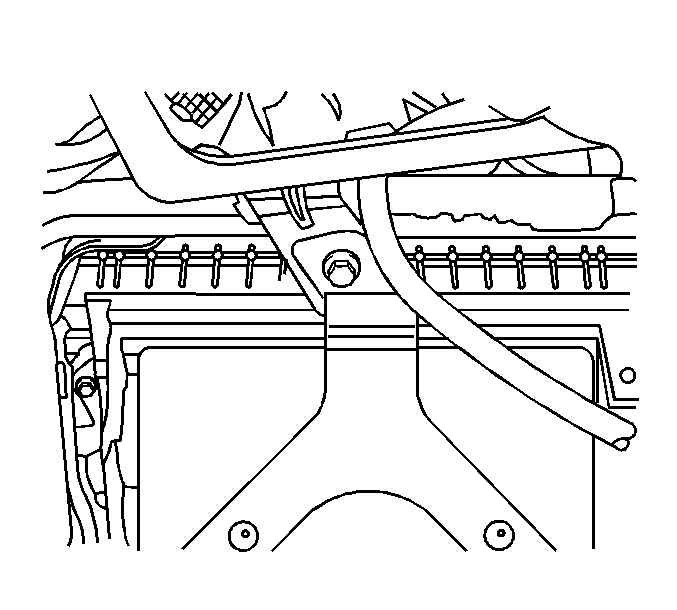
- Remove the communication interface module bracket screws.
- Remove the communication interface module bracket bolt.
- Pull the module toward you.
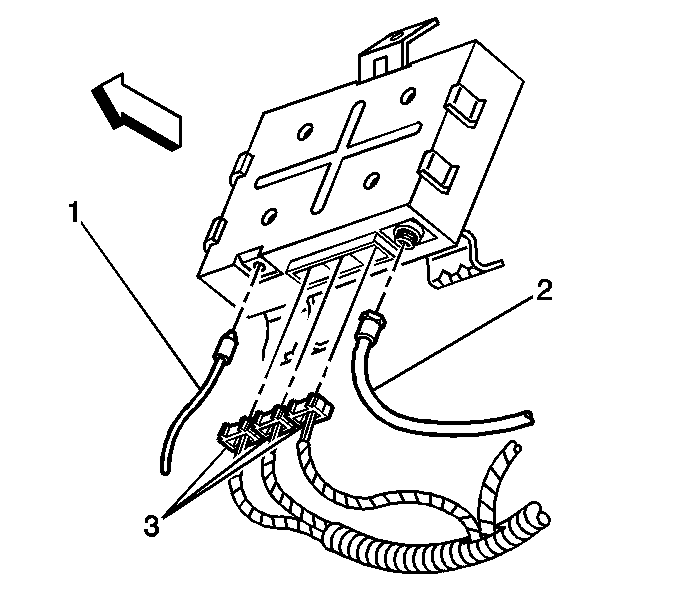
- Disconnect the cellular antenna cable (2) from the module.
- Disconnect the GPS antenna cable (1) from the module by pulling outward on the circular metal sleeve.
- Disconnect the 3 I/P harness connectors from the module.
- Remove the module.
Important: The vehicle communication interface module has a specific set of unique numbers that tie the module to each vehicle. These numbers, the 10-digit station identification and the 11-digit electronic serial number, are used by the National Cellular Network and OnStar® to identify the specific vehicle. Because these numbers are tied to the vehicle identification number of the vehicle, you must never exchange these parts with those of another vehicle.
Installation Procedure
- If you are replacing the module, record the 10-digit STID number and the 11-digit ESN number from the labels on the new communication interface module.
- Align the module to the I/P opening. Connect the 3 I/P harness connectors to the module.
- Gently connect the GPS antenna cable (1) to the module by pushing inward on the circular metal sleeve.
- Connect the cellular antenna cable (2) to the module.
- Align the bracket to the J-clip on the tie bar. Install the communication interface module bracket bolt.
- Install the communication interface module bracket screws.
- Install the cupholder. Refer to Front Floor Console Cup Holder Replacement in Instrument Panel, Gages, and Console.
- Install the I/P accessory trim plate. Refer to Instrument Panel Accessory Trim Plate Replacement in Instrument Panel, Gages, and Console.
- Press and hold the white dot button until the OnStar® status LED turns from green to red, and back again to green.
- Install a scan tool. Use the ID information menu to access the new ESN.
- Move the vehicle to an open area that is away from tall buildings and with a clear view of unobstructed sky. Allow the vehicle to run for 10 minutes.
- Press the blue OnStar® button to connect to the OnStar® call center:
Important: This GPS antenna cable connector may be damaged if not correctly aligned before installation.
Notice: Refer to Fastener Notice in the Preface section.
Tighten
Tighten the bolt to 10 N·m (89 lb in).
Tighten
Tighten the screws to 2 N·m (18 lb in).
Important: After replacing the communication interface module, you must reconfigure the OnStar® system. Failure to reconfigure the system will result in additional customer visit for repair.
| 12.1. | Tell the advisor that this vehicle has received a new communication interface module. |
| 12.2. | Ask the advisor to add the new ESN to update the customer account. |
| 12.3. | Follow any additional instructions from the OnStar® advisor. |
| 12.4. | Ask the advisor to activate the OnStar® personal calling feature, if available. |
