For 1990-2009 cars only
Removal Procedure
- Disable the SIR. Refer to Disabling the SIR System in SIR.
- Remove the console. Refer to Console Replacement .
- Remove the passenger side insulator panel. Refer to Instrument Panel Insulator Panel Replacement - Right Side or Instrument Panel Insulator Panel Replacement - Left Side .
- Remove the side window air outlets. Refer to Side Window Air Outlet Replacement in HVAC System-Automatic.
- Remove the passenger side inflator module. Refer to Inflatable Restraint Instrument Panel Module Replacement in SIR.
- Remove the passenger side instrument panel accessory trim plate. Refer to Instrument Panel Accessory Trim Plate Replacement - Right Side or Instrument Panel Accessory Trim Plate Replacement - Left Side .
- Remove the instrument panel cluster. Refer to Instrument Cluster Replacement .
- Remove the radio or the navigation display module. Refer to Radio Replacement in Entertainment or Navigation Display Module Replacement .
- Remove the AC/heater control head. Refer to Control Assembly Replacement in HVAC System-Automatic.
- Remove the lap cooler duct. Refer to Air Distributor Duct Replacement in HVAC System-Automatic.
- Remove the steering column. Refer to Steering Column Replacement in Steering Wheel and Column-Tilt.
- Remove headlamp switch. Refer to Headlamp Switch Replacement in Lighting Systems.
- Remove the fuel/rear compartment release switch. Refer to Fuel/Rear Compartment Release Switch Replacement .
- Disconnect the ignition switch electrical connector.
- Disconnect the park lock cable from the ignition switch. Refer to Park Lock Cable Replacement in Automatic Transaxle.
- Remove the instrument panel storage compartment. Refer to Instrument Panel Compartment Replacement .
- Remove the instrument panel retaining screws from the ends of the retainer.
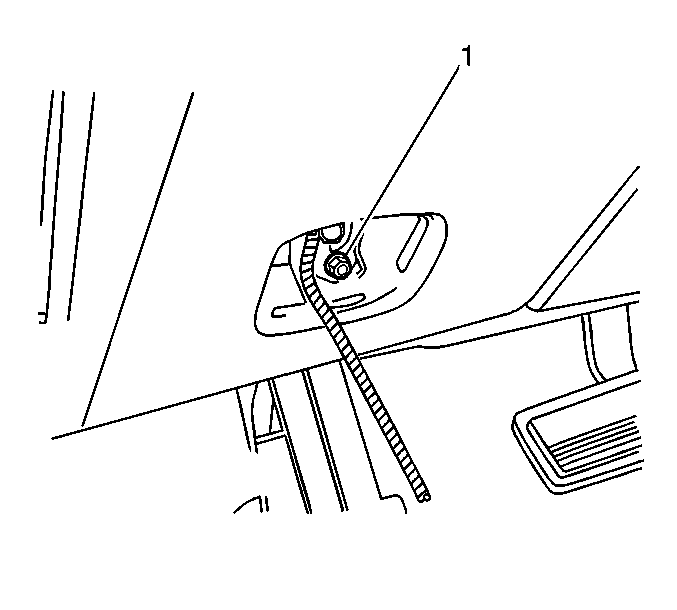
- Remove fasteners from instrument panel retainer. One fastener (1) is located in the opening for the fuel/rear compartment release switch.
- Remove the retaining bolts from the instrument panel retainer to lower support bracket.
- Remove instrument panel retainer from the carrier, feed wiring through openings as necessary.
- Remove the ignition switch from the instrument panel. Refer to Ignition and Start Switch Replacement .
- Remove the inside temperature sensor from the instrument panel retainer. Refer to Inside Air Temperature Sensor Replacement in HVAC System-Automatic.
- Remove the drivers side trim plate from the instrument panel. Refer to Instrument Panel Accessory Trim Plate Replacement - Left Side or Instrument Panel Accessory Trim Plate Replacement - Right Side .
Caution: This vehicle is equipped with a Supplemental Inflatable Restraint (SIR) System. Failure to follow the correct procedure could cause the following conditions:
| • | Air bag deployment |
| • | Personal injury |
| • | Unnecessary SIR system repairs |
| • | Refer to SIR Component Views in order to determine if you are performing service on or near the SIR components or the SIR wiring. |
| • | If you are performing service on or near the SIR components or the SIR wiring, disable the SIR system. Refer to Disabling the SIR System. |


Disconnect the inside air temperature sensor electrical connector.
Complete removal.
Installation Procedure
- Install the driver side trim plate to the instrument panel. Refer to Instrument Panel Accessory Trim Plate Replacement - Left Side or Instrument Panel Accessory Trim Plate Replacement - Right Side
- Install the inside temperature sensor to the instrument panel retainer. Refer to Inside Air Temperature Sensor Replacement in HVAC System-Automatic.
- Install the ignition switch to the instrument panel. Refer to Ignition and Start Switch Replacement .
- Partially install the instrument panel retainer to the carrier.
- Guide the wiring through the instrument panel retainer openings.
- Install the retaining bolts to the instrument panel retainer to the lower support bracket.
- Install the fasteners to the instrument panel retainer. One fastener (1) is located in the opening for the fuel/rear compartment release switch.
- Install the instrument panel retaining screws to the ends of the retainer.
- Install the instrument panel storage compartment. Refer to Instrument Panel Compartment Replacement .
- Connect the park lock cable to the ignition switch. Refer to Park Lock Cable Replacement in Automatic Transaxle.
- Connect the ignition switch electrical connector.
- Install the fuel/rear compartment release switch. Refer to Fuel/Rear Compartment Release Switch Replacement .
- Install headlamp switch. Refer to Headlamp Switch Replacement in Lighting Systems.
- Install the steering column. Refer to Steering Column Replacement in Steering Wheel and Column-Tilt.
- Remove the lap cooler duct. Refer to Air Distributor Duct Replacement or Air Distributor Duct Replacement in HVAC System-Automatic.
- Install the AC/heater control head. Refer to Control Assembly Replacement or Control Assembly Replacement in HVAC System-Automatic.
- Install the radio or the navigation display module. Refer to Radio Replacement in Entertainment or Navigation Display Module Replacement .
- Install the instrument panel cluster. Refer to Instrument Cluster Replacement .
- Install the passenger side instrument panel accessory trim plate. Refer to Instrument Panel Accessory Trim Plate Replacement - Right Side or Instrument Panel Accessory Trim Plate Replacement - Left Side .
- Install the passenger side inflator module. Refer to Inflatable Restraint Instrument Panel Module Replacement in SIR.
- Install the side window air outlets. Refer to Side Window Air Outlet Replacement in HVAC System-Automatic.
- Install the passenger side insulator panel. Refer to Instrument Panel Insulator Panel Replacement - Right Side or Instrument Panel Insulator Panel Replacement - Left Side .
- Install the console. Refer to Console Replacement .
- Enable the SIR. Refer to Enabling the SIR System in SIR.
Connect the inside air temperature sensor electrical connector.
Align the instrument panel retainer to the carrier complete installation.


