DELCO-BOSE SOUND SYSTEM SPEAKER INSTALLATION/CLEANING

DELCO-BOSE SOUND SYSTEM SPEAKER INSTALLATION AND GRILLE COVER CLEANING
When replacing certain body sheet metal and/or trim components on 1983 Eldorados and Sevilles equipped with Delco-Bose Sound Systems, rework of the service parts will be required to accommodate the Bose speaker enclosures. This bulletin contains the guidelines for reworking the sheet metal and trim components as well as a procedure for cleaning the front Bose speaker grilles.
NOTICE: These rework procedures are for repairing existing Delco-Bose Sound Systems only. These procedures are not to be used to convert a non-Bose car into a Bose car. In order to guarantee the performance and the appearance of the Delco-Bose Sound System, conversions of non-Bose to Bose or Bose to non-Bose are not recommended.
1. SPEAKER INSTALLATION
A. Seville
1. Front Door Speaker Opening:
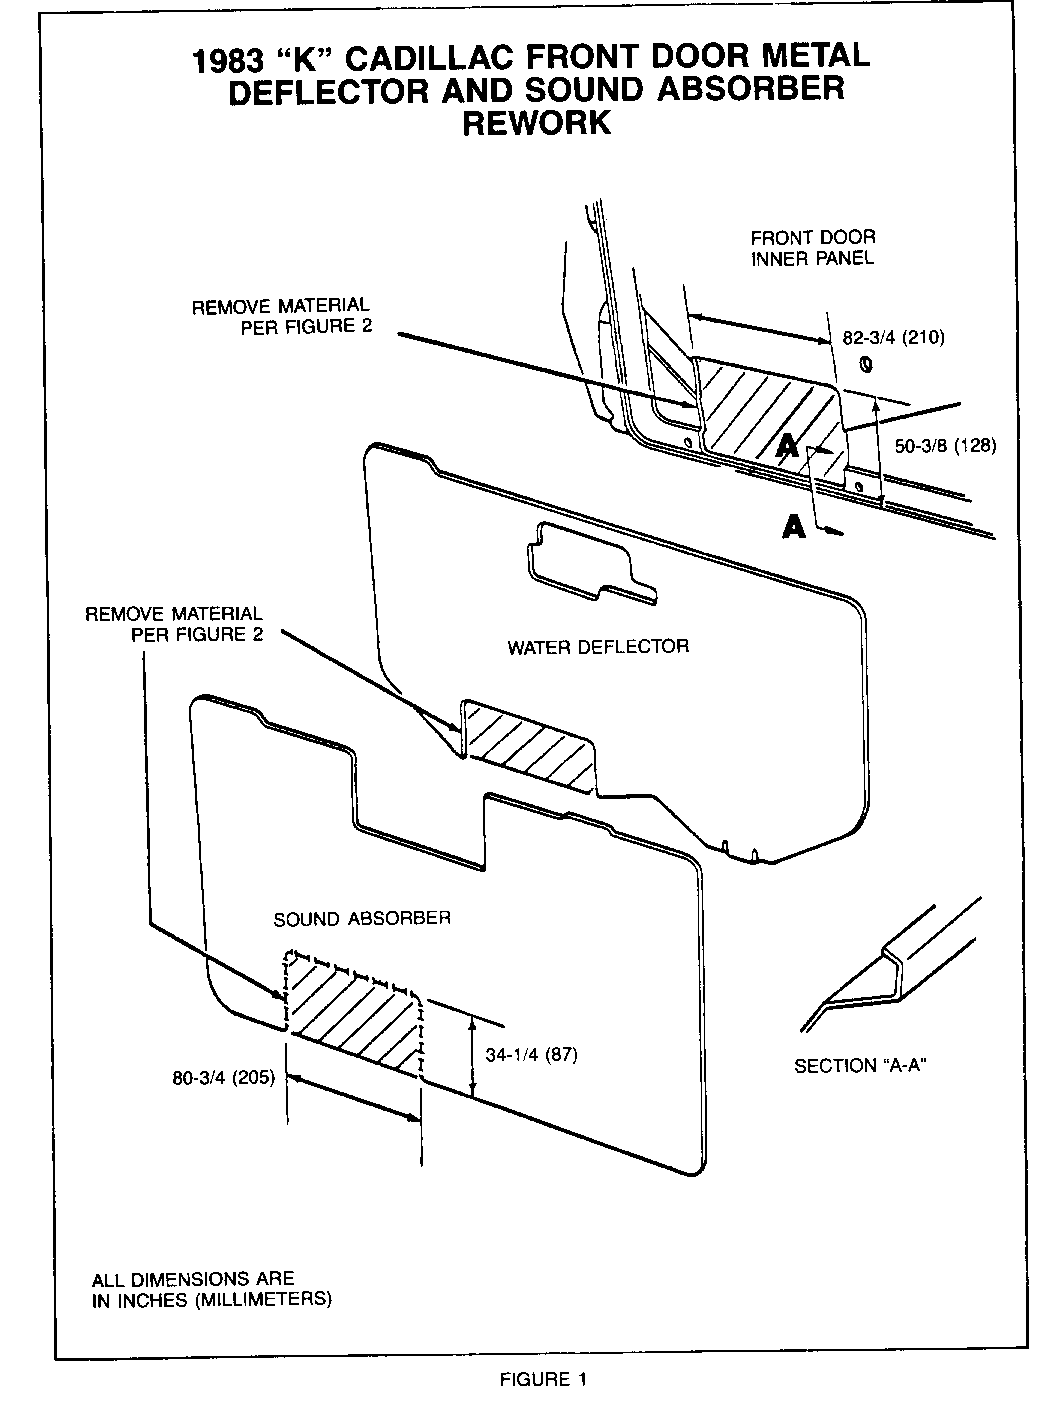
Cut hole in metal front door inner panel with electric shears or impact cutting tool. Cut water deflector and sound absorber with hand shears as shown in Figure 1. Install enclosure in the inner panel and secure speaker enclosure to inner panel with two (2) 4.2 x 1.41 x 13 large washer head self-drilling screws (Part No. 20441100 or equivalent).
2. Front Door Trim:
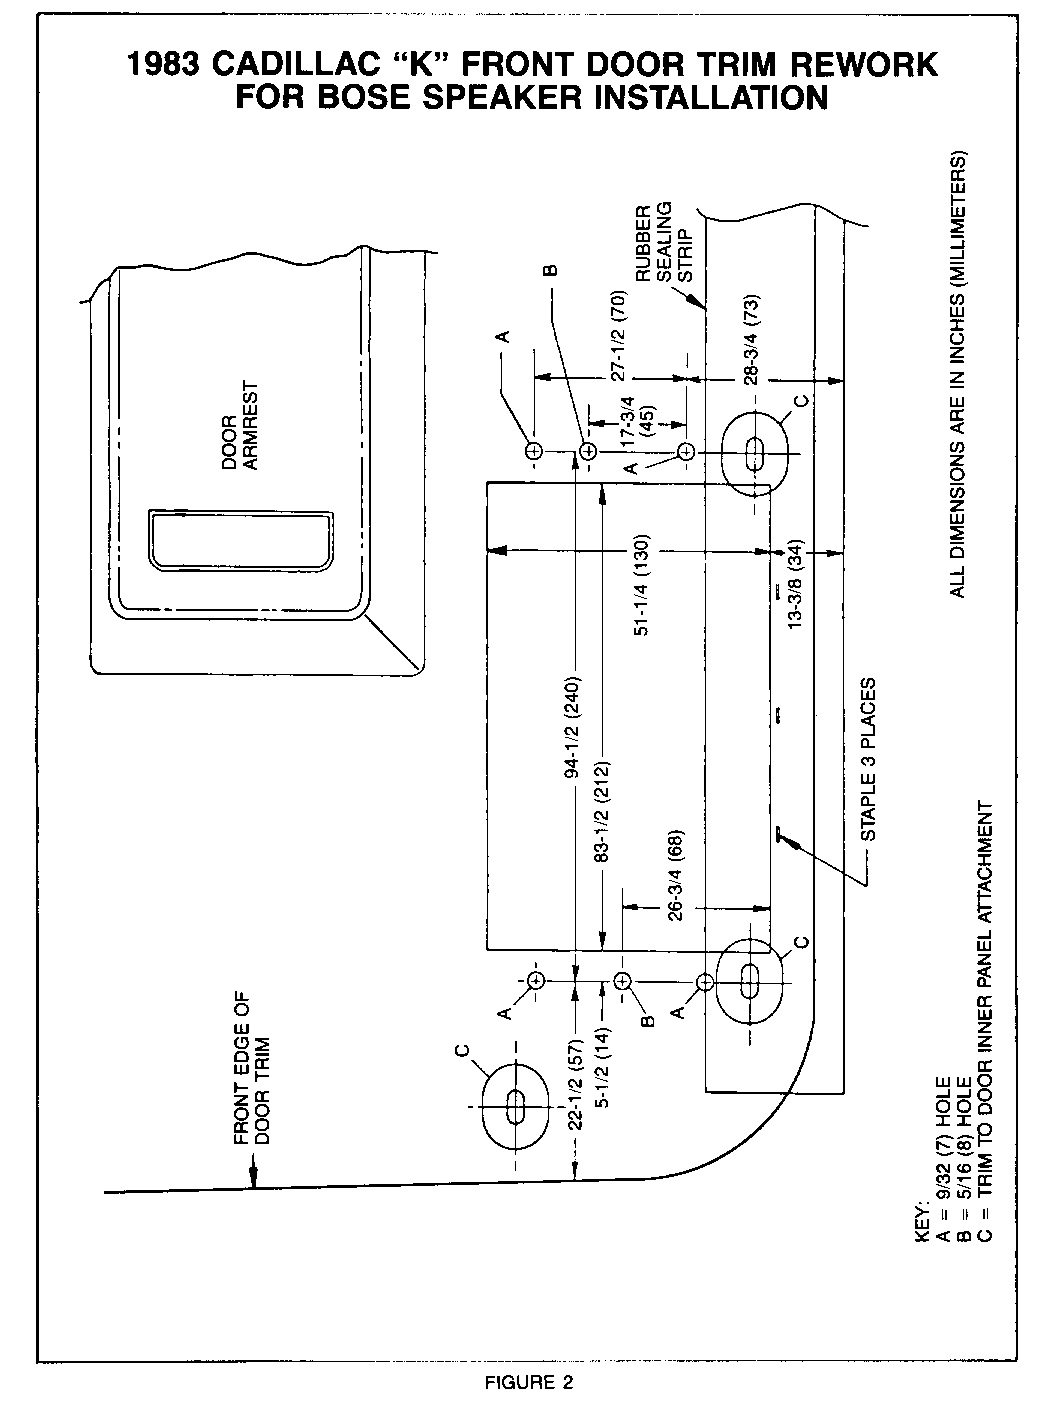
Locate and drill enclosure and grille attaching holes (marked "A and B", Figure 2) in trim panel. Cut-rectangular hole in front door trim and lower door sealing strip with an X-acto knife or similar tool. Secure narrow section of carpet at the bottom edge of the opening to the foundation with staples or Sure Seal Trim Adhesive (BASG) or equivalent.
3. Front Speaker Grille:
Install grille to the trim panel with four (4) 4.2 x 1.41 x 20 hex head with 12.5 diameter free spinning washer screws (Part No. 11503552 or equivalent).
4. Rear Seat to Back Window Panel Opening:
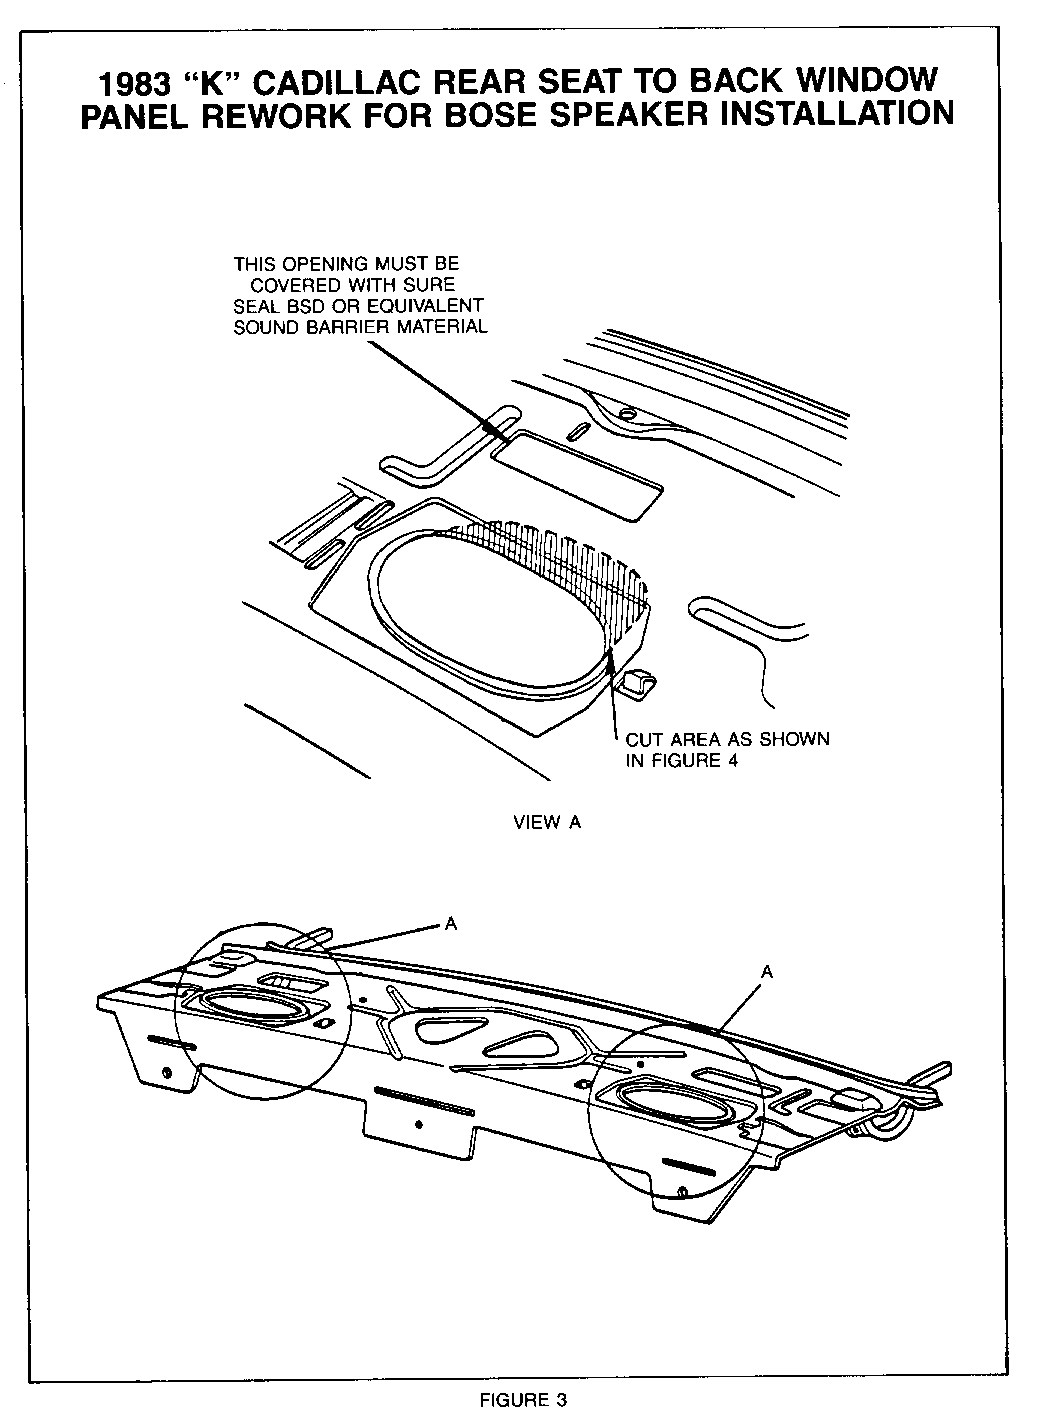
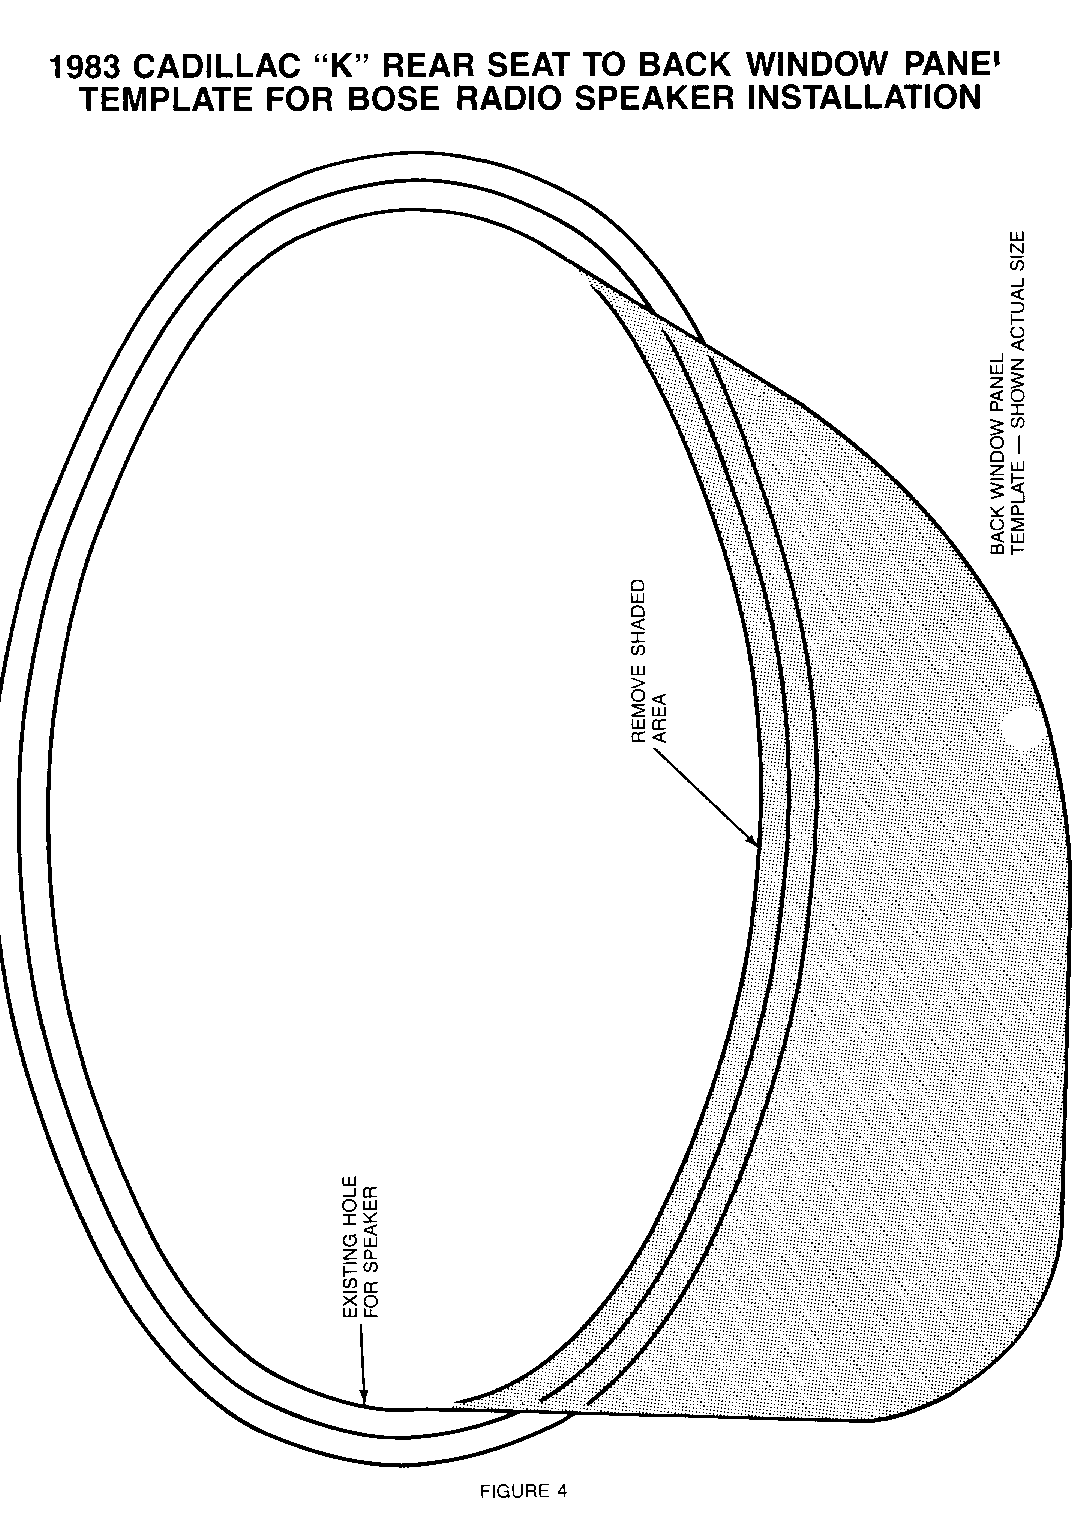
Cut panel with electric shears or impact cutting tool, as shown in Figures 3 and 4. The port opening for the conventional speaker system must be covered with Sure Seal "BSD" or equivalent sound barrier material.
5. Rear Seat to Back Window Panel Trim:
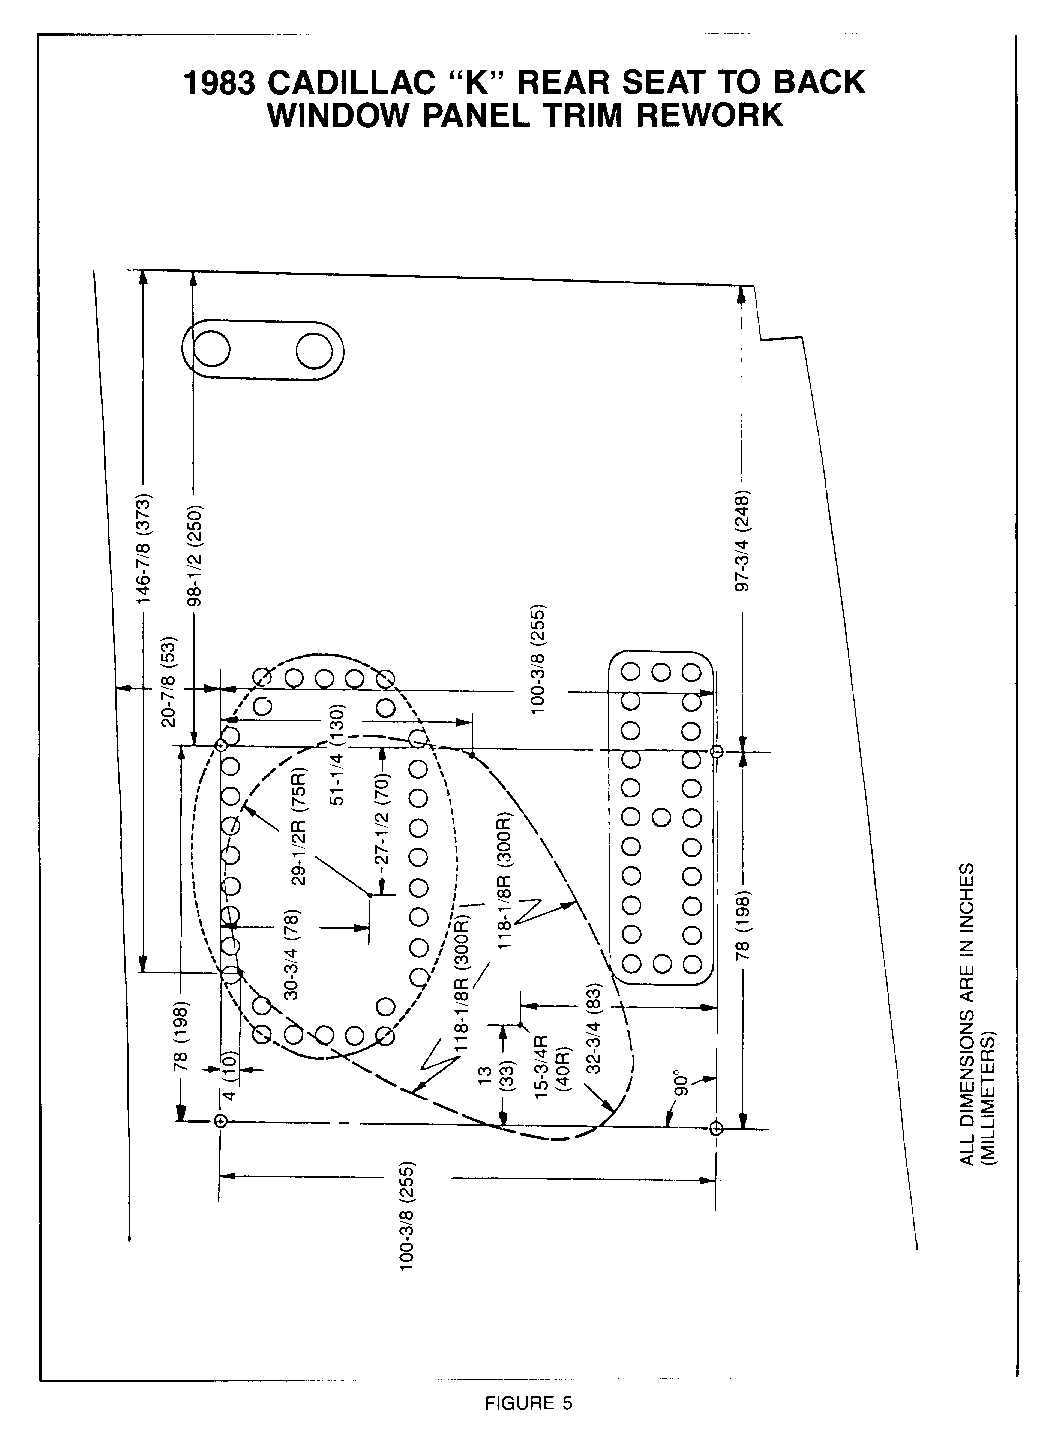
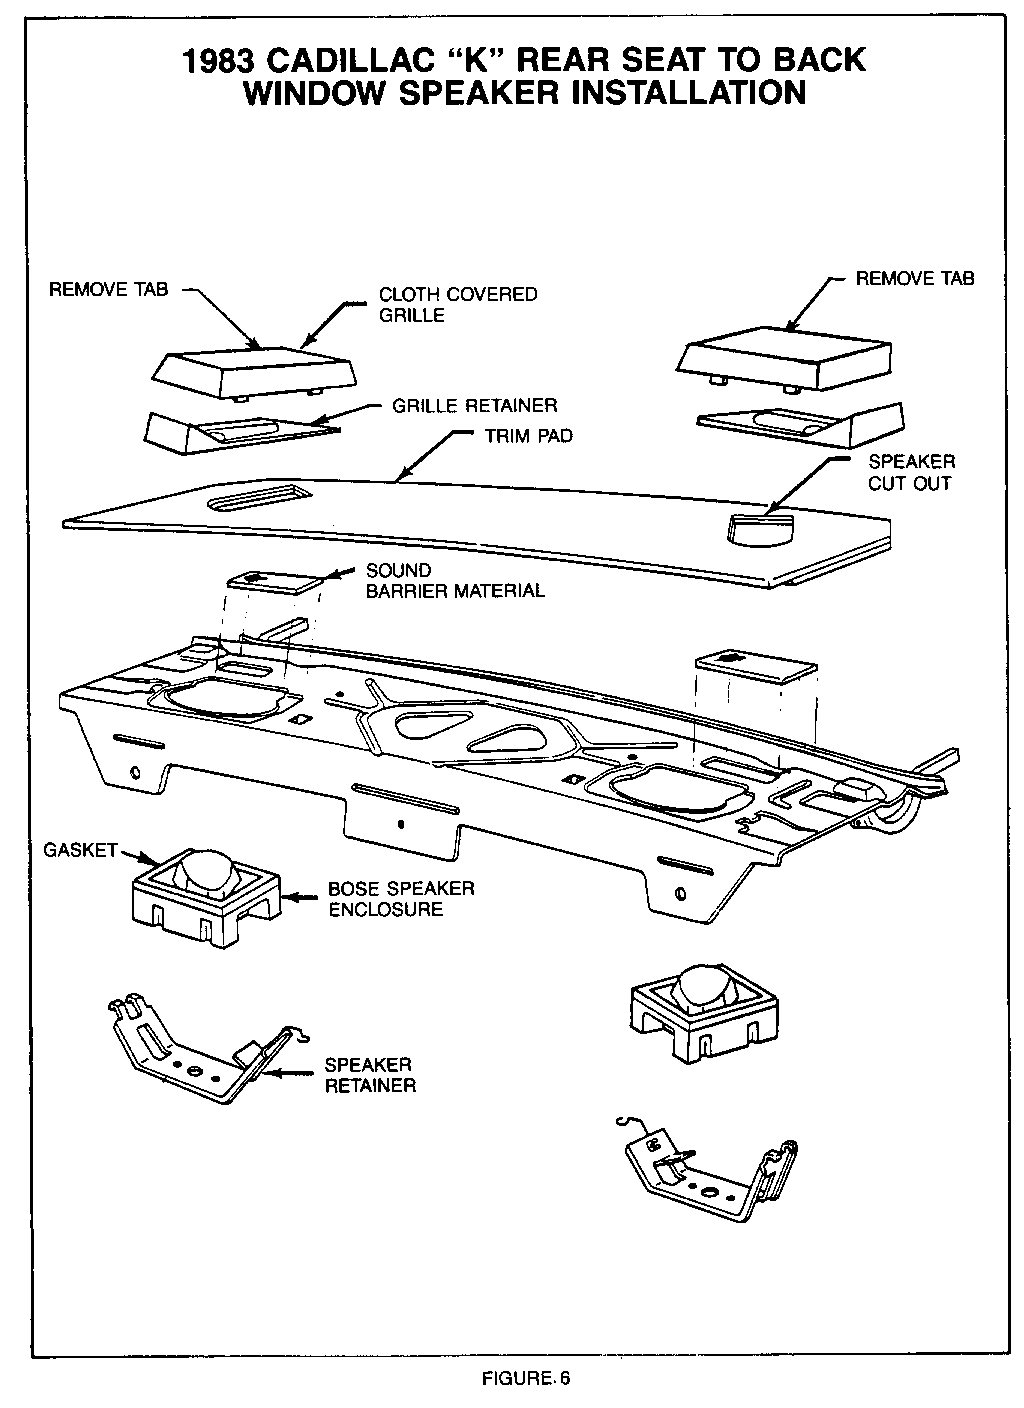
Rework rear seat to back window panel trim with a sabre saw or similar tool as shown in Figure 5. Paint the rear grille retainer to match interior trim color. Fasten rear retainer to rear trim panel with four (4) self-threading nuts for 6.3 studs (Part No. 11505865 or equivalent).
6. Rear Speaker Grille:
To eliminate interference between the speaker enclosure and the speaker grille, the outboard front locking tab (Figure 6) on the speaker grille must be removed.
B. Eldorado
1. Front Door Speaker Opening:
No rework of the front door inner panel, water deflector or acoustic absorber are required.
2. Front Door Trim:
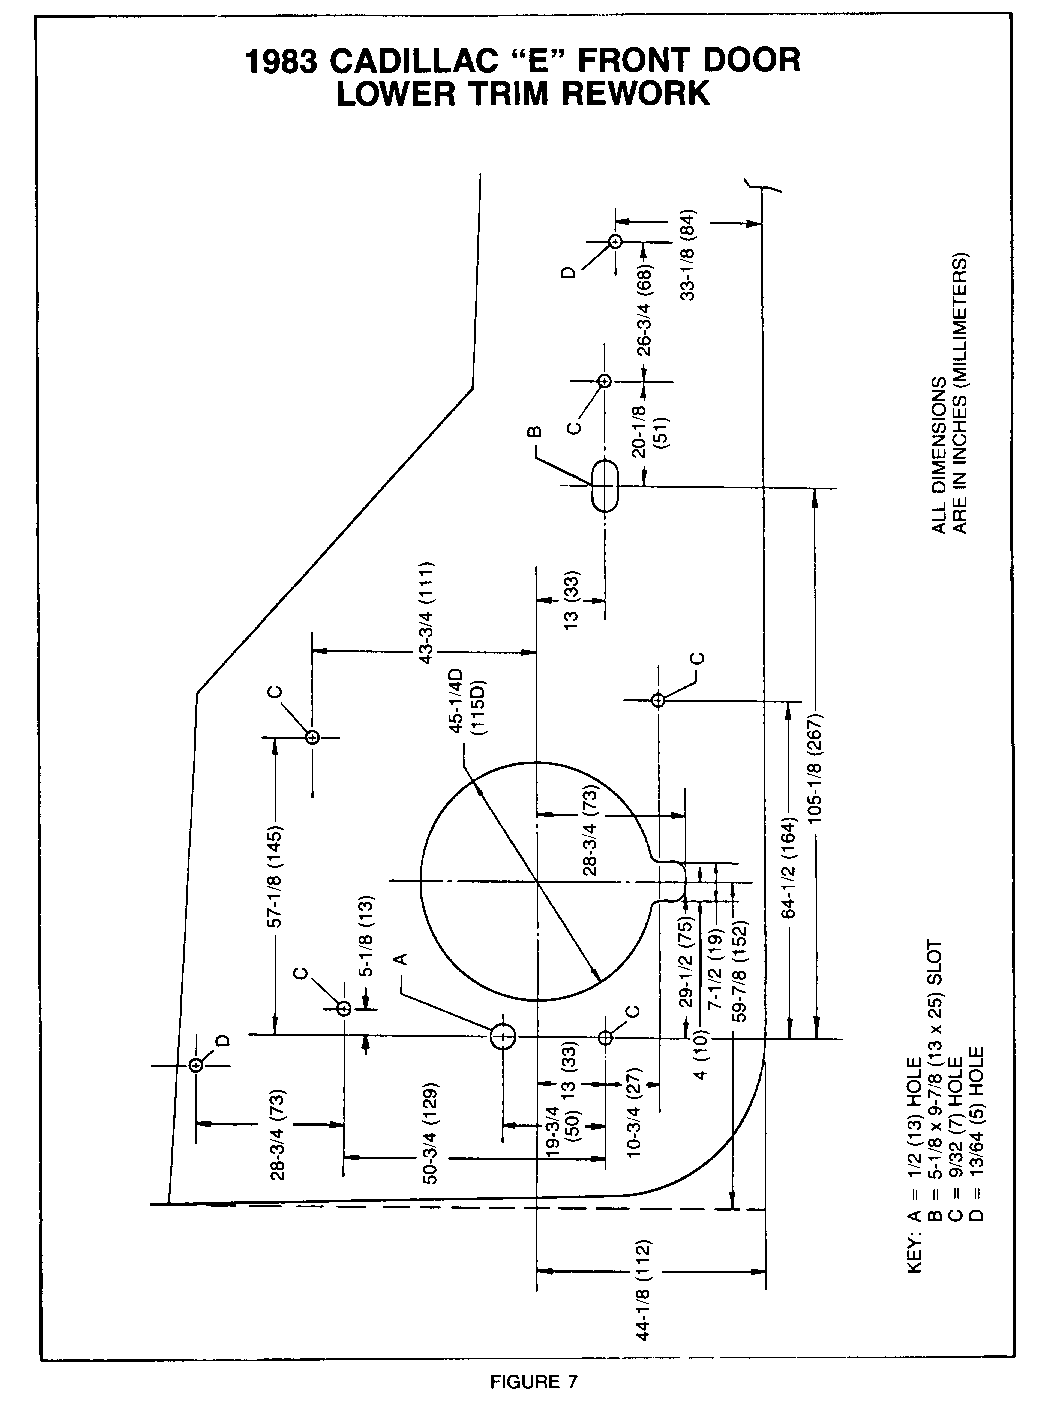
The front door trim pad must be reworked to accept the speaker enclosure as described below and shown in Figure 7.
a. Cut a 115mm hole with hole saw and form a slot at bottom for rear protrusion of speaker (5 inch hole saw hole without slot is acceptable).
b. Drill one 13mm hole marked "All and 13mm x 25mm slot marked "B" for positioning the enclosure.
c. Drill five 7mm holes marked "C" for fastening the enclosure to the trim panel.
d. Drill two 5mm holes marked "D" for securing the door trim pad to the door inner panel.
Paint the front and lower edges of the lower door trim pad to match the interior trim color. Apply carpet material to the trim pad with Sure Seal Adhesive (BASG) or equivalent.
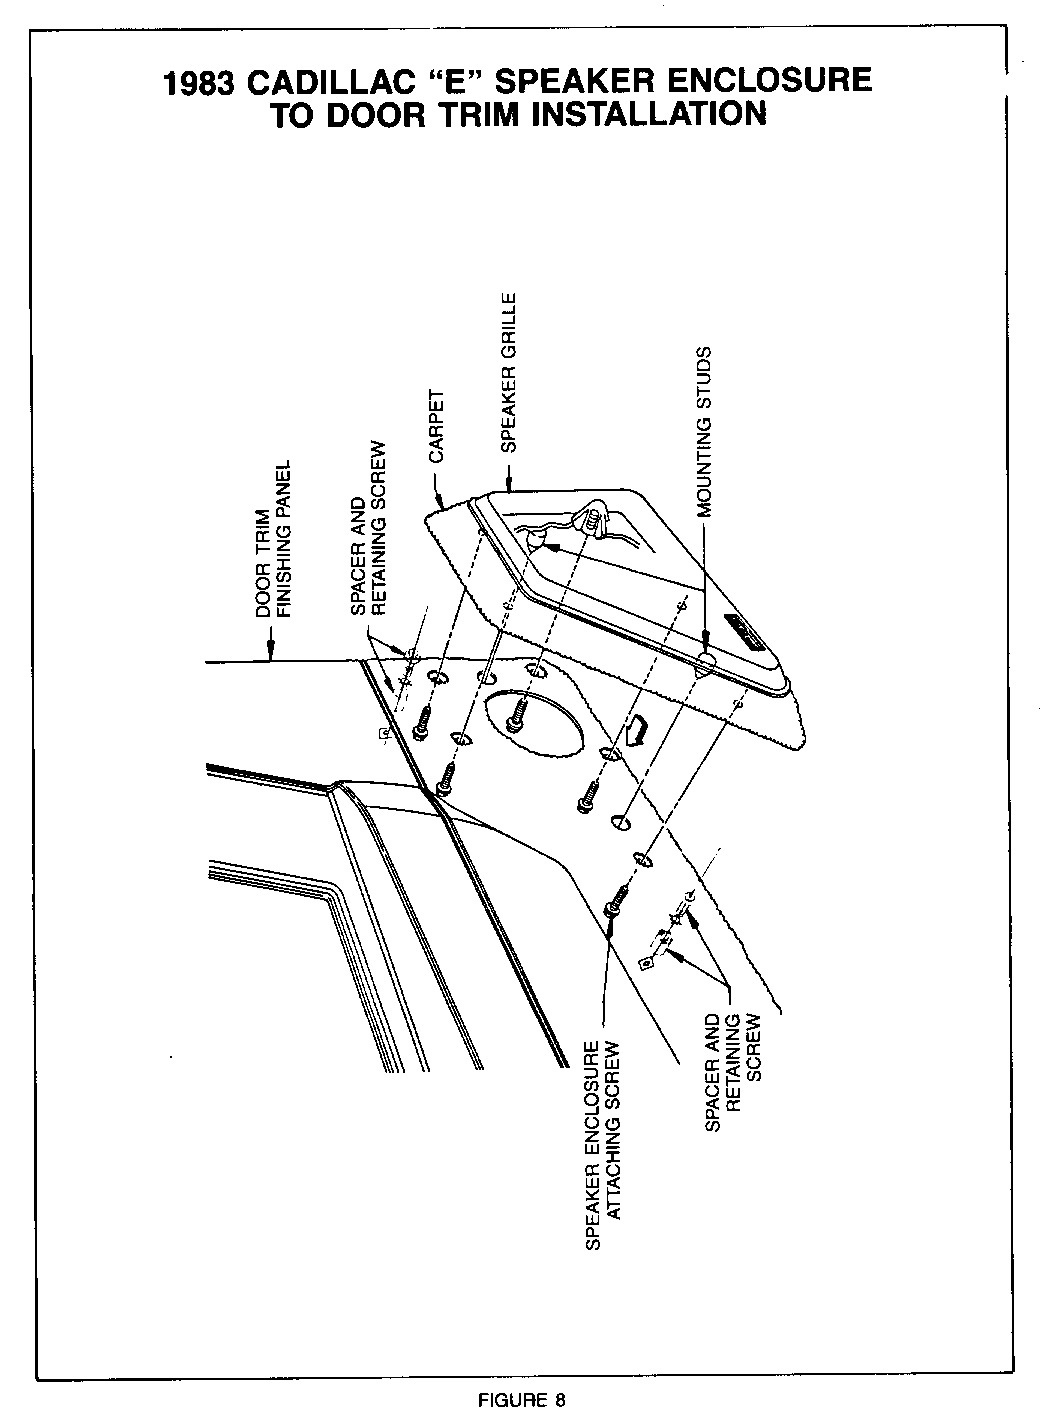
After rework, painting and carpeting are completed, fasten the speaker enclosure to the trim pad with five (5) 6.3 x 1.69 x 18 hex head hi-lo threaded screws with 19mm diameter washer (Part Nos. 11503648 and 11501869 or equivalent) as shown in Figure 8. Before installing trim pad to door, install two (2) 4.2 x 1.41 x 35 oval trim head drilling screws with counter sunk washer (Part No. 20365259 or equivalent) in 5mm holes marked "D" (Figure 7) in the trim pad. On the backside of the door trim panel, install two (2) spacers (Part No. 20446838) as shown in Figure 8 on the screws protruding through the trim pad. After trim pad is secured to the door, fasten the spacer retaining screws to the inner panel.
3. Front Speaker Enclosure:
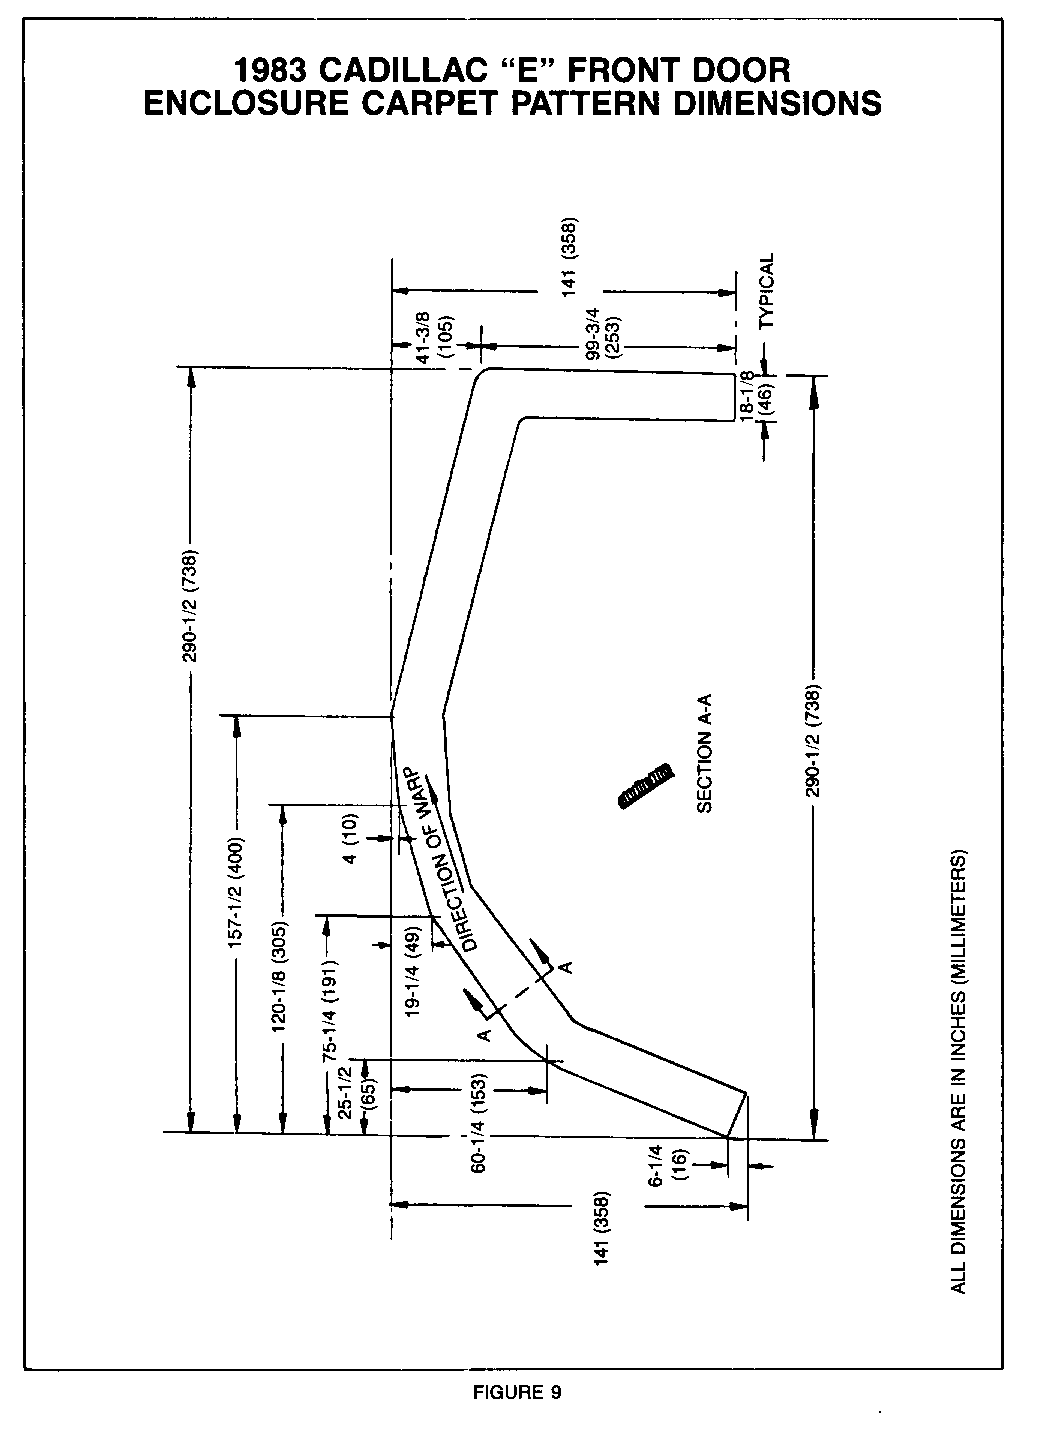
Cut a section of carpet using hand shears to the dimensions specified on Figure 9. Apply Sure Seal Trim Adhesive (BASG) or equivalent to the sides of the enclosure and to the back of the carpet. Install carpet ring to enclosure. (The ends of the carpet must be located on the bottom of the enclosure when mounted in the vehicle.)
Trim carpet can be removed from a speaker enclosure by lightly applying heat to melt the adhesive on the backside of the carpet. The heat gun must be set at the coolest heat setting to prevent fabric damage.
4. Front Speaker Grille:
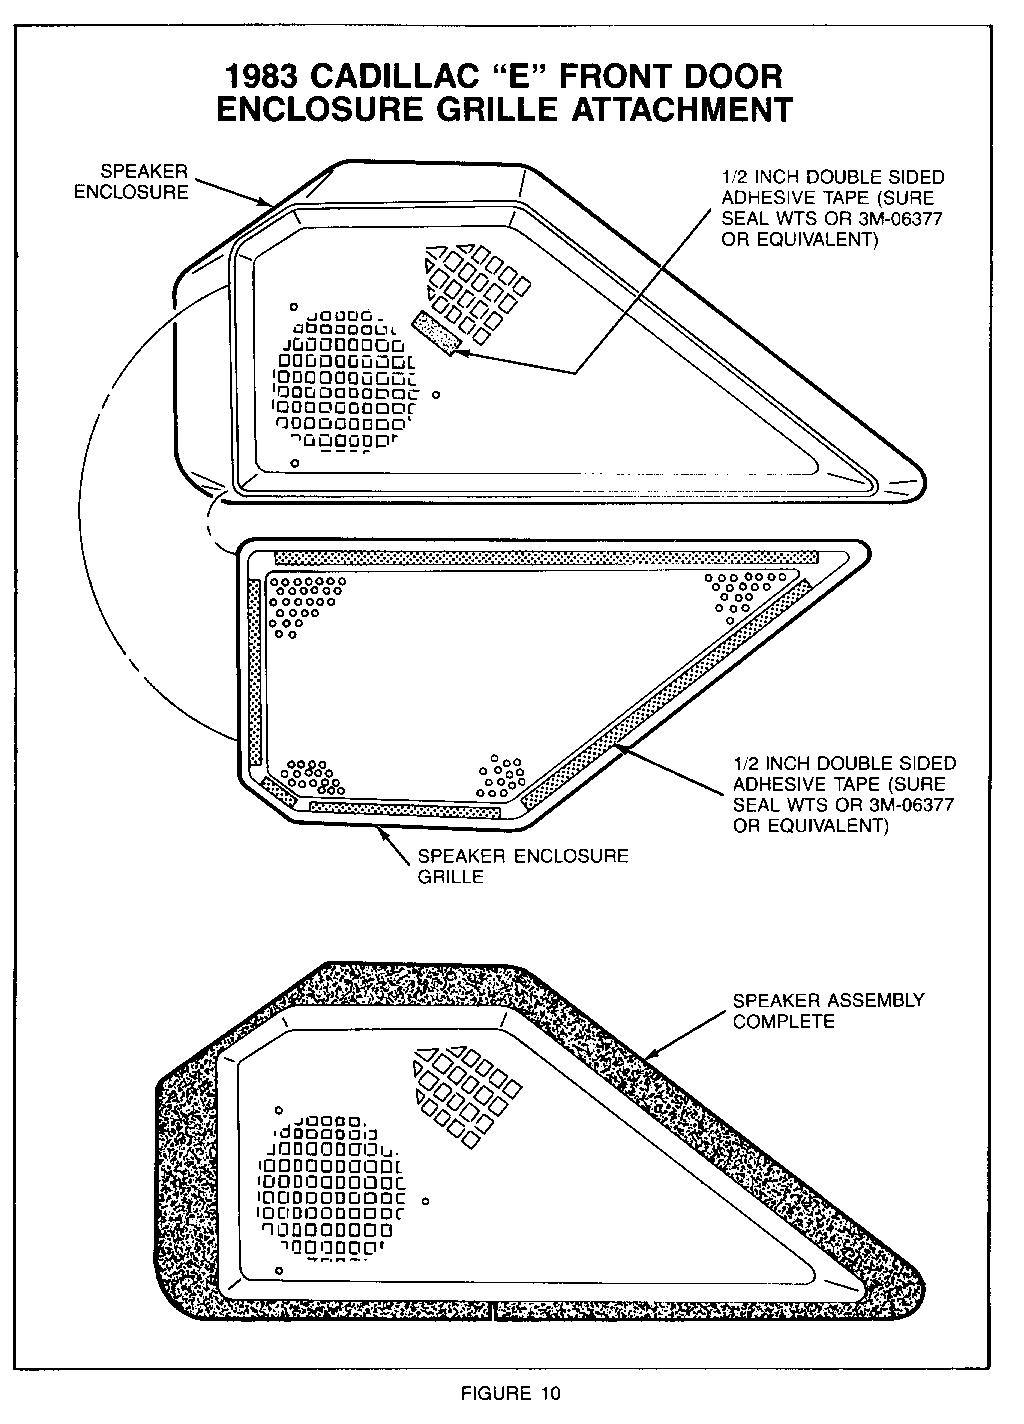
Clean back side of grille ring and surface of enclosure with 3M-8984 General Purpose Cleaner or Sure Seal (BSS-Sure Solv) or equivalent. Apply 1/2 inch wide Sure Seal WTS or 3M-06377 double backed tape or equivalent to the grille ring surface that is fastened to the enclosure. Apply a one (1) inch length of tape between the speaker vent and air diffuser holes on the front surface of the enclosure as shown in Figure 10. Attach grille to speaker enclosure.
5. Rear Seat to Back Window Panel Speaker Opening:
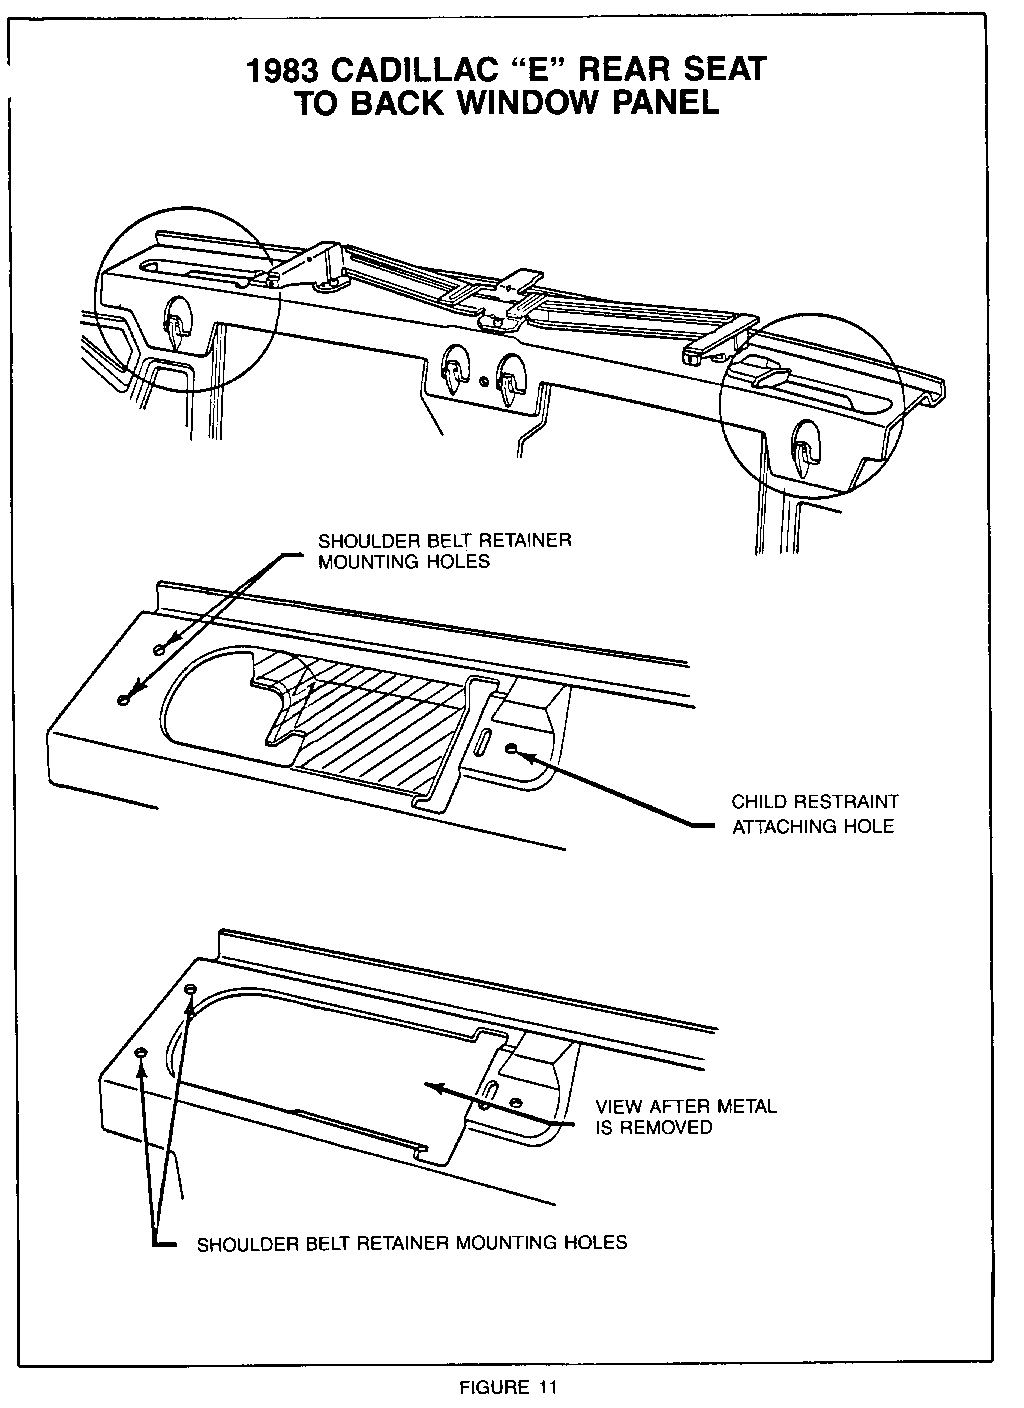
Cut the rear seat to back window metal panel with electric shears, impact tool or etc., as shown in Figure 11. Remove all sharp edges and burrs to prevent interference with the speaker enclosure installation. Before installing rear speaker enclosure, install gasket (Part No. 20444313) to speaker housing. Paper on the gasket should not be removed and should contact the enclosure surface.
6. Rear Seat to Back Window Panel Trim:
No rework of the rear seat to back window panel trim is required. Replacement trim with the required opening is available from GMWDD.
7. Rear Speaker Grille:
Before installing the back window trim panel, each rear speaker grille must be attached to panel with four (4) M4 x 0.7 thread hex nuts with integral locking washer (Part Nos. 11502847 and 121753 or equivalent).
II. GRILLE COVER CLEANING
The following cleaning technique is recommended to maintain the appearance of the front speaker grilles on both Eldorados and Sevilles.
A. Always clean a complete speaker cover. Mask surrounding trim.
B. Mix GM Multipurpose Powdered Cleaner in strict accordance with the directions on the container label.
C. Apply "Spray and Wash" or equivalent onto a sponge and thoroughly dampen the speaker cover. Do not spray cleaner directly onto speaker cover material. After one minute, apply GM Multipurpose Cleaner.
D. Use suds only on a clean sponge or soft bristle brush. Do not saturate the fabric or rub it harshly with a brush. Immediately after cleaning, completely wipe off excess suds with a clean damp absorbent towel or cloth.
NOTICE: Immediately after wiping, blow dry the fabric with a heat gun. Heat gun must be set at the coolest heat setting to prevent fabric damage.
DOMINION/AMERICAN SURE SEAL LIMITED STOCKING WAREHOUSES AND SALES OFFICES
Head Office: Dominion Sure Seal Ltd. 416-625-7900 4635 Burgoyne Street Plant #1 & 2 Mississauga, Ont. L4w IG3
Detroit, MI American Sure Seal 313-961-3839 7246 Orchard Street Dearborn, Michigan 48127
San Antonio, TX Lebo Glass 512-735-9257 1000 Cincinatti San Antonio, Texas 78201
Dallas, TX Regal Plastic 214-634-9355 8205 Sovereign Row Dallas, Texas 75247
Seattle, WA Wesmar 206-783-5344 1452 N.W. 46th Street Seattle, Washington 98107
Los Angeles, CA Specialty Products Dist. 213-666-7512 3229 Casitas Ave. Los Angeles, CA 90039
Nebraska, ILL, MO, E.C.P. Inc. 1-800-232-3521 IND,MICH,OHIO,IOWA 4700 South Central Ave. KEN,TENN,VIRGINIA,MD, Chicago, Illinois PA,NJ,DEL,NY,MONN,RI, 60638 MASS,MA,NH,VER,SD,MINN, NC,SC,VIRG,V.VIRG, Triad Automotive Supply Co. 1-800-662-7106 KEN,TENN,MARYLAND, P.O. Box 1055 WASH-DC,GEORGIA, FLA Garner, NC 27529
Tampa, FLA Autobody Equipment & Supply 813-247-6626 5129 Trenton St. Tampa, FLA 33619
Ford, NJ Autobody Equipment & Supply 201-738-8880 859 King George Rd. Ford, NJ 08963
General Motors bulletins are intended for use by professional technicians, not a "do-it-yourselfer". They are written to inform those technicians of conditions that may occur on some vehicles, or to provide information that could assist in the proper service of a vehicle. Properly trained technicians have the equipment, tools, safety instructions and know-how to do a job properly and safely. If a condition is described, do not assume that the bulletin applies to your vehicle, or that your vehicle will have that condition. See a General Motors dealer servicing your brand of General Motors vehicle for information on whether your vehicle may benefit from the information.
