Loose or Missing Luggage (Roof) Rack End Covers (Apply Sealant or Replace Side Rails/Covers)

| Subject: | Loose or Missing Luggage (Roof) Rack End Covers (Apply Sealant or Replace Side Rails/Covers) |
| Models: | 2002 Cadillac Escalade |
| Built Prior to VIN Breakpoint 2R111939 |
Condition
Some customers may comment that the body colored covers on the ends of the luggage or roof rack are loose or missing.
Correction
Two different service procedures have been developed based on whether the covers that have come off are available for reinstallation. Review the following descriptions and follow the procedure that matches your situation.
| • | One or more end covers are loose or have come off, but the customer has all of them. |
| • | One or more end covers are loose or have come off, and one or more covers are missing. |
Service Procedure
(One or more end covers are loose or have come off, but the customer has all of them)
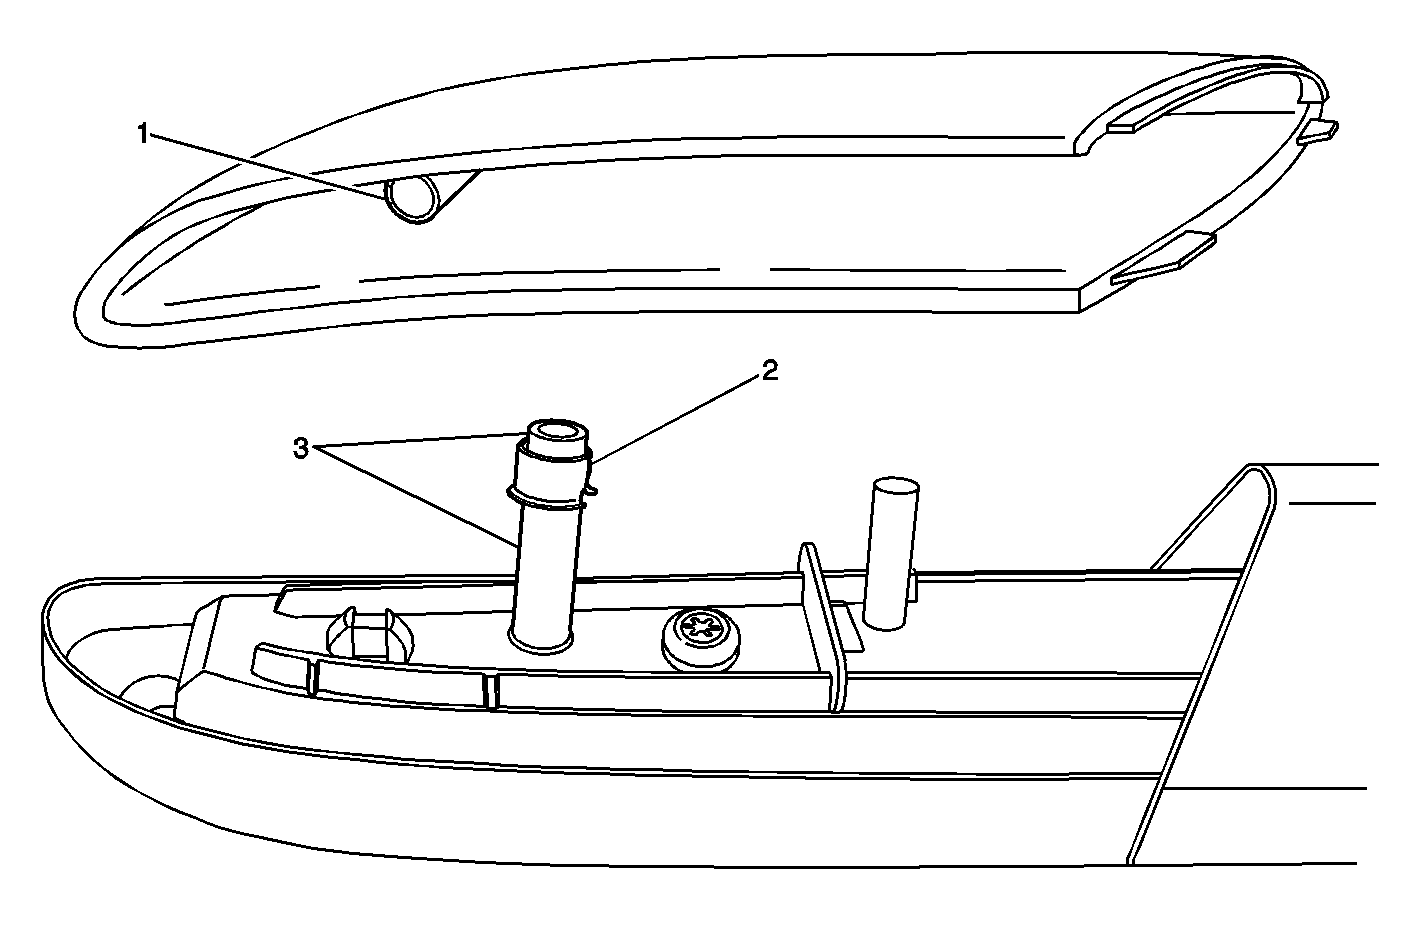
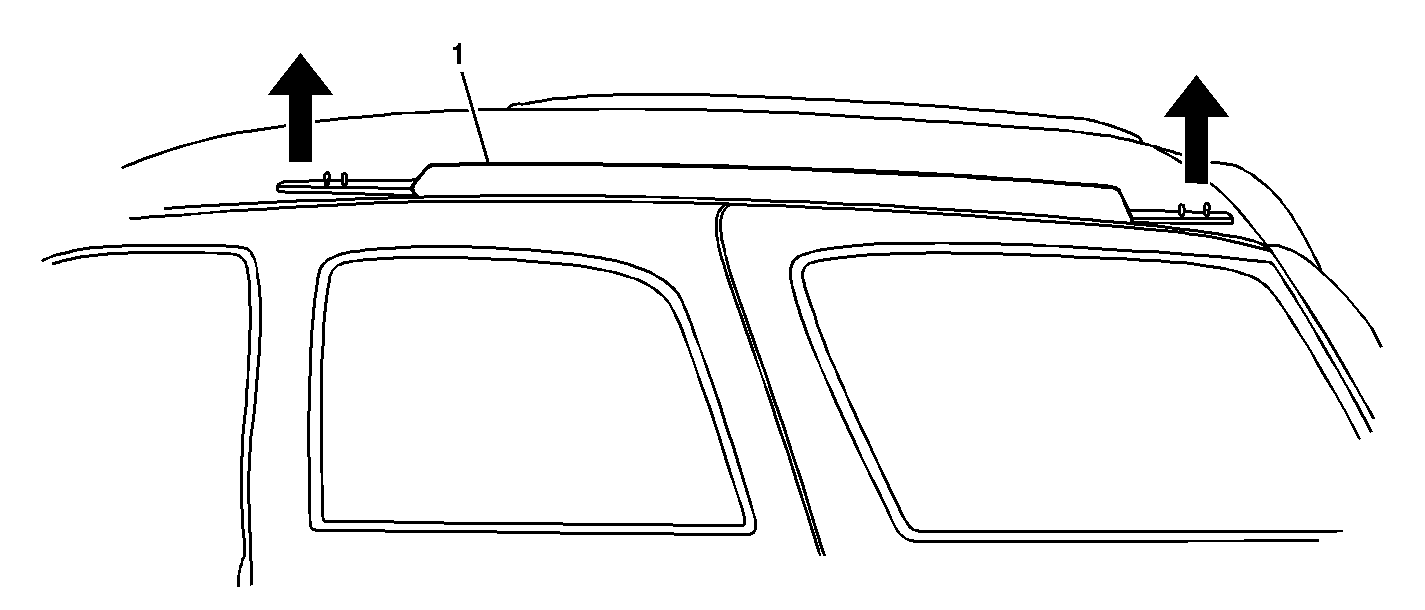
- Remove the loose end cover(s) by carefully pulling upwards on the tapered end.
- If the metal ring (2) remains on the plastic stud on the roof rack base, carefully remove it and reinstall it in the hole (1) in the cover.
- Clean any dirt from the plastic stud on the roof rack base.
- Apply a small amount of RTV Silicone Rubber Sealant, P/N 12345739 (in Canada, use P/N 10953541), or equivalent to the sides of the plastic stud (3) on the roof rack base.
- Apply a small amount of the same sealant to the inside of the hole in the cover.
- Install the cover on the roof rack and press down firmly until seated.
- Repeat steps 1-6 on each of the remaining end caps, even if they are not loose.
Service Procedure
(One or more end covers are loose or have come off, and one or more covers are missing)
If one or more end covers are missing, review the two different service procedures listed below and follow the one that best describes your situation.
| • | One or more end covers are loose or missing and original design replacement covers ARE still available from GMSPO. See Parts information section for original design part numbers. |
| • | One or more end covers are missing and original design replacement covers are NO LONGER available from GMSPO. See Parts information section for original design part numbers. |
Service Procedure
(Original design replacement covers ARE still available from GMSPO)
- Obtain an original design end cover(s) from GMSPO using the part number(s) listed below in the Parts Information section. The replacement covers are paint to match. See the GM Refinish Material Booklet GM4901M-D-2001 (English) or GM4901M-D-F-2001 (French). After painting, proceed to step 2 of this procedure.
- If the metal ring (2) remains on the plastic stud on the roof rack base, carefully remove it and discard.
- Clean any dirt from the plastic stud on the roof rack base.
- Apply a small amount of RTV Silicone Rubber Sealant, P/N 12345739 (in Canada, use P/N 10953541), or equivalent to the sides of the plastic stud (3) on the roof rack base.
- Apply a small amount of the same sealant to the inside of the hole in the cover.
- Install the cover on the roof rack and press down firmly until seated.
- Even if they are not loose, remove the remaining end covers by carefully pulling upwards on the tapered end.
- If the metal ring (2) remains on the plastic stud on the roof rack base, carefully remove it and reinstall it in the hole (1) in the cover.
- Repeat steps 3-6.
Important: When an original design cover(s) is no longer available, GMSPO will automatically supersede the part number you ordered with a rail kit. The parts contained in the rail kit are the same as those used on vehicles manufactured with or after the above listed VIN breakpoint. A kit includes one side rail (left or right), one front end cover, and one rear end cover for that side. The end covers are paint to match. If you ordered an original design cover, but received a rail kit instead, follow the instructions in the NEXT section titled "One or more end covers are missing and original design replacement covers are NO LONGER available from GMSPO." DO NOT ATTEMPT TO PUT THE NEW DESIGN COVERS INCLUDED IN A RAIL KIT ON THE ORIGINAL DESIGN SIDE RAILS.
Service Procedure
(One or more end covers are missing and original design replacement covers are NO LONGER available from GMSPO)
- Obtain both of the end covers from the rail kit and paint to match. See the GM Refinish Material Booklet GM4901M-D-2001 (English) or GM4901M-D-F-2001 (French). After painting, proceed to step 2 of this procedure.
- If necessary, remove the remaining end cover from the side rail being replaced by pulling upwards on the tapered end.
- Remove the small screw at each end of the side rail that prevents the crossrails from being removed.
- Loosen and remove the front and rear crossrails from the side rails.
- Remove the screws attaching the front and rear of the side rail to the roof.
- Lift up both ends of the side rail (1) high enough to clear the top of the insert nut heads in the roof.
- While holding up the side rail ends, rotate the side rail (4) either clockwise (right side) or counterclockwise (left side) until the insert nuts (2, 5) are no longer underneath the ends of the rail.
- Slide the side rail (1) rearward to unlock the center bolt (3) from the slot (2) in the bottom of the rail.
- Install the new side rail on the center bolt and slide the rail forward to lock it on the bolt.
- While lifting up on both ends, rotate the side rail in the opposite direction, right side counterclockwise or left side clockwise, until the ends of the rails are over the heads of the insert nuts in the roof.
- Install the side rail screws.
- Install the front and rear crossrails to the side rails.
- Install the small screw at each end of the side rail that prevents the crossrails from being removed.
- Install the new design covers on each end of the new side rail.
- If the other side rail is NOT being replaced, remove the remaining end cover by pulling upwards on the tapered end.
- If the metal ring (2) remains on the plastic stud on the roof rack base, carefully remove it and reinstall it in the hole (1) in the covers.
- Clean any dirt from the plastic stud on the roof rack base.
- Apply a small amount of RTV Silicone Rubber Sealant, P/N 12345739 (in Canada, use P/N 10953541), or equivalent to the sides of the plastic stud (3) on the roof rack base.
- Apply a small amount of the same sealant to the inside of the hole in the covers.
- Install the covers on the roof rack base and press down firmly until seated.
Important: When an original design cover(s) is no longer available, GMSPO will automatically supersede the part number you ordered with a rail kit. The parts contained in the rail kit are the same as those used on vehicles manufactured with or after the above listed VIN breakpoint. A kit includes one side rail (left or right), one front end cover, and one rear end cover for that side. The end covers are paint to match. If you ordered an original design cover, but received a rail kit instead, follow the instructions below. DO NOT ATTEMPT TO PUT THE NEW DESIGN COVERS INCLUDED IN A RAIL KIT ON THE ORIGINAL DESIGN SIDE RAILS.
Important: The side rail is also attached by a center bolt that is not visible. To unlock the side rail from the center bolt will require the rotation or pivoting of the rail on the center bolt in the next steps. Right side rails must be rotated clockwise and the left side rails must be rotated counterclockwise.
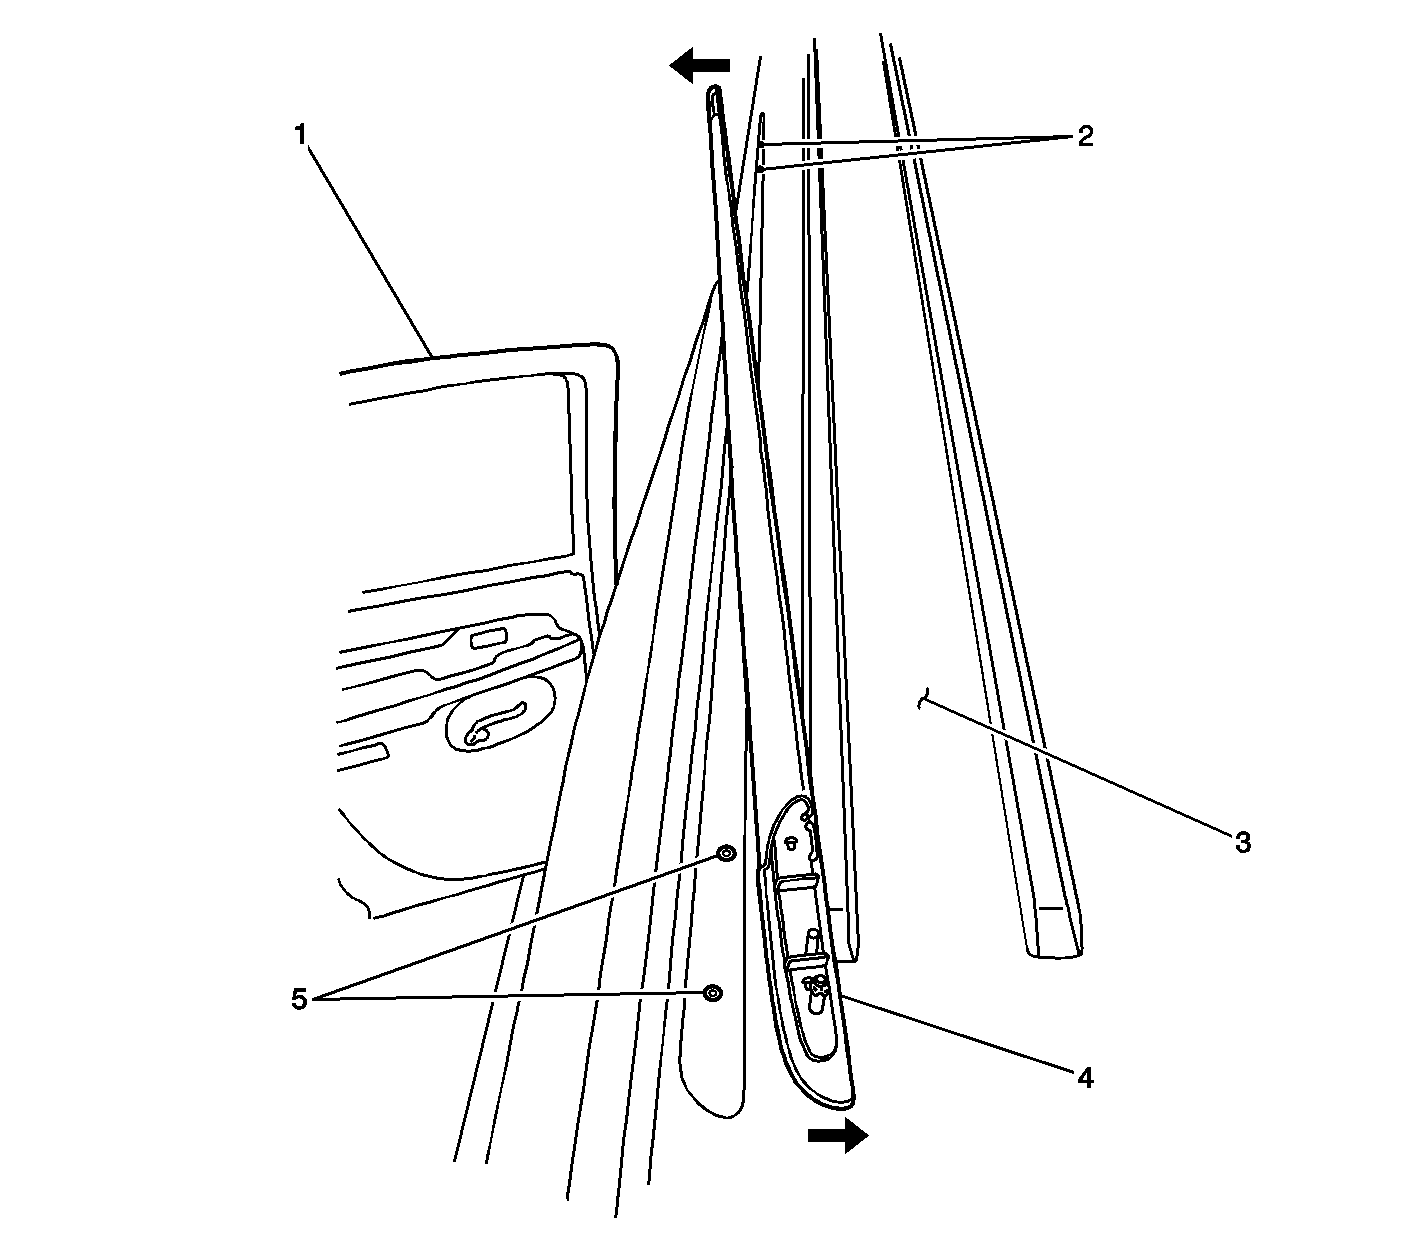
Important: The above illustration is of the left side rail. The left rear side door (1) and the roof sheet metal (3) are shown for reference purposes only.
Important: The above illustration shows how the hidden center bolt (3), which is located in the roof sheet metal (4), attaches to the slot (2) in the bottom of the side rail (1).
Important: When installing the side rail screws in the next step, do not tighten them until after the crossrails have been installed.
Tighten
Tighten the side rail screws to 4 N·m (35 lb in).
Tighten
Tighten the screw to 2 N·m (17 lb in).
Parts Information
Part Number | Description |
|---|---|
15081001 | Cover, Luggage Carrier - Left Front (original design) |
15081002 | Cover, Luggage Carrier - Right Front (original design) |
15080617 | Cover, Luggage Carrier - Left Rear (original design) |
15080618 | Cover, Luggage Carrier - Right Rear (original design) |
88943434 | Rail Kit, Luggage Carrier - Right Side (includes new design rail and both covers) |
88943435 | Rail Kit, Luggage Carrier - Left Side (includes new design rail and both covers) |
12345739 (In Canada, use P/N 10953541) | RTV Silicone Sealant |
Parts are currently available from GMSPO.
Warranty Information
For vehicles repaired under warranty, use:
Labor Operation | Description | Labor Time |
|---|---|---|
R2320 | Luggage Rack Components- Replace Bracket and/or Bar (Left or Right Side Rails) Note: Includes installing both end covers | 0.5 hr |
Add | To replace opposite side rail Note: Includes installing both end covers | 0.2 hr |
B8585 | Covers, Roof Rack - R&R or Replace (original design, one or all) | 0.2 hr |
Add | Color/Clearcoat (one or two end covers) | 0.4 hr (GD) |
Add | Color/Clearcoat (three or four end covers) | 0.5 hr (GE) |
