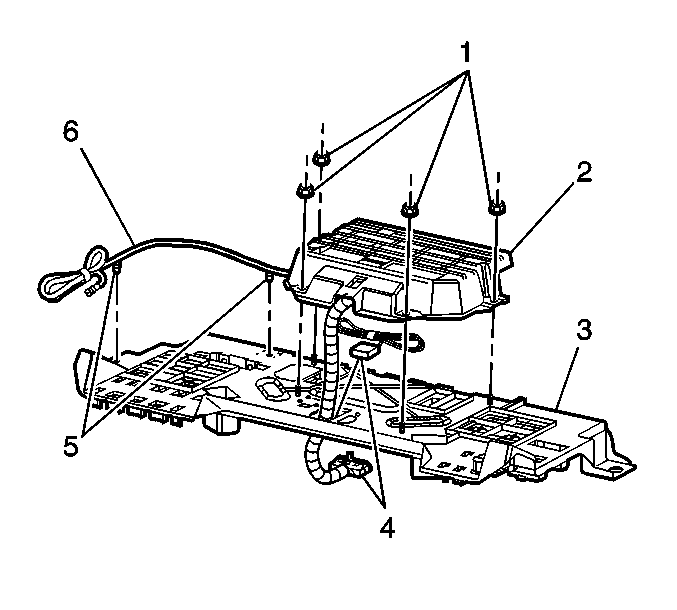
Important: Never swap OnStar® vehicle integration units (VIU), or the vehicle communication units (VCU) from other vehicles. Transfer of OnStar® components from other vehicles should NOT be done. Each OnStar® component has a unique identification number. The VIU has a 10-digit specific station identification (STID) and the VCU has a 11-digit specific electronic serial number (ESN). These identification numbers are used by the National Cellular Telephone Network and OnStar® systems, and are stored in the General Motors vehicle history files by VIN.
Removal Procedure
- Open the rear compartment lid.
- Remove the rear seat back trim. Refer to Rear Compartment Front Trim Panel Replacement in Body Rear End.
- Remove the 4 fasteners (1) securing the tub assembly (2) to the rear seat back panel (3).
- Lower the module bracket assembly into the rear compartment.
- Disconnect the global position sensor (GPS) antenna coaxial cable from the (VIU).
- Disconnect the 2 electrical connectors.
- Remove the OnStar® VIU by depressing the retainer tabs.
- Remove the VIU.
- The old VIU must be returned for core credit.

Installation Procedure
- Record the 10-digit STID number from the label on the VIU module.
- Install the OnStar® VIU into the module bracket assembly.
- Ensure the locking tabs are secure to the VIU.
- Connect the 2 electrical connectors.
- Connect the GPS antenna coaxial cable to the VIU until fully seated.
- Install the module bracket assembly (2) to the seat back panel (3).
- Install the module bracket fasteners (1).
- Install the seat back trim. Refer to Rear Compartment Front Trim Panel Replacement in Body Rear End.
- Contact the OnStar® Dealer Support line by pressing the OnStar® button twice.
- Close the rear compartment lid.

Notice: In order to avoid damage to the circuit board, do NOT over-tighten the thumb screws. Using your fingers, apply only a light pressure.
Tighten
Apply 0.2 N·m (2 lb in) of torque or less,
to the VIU thumb screw electrical connections.
Notice: Use the correct fastener in the correct location. Replacement fasteners must be the correct part number for that application. Fasteners requiring replacement or fasteners requiring the use of thread locking compound or sealant are identified in the service procedure. Do not use paints, lubricants, or corrosion inhibitors on fasteners or fastener joint surfaces unless specified. These coatings affect fastener torque and joint clamping force and may damage the fastener. Use the correct tightening sequence and specifications when installing fasteners in order to avoid damage to parts and systems.
Tighten
Tighten the fasteners to 9 N·m (80 lb in).
The 10-digit STID number recorded will be needed by the OnStar® Dealer Support line.
