Instrument Panel Upper Trim Pad Replacement DeVille
Removal Procedure
- Disable the SIR system. Refer to Disabling the SIR System in SIR.
- Remove the defroster grille. Refer to Defroster Grille Replacement .
- Remove the windshield garnish moldings. Refer to Windshield Pillar Garnish Molding Replacement in Interior Trim.
- Remove the air outlet deflectors. Refer to Instrument Panel Air Outlet Vent Replacement .
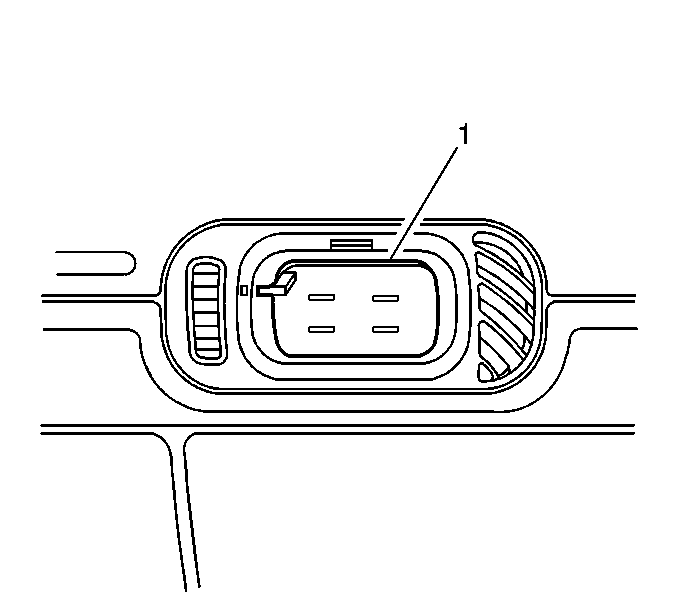
- Close the air outlets (1) in order to prevent the upper trim pad fasteners from falling into the HVAC ducts.
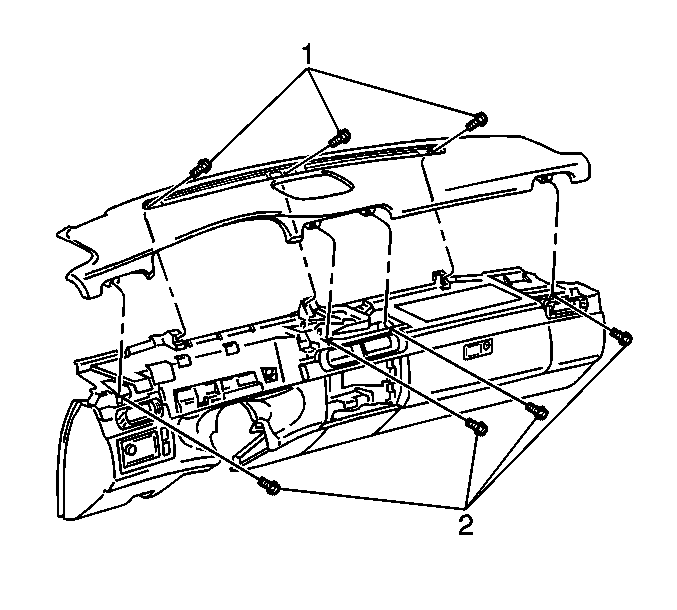
- Remove the 3 fasteners (1) that retain the upper trim panel.
- Remove the 4 fasteners (2) through the air outlet deflector openings that retain the upper trim panel.
- Press down on the forward edge of the trim panel while pulling upward and back on the rear edge of the trim panel.
Caution: This vehicle is equipped with a Supplemental Inflatable Restraint (SIR) System. Failure to follow the correct procedure could cause the following conditions:
• Air bag deployment • Personal injury • Unnecessary SIR system repairs • Refer to SIR Component Views in order to determine if you are performing service on or near the SIR components or the SIR wiring. • If you are performing service on or near the SIR components or the SIR wiring, disable the SIR system. Refer to Disabling the SIR System.


Remove the fasteners through the defroster grille openings.
Important: This step refers to the passenger side of the vehicle.
Remove the upper trim panel.
Installation Procedure
- Position the upper trim panel on top of the instrument panel. Ensure that the sensors protrude through the trim panel.
- Install the 4 fasteners (2) through the air outlet deflector openings.
- Install the 3 fasteners (1) through the defroster grille openings.
- Open the air outlets (1).
- Install the air outlet deflectors. Refer to Instrument Panel Air Outlet Vent Replacement .
- Install the windshield garnish moldings. Refer to Windshield Pillar Garnish Molding Replacement in Interior Trim.
- Install the defroster grille. Refer to Defroster Grille Replacement .
- Enable the SIR system. Refer to Enabling the SIR System in SIR.

Notice: Use the correct fastener in the correct location. Replacement fasteners must be the correct part number for that application. Fasteners requiring replacement or fasteners requiring the use of thread locking compound or sealant are identified in the service procedure. Do not use paints, lubricants, or corrosion inhibitors on fasteners or fastener joint surfaces unless specified. These coatings affect fastener torque and joint clamping force and may damage the fastener. Use the correct tightening sequence and specifications when installing fasteners in order to avoid damage to parts and systems.
Tighten
Tighten the fasteners to 2 N·m (18 lb in).
Tighten
Tighten the fasteners to 2 N·m (18 lb in).

Instrument Panel Upper Trim Pad Replacement Eldorado
Removal Procedure
- Disable the SIR system. Refer to Disabling the SIR System in SIR.
- Remove the defroster grille. Refer to Defroster Grille Replacement .
- Remove the windshield garnish moldings. Refer to Windshield Pillar Garnish Molding Replacement in Interior Trim.
- Remove the air outlet deflectors. Refer to Instrument Panel Air Outlet Vent Replacement .
- Close the air outlets (1) in order to prevent the upper trim panel fasteners from falling into the HVAC ducts.
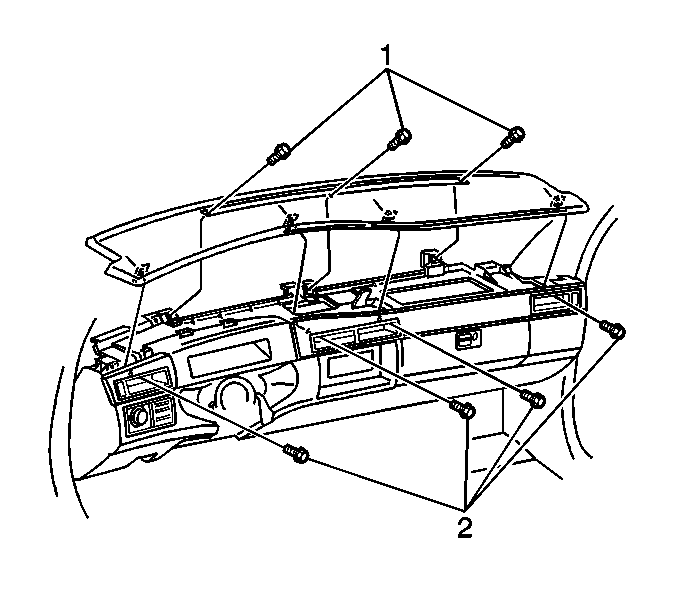
- Remove the 3 fasteners (1) that retain the upper trim panel.
- Remove the 4 fasteners (2) through the air outlet deflector openings that retain the upper trim panel.
- Press down on the forward edge of the trim panel while pulling upward and back on the rear edge of the trim panel.
- Remove the upper trim panel.
Caution: This vehicle is equipped with a Supplemental Inflatable Restraint (SIR) System. Failure to follow the correct procedure could cause the following conditions:
• Air bag deployment • Personal injury • Unnecessary SIR system repairs • Refer to SIR Component Views in order to determine if you are performing service on or near the SIR components or the SIR wiring. • If you are performing service on or near the SIR components or the SIR wiring, disable the SIR system. Refer to Disabling the SIR System.


The 3 upper trim panel fasteners are different sizes, make note of fastener location.
Remove the fasteners through the defroster grille openings.
Important: This step refers to the passenger side of the vehicle.
Installation Procedure
- Position the upper trim panel on top of the instrument panel. Ensure that the sensors protrude through the trim panel.
- Install the 4 fasteners (2) through the air outlet deflector openings.
- Install the 3 fasteners (1) through the defroster grille openings.
- Open the air outlets (1).
- Install the air outlet deflectors. Refer to Instrument Panel Air Outlet Vent Replacement .
- Install the windshield garnish moldings. Refer to Windshield Pillar Garnish Molding Replacement in Interior Trim.
- Install the defroster grille. Refer to Defroster Grille Replacement .
- Enable the SIR system. Refer to Enabling the SIR System in SIR.

Notice: Use the correct fastener in the correct location. Replacement fasteners must be the correct part number for that application. Fasteners requiring replacement or fasteners requiring the use of thread locking compound or sealant are identified in the service procedure. Do not use paints, lubricants, or corrosion inhibitors on fasteners or fastener joint surfaces unless specified. These coatings affect fastener torque and joint clamping force and may damage the fastener. Use the correct tightening sequence and specifications when installing fasteners in order to avoid damage to parts and systems.
Tighten
Tighten the fasteners to 2 N·m (18 lb in).
Tighten
Tighten the fasteners to 2 N·m (18 lb in).

