For 1990-2009 cars only
Headlining Trim Panel Replacement DeVille
Removal Procedure
- Remove the rear vanity mirror assemblies, if equipped. Refer to Vanity Mirror Replacement .
- Remove the rear quarter trim panels. Refer to Rear Quarter Upper Trim Panel Replacement .
- Remove the windshield pillar garnish moldings. Refer to Windshield Pillar Garnish Molding Replacement .
- Remove the body lock pillar trim panel. Refer to Body Lock Pillar Trim Replacement .
- Disconnect the electrical connector at the rear quarters.
- Remove the 4 passenger assist straps. Refer to Assist Strap Replacement .
- Remove the rear courtesy/reading lamp assemblies. Refer to Courtesy Lamp Replacement - Rear Quarter in Lighting Systems.
- Disengage the locator by pulling down on the locator behind the attachment point at the rear.
- Position the seats fully rearward. Recline the seats.
- Remove the sunshade assemblies. Sunshade Replacement .
- Remove the rearview mirror assembly. Refer to Inside Rearview Mirror Replacement in Stationary Windows.
- Remove the roof console. Refer to Roof Console Replacement .
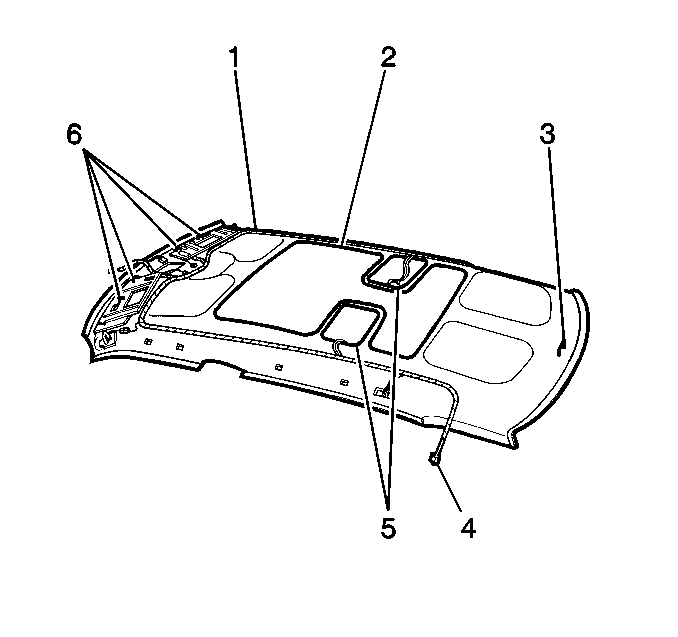
- Release the tabs (3) that attach the roof console to the support.
- Pull the headliner down in order to release the headliner from the cardboard roof damper.
- Pull downward the front of the headliner (1) (without a sunroof) at the auxiliary sunshade locations (5).
- Pull downward the front of the headliner (1) (with a sunroof) at the auxiliary sunshade locations (5).
- Release the 2 clips from each sunshade.
- Release the hook and loop strips above the driver door and around the sunroof opening, if equipped.
- Remove the headliner through the right front door.
Important: Remove the rear vanity mirrors before you remove any other components in order to avoid damage to the headliner.

Important: Installation of a new cardboard roof insulator is necessary to ensure the acoustical integrity of the roof system. Use GM P/N 12378192 Adhesive available through General Motors Service Parts Operations.

Installation Procedure
- Install the headliner through the right front door.
- Engage the rear locator clips (2).
- Press the auxiliary sunshade clips (5) into place.
- Attach the hook and loop strips above the driver door and around the sunroof opening, if equipped.
- Install the rear vanity mirror assemblies. Vanity Mirror Replacement .
- Install the rearview mirror assembly. Refer to Inside Rearview Mirror Replacement in Stationary Windows.
- Install the sunshade assemblies. Refer to Sunshade Replacement .
- Install the rear courtesy/reading lamp assemblies. Refer to Courtesy Lamp Replacement - Rear Quarter in Lighting Systems.
- Install the passenger assist strips. Refer to Assist Strap Replacement .
- Connect the electrical connectors (3).
- Install the body lock pillar trim panel. Refer to Body Lock Pillar Trim Replacement .
- Install the windshield garnish moldings. Refer to Body Lock Pillar Trim Replacement .
- Install the rear quarter trim panels. Refer to Rear Quarter Upper Trim Panel Replacement .

Headlining Trim Panel Replacement Eldorado
Removal Procedure
- Remove both of the quarter trim panels. Refer to Rear Quarter Upper Trim Panel Replacement .
- Remove both of the windshield pillar garnish moldings. Refer to Windshield Pillar Garnish Molding Replacement .
- Remove both of the shoulder belts to headlining escutcheons. Refer to Seat Belt Replacement - Driver or Passenger in Seat Belts.
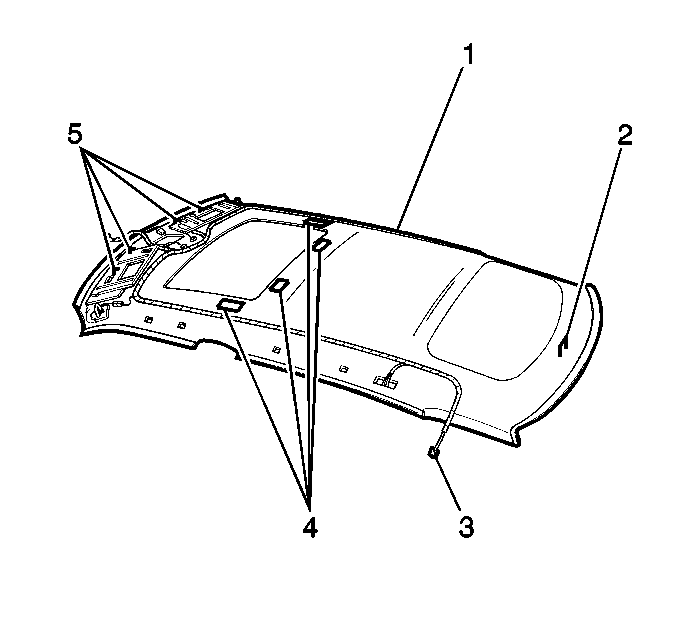
- Disconnect the electrical connectors (4) at the rear quarters.
- Remove the roof mounted lamps.
- Remove the sunshades. Refer to Sunshade Replacement .
- Pull down at the attachments in order to detach the hook and loop.
- For vehicles without a sunroof, separate the headliner from the cardboard roof dampener. The dampener is glued to the roof.
- Remove the headliner (1) through the right front door with the aid of an assistant.

Important: Installation of a new cardboard roof insulator is necessary to ensure the acoustical integrity of the roof system. Use GM P/N 12378192 Adhesive available through General Motors Service Parts Operations.

Installation Procedure
- Install the headliner with the aid of an assistant.
- Complete the following steps with the help of an assistant:
- Install the interior roof mounted lamps.
- Install the sunshades. Refer to Sunshade Replacement .
- Connect the electrical connectors (3) at the rear quarters.
- Install both of the shoulder belt to headlining escutcheons. Refer to Seat Belt Replacement - Driver or Passenger in Seat Belts.
- Install both of the windshield pillar garnish moldings. Refer to Windshield Pillar Garnish Molding Replacement .
- Install the quarter trim panels. Refer to Rear Quarter Upper Trim Panel Replacement .
- Firmly press the headliner (1) at the hook and loop locations.
Important: Do not pinch the vanity mirror wires when you install the sunshade support fasteners.

| 2.1. | Engage the locator at the rear. |
| 2.2. | Attach the sunshade supports (5). Refer to Vanity Mirror Replacement . |

Important: Applying glue to the headliner to the cardboard roof dampener is not necessary.
